Friday, October 26, 2012

Guilt free Snacks ~ Oven Roasted Chickpeas / Garbanzo Beans


Baked garbanzo beans is going to be my last post of the BM#21 under "Copy Cat" theme. This perfectly crunchy, guilt free snack comes from Vardhini of Cook's Joy. I had noted it down in one of the previous marathons and this recipe did yield very good results. I thoroughly enjoyed this non greasy, healthy snack.

Ingredients:
1.5 cups chickpeas /garbanzo beans / chana
Salt and chili powder to taste
Cumin powder and/or any spice powder preferred as per taste
Oil to spray or a Tbsp of oil

Method:
* Soak garbanzo beans overnight and pressure cook them for about 3 whistles, without turning them mushy. Drain and cool the beans.
Skip this step if you are using canned beans. Rinse the canned beans before using.


* Preheat the oven to 400 deg F. Line a baking sheet with aluminium foil and keep aside.
* Add salt, chili powder, cumin powder / any other spice powder preferred to the beans and mix well. If you are not spraying the oil, you can add a Tbsp of oil to the beans mixture and mix well.


* Spread the beans on the prepared baking sheet. Spray it with oil.
* Place the sheet in the preheated oven and bake for 40 - 50 minutes or until they turn crunchy. Actually I baked for an hour and left the sheet in the turned off oven for 10 minutes more.

 
The original recipe mentioned that the beans would turn rock hard if baked longer than needed and so, pay attention to the beans at the final stages of baking.
 
Check what other marathoners are cooking, here.


Thursday, October 25, 2012

Vegetable - Dal Khichdi


Recipe Source: Vaishali Sabnani

Usually whenever I came across a recipe that piques my interest, I keep filing them in the memory folders of my brain or computer. However I hardly try them as I keep mostly going to the same, traditional recipes that have been in our families for generations. Because of the familiarity and the experience, those seem pretty easy and quick to put together, how elaborate the procedure may be. I think this must be a pretty familiar scenario to many of us here.

My recipe repertoire again increased as expected due to BM#21. This time however I tried a couple of recipes without procrastinating. One was this yummy khichdi, from the Saurasthra region of Gujarat, posted by Vaishali. It is a nourishing and comforting one pot meal full of goodness with nutritive dals and veggies. Besides it is very delicious and healthy, easy to put together and needs no side dishes if prepared according to one's preferred spice levels. I used just oil for tadka and didn't use any ghee while serving and so this was not greasy at all.

Ingredients:
1 cup rice (I used Extra long grain as I love mushy khichdis.)
1/2 cup yellow moong dal
1 Tbsp each - chana dal (Bengal gram) & toor dal (pigeon peas)
1 cup chopped vegetables (I used carrot, potato, beans and peas.)
1 tomato chopped
1 cup chopped spinach
Salt to taste
1 tsp chili powder or according to taste
1/4 tsp turmeric powder
For tadka:
1 Tbsp oil, 1 tsp cumin seeds, 4 cloves, 2 red chillies, 2 one inch piece cinnamon, 1 bay leaf and a pinch of asafoetida

Method:
* Soak rice and dals in water for about 30 minutes. Drain and keep aside.
* In the mean while, prep the veggies that you are going to use.
* Heat the oil in a pan or directly in a pressure cooker and add the tadka ingredients. When cumin starts to brown, add the veggies and saute for a couple of minutes. Add the rice - dal mixture and saute for a couple of minutes more.
* Next add the chili powder and about 4 cups of water to the mixture and pressure cook for 2 whistles.
* When the valve pressure is gone, add salt and mix well.
* Serve warm with a pickle and ghee if desired.

Note:
1. I actually don't add salt when dal is being cooked. It hinders the cooking process of dals usually and so I always add it at the end. I added 3 cups of water while pressure cooking the rice - dal. At the end, I added salt and 2 more cups of water to reach the desired consistency.
2. Also because of where we come from, this was not spicy for us. :) I had increased the spice levels according to our taste though above measurements is good for those who prefer moderate heat, speaking in terms of Indian cuisine.
3. The original recipe recommends the addition of raw spinach and tomato at the end of cooking. I had however added them along the other vegetables to cook. 

Check what other marathoners of BM#21 are cooking here.

Comments


Wednesday, October 24, 2012

Baked Gulab Jamun


Recipe Source: Priya Suresh

The final week of this month's blogging marathon starts from today and I chose the "Copy Cat " theme. I am supposed to cook from other marathoners' posts and it was quite challenging considering the fact that there are many mind boggling recipes in the marathon collection. I had one particular recipe in mind from dear Priya's blog when I visited her space yesterday. I totally forgot about that when I came across a baked version of gulab jamuns. I had missed this recipe due to my vacation and when I saw "zero oil" in the title, I must say that I was intrigued and interested at the same time.

I was even skeptical about the results of this experiment but I did try them today. For a baked version, these are pretty good and are almost close to the frying version. I did not get the regular brown color though. I think we can bake them at 300 deg F or a little lower temperature and have to keep constantly moving the jamuns all around for uniform baking. I noticed that they kept browning within 2 - 3 minutes on each side. If they are not moved, it would end up looking like the jamuns are burnt and so keep turning them.

Soaking jamuns in the sugar syrup for a few hours is very crucial in this recipe. When the jamuns come out baked, they are a little on the crispy side. You end up disappointed if you serve them immediately with sugar syrup. I had prepared them around 11 am and after a couple of hours of soaking, the texture of these baked jamuns was more like rosgullas. By evening, they tasted exactly like the fried jamuns except the color which didn't bother me at all.
We really enjoyed them and thanks Priya for this wonderful recipe and the delectable jamuns.

Ingredients: (Makes 12 jamuns)
1 ready made jamun mix (100 grams)
1 cup sugar
1/2 tsp powdered cardamom
Slivered almonds / pistachio for garnishing

Preparing sugar syrup:
Add a cup of water to the sugar and bring it to a simmer. When sugar completely dissolves, add cardamom powder. If preferred, a pinch of orange food color may also be added at this point. Simmer 3 - 4 minutes more and turn off the stove.

Preparing the Jamun dough:
Add a few Tbsp of water and prepare a firm dough according to the package directions. Let it rest for 10 minutes. Then divide the dough into 12 portions and roll each of them into a ball with your hands.

Baking the Jamuns:
Preheat the oven to 300 deg F. Place the jamun dough balls on a greased or foil covered baking sheet and bake for 15 - 20 minutes, constantly turning them around for uniform baking.
Add them to the sugar syrup and let it soak for at least a couple of hours before serving. The longer soaking results in softer jamuns.

Check what other marathoners are cooking during BM#21.

Comments


Friday, October 19, 2012

Moong Tikkis


My final post during third week of BM#21 under "Cooking with Moong" theme is these nutritious, and yummy sprout tikkis. These are one of the sprouts tikkis made regularly at my home. They can be served as an evening snack or they can go even in ragda patties. Depending upon the mood, one can go with garam masala, cumin / coriander powders, ginger / garlic / green chili paste or whatever spice powders or flavors preferred, while making the patties. This time I kept simple, added chili powder and made them real hot and served them with sweet chutney.


Ingredients: (Yield 10 patties)
1 cup moong beans (Green colored) or moong sprouts (I used sprouts.)
1 cup cooked and mashed potatoes
1/2 cup bread crumbs or as needed for binding
1/8 tsp turmeric powder
Salt and chili powder to taste
Oil to shallow fry the tikkis

How I made them:


* Pressure cook moong beans/sprouts and potato chunks together for 2 whistles.
* Drain and let the moong cool a bit. Mash the potatoes.
* Mix well the moong, potatoes, bread crumbs, salt and chili powder.
* Divide the mixture into 10 portions and shape them into patties.
* Place them on a shallow pan or a tawa and shallow fry them until golden brown on both sides.
* Remove them and serve hot with spicy or sweet chutney.

Check what other marathoners are cooking during BM#21.

Comments 

Thursday, October 18, 2012

Moongdal - Methi Rottis


Rottis ~ - the quintessential breakfast item from Karnataka.

I was planning to prepare something else for today's post and had cooked about a cup of moongdal. I added rice flour to it as per the requirement of the recipe and proceeded with a small portion of it only to realize that the recipe I had tried zillions of time earlier with no problems was turning into a mess this time. That too when I very badly needed it for the BM#21. :(
I did not feel like trashing the dough and after giving it a considerable thought, ended up preparing these delicious rottis. I added methi leaves besides the regular stuff that goes into a rotti preparation. These can be served as breakfast / a light meal or as a snack. They are usually spicy enough that an accompaniment is not needed but some serve it with chutney powder / jaggery powder.

Ingredients: (Yield 8 medium sized rottis)
1.5 cup cooked moongal
1.5 cup rice flour
1 cup finely chopped methi leaves (fenugreek greens)
2 onions, finely chopped
1/2 cup shredded, fresh coconut
Finely chopped green chillies as needed
Salt to taste
Oil to make the rottis

Dough preparation:
* Mash well the cooked moongdal in a mixing bowl, with the back of a ladle or just puree it in a food processor.
* Add all the other ingredients to the mashed dal except the oil and make a firm dough, adding water as needed.


Making rottis:
Pinch about a big orange sized portion from the prepared dough and shape into a ball. Pour about a tsp of oil at the center of a griddle and place the dough ball on it. Pat it into a thin, flat circle and pour a tsp of oil around the edges and cover with a lid.

Now turn on the stove and let it cook on a low - medium flame. When it appears cooked on the bottom side and brown spots appear, flip it. Again add a tsp of oil around the edges if needed. Cover it again and cook till the other side is done too. Repeat the procedure with the remaining dough.

Note:
1. The dough can be prepared a day in advance and refrigerated.
2. Be sure to turn off the stove and cool the griddle slightly so that it is safe to pat the next dough ball on it. You can use 2 griddles to quicken the process but still have to let the tawa / griddle to cool after making a rotti. Actually I give the cast iron pan a quick wash with cold water after preparing a rotti so that I can go ahead immediately just after wiping it dry with a paper napkin.
3. I think moongdal flour can be substituted for the cooked moongdal in this recipe.
4. Finely chopped amaranth leaves / spinach can replace the methi leaves. Shredded carrot can also be added.

Check what other marathoners are cooking here.

Comments

Wednesday, October 17, 2012

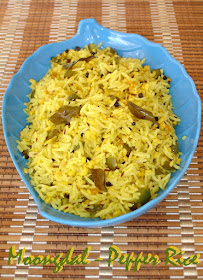
Moongdal - Bell Pepper Rice


Third week of BM#21 is here and this time, my theme is related to "cooking with moong". Srivalli has made this particular theme interesting by giving us some combos to choose from. Besides, the marathoners from the first two weeks had already posted the dishes I was contemplating about. I therefore had to think this time beyond the regular ones dished out in my kitchen.
The first recipe in the series is going to be a basic rice item with simple flavors, that I got from a TV cook show. I had noted down this recipe since it sounded so different than the rice items that I get to eat regularly / see in the blogworld. Neither any spice powder to flavor nor a medley of vegetables. Even the moongdal is not cooked as you expect.  A simple and quick one that you can put together probably even in the morning rush hours. Serve with chutney / sambhar or any other spicy accompaniment. Or plain yogurt will do if serving kids.

Ingredients for 2 servings:
1/2 cup Basmati rice
1/4 cup moongdal
2 Tbsp oil
1 tsp cumin seeds
2 tsp pepper corns
Few curry leaves
1/8 tsp turmeric powder
1 capsicum, finely chopped
Salt to taste

Method:
* Wash rice thoroughly and pressure cook adding a cup of water.
* Wash and soak moongdal in water for at least 30 minutes. Drain and keep aside.
* Heat oil. Then add cumin seeds, pepper corns and curry leaves. When cumin starts to brown, add capsicum and turmeric. Mix well with a spatula and cook covered until capsicum is tender.
* Add soaked moongdal and salt, saute for a couple of minutes.
* Then add the fluffed rice and mix well.

Note:
A handful of shredded, fresh coconut can also be added along with soaked moongdal.

 
Check what other marathoners are cooking during BM#21 here.
 

Friday, October 12, 2012

Chanadal - Coconut Kheer


Any festival meal without a kheer is incomplete in our household or any south Indian home for that matter. It doesn't count how many other sweet dishes are on the menu that day. While vermicelli kheer used to be the most common one at my mother's place, this chanadal kheer was the most regular one in my MIL's kitchen. Though the traditional version doesn't contain any coconut, I like to add some, grinding it along with some cooked chanadal to make it thicker. I like the consistency of the kheer, prepared that way.

Ingredients:
1 cup chanadal
1.5 cup powdered jaggery (or adjust)
1/2 cup shredded, fresh coconut
1 cup milk (or as needed.)
1 tsp cardamom powder
1 Tbsp cashews & raisins toasted in ghee

Method:
* Pressue cook chanadal adding a cup of water until the dal turns mushy. If you don't own a pressure cooker, soak chandal in water for a couple of hours or overnight to quicken the cooking process. Cook in a pan adding water as needed.
* Meanwhile, heat milk in a pan and allow it to come to room temperature.
* Take about 1/3 portion of the cooked dal and coconut and grind them into a coarse paste. If you don't wish to add the coconut or grind the chanadal, then mash the chanadal as much as you can with the back of a ladle.
* Add the ground mixture and jaggery powder to the remaining cooked dal and bring to a boil, until the jaggery melts. 
If the jaggery used is not clean then it can be separately melted in another pan, adding a few Tbsp of water. Just filter it and add it to the chana dal. 
* Add the toasted raisin-cashew mixture, cardamom powder and the milk to the chanadal - jaggery mixture. Mix it well before serving.

Usually I add milk directly to the chana dal, after the jaggery is melted and bring the kheer to a boil. Though it had never happened to me, I have heard that sometimes the milk splits because of the jaggery used. If that is the case, then cool the milk and add at the end as mentioned above.

Check what other marathoners are cooking during BM#21 here.

Comments

Thursday, October 11, 2012

Maida Chegodilu


For the 2nd day of BM#21, here is a savory snack from Andhra. This recipe uses only maida unlike the general chegodi version. I came across this in a Telugu cookbook many years ago and had tried once earlier. I had then shaped them into tiny rings like the bakery ones and it had become a tedious job. This time I remembered to prepare bigger chegodis. Making rings may be a little bit trickier for novices. They tend to open up during frying and become "C"s instead of "O"s, if chegodis are smaller. Or shape them into small logs for a more easy version. They taste almost like the bakery version, non spicy little kodbale rings.

Ingredients:
2 cups all purpose flour / maida
3 - 4 Tbsp butter
1 tsp cumin seeds
Salt to taste
Chili powder to taste (optional)
Oil to deep fry

Method:
1. Mix everything except the oil. Add water gradually and make a firm dough. Allow to rest it for about an hour.
2. After the resting period, knead the dough once and divide it into tiny balls.
3. Take a dough ball, roll it using fingers to a thin log and join the ends to form a ring. When enough are made, heat the oil in kadai or pan.
4. When oil is ready for deep frying, drop as many rings as the kadai can fit. Fry on low flame turning them in between, until golden brown. Repeat the steps with the remaining dough. Don't be tempted to increase the flame and get it done quickly. They don't come crunchy if done that way. Remove them with a slotted spoon and drain them on paper towels. 

Comments 

Wednesday, October 10, 2012

Besan Laddu


I often wonder how some bloggers enthusiastically do special posts in advance during festivals. I never happen to cook special dishes just before the festival days for blogging sake and I am left too exhausted on a festive day to click the dishes I prepared. I therefore end up posting no festive foods during the season. This time I wanted it to be different and on purpose, I selected "Navaratri Special" theme during the second week of BM#21 so that I could post some easy and yummy sweets/savories.
My first post in the series is going to be these delicious besan laddus that need very minimal efforts to prepare. The only thing needed is a pair of strong arms to fry the besan until you start to smell the aroma. The fried besan and powdered sugar are formed into laddus using ghee as the binding agent. The less amount of ingredients used and the simplicity of the recipe makes it novice friendly.

Ingredients: (Yield about 18 - 20 laddus)
2 cups besan / chickpea flour
1.5 cups powdered sugar *
1/2 cup ghee (or as needed.)
1/4 tsp cardamom powder (optional)

* My mother uses sugar and besan in the same ratio for these laddus. If you have a sweet tooth go with 1:1 ratio. I however prefer my sweets to be not sweeter and so this proportion works for me.


Method:
1. Melt 1/4 cup ghee in a pan and add besan to it. Fry the besan on low flame, continuously stirring. Fry until the raw smell of the flour is gone and the besan starts to change color. It would take around 12 - 15 minutes of continuous stirring. Turn off the stove.
2. Add powdered sugar and cardamom to the besan pan and mix well. Leave it aside for about 10 minutes so that the flour mixture is easy to handle with bare hands.
3. After the mixture has cooled down, add the remaining ghee (or as needed) to the besan mixture and mix well.
4. Take a handful of the mixture and shape into a round ball. Repeat the step with the remaining besan - sugar mixture. Store them in an airtight container.

Comments

Friday, October 5, 2012

Beaten Riceflakes Upma With Peanut - Dalia Powder / Atukula Upma / Avalakki Uppittu


Anyone familiar with south Indian cooking need no introduction to upma. Though traditionally made with semolina, this filling and quick breakfast can be made with vermicelli, beaten rice flakes, cracked wheat / rice, rice flour, cornmeal, bread, sago, oats and so on. Today's upma is with beaten rice flakes / poha and the addition of peanut - dalia powder makes it more delectable and interesting.

Ingredients:
2 cups poha (thick variety)
Salt to taste
1/4 cup peanut - dalia powder
2 onions finely chopped
4 - 6 green chillies, finely chopped (More or less depending upon the heat preferred.)
1/4 tsp turmeric powder
For tadka:
2 Tbsp oil, 2 Tbsp peanuts, 1 tsp Bengal gram / chana dal, 1 tsp skinned black gram /  urad dal, 1 tsp mustard seeds, few curry leaves


Method:
* Wash the poha thoroughly with water and drain in a colander.
* Heat oil in a pan and add the tadka ingredients. When the dals start turning reddish, add green chillies and turmeric powder and saute for about 30 seconds. Then add the onion and fry on low flame till it turns translucent.
* Next add the poha, peanut - dalia powder and salt to the onion mixture and stir well to combine.
* Cover and cook on low flame until poha is done.

Check what other marathoners are cooking during BM #21.

Comments 

Thursday, October 4, 2012

Spicy Vermicelli - Capsicum Upma


Vermicelli - capsicum upma is going to be my Day 2 entry of BM #21. When I am tired of the regular vegetable or the coconut version of vermicelli upmas, I go with this spicy one. Add your choice of vegetables and vangibhath powder instead of chillies, you will end up with a delicious meal. Regular semolina or a combo of semolina and vermicelli can be substituted for vermicelli.

Ingredients for 2 - 3 servings:
2 cups vermicelli
1 capsicum finely chopped
1/4 cup green peas (I used frozen ones.)
3 - 4 Tbsp vangibhath powder
Salt to taste
For tadka: 3 - 4 tsp oil / ghee, 1 tsp chana dal / Bengal gram, 1 tsp urad dal / skinned black gram, 1 tsp mustard seeds and few curry leaves 

Method:
* Heat oil in a pan and then add the dals and mustard seeds. When dals start turning reddish, add curry leaves and capsicum. Mix them once with a spatula, cover and cook on low flame until capsicum turns tender. 
*  Meanwhile, dry toast the vermicelli in another pan until it turns golden brown and keep aside. If using pre-roasted vermicelli, skip this step.
* Next add (about 2.5 to 3 cups) water to the capsicum pan and bring it to a rolling boil. Lower the heat and add salt, vangibhath powder, peas and toasted vermicelli.
* Mix well, cover and cook until vermicelli is done. Don't forget to stir in between.

Note:
If the concoction of spices in the vangibhath powder is strong for your taste,  the quantity of vangibhath powder can be reduced. If you prefer more heat, add a bit of chili powder. Home made or store bought powder can be used. Check here for my version of the vangibhath powder.


Wednesday, October 3, 2012

Biyyapu Rava Upma / Rice Rava Upma / Akki Tari Uppittu


To those who are wondering about me, I am alive and kicking. :) I planned to take a small break during summer because of my India trip. However the actual trip, unpacking, jet lag and falling back to my routine took a while, extending my hiatus to more than a couple of months. After being away, I began feeling like a lost toddler and somewhat grew apprehensive about blogging again. Funny but it happens each time I take a break. :)
To be honest, Srivalli's Blogging marathon #21 brought me back this time and this week, there are going to be some "Upma" posts as this is my chosen theme. These are going to be those upmas that are prepared regularly at my home and haven't appeared yet on my blog. The first one is this simple, delicious and filling upma prepared using rice rava / broken rice.

Ingredients:
1.5 cups rice sooji / biyyapu rava / broken rice / akki tari
5 - 6 chillies, chopped fine (More or less depending upon the heat of chillies.)
Few curry leaves
1/2 cup coconut
Salt to taste
For tadka:
2 Tbsp oil, 1 tsp chana dal / Bengal gram,  1tsp urad dal / split black gram, 1 tsp jeera / cumin seeds, 1 tsp mustard seeds

Method:
* Dry toast the sooji on medium flame until it starts to change color. Remove and keep aside.
* Heat oil in  a pan / kadai. Add the tadka ingredients in the order mentioned. When the dals start to turn reddish, add the chillies and curry leaves. Saute for about 20 - 30 seconds.
* Next add 3 cups of water, salt and coconut to the pan. Bring the water to a rolling boil, lower the heat and add the sooji to it. Keep constantly stirring the sooji while adding to the pan, to avoid forming any lumps. Cover and cook on low flame until the sooji is cooked. Turn off the stove.
* Serve warm with chutney or a dash of lime/lemon juice if desired.

Comments