Thursday, June 26, 2014

Chocolate-Nut Covered Strawberries

Though today's post looks like catering towards a valentines day treat, it is actually not. It is for the "iron rich foods" based theme of this week's blogging marathon. Believe it or not, dark chocolate with at least 70 cacao solids is a rich and an unexpected source of iron. Our body can absorb iron better in the presence of vitamin C, for example like citrus fruits. So this dark chocolate covered berries happen to be a good source of iron. I rolled them in crushed peanuts for an extra dose of iron. It can be substituted with other iron rich nuts like almonds, cashews, etc. Sweet, plump strawberries paired with chocolate and nuts is a delicious treat and a kid approved one at my home.

Ingredients:
About 4 - 5 oz of bitter chocolate, chopped
A pint of strawberries
1/4 cup of crushed nuts

Method:
* Wash the berries and pat them dry.
* Melt chocolate in a microwave-safe bowl or in the top of a double boiler over simmering water.Stir until chocolate is smooth. 
* Holding the berries by stem, dip them in the molten chocolate one by one, about 3/4th of the way to the stem.
* At this point if you prefer, roll them in crushed nuts.
* Place the berries stem side down on parchment paper lined plate or on a paper plate.
* Chill in refrigerator until hardened.

These go to the following events.
1. Blogging Marathon #41
2. Srivalli's "Kids' Delight", hosted this month by Kalyani with the theme "Iron rich recipes". 

Comments

Wednesday, June 25, 2014

Spinach Dal / Paalakoora Pappu

My kids love spinach and so I knew spinach is going to feature in one of my "Iron rich recipes" for this week's blogging marathon. However I didn't decide on the "how" part until the end and kept contemplating over salads, pastas and baked dishes. I figured it out finally that it is best to stick to a tried, tested and loved recipe at my home. And so I am here with this spinach dal which is healthy, delicious and wholesome. It uses spinach and lentils which are two good sources of iron for vegetarians. This Andhra style, spicy lentil dish happens to be a favorite of my family, especially my kids and gets cooked at least 3 to 4 times a month. Indian kids are used to these kind of comforting, home cooked dals on a daily basis and so, I thought it would be a suitable entry for the event. However adjust the spice levels according to the kids' preferences. 

Ingredients: (For 4 servings)
1/2 cup toor dal
1 bunch of spinach leaves (About 2 to 2.5 cups packed, chopped leaves)
1/4 tsp turmeric powder
1 to 2 tsp oil
1 tsp cumin seeds
1 tsp mustard seeds
Few curry leaves
A pinch of asafoetida powder
1 tsp salt
1/2 to 3/4 tsp chili powder
1&1/2 to 2 tbsp tamarind extract

Preparation:
* Discard any damaged spinach leaves and wash the rest that are going to be used. Finely chop them including the tender stalks. 
Feel free to use frozen, chopped spinach instead of fresh variety and you are not going to notice any difference. If using frozen spinach, go with about 5 oz for this recipe.
* By default, Indians usually own pressure cookers in their kitchens which make cooking beans a cinch. It takes about 10-15 minutes to cook lentils in a pressure cooker. If you don't own a pressure cooker, soak the lentilS in water for about a couple of hours to fasten the cooking. And then proceed with cooking lentils and spinach in a sauce pan on stove-top until the lentils turns mushy, adding water as needed in between.
Method:
* Wash lentils in two exchanges of water. Pressure cook together the lentils, spinach and turmeric adding about 1 cup water.
* When the valve pressure is gone, remove the lid of the cooker. Mash the cooked lentils well with the back of a ladle.
* Heat oil in a kadai or a pan. Add mustard and cumin seeds. When they start to crackle and pop, add asafoetida and curry leaves. Next add the cooked lentil-spinach mixture, tamarind, salt and chili powder. Mix well, taste and adjust the seasonings if needed.
* Bring the mixture to a boil and continue cooking for about 1-2 minutes and turn off the stove.
* Serve warm with rice or rotis. I had served it along with beetroot curry that happens to be another good source of iron.

Note:
* 1 or 2 green chillies can also be added along with the lentils. If green chillies are added, adjust the chili powder in the recipe accordingly. Or chilli powder can be completely excluded and substituted with green chillies.
* Finely chopped onion can also be added with the lentils.
* The tadka part can be done separately in another pan and can be added finally.

These go to the following events.
1. Blogging Marathon #41
2. Srivalli's "Kids' Delight", hosted this month by Kalyani with the theme "Iron rich recipes". 

Comments

Tuesday, June 24, 2014

Chimmiri Undalu / Sesame Seeds Laddu


Rustic and earthy - I think that best describes these laddus. They used to be traditionally prepared using a mortar and pestle though now one can use a food processor or a mixer to grind the mixture. The black sesame seeds used in the recipe adds an intense flavor to these laddus and that's what we use in making chimmiri in our households. However white sesame seeds can replace black ones. Whatever you use just make sure the sesame seeds have not gone rancid. Sesame seeds, dried coconut and jaggery used here are all rich in iron content and so a mandatorily fed item to girls in many Andhra households during their initial menstrual cycles. Generally it is advised to go on easy with the consumption part since they supposedly generate heat and bring on an early period in women.

There are no set rules when comes to the proportions of ingredients used. One can use coconut and jaggery according to one's taste preferences. Increase / decrease the quantities from the below recipe accordingly. The recipe is quite a simple one. Lightly toasted sesame seeds, jaggery and the coconut are coarsely ground and shaped into laddus.

Ingredients: (For about a dozen laddus)
1 cup black sesame seeds
3/4 to 1 cup powdered jaggery
1/2 cup grated dried coconut / copra

Method:
* Toast the seame seeds on low heat for 60 - 90 seconds, turn off the stove and let them cool. This step is optional as some prepare laddus without toasting sesame seeds as well.
* Run the ingredients through a food processor until they are coarsely blended and can be fisted together to shape them into laddus.
* Transfer the mixture to a wide plate and shape them into lemon sized balls.
* Store the laddus in an airtight container. They can be left over the counter if one is planning to consume them in the next few days. If not, they can be refrigerated.

Note: 
Peanuts are another good source of iron and can be added to the above mixture to make another variety of laddus. Check out the recipe here.

These go to the following events.
1. Blogging Marathon #41
2. Srivalli's "Kids' Delight", hosted this month by Kalyani with the theme "Iron rich recipes". 

Comments

Thursday, June 19, 2014

Batani Vada / Green Pea Fritters

Event: Blogging Marathon #41
Theme: Pick one ingredient and cook for 3 days
My choice: Green Peas

These are one of the vadas I am partial towards and don't mind the deep frying part. Compared to other traditional Indian vadas, these are easy and quick to put together. The recipe yields spicy, yummy and addictive fritters which stay crisp comparatively longer because of the rice flour and semolina used in the recipe.

Ingredients: (makes 16 vadas)
1 cup green peas
1/2 cup rice flour
1/2 cup fine semolina / chiroti rava
4 green chillies
Salt to taste
1 big onion finely chopped
2 - 3 tbsp minced cilantro
Oil to fry

Method:
* Cook the peas and drain. (I used frozen peas and so boiled them in a microwave with little water for a couple of minutes before using.) Or the cooking part can be skipped since vadas are going to be deep fried anyway.
* Pulse green peas and chillies to a paste using a food processor or in a mixer.
* Transfer the ground pea paste to a mixing bowl. Add rice flour, semolina, salt, onion and cilantro to it and mix well to combine. Add water as needed to form a thick mixture.
* Make patties from the mixture and keep them aside.
* Meanwhile, heat oil for frying the vadas in a kadai / frying pan. 
* Drop a pea sized vada batter into the hot oil. If it sizzles and comes to the surface, then proceed with deep frying. If not, heat oil for 1 - 2 minutes more.
* Drop as many patties as the pan can fit and fry them on medium flame until they are cooked and turn golden brown through out.
* Remove them with a slotted spoon and drain them on absorbent towels.
* Repeat the procedure with the remaining patties.
* Enjoy them warm with a cup of coffee / tea.

Comments


Wednesday, June 18, 2014

Matar Ka Paratha / Suffed Green Peas Parathas

Event: Blogging Marathon #41
Theme: Pick one ingredient and cook for 3 days
My choice: Green Peas

By the time I realized that I forgot to take the paratha pictures, they were cut into triangles to go into lunch boxes and so those are what featured here. These are one of the yummiest stuffed parathas even though one may get fooled by the simplicity of the recipe or if one is especially not so fond of peas. Even though the green peas appear to dominate the dish, the spices used in the mixture shine through and make the stuffing, a delicious one. The end result is yummy, spicy parathas which need just some plain yogurt to go with. If preparing for kids or prefer a milder version, one can adjust the quantity or the kind of spices used for the stuffing. 

  Ingredients:
1 cup atta / whole wheat flour + 1/2 tsp salt
1 cup boiled and drained green peas (Fresh or frozen can be used.)
A pinch of asafoetida powder
1/8 tsp turmeric powder
1/2 tsp chili powder / 2 green chillies (I used chillies.)
1/4 tsp cumin powder
1/4 tsp coriander powder
1/4 tsp amchur / dried mango powder
1/4 tsp garam masala
Salt to taste
Oil to toast parathas

Method:
* Combine flour and 1/2 tsp salt in a mixing bowl. Add water as needed and knead into a soft, pliable dough. Cover and rest for about 30 - 60 minutes.
* Run peas and chillies (if using) through a food processor to a coarse paste.
* Heat a tsp of oil and add asafoetida, the ground pea paste, turmeric, cumin powder, coriander powder, amchur powder, garam masala and salt. Add chili powder as well if chillies were not used. Cook the mixture for about 30 - 60 seconds. Turn off the stove and let the mixture cool.
* Divide the mixture into 5 portions, roll them into balls and keep aside.
* Divide the dough into 5 portions and shape them into discs. Work on one disc at a time while keeping the rest covered.
* Roll out the disc into a circle of about 3 inches in diameter. Place one portion of the prepared stuffing at the center. Bring the edges of the rolled out dough circle together to seal the stuffing inside. Again roll out the stuffed disc into a circle of about 5 inches diameter.
* Heat a tawa / shallow frying pan. Toast the rolled out disc adding a tsp of oil around the edges and cooking both sides, until brown spots appear on both sides.
* Repeat the steps with the remaining dough and the stuffing.
* Serve them warm with a bowl of yogurt.

Comments

Tuesday, June 17, 2014

Matarchi Usal

Event: Blogging Marathon #41
Theme: Pick one ingredient and cook for 3 days
My choice: Green Peas

I chose to go with matarchi usal for my first "green peas" based post. This Maharashtrian side dish with subtly sweet flavors is a quick and easy one to prepare. It is so simple that it can be done under 10 minutes, especially if using frozen peas. Just zap the peas in a microwave for a couple of minutes while grinding the coconut mixture and just cook enough until the flavors are absorbed by the peas. The mixture is on the wet / semi dry side but I kept it dry to showcase it better. This is served with pav / rotis.

Ingredients:
2 cups green peas (I used frozen peas.)
2 tsp oil
1 tsp mustard seeds
Few curry leaves
1/8 tsp turmeric powder
A pinch of asafoetida powder
Salt to taste
Ingredients to grind:
1/4 cup coconut
3 - 4 green chillies or as required
1 tsp cumin seeds
1/2 inch piece of ginger

Method:
* Grind coconut, cumin, chillies, ginger to a fine paste adding 2 - 3 tbsp of water.
* Heat oil and add mustard seeds. When they start to sizzle and pop, add turmeric, curry leaves and asafoetida. Add peas, the ground paste, salt and add about 1/2 cup water. 
* Cook until the peas are done and serve warm.

Comments

Thursday, June 12, 2014

Home Fries

Event: Blogging Marathon #41
Theme: Breakfast dishes

Home fries are pan fried, crisp potatoes that can be served as a breakfast or as a side dish. Sometimes they are also used as a pizza topping. They also go by the names of house fries, cottage fries and American fries in USA while they are known as fried potatoes in UK. The potatoes can be cubed, sliced or cut into wedges and then parboiled before frying them to crispy fries. It is speculated that they may be called so because they are not French fried / deep fried. These are almost like the other potato dish, the hash browns and are eaten with a fork. (Source:Wiki)
It may not be an apt choice when one is looking for a healthy breakfast but would be a great side dish in an indulgent mood. These crispy fries are addictive and yummy. My daughter especially wanted me to mention that she loved them and is looking forward to enjoy another batch of fries tomorrow.

Ingredients: (2 servings)
3 potatoes
3 - 4 tbsp oil / butter (I used canola oil.)
Salt & pepper to taste

Method:
* Bring about a quart of water to a boil in a saucepan. 
* In the meantime, peel the potatoes and cube them. Skip the peeling part if you prefer the skin on.
* Drop the potato cubes into the hot water and boil for 5 minutes and turn off the stove. Drain the water and pat dry the potato cubes with a towel.

* Heat the oil in a pan. (I prefer a nonstick pan.) Add the parboiled potato cubes to the oil. Fry them on medium flame until they turn golden brown and crisp through out, without stirring them too often. If they start to turn brown quickly, lower the heat and continue to cook. 
* Sprinkle salt and pepper and toss the pan to coat. Serve warm with ketchup or sour cream.

Comments

Wednesday, June 11, 2014

Khaman

Event: Blogging Marathon #41
Theme: Breakfast dishes

I had picked breakfast theme for this week's blogging marathon and we were supposed to choose our dishes from this specific wiki listAn earlier chitchat I had with my Gujarati neighbor had landed me with some authentic recipes from her state and this week's theme provided an opportunity to try her khaman recipe. Khaman, a Gujarati delicacy is prepared using fermented batter made with chana dal / roasted chickpeas. Khaman looks similar to another tasty Gujarati snack  dhokla though the two are different. 

My neighbor's khaman version is kept to a basic version. A tiny quantity of rice can be added along with chana dal to grind, if desired but that is entirely optional. Her version of batter includes only addition of salt (before fermentation) and eno's fruit salt (before steaming.) and nothing else. I think she mentioned that they use the below mentioned garnishing but don't serve chutney along with these khaman. Her mother in law earlier had given me another version which is what close to the one I had posted below. This recipe yields soft, fluffy and yummy khaman.

Ingredients:
1 cup chana dal / split chickpeas
Salt to taste
1/4 tsp turmeric powder
1 tsp lemon/lime juice
1/2 tbsp green chillie - ginger paste
1 tsp Eno's fruit salt
For tempering:
2 tsp oil
1 tsp mustard seeds
1 tsp white sesame seeds
1 - 2 green chillies, finely minced
A pinch of asafoetida
2 tbsp minced cilantro
2 tbsp shredded coconut
Method:
* Soak chana dal in water for about 3 - 4 hours. Drain, wash them thoroughly and grind into a thick batter adding water as needed. Add salt to the ground batter and mix well. Cover and leave it to ferment overnight. (The batter doesn't increase in volume as dosa and idli batters.)
* Keep the steamer / dhokla maker /  pressure cooker ready before preparing the khaman. Grease the dish in which khaman is going to be steamed. I prepared khaman in my pressure cooker without the whistle on. I poured about 2 cups of water in the cooker base and used a utensil that comes along with the cooker to steam the khaman. 
Basically, any round dish with a flat bottom, about 2 inches deep would work. 
* Add turmeric powder, ginger-chillie paste, lemon juice and Eno's fruit salt to the batter just when you are ready to steam and mix well. 
* Pour the batter into the greased container used for steaming. Pour water at the base of a steamer / pressure cooker and place the container in it. If using a pressure cooker, remember to not put the whistle on. 
* Steam on medium flame for about 15 - 20 minutes or until a toothpick inserted at the center comes out clean.
* Gently run a sharp spoon / knife around the edges of the steamed khaman and revert the pan over a plate. 
* Heat oil in a small pan and add mustard and sesame seeds. When mustard seeds start to splutter, add green chillies and fry for about 20- 30 seconds. Add asafoetida and turn off the stove.
* Pour the above seasoning over the steamed khaman. Garnish with minced cilantro and shredded fresh coconut. 
* Slice them into cubes and serve with coriander-mint chutney.
Notes:
1. 1 or 2 tbsp of rice can also be soaked along chana dal for grinding.
2. 2 to 3 tbsp of yogurt can be used to grind but I didn't add any.
3. Combine 1 tbsp of lime juice, 1 tbsp of sugar and about 1/4 cup of water in a small bowl. Drizzle it over the steamed khaman along with the mustard seasoning if you prefer sweetness in the khaman. 

Comments

Tuesday, June 10, 2014

Banana - Coconut - Chocolate Muffins

Event: Blogging Marathon #41
Theme: Breakfast dishes


A few bananas that had gone beyond the "over-ripe" stage and a teenager at home who had plenty of free time on her hands because of her summer vacation resulted in these muffins. My daughter wanted to bake something over the weekend and as usual her ideas were revolving around something "chocolate". Finally, we decided to try this recipe as finishing the leftover bananas was our primary goal. And my girl decided to add chocolate chips in the recipe as a compensation for not baking her favorite chocolate chip cookies. I gave her the ingredients and the instructions and she had the batter ready for baking. These muffins were real yummy with coconut flavor and I recommend the addition of chocolate chips to these muffins which add a sweet touch.

Ingredients: (Makes 7 - 8 muffins)
1 cup all purpose flour
1 tsp baking soda
1/4 tsp salt
1/2 cup coconut flakes
2 bananas
1/4 cup sugar
1/4 cup coconut milk 
2 tbsp + 2 tsp coconut oil 
1 tsp vanilla essence
1/2 cup roughly chopped walnuts
1/4 cup chocolate chips

Substitutes:
1. Milk / any nondairy milk for coconut milk
2. Butter / oil for coconut oil
3. Pecans / almonds for walnuts

Method:
* Preheat the oven to 350 deg F. Lightly spray the muffin cups or use the liners.
* Combine flour, baking soda and salt in a mixing bowl.
* Mash the bananas in another bowl. Add sugar, oil, coconut milk and vanilla to it. Stir them together until combined well. Now add the flour mixture and stir lightly.
* Finally stir in the coconut, chocolate chips and nuts. 
* Spoon the batter to 3/4th level of muffin cups. Sprinkle some nuts, chocolate chips and coconut if desired.
* Bake for 20 - 25 minutes or until they turn golden brown.
Comments
Thursday, June 5, 2014

Tomatillo Chutney

Event: Blogging Marathon #41
Theme: Stove-top cooking with alphabets - N, P & T

The idea of this chutney came to me when my husband one day mentioned about his mother's green tomato pachadi. Since my mother-in-law is not there any more and I never had an opportunity to taste that pachadi, it was hard to replicate it. And instead I came up with a version of my own using the tomatillos. The tomatillos and unripe green tomatoes are different even though they look the same particularly when tomatillos are dehusked. Tomatillo, original to Mexico comes with an inedible papery husk and is quite tart to taste. They have a sticky film which needs to be washed off before using them in recipes.
Tart tomatillos are paired with aromatic cilantro here and the addition of garlic lends a great flavor according to my husband. One day I had packed this chutney along with idlis in his lunch box and the yummy chutney had become a great hit among his colleagues. And so, I thought of sharing this flavorful chutney today.

Ingredients:
1 tbsp oil
1 tsp mustard seeds
A pinch of asafoetida
1/8 tsp turmeric powder
1 big onion or 2 onions, chopped roughly
4 - 5 green chillies
2 cloves of garlic, thinly sliced
3 tomatillo
1/2 cup cilantro leaves
Salt to taste

Method:
* Peel off the husks  from tomatillo. Rinse and gently rub to remove the sticky film. Cut each tomatillo into 6 - 8 chunks.
* Heat oil and add mustard seeds. When they start to splutter add turmeric, asafoetida and chillies. Fry for about 30 seconds.
* Next add garlic and and onion. Fry until onion turns translucent.
* Then add tomatillo and cook until it turns mushy.
* Finally add cilantro leaves and salt. Just cook until the leaves wilt.
* Let cool the mixture and grind coarsely.
* Serve with idlis / dosas / rice.

Comments

Wednesday, June 4, 2014

Poha, Indori Style

Event: Blogging Marathon #41
Theme: Stove-top cooking with alphabets - N, P & T

Beaten rice flakes / poha is widely used to create quick and easily digestible breakfast / snack items among the Indian subcontinent. No surprises there, considering that rice is one of the chief grains produced and consumed by Indians. There are both spicy and sweet poha versions prepared across the country and of course when we are talking about India, there tend be regional variations. I had assumed that I was familiar with all the spicy poha versions until the BM #39 which focused on Indian state cuisines. I came across a few versions of poha during the event for the first time and this Indori version was one of them. It caught my attention primarily because of the sev garnishing and some of the ingredients used here are not usually a part of the standard poha recipe.  
The first recipe I came across when I googled for Indori Poha recipe was this and it seemed like it came straight from the horse's mouth. The blogger didn't use another online / literal source for the recipe and knew what she was talking about. And so I stuck to her recipe and the soft, fluffy poha and the crispy sev was a match made in heaven. 

Ingredients:
2 cups thick poha
2 tbsp oil
2 - 3 tbsp peanuts
1 tsp mustard seeds
1 tsp fennel seeds
2 - 4 green chillies, chopped fine (Use as needed depending upon the spiciness of chillies.)
Few curry leaves
1/4 tsp turmeric powder
A pinch of asafoetida powder
2 onions, chopped fine
1/2 tsp sugar (I didn't use any.)
Salt to taste
Juice from a lime / lemon
For garnishing:
2 - 3 tbsp minced cilantro
1/4 cup shredded fresh coconut
1/2 cup sev
Method:
* Wash the poha in a colander, drain and leave the poha aside for 10 minutes. (I have noticed that the poha available in south India needs soaking in water. If poha is of a thick variety like that, soak it in water 6 -8 minutes or until poha feels soft to touch but have not turned mushy. Drain and keep it aside.)
* Heat oil in a pan. Add peanuts and mustard seeds. When mustard seeds start to pop and peanuts turn golden brown, add fennel seeds, chillies and curry leaves. Fry for abut 30 seconds and add onion, turmeric and asafoetida. Stir well and fry on medium flame until they turn translucent. 
* Next add poha, salt and sugar if using. Cover and cook for about 5 minutes. 
* Squeeze lemon juice over the prepared poha and mix well.
* Serve the poha onto plates for individual servings and garnish each plate with cilantro, coconut and sev. 

Comments

Tuesday, June 3, 2014

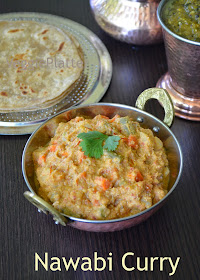
Nawabi Curry

Event: Blogging Marathon #41
Theme: Stove-top cooking with alphabets - N, P & T

The Mughal rule had a great impact on India in all quarters and naturally the Indian cuisine too evolved in the process, giving birth to one of the lavish and popular cuisines of the country. The cuisine developed in the imperial kitchens of the Mughal rulers came to be known as the Mughalai cuisine and used rich dry fruits, nuts, exotic fresh fruits and the expensive saffron as part of their cooking. A wide variety of pilafs, kebabs, rich-creamy gravies and luxurious desserts are a part of it's repertoire and are popular to this day in the Indian subcontinent. Over the centuries, the rich, aromatic and delicious Mughali food has become a part and parcel of Indian life and it has enhanced the already rich Indian culinary heritage.

While looking for some quick and easy nawabi recipes, I ended up here. This curry is supposedly from the Mughal era and as the name suggests, it is a curry fit for imperial kitchens. The cashew nuts, almonds, coconut and poppy seeds give a luxurious base to this mild and yummy curry. It was a curry meant for royals / the nawabs once upon a time, going by the ingredients used and the rich and creamy dish one ends up with. Though the ingredients are now in reach for even the commoners, it is the kind one would like to have when one is in self indulgent mood or in company.

Ingredients:
1 cup mixed vegetables (I used potato, carrot, green peas and beans)
2 - 3 tbsp oil
2 small tomatoes
Salt to taste
A pinch of saffron strands soaked in 1 tsp of warm milk
To grind:
3/4 cup chopped onion
1 tbsp cashews
1 tbsp almonds
1 tbsp poppy seeds
2 tbsp fresh, shredded coconut
2 tsp coriander seeds
2 tsp cumin seeds
1 tsp fennel seeds
1 tsp chopped green chillies
4 Kashmiri red chillies
1 inch piece of ginger
1 - 2 cardamom
2 cloves
1 inch piece of cinnamon
1 stalk of curry leaves

Method:
* Peel and cube potato and carrot. Cut beans into 1/4 inch pieces. Add water and cook the vegetables in either a pressure cooker or in a microwave. 
* Grind fine all the ingredients mentioned under "to grind" adding water as needed.
* Heat oil in a pan, preferably a nonstick one. Add the ground paste and cook until the oil starts to leave he sides or until the raw smell of the onion leaves.
* In the meantime, cut tomatoes into chunks and cook in a microwave. Let cool, peel the skins and puree the tomatoes. Pass it through a strainer and add the filtered puree to the fried paste in the above step. Add the cooked vegetables, saffron and salt. Bring the mixture to a boil and turn off the stove.
* Serve it with parathas or pooris.

Comments