Thursday, March 26, 2015

Sabudana Laddu

 
I chose to cook with sabudana this week just because I had around 5 to 6 pounds of sabudana lying in my pantry and as far as I remember I haven't posted a single sabudana recipe so far. Growing up I saw my mother using sabudana / saggubiyyam basically in two recipes - a payasam (that was less preferred over the vermicelli one) and the saggubiyyam vadiyalu or the vadi. Later on came the sabudana dosa, sabudana vada and the khichdi to my life when I had my own home and hearth. For today's post it was decided that I would do a dessert and kheer seemed like an easy way out. I have grown a penchant towards the sago kheer over the years and besides, my son loves it too. However change in plan happened because of Ugadi. I thought of preparing something with sabudana for the neivedyam and this laddu came to the rescue. The laddus were so yum and appealing that even my sweet-phobic husband ate a couple of them without any coaxing from me. They looked so tempting to him that he wanted to taste a bit of it and couldn't stop himself from tasting more. That means a lot coming from a person who wouldn't even glance the sweet dishes.

Ingredients:(Yield 15 - 16 laddus)
1 cup sabudana / sago / tapioca pearls
1 cup powdered sugar (or adjust the quantity)
1/4 tsp cardamom powder
2 tbsp. ghee
1 Tbsp. raisins
1 Tbsp. cashews
Extra ghee / milk to shape the laddus

Method:
* Dry toast sabudana on low flame, continuously stirring until they turn slightly brownish. It would take around 15 - 20 minutes to toast sabudana this way. The hard sabudana would have attained a crunchy texture by the time toasting is done. Transfer the sabudana to a wide plate and let it cool.
* Heat 2 tbsp. ghee in a small pan and add raisins and cashews. Stir and toast them for few seconds until the raisins turn plump and cashews turn golden brown. Turn off the stove and keep the pan aside.
* Grind the toasted sabudana to a fine powder. This step can be done in batches. Grind the mixture and sieve it if it appears coarse. Collect the fine powder and again grind the coarse powder left in the sieve and repeat the process until you are left with finely ground sabudana.
* Combine the ground sabudana, sugar powder, ground cardamom and the toasted cashew-raisin mixture along with the ghee in which they were toasted in a mixing bowl. Add extra melted ghee / milk to the mixture until you are able to hold it together. 
* Shape lemon sized balls out of the mixture by rolling between your palms.
* Store them in an airtight container.

Notes:
1. In case, one doesn't prefer to use that much of ghee in the recipe, warm milk can be substituted instead to shape the laddus. 3 to 4 tbsp. milk should suffice to make laddus. Please note to add ghee / milk in small increments instead of dumping it all into the mixture at once. If it becomes too wet, you need extra sabudana powder to fix it and extra sugar to balance the flavor and so add milk/ghee in little quantities, combine the mixture and check whether the laddus can be made or not. 
2. If milk is used to make laddus, they would turn harder after a few hours. They just need to be warmed in the microwave for few seconds before consuming them. I used milk to make these laddus and didn't refrigerate them. We ate them in about four days and they stayed fresh for that long.

This goes to Blogging Marathon #50, under the theme of "One ingredient - Three different dishes", Sabudana / Sago / Tapioca pearls being my chosen ingredient. Check out the link to find out what other marathoners are cooking.

Comments

Wednesday, March 25, 2015

Sabudana Vada / Sago Vada

Honestly speaking, fasting during navratri or the fasting food aka 'vrat ka khana' is an alien concept to me as a south Indian. As a vegetarian, I know that onion and garlic are taboo during religious occasions and rice is not consumed sometimes when fasting. However I had no clue that there is a long list of ingredients that people wouldn't consume during fasting in other parts of the country until I moved to U.S. and saw some of my Indian friends fasting at the drop of a hat in the name of festivals.  
Sabudana or tapioca pearls is one of the ingredients that is allowed during fasting and can be used to prepare yummy, light snacks such as khichdi or vadas. Sabudana vada, a traditional deep fried snack from Maharashtra is also equally popular as a fasting food. They are yummy but the flip side is that they are deep fried and need a bit of pre-planning since sabudana needs soaking. This 'crunchy on the outside and softer inside' vadas make a great snack along with your evening cup of tea.
 
Ingredients:
1 cup sabudana / sago pearls
2 small sized potatoes
1/4 cup peanuts
2 -3 green chillies, finely chopped (adjust the quantity as per preference.)
1 - 2 tbsp. finely minced cilantro
Salt to taste (or rock salt if fasting.)
1 Tbsp. rice flour (optional and if fasting, rice flour can be replaced with buckwheat flour or chestnut flour.)
Oil to fry (I used canola oil. Vegetable / peanut oil can be substituted.)
  
Preparation:
* Soak sabudana in just enough water to cover them for about 2 - 3  hours or overnight depending upon the sabudana variety. Drain in a colander and keep it aside until all the water is completely drained. (check notes.)
* Peel and cook the potatoes in a pressure cooker. Drain completely and then mash finely.
* Roast and skin the peanuts. Grind them coarsely and keep aside.

Method:
* Heat oil in a kadai / frying pan to deep fry the vadas.
* Add soaked and drained sago pearls, mashed potato, peanut powder, green chillies, cilantro, salt and flour if using to a wide bowl. Mix well to combine. 
* Pinch about lemon sized portions from the mixture.
* Gently pat them into patties and gently slide them into hot oil. Fit as many patties as the pan could hold without overcrowding.

* Deep fry them until they turn golden brown and are done.
 Notes:
1. I have used large sabudana pearls here. The soaking time depends upon the quality and the variety of sabudana. I have heard from my mom that the best quality sabudana needs just sprinkling of water to make the pearls soften but the variety I usually get here requires overnight soaking. Some soften in lesser time than the other and so check accordingly. When you press a soaked sago pearl between your finger tips, it should be moist and spongy.)
2. I usually deep fry keeping the flame at somewhere between low and medium. Vadas cooked at high temperature would brown faster leaving the insides uncooked while a low cooking temperature would make vadas greasier.
3. During fasting months, amaranth flour / buckwheat flour or water chestnut flour can be substituted for rice flour and rock salt can be used in place of regular salt.
4. For a healthier version, they can be shallow fried in a appe pan.
5. Minced ginger, 1 tsp of sugar or lemon juice can also be added to the recipe.

This goes to Blogging Marathon #50, under the theme of "One ingredient - Three different dishes", Sabudana / Sago / Tapioca pearls being my chosen ingredient. Check out the link to find out what other marathoners are cooking.

Comments

Tuesday, March 24, 2015

Saggubiyyam Dosa / Sago Dosa


My 3 year old niece is close to me despite the distance barriers. She makes sure that the adults at home call me frequently so that she can share the so called 'fun' things happening in her life. I got a similar call from her yesterday and the tiny one was all excited to share the news that she received 4 medals  in her pre-school sports day event, including the one for hosting the event along with her teacher in front of an audience of 100 plus. It is a remarkable feat considering that no one cannot elicit a single word from her in front of strangers though she talks a dozen to dime with those who are in her 'friendly' zone. Everyone at home is usually happy to hear her pleasant chatter and it is hard for us to escape from her charming and strong persona. Even my 16 year old who acts as if he is reclusive and doesn't show an iota of enthusiasm when he wins state and national level competitions at school couldn't escape from the excitement his little cousin was spreading and was chatting away enthusiastically with her sharing her sense of pride. 
My sister was mentioning that her daughter was acting as a mini adult these days and behaving so mature for her age. Gradually the conversation veered towards the food in general and the little one's preferences in particular. It seems that her daughter was bored with the same kind of dosas she was making and asked me for some varieties to rotate. For people who are in the same boat like my sister, here is one dosa made with sago. These dosas taste good when served warm along with a spicy chutney.

Ingredients:
1 & 1/2 cups rice (I used extra long grain rice.)
1/2 cup sago / tapioca pearls (Saggubiyyam)
Buttermilk (Majjiga)
Salt to taste
Oil to make dosas ( Canola / vegetable / peanut oil)

Method:
* Soak rice and sago pearls together for about 4 - 5 hours in water such that they are immersed well in water. Wash and drain the water after the soaking period.
* Grind rice and sago together finely into a thick batter, using butter milk. In absence of butter milk, add equal quantities of yogurt and water.
* Transfer the ground batter to a big container, add salt and mix well. Cover and allow the batter to ferment overnight. (I usually soak the ingredients in the afternoon, grind the batter in the evening.)
* When ready to make dosas, heat a griddle or a shallow pan. Pour a ladleful of batter at the center of the griddle and spread thinly into a 6 inch circle using the backside of the ladle. Drizzle 1/2 tsp oil around the edges and cook until the bottom side of the dosa turns light golden. Flip the dosa using a spatula, drizzle about 1/4 tsp oil around the edges and cook for about 20 seconds and remove.
* Repeat the dosa making process using the remaining batter.
* Serve dosas warm with roasted chickpea / peanut chutney.

This goes to Blogging Marathon #50, under the theme of "One ingredient - Three different dishes". I have decided to showcase three different dishes this week using Sabudana / Sago / Tapioca pearls. Check out the link to find out what other marathoners are cooking.

Comments

Thursday, March 19, 2015

Creamy Tomato Pasta

Any colored pasta turns into a orange/red hued one as soon as it hits my husband's plate. He adds oodles of tomato based condiments to his pasta and tells me that he is making it more flavorful. I stopped complaining long ago and keep making tomato based pastas more often instead. Today's recipe is the standard one I make but added some evaporated milk to make it creamier. I used evaporated milk instead of cream / milk just because I had some leftover evaporated milk that had to be used. The evaporated milk lends a nice, creamy background for the tomato sauce based pasta and makes it more flavorful. I used twisted elbows that was a carrot, corn, squash pasta blend. Penne, shell pasta or any long pasta can be substituted for elbow pasta.

Ingredients:
1 & 1/2 cups twisted elbows
1 to 2 Tbsp. olive oil
1 small onion, finely chopped
1 garlic clove, finely minced
8 oz / 225 gm / 1 cup tomato sauce (I used store-bought sauce.)
Salt and freshly ground pepper to taste
About 1/2 cup evaporated milk / cream
1/4 cup grated Parmesan (optional)
Chopped basil leaves to garnish (optional)

Method:
* Heat oil in a saute pan and add minced garlic and onion. Saute until light golden. Add tomato sauce and ground pepper to the pan and let it simmer on low flame, just to let the flavor build up. Taste and adjust the salt if needed.
* Bring a big pot of salted water to a boil. Add the pasta to boiling water and cook until al dente. Drain the pasta in a colander and return it back to the pot in which it was cooked. Add evaporated milk or cream and gently give a stir to mix.
* Pour the tomato sauce mixture over the pasta and stir to combine.
* Garnish with Parmesan and basil and serve warm.

This goes to Blogging Marathon #50, under the theme of "Pasta". Check out the link to find out what other marathoners are cooking.

Comments

Wednesday, March 18, 2015

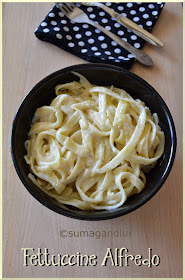
Fettuccine Alfredo

If left on her own devices, my daughter would survive on cheesy pasta for the rest of her life happily. I genuinely mean it and am not saying just to sound fancier. One of her meals each day, especially lunch on a school day typically would be macaroni and cheese and by any chance, if something else is packed, the lunch box comes untouched, literally.  She prefers to go hungry the whole day instead of eating something else and she wouldn't care even to open her lunch box that day. Even after having her 'the most favorite' lunch, she comes home asking if I have any leftovers of the same. I couldn't even call it a phase as this has been going on for years now and her fascination towards the dish hasn't dimmed a bit. If not for the 'terrible mom' at home, she would not have to eat so many other foods. Seeing her love for 'cheese'y pastas and pizzas, my husband keeps joking that she probably was an Italian in her previous birth while I muse that a cheesy pasta recipe is all she ever needs in her life.

With this much of love for cheese going on in my home, it was obvious that I had to post a 'Cheese Sauce' based pasta. And it is going to be Fettuccine Alfredo for today that everyone enjoys at home. Fettuccine literally means 'little ribbons' in Italian and is made with eggs and flour. I have substituted the traditional fettuccine with egg-free, durum semolina one. This dish can either be called a triple treat or a triple heart attack depending upon which side of the coin you are. Cheese, cream and butter - the terrific trio definitely add oodles of flavor to the Alfredo sauce along with increasing one's girth. That said, this sauce is a no brainer and can be prepared in a jiffy. 

I had noted the recipe once that was on a cheese container that I bought and it seems to be a standard one going by the recipes that I get to see in blogs. It is a simple one to remember and have given below.  However I would prefer to go by those proportions only if I have company or if I prepare it once in a blue moon. Otherwise, I would reduce the butter proportion drastically, substitute cream (or at least some portion of it) with whole milk and go easy with the cheese and call it a lighter version. :)

Ingredients:
16 oz / 1 lb fettuccine
1 stick of butter
1 cup heavy cream
8 oz. Parmesan cheese
Salt and freshly ground black pepper to taste  

Method:
* Cook fettuccine in a large pot according to the package directions. Drain and add the cooked fettuccine back to the pot.
* Prepare the sauce while the pasta is being cooked. Heat butter and cream in a sauce pan over low heat. Keep stirring it constantly until the butter melts. Stir in cheese, salt and pepper.
* Pour the sauce over the fettuccine in the pot. Toss until the pasta is coated well with the sauce.
* Serve warm immediately. 

This goes to Blogging Marathon #50, under the theme of "Pasta". Check out the link to find out what other marathoners are cooking.

Comments

Tuesday, March 17, 2015

Spaghetti, Aglio, Olio e Peperoncino

  
Though the name of this pasta dish is a mouthful and sounds complicated, the preparation is not. It is one of those simple, comforting kind of meals that can go from stove to table in under 15 minutes. This traditional dish which originated around Rome is one of the fine examples of Italian rustic cooking and mostly considered a peasant dish. Aglio, the Italian word for garlic is pronounced as ah -lyoh while olio, the oil is pronounced as oh-lyoh and the spicy chili, peperoncino is pronounced as pepe- rone (say like tone) - chino. And so spaghetti aglio, olio e peperoncino literally means spaghetti with garlic, oil and chili pepper in Italian. 

This dish out and out belongs to 'garlic lovers' and uses loads of garlic in it while there is no place for any kind of cheese in the traditional versions. However one can add some generous amounts of  Parmesan / Romano cheeses at the final stages of cooking to make it more flavorful. The minced garlic and the red chili pepper sauteed lightly in olive oil form a lighter sauce for this humble pasta unlike the heavy cheesy / tomato based sauces. The chili pepper gives the needed kick to this dish while the generously added parsley imparts it's flavor. Any spicy, red (ripe) chili pepper can be used or in lieu of it, go with crushed chili flakes. I used 8 wholegrain spaghetti in this recipe and spaghetti can be replaced in this dish with any long pasta shapes like linguine, angel hair pasta or others.

Ingredients: (Yield 2 servings)
1/2 pound / 8 oz. spaghetti
Salt to taste
3 - 4 Tbsp. olive oil
2 large garlic cloves, thinly sliced or finely minced (I minced finely.)
1 chili pepper, finely sliced / dried red chili flakes to taste
3 Tbsp. minced parsley (This is entirely optional.)

Method:
* Bring a large pot of generously salted water to a boil. There is going to be no salt in the sauce and so add salt accordingly.
* Add spaghetti and cook according to the package directions, al dente.
* Drain the cooked pasta in a colander, reserving about 2 - 3 tbsp of the pasta water.
* In the mean while, heat olive oil, garlic and chili in a frying pan, on medium heat. Cook the garlic until it starts to turn light gold in color. Add the pasta along with the reserved water to the pan. Give it a stir to combine and cook for about 30 seconds. Turn off the stove and serve immediately.

This goes to Blogging Marathon #50, under the theme of "Pasta". Check out the link to find out what other marathoners are cooking.

Comments

Thursday, March 12, 2015

Afghani Bolani / Bolani Katchalu / Potato Bolani


Among the International flatbreads I posted this week, these bolanis were the best and we absolutely loved them. Bolanis are traditional Afghani flatbreads with a filling, usually made with potato, spinach, green lentils, pumpkin or leeks. These vegan, stuffed breads can be either fried or baked and are served with mint yogurt sauce. Though these potato bolanis sound like our own aloo parathas, they are not. The similarity ends with potatoes and they are different in terms of the flavor of the filling, the shape of the bolanis and the way they are toasted.
Ingredients: (Make 7 - 8 bolanis)
1.5 cups flour (I replaced half of it with wheat flour. )
1 tbsp. oil (optional)
1/4 tsp salt
4 medium sized potatoes (Should come to 2 cups when cooked and mashed.)
1 tsp pepper powder (more or less, as required)
Salt to taste
1/4 cup finely chopped cilantro
1/4 cup finely chopped green onion
1/4 cup olive oil to toast bolanis

Method:
* Combine flour, salt and oil in a mixing bowl. Add water in small increments and knead it into soft, pliable dough, for about 5 minutes. (I added about 1/2 cup + 2 tbsp. water.) Cover and let the dough rest for about an hour. 
 
* Meanwhile, peel and cook the potatoes until done in a sauce pan or in a pressure cooker. Keep the cooked potatoes aside and let them cool.
* Mash the potatoes well so that they are lump-free. Add cilantro, green onions, salt and pepper to the mashed potatoes and mix well. 

* When ready to make bolani, knead the dough once and divide the mixture into 7 - 8 portions. Also divide the potato mixture into 7 - 8 portions (depending upon how many dough portions are made.) 
* Roll each portion into a ball between your palms and then gently flatten them into discs. Work with one portion at a time and keep the rest covered, to prevent them from drying out.
* Roll a portion as thin as a tortilla, into 5 - 6 inch diameter circle. Place one portion of the potato mixture (about 2 tbsp.) on one half of the rolled out dough circle, leaving the edges.(Traditionally, they are rolled into 10 - 12 inch circle.)

* Fold the other half over it, to enclose the potato filling and seal the edges properly. I used a fork to seal which is entirely optional. Gently pat the surface of the bolani for uniformity.

* Heat the oil to toast bolanis. Place the bolani one by one in the hot oil and toast both sides until golden brown. (Though they tasted awesome like stuffed pooris frying this way, I just toasted them like regular rotis.)
* Serve them with minty yogurt sauce and taste the best when served warm.

This goes to Blogging Marathon #50, under the theme of "International Flatbreads". Check out the link to find out what other marathoners are cooking.

Comments

Wednesday, March 11, 2015

Scallion Pancakes

For the uninitiated, that's not a misnomer. These flatbreads from China are indeed called pancakes and they use a dough instead of a batter. These chewy and savory pancakes are just like Indian parathas except that all purpose flour is used to make them and some plain, chopped green onions / scallions are stuffed inside. This recipe is a cinch to make as there is no need to cook the stuffing, which is the usual case with the classic Indian stuffed parathas. These mildly flavored pancakes are usually served with a soy - ginger dipping sauce. I made the sauce from here but no one at home cared about it.

Ingredients: (Yields 5 pancakes)
1 cup all purpose flour + extra for dusting
1/4 tsp salt
6 tbsp. water at room temperature (more or less as needed.)
1/4 cup finely chopped, green parts of scallions
Oil to toast the pancakes

Method:
* Combine the flour and salt in a mixing bowl. Add water in small increments and knead into a soft, pliable dough that is no longer sticky, about 5 minutes. In case the dough looks dry, wet you hands with water or add about 1 tbsp. water and knead. In case the dough is sticky, add extra flour until the dough is workable. Cover the dough and allow it to rest for about 30 minutes. No harm is done if the dough is allowed to rest longer.
* Divide the dough into 5 portions and roll each portion between your palms into a smooth ball. Work with one portion at a time and keep the rest covered to prevent them from drying out. Gently press the ball into a disc.

* Dust the working surface with flour if necessary. Roll the disc into a thin rectangle and gently brush with oil over the surface. (Sesame oil is preferred for this step.)
* Sprinkle the chopped green parts of the scallion over the surface of the rolled out dough.
* Starting from one longer side, roll it like a mat / carpet.
* Coil it up and gently press down. Again roll it into a thin circle of about 5 inches diameter, using a rolling pin. 
* Heat a skillet or a shallow frying pan. Place the pancake onto the skillet. Cook for about 30-40 seconds and flip. Cook for another 30 seconds. Then add about 1/4 tsp oil around the edges and brush the surface with the back of the spoon used earlier to drizzle oil. Flip and brush the other surface too with oil. Cook until brown spots appear on both sides and pancakes look cooked.
* Repeat the steps of rolling and toasting the pancakes with the remaining dough.

Note:
Add scallions directly to the flour while making the dough in the first step. in case if stuffing the scallions while rolling looks hard. 

This goes to Blogging Marathon #50, under the theme of "International Flatbreads". Check out the link to find out what other marathoners are cooking.

Tuesday, March 10, 2015

Turkish Gözleme


Oh boy! I was under this great misconception that I somewhat mastered the art of rolling flatbreads until I saw this video. I was exploring some European flatbreads and in the quest, came across this amazing video where a skilled and experienced Turkish woman is rolling out humongous sized gozlemes effortlessly. Gozleme is a savory and stuffed, griddle bread from Turkey prepared from hand-rolled dough. The traditional gozleme making requires a long, thin rolling pin and a large griddle. The name 'gozleme' is derived from the Turkish word 'göz' meaning compartment, referring to the pocket of the dough where the stuffing is sealed and cooked. The stuffing that goes inside these popular Turkish breads can range anywhere from vegetables, cheeses to meats.

I couldn't make gozlemes in the traditional size as neither I had the required tools nor the expertise to nail them. Gozlemes can be prepared in two shapes - a crescent shaped one or like a stuffed envelope. I used the spinach-cheese filling to make my gozlemes, in a mini size and made in both shapes. My gozleme experience is telling me that crescent shaped one is the ideal one for uniform toasting. The envelope shaped ones need extra time for getting uniformly toasted. I wasn't sure whether they were toasted properly inside or not and so toasted them again to just make sure. I cut gozlemes into strips, held them with tongs and toasted them on all sides including the edges.We enjoyed these yummy gozlemes with ketchup.
 
Ingredients:
1 cup all purpose flour
Salt to taste
1 tbsp. olive oil
2 medium sized onions, finely minced
2 cups coarsely chopped spinach
1/2 cup crumbled feta cheese (I used paneer instead.)
Salt and pepper to taste
Oil to toast gozleme

Preparation of dough:
Combine flour and salt in a mixing bowl. Add water in small increments to the flour mixture and prepare a soft, pliable dough. (I added a little less than 1/2 cup water.) Gently knead it for 5 to 7 minutes. Cover the dough and keep it aside for about 15 - 30 minutes. (Gozleme dough doesn't include any oil but I added a tsp. of it.)
Preparation of filling:
Heat oil and add minced onion. Fry until onion softens and add spinach. Cook until spinach wilts and the rawness is gone. Add salt and pepper and mix well. Next add the crumbled cheese, give it a stir and turn off the stove. Let the filling cool a bit.

Method:
* Divide the dough into 4 portions and roll them into discs between your palms. Work with one disc at a time and keep the rest covered. Roll it thin into a rectangle or in a circular shape. Dust with flour if necessary.
* Place about 2-3 tbsp. of filling at the middle of the rectangle. (I used more filling than showed in the picture.)
* Fold the opposite sides to cover the filling.
* Then fold the remaining sides to cover up the filling and form an envelope. Gently press with fingertips to seal properly.

* If the dough disc was rolled out into a circle, place about 1/4 cup of the filling on one half of the circle. Then fold the other half over it. Seal the edges using your finger tips and gently pat the whole crescent shaped gozleme.

* Heat a skillet and place the rolled dough square or crescent on it. Cook on low flame, drizzling with oil / butter until brown spots appear on both sides. (I cut them into strips and toasted them again. I held the pieces with tongs and toasted on all sides to make sure that gozlemes are properly cooked.)
This goes to Blogging Marathon #50, under the theme of "International FlatBreads". Check the link to find out what other marathoners are cooking.

Comments

Thursday, March 5, 2015

Methi - Pakoda Curry

This is one 'Methi' curry that I wanted to try ever since I copied the recipe from one of my husband's aunts years ago. The deep frying part kept me away from the recipe so far and this week's BM theme of "methi' seemed like a right occasion to try it. Besides it sounded like this palakoora- vadiyala koora we love. It is kept on a dry side unlike the other Andhra pakoda curry versions or the kadhi pakora. The methi leaves add a nice, aromatic background for the yummy pakodas in this curry.

Ingredients for the pakodas:
1 cup besan / garbanzo flour
One big onion, finely minced (The original recipe didn't use it.)
Salt to taste
Chili powder to taste
Oil to fry (I used canola oil.)
Ingredients for the curry:
Pakodas from above
1 tbsp. oil
1 tsp mustard seeds
1/8 tsp. turmeric powder
1 to 1& 1/2 cups fenugreek greens / methi leaves
Salt & chili powder to taste

Making Pakodas:
* Sift besan, salt and chili powder together in a mixing bowl.
* Add chopped onion and mix well. Next add water and make a thick batter.
* Heat oil for deep frying in a pan. Drop small balls of batter into the hot oil. Fry them on low flame until they turn golden brown through out.

Curry Preparation:
* Wash and roughly chop the methi leaves.
* Heat a tbsp. oil in a pan and add mustard seeds. When they start to crackle, add methi leaves and turmeric powder. Stir well, cover and cook until the rawness of methi leaves is gone.
* Add salt and chili powder to the cooked methi and stir well. Add the fried pakode and stir to combine.
* Cook for about a minute and remove from fire. Serve immediately with rice.

This goes to Blogging Marathon #50, under the theme of "Methi Dishes". Check the link to find out what other marathoners are cooking.
 
Comments 

Wednesday, March 4, 2015

Menthikoora Pappu / Andhra Style Methi Dal

Give a bunch of greens to a person from Andhra, 90% chances are that they are going to get used in a pappu. The local favorites usually are gongura, chukkakoora, thotakoora (amaranth greens) and so on. Paapu is a dal preparation from Andhra, that is kept on a thicker side unlike sambhar and no spice mixes go into the dish. Toor dal / yellow lentils is usually preferred to make pappu and occasionally moong dal is substituted. 
I get only 3 to 4 varieties of greens here locally, that I grew up seeing in India. Of course there are loads of other varieties available. I can get spinach and methi/ fenugreek greens leaves all year round while occasionally I see gongura, amaranath and Malabar spinach at Indian grocers'. And so, spinach and methi get used extensively in my kitchen while my husband keeps getting nostalgic about the greens he grew up eating.

I don't mind using American brands' frozen spinach and use it liberally in my cooking whereas with methi leaves, I try to use fresh ones as much as possible. The frozen methi I get here are Indian brands and I have noticed that half the packet is filled with chopped stalks of methi leaves which tend to be on the bitter side and also there are even weeds like chopped grass stalks sometimes. Either it is because of the carelessness of the packers or slyness of the manufacturers, I guess. I feel like being cheated when I cut open a packet only to come across the sneaky additions of ripened tindora slices, green leafy vegetables with unwanted weeds, smelly coconut or browned surti papdi though the packet promises you that things are frozen fresh. And so the lesson I learnt is to buy fresh methi leaves as much as possible to avoid the disappointment.
I realized that surprisingly menthikoora pappu hasn't been posted yet on my blog though it gets frequently made at my home and is one of my favorite dishes. And so I decided to go with this yummy, flavorful dal for today's post.

Ingredients:
Toordal / Kandipappu - 3/4 cup
1 small bunch of methi leaves / fenugreek greens
1/8 tsp turmeric powder
Salt to taste
Chili powder to taste (I used about 3/4 tsp.)
2 to 3 tbsp. thick tamarind juice (Soak about a lemon sized tamarind in water and extract thick juice. )
Tadka: 2 tsp oil, 1 tsp each of mustard seeds & cumin seeds, a pinch of asafoetida powder, few curry leaves 

Method:
* Pluck the leaves from the methi bunch and discard any damaged ones. Wash and roughly chop them. Don't be tempted to use the stalks in the case of methi leaves. They lend a bitter taste to the dish, even if they are looking tender.
* Wash the lentils with two exchanges of water. Pressure cook lentils, methi leaves, turmeric powder and about 1 & 1/2 cups of water together. If not using a pressure cooker, soak the lentilS in water for about a couple of hours to fasten the cooking. And then proceed with cooking in a sauce pan on stove-top until the lentils turns mushy, adding water as needed in between.
* When the valve pressure is gone, remove the lid of the cooker and mash the cooked lentils well with the back of a ladle.
* Heat oil in a pan and add mustard and cumin seeds. When they start to crackle and pop, add asafoetida and curry leaves. Next add the cooked lentil-methi mixture, tamarind, salt and chili powder. Mix well, taste and adjust the seasonings if needed.
* Bring the mixture to a boil and continue cooking for about 1-2 minutes and turn off the stove.
* Serve warm with hot steamed rice or rotis. 

This goes to Blogging Marathon #50, under the theme of "Methi Dishes". Check the link to find out what other marathoners are cooking.

Comments 

Tuesday, March 3, 2015

Shalgam - Methi Ki Subzi ~ Turnip - Fenugreek Greens Curry

 
I wanted to pair methi with another vegetable in a subzi dish, without taking the limelight away from this strong flavored greens. Turnip lying in my refrigerator sounded like an apt choice and I prepared this yummy subzi  along the lines of aloo methi. The mild turnip mellows down the strong flavor of methi / fenugreek greens slightly and would be a great substitute here if you want to cut down on potato. This would be a great side dish for rotis / parathas / pooris.

Ingredients:
1 tbsp. oil
1 tsp cumin seeds
1 tsp ginger, finely chopped
1 onions, finely chopped
1 tomato, chopped
1 small turnip, peeled and cubed
1 bunch of of methi leaves
1/4 tsp turmeric powder / fenugreek greens
Chili powder to taste (I used about 3/4 tsp, spicy variety.)
1 tsp coriander powder
1 tsp cumin powder
1 tsp amchur powder / dried mango powder
Salt to taste

Method:
* Heat oil in a pan and add cumin seeds. When they turn brown and sizzle, add ginger and fry until golden brown.
* Next add and fry onions until lightly brown. Add tomatoes next and cook until mushy.
* Add turnip, cover and cook until is turnip almost done, stirring occasionally.
* Then add all the dry spices and salt. Mix and then add methi leaves. Cover and cook until the rawness of methi leaves is gone.
* Serve warm with rotis / pooris.

This goes to Blogging Marathon #50, under the theme of "Methi Dishes". Check the link to find out what other marathoners are cooking.

Comments