Tuesday, May 26, 2020

Green Peas Kheer / Matar Ki Kheer

Kheer made with peas may sound unusual and even weird if one has never heard about it. However matar ki kheer aka green peas kheer is a traditional dish that is cooked in parts of north India. I had known about this kheer for years but I too had been skeptical since I wasn't sure whether I would favor green peas in a sweet dish. I put my apprehensions away this time as I had tried a kheer with field beans recently and really liked it. Besides, I had loads of frozen peas. 

The kheer is a perfect one if you are planning to floor your family or guests without slaving in front of the stove. I am really glad that I gave this kheer a try. It is so delicious that it has become one of my favorite kheers now. No one can beat you if you start playing a guessing game with this kheer. My kids could not guess at all what went in and my daughter, who avoids peas kept leaning towards pistachio because of the color and loved it. 

The kheer preparation involves the usual, simple steps. There is no need for any fancy ingredients to prepare this kheer. All you need are milk, sugar and fresh / frozen peas. Peas are ground to a paste and cooked in milk until it slightly thickens. Be sure to prepare a large quantity of this delicious kheer or else be ready to regret it.

Ingredients: (Yield - 2 servings)
1 cup fresh / frozen green peas (I used frozen ones.)
2 tsp. ghee
1.5 cups milk
Sugar to taste
2 pinches of  ground cardamom
Chopped nuts to garnish

Directions:
* Grind the peas finely / slightly coarsely using water if needed. 

* Heat ghee in a pan, preferably a non-stick one and add the ground peas puree. Saute it on low flame until the raw smell of the peas disappear, about 8 to 10 minutes.

* Add milk and cook it, stirring intermittently until it reduces to 3/4th the original quantity or a little thicker. Leave a ladle in the pan to avoid the milk from boiling over. (One can adjust the quantity of milk depending upon the preferred consistency of the kheer.)

* Add sugar and cardamom powder and cook until sugar melts and turn off the stove.

* The kheer can be served warm or chilled. Garnish with chopped nuts before serving.


Comments

Monday, May 25, 2020

Potato Gulab Jamun

Sweet potato jamuns were on my mind when I picked 'sweets with vegetables' theme. However when the time came to cook, I had to work with whatever vegetables I had on hand when we decided to not venture out at all during the lock down period. I had about 20 pounds of potatoes and I therefore decided that one of the sweets would be potato based. I was wondering whether sweet potatoes can be replaced by potatoes in the jamun recipe and dear Google showed that in fact I can. 

I tried this recipe and surprisingly, potato based jamuns taste delicious and they didn't disappoint. It is hard to detect potatoes in the dish and they make a great substitute for the regular dairy based ones. It is perfect when those jamun cravings hit and there is no milk powder / khoya or the instant gulab jamun mix at hand. I was not very careful while preparing the dough and so probably a few balls opened up a little while frying though they didn't spread in the oil. It didn't make a difference though, once soaked in the sugar syrup. 
Ingredients for sugar syrup:
1.5 cup sugar 
1.5 cup water
A pinch of ground cardamom / 1 tsp. of rose water
Ingredients for gulab jamun:
1 cup boiled and mashed potato
3 - 4 tbsp. all purpose flour
A pinch of baking soda
Oil to fry gulab jamun

Directions:
* Peel and boil the potatoes until cooked through. 
* Heat sugar and water in a pan. When the sugar melts, lower the heat and cook until the sugar solution slightly thickens. (I usually leave the mixture on low heat for about 8 to 10 minutes.) Add cardamom / rose water and turn off the stove. 
* Drain the cooked potatoes well so that there is no water left. Grate the boiled potatoes to keep them even or mash them finely so that there are not any lumps. 

* Add flour and baking soda to the mashed potatoes.

* Knead the mixture into a smooth dough without any cracks. Do not add any water to the mix. If the mixture appears loose add a tbsp. of extra flour to the mixture and knead.

* Make big marble sized balls from the mixture, each without any cracks. 

* Heat oil in a pan on medium flame but no need to bring it to a smoking point. When a small pinch of dough is dropped into the hot oil and it swims to the surface, then the oil is ready to fry. If it sinks and stays at the bottom then the oil needs to heated a little longer. 

* Drop the dough balls into the pan, gently sliding it from the sides of the pan. Add as many dough balls as the pan can fit, without overcrowding. 

* Lower the heat to low medium and fry, turning them intermittently until they turn golden brown through out. If fried on high heat, they get brown quickly and do not get cooked through.

* Remove the fried balls with a slotted spoon, (draining as much oil as possible into the pan) and gently drop them into the warm sugar syrup.
* Repeat the steps with the remaining dough balls. 
* Let the gulab jamun sit for a while before serving and warm them in a microwave before serving, if preferred.

Comments

Sunday, May 24, 2020

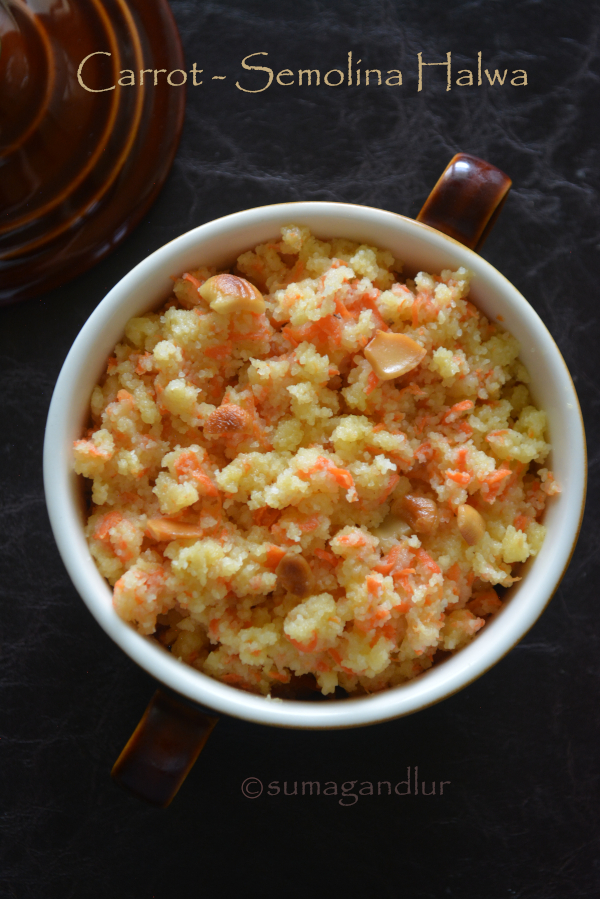
Carrot Semolina Halwa

I am planning to post three sweet dishes from Indian cuisine this week that are made with vegetables. The first one among those is this delicious halwa. Halwa, though associated with Persian cuisine also happens to be a popular sweet dish in India and there are varieties ranging from those made with flours, legumes to fruits and vegetables. Carrot halwa and semolina halwa are two popular ones among the genre and I tried to combine both in today's dish which yielded a yummy fusion. 

Carrots, semolina and sugar are the main ingredients that are needed to make this quick and easy sweet dish. Dairy or non dairy milk can be added or omitted depending upon whether halwa needs to be rich or not. I tried to keep it a less calorie one adding little amount of ghee and milk. It can be made rich adding more ghee and cooking the halwa in milk instead of water.
(Yield 4 servings) Ingredients: 
2 tbsp. ghee
2 tbsp. cashews
1 cup peeled and grated carrot
1/2 cup milk
1 and 1/2 cups water *
2 pinches of ground cardamom
1/2 cup roasted semolina 
3/4 cup to 1 cup sugar

*  Milk can be used instead of water. Or half the quantity of water can be replaced with milk.
Directions:
* Heat ghee in  a pan and add toast cashews until golden brown. Remove them with a slotted spoon onto a plate and add grated carrot to the same ghee. 
* Saute the carrot for a couple of minutes and add milk. Cook on low medium flame until carrot is softened, stirring intermittently. The carrot would have absorbed all the milk, by this time.
* Next add water to the cooked carrot and bring the mixture to a boil. (Half or full quantity of water can be replaced with milk if preferred.) 
* Add ground cardamom to the boiling water and lower the heat. Next add semolina, stirring continuously while doing so and taking care that no lumps are formed. Cover and cook until semolina is done. 
* Next add sugar and cook until the sugar melts. Mix well and cook for a minute more and turn off the stove.
* Add the toasted cashews to the cooked halwa and serve.

Comments

Tuesday, May 19, 2020

A - Z Karnataka Recipe Series ~ L for Limbe Hannina Gojju


So far in my 'A - Z' Karnataka recipe series,
A - Akki Halbai
B - Biscuit Roti
C - Congress Kadalekayi
D - Davanagere Benne Dose
E - Ellu Pajji
F - Field Beans / Avarekalu Payasa
G - Girmit
H - Hitakida Avarekalu Huli
I - Iyengar Bakery Style Masala Toast
J - Jolada Vade
K - Kumbalakayi Idli

It's time for my 'L' dish and this gojju was my plan B to be honest. To start with, I did not have many recipes or ingredients to choose from for today's alphabet. The traditional and popular sweet dish laddu is called laadu in Kannada and in fact there is one north Karnataka laadu recipe that starts with the letter 'L'. I was fixated on it until my first attempt to make those traditional laadu turned out to be a disaster and I did not have enough sweetener for the next attempt. Then I had to resort to use 'limbe hannu' aka 'nimbe hannu' which is lemon in Kannada as we hardly are making any trips to Indian grocers these days. 

Among the few lemon recipes I could think of, gojju seemed to be the one exclusively linked to the regional cuisine of Karnataka and is a classic dish of the region. A gojju is a tasty gravy with loads of flavors, that is usually served with plain steamed rice. It can range from those varieties than can perk up a simple everyday meal to those that appear in a wedding feast. It is usually prepared using a single variety of vegetable / fruit. Bitter gourd, okra, cucumber, pineapple are the commonly used ones though today's version contains no vegetables. Toasted and ground spices and coconut form the base of a gojju. Well balanced flavors is the key to a good gojju and may be a little tricky if one is preparing it for the first time.

Balancing the sourness from the tamarind, sweetness from the jaggery and the heat from the chillies is the key to a tasty gojju, as I mentioned above. Tamarind is replaced with lemon juice in this particular gojju recipe. It is added at the end as cooking after the addition of lemon juice may turn the dish bitter. One should keep this fact in mind and add the other ingredients accordingly. If not sure, taste and add ingredients accordingly. 

Ingredients:

To toast and grind:
1 tbsp. split chickpeas / chana dal
1 tbsp. skinned black gram / urad dal
1.5 tbsp. coriander seeds
A pinch of fenugreek seeds
A pinch of black peppercorns
2 spicy variety dried red chillies 
4 less spicy variety chillies (I used Byadagi for color.)
A handful of grated, fresh coconut
For tempering:
1 tsp. oil
1/2 tsp. mustard seeds
A sprig of curry leaves
A pinch of asafoetida powder
Other ingredients:
About 1.5 cup water or more
Salt to taste
2 - 3 tbsp. jaggery 
2 tsp. lemon juice
Chili powder if needed

Directions:
* Add split chickpeas and split black gram to a pan and toast until they start to change color. Next add coriander seeds, fenugreek seeds, black pepper corns, red chillies to pan and toast until coriander seeds turn a shade darker. Add coconut next and saute for a minute. Turn off the stove and let the ingredients cool. 
* Grind toasted ingredients to a fine paste adding water as needed.

* Heat oil in a pan / pot and add mustard seeds. When they start to splutter add curry leaves and asafoetida. 

* Add the ground paste, water, salt and jaggery to the pan. The water quantity depends upon the consistency preferred. Add more water than mentioned in the list if you prefer a gojju of thinner consistency.

* Bring the mixture to a boil. Lemon juice is added at the end and so adjust the seasonings as needed. Taste and add chili powder, if needed. Simmer the mixture for a couple of minutes more and turn off the stove. 

* Add lemon juice as needed and mix well. (Start with a tsp. lemon juice, mix into the gravy, taste and add as much as needed.)

Comments

Monday, May 18, 2020

A - Z Karnataka Recipe Series ~ K for Kumbalakayi Idli


So far in my 'A - Z' Karnataka recipe series,
A - Akki Halbai
B - Biscuit Roti
C - Congress Kadalekayi
D - Davanagere Benne Dose
E - Ellu Pajji
F - Field Beans / Avarekalu Payasa
G - Girmit
H - Hitakida Avarekalu Huli
I - Iyengar Bakery Style Masala Toast
J - Jolada Vade

There are plenty of Indian pantry staples and fresh produce that start with 'K' sounding Kannada names. I chose to go with a recipe featuring 'kumbala kayi' aka pumpkin for my 'K' recipe. Kumbala kayi or pumpkin idli to be precise, which happens to be a traditional dish from the state. These are gluten-free idlis which are an instant version. It doesn't involve any grinding and fermenting process making it an easy and fuss free preparation.

Idli rava and grated pumpkin are the main ingredients used in the preparation here. One can keep it basic or make it a spicier version with the addition of other ingredients like coconut, chillies and cilantro. There is also a version prepared using jaggery that is obviously sweeter. These make a tasty and quick alternative to regular idlis and pair well with coconut or peanut chutney.

Ingredients: (Yield - 7 idli)
1 cup peeled and grated pumpkin
1/2 cup rice rava / idli rava
Salt to taste
1/2 cup water
A handful of grated fresh coconut
1 green chillie, finely chopped
2 tbsp. minced cilantro


Directions:
* Combine idli rava, grated pumpkin, salt and water in a mixing bowl and leave aside for about an hour.
* Add coconut, chillies and cilantro to the rava mixture. If one doesn't prefer to see chillies in the idlis then coconut and chilies can be coarsely ground and added to the mix.
 
 * Mix it well. Add a tbsp. or two of water if the mixture appears dry. However the mixture need not be of pouring consistency. 

* Heat water in a steamer / base of the idli stand or the base of a pressure cooker. 
* Grease idli plates and pour the mixture into the moulds.

* Place the idli stand in a steamer / pressure cooker filled with water. Close the lid and steam for about 20 minutes or until a tooth pick inserted at the center comes out clean. If using a pressure cooker, don't put the pressure valve on.
* Serve pumpkin idlis warm with coconut chutney / sambhar.
 
Comments

Sunday, May 17, 2020

A - Z Karnataka Recipe Series ~ J for Jolada Vade / Jowar Vadi

So far in my A - Z Karnataka Series
A - Akki Halbai
B - Biscuit Roti
C - Congress Kadalekayi
D - Davanagere Benne Dose
E - Ellu Pajji
F - Field Beans / Avarekalu Payasa
G - Girmit
H - Hitakida Avarekalu Huli
I - Iyengar Bakery Style Masala Toast

Today we are onto the alphabet "J' in my A - Z Karnataka recipe series. This alphabet was a no brainer considering that there are not many ingredients that start with 'J' in Kannada language and jowar aka jola is a staple in the northern parts of the state. I did not even try to explore a 'J' recipe as I had early on decided that I am going to cook something using this millet. 

There are several jowar based recipes in Karnataka cuisine including rotti, mudde and these vade. Jolada rotti aka sorghum flour flat bread is a staple meal in northern Karnataka, and eaten on a daily basis. I would have loved to post the recipe if I had mastered the art of jowar roti making which seriously needs some skill and expertise. These vade or vadi also come from the northern Karnataka region and eaten as a snack though they make a great lunch item too. They are almost spicy on their own and there is no need to toil for a side dish to go with these vadis. They pair well with a simple coconut or peanut chutney.

There are two ways to make these vadi, the following one being the simple one prepared using dry ingredients. The other method involves using freshly ground paste of skinned black gram and other ingredients which needs some advance prep work. These vade or vadi are not like the regular, crispy fritters though they are called so. They look like pooris and are prepared on the similar lines as bedmi poori, a famous breakfast option from the northern parts of India.
Ingredients: (Yield - 25 to 30 vade)
1 cup sorghum flour / jowar flour 
1 cup wheat flour 
2 - 3 tbsp. gram flour / chickpea flour 
2 - 3 tbsp. skinned black gram flour / urad dal flour
1 tsp. salt
1 tsp. red chili powder or to taste
1 tbsp. coriander powder
1/2 tbsp. cumin powder
A handful of cilantro leaves, minced
A sprig of curry leaves, minced
Lukewarm water to prepare the dough 
Oil to fry vade

Directions:
* Combine all ingredients except water and oil in a mixing bowl.
 
* Add luke-warm water in small increments and knead into a stiff and smooth dough. (I used a little less than 1.5 cups). Add 1/4 tsp. oil to the prepared dough and knead once. Cover and let the dough rest for a couple of hours. 

* Knead the dough again for few seconds before making the vadi. Pinch big marble sized portions of dough and shape them to smooth balls. Work with one portion at a time while keeping the rest covered.
* Heat about 1-5 to 2 cups oil in a pan / small kadai on medium flame. There is no need to bring the oil to a smoking point. Pinch a small portion of the dough into the hot oil. If it immediately swims to the surface, then the oil is hot enough to fry. If the dough ball stays at the bottom, then it needs some more heating. 
* Grease a rolling board / work surface or a thick plastic sheet. Pat a dough ball into a thin, 3 - 4 inches circle of uniform thickness with greased fingers. Sprinkle some white sesame seeds on top and press, if preferred. (I used sesame seeds only for first batch as some of the sesame seeds don't stick to the vadi while frying.)

* Gently drop it into the hot oil from the sides. It usually starts puffing up and if it doesn't, gently tap it with the back of the ladle. (Don't worry if it still doesn't puff up. Some may not puff up.)

* Flip it once it puffs up and cook the other side as well. for few seconds. Remove with a slotted spoon and place it on a plate lined with absorbent paper towels.

* Repeat the shaping the dough circles and frying part with the remaining dough.  
* Serve them with coconut or peanut chutney or peanut powder. 


Comments

Monday, May 4, 2020

Bendakaya Perugu Pachadi / Andhra Style Okra Raita


Today's recipe is a perugu pachadi made with bendakaya / okra. A perugu pachadi is a spicy raita, Andhra style. It is not made with fresh yogurt as the north Indian, chilled and creamy raitas. It is made with sour yogurt and usually contains a cooked vegetable added to it. The other common vegetables used in the preparation are eggplants / snake gourd. A perugu pachadi is usually eaten as a dip to go with rice and mudda pappu, cooked lentils just seasoned with salt. Or as  a side dish to go with rice.

Ingredients for tempering:
1 tsp. oil
1 tsp. mustard seeds
1/2 tsp. cumin seeds (optional)
1 pinch of asafoetida powder
Few curry leaves
A pinch of turmeric powder
Ingredients for pachadi / raita:
1 tbsp. oil
10 to 15 okra / lady fingers
1- 2 spicy chilis + 1/2 tsp ginger roughly crushed
2 cups sour yogurt
Salt to taste
Minced cilantro to garnish

Directions:
* Heat a tsp. oil and add mustard seeds and cumin seeds. When the mustard seeds start to splutter, add curry leaves, asafoetida and turmeric. Stir them once and turn off the stove. Keep it aside.
* Rinse and wipe dry the okras. Trim the edges and chop them thin, crosswise.
* Heat a tbsp. oil in a wide pan and add the okra pieces. Toast them on low medium flame until the pieces are cooked. (I toasted them in an air fryer instead.)
* Grind the chili and ginger finely adding a little yogurt if needed.
* Whisk yogurt, green chili - ginger paste and salt together in a bowl and add the cooked / toasted okra pieces. Add the tempering and minced cilantro. Mix well and serve.

Comments

Sunday, May 3, 2020

Kumaoni Raita

Here is a simple and flavorful raita from the Uttarakhand region. This cool and refreshing side dish contains grated cucumber and ground mustard seeds which add a piquant flavor to it. However since the mustard seeds flavor is an acquired taste, add only as much as needed. Add a pinch of toasted and ground fenugreek seeds as well if preferred. The raita goes well with any stuffed parathas or any pulao kind of rice dishes. I served it along with stuffed horse gram parathas / gehat ke parathea

Ingredients:
1/2 to 1 tsp. mustard seeds
1 small sized cucumber
2 cups yogurt
Salt to taste
A pinch of turmeric powder
1 or 2 green chilis, finely minced

Directions:
* Lightly toast the mustard seeds and let cool. Grind them finely.
* Peel and grate the cucumber. Squeeze out water from the cucumber and keep aside.
* Whisk yogurt, mustard powder, salt, turmeric and green chillies in a bowl. Add cucumber to the bowl and mix well. (Taste and add mustard powder as much as preferred. The mustard powder is an acquired taste and so use as needed, more or less.)
* Serve the raita with any spicy rice or stuffed parathas.

Comments