Thursday, March 31, 2011

Wheat Flour Polis with Carrot - Almond Stuffing & Wheat - Lentil Stew

 
Carrot-Almond Polis with Mango Chitrannam in the background

I grew up in a household where every festive meal ended with soft, flaky and utterly delicious polis. My mother would go the extra mile even though she would serve us a platter full of mouthwatering dishes prepared single handedly, on each and every festival. No surprise, we kids were more interested in her food than the religious part. :)
Reminiscing my mother's polis, I prepared some a few days back with a few changes. I substituted wheat flour for the maida and used the carrot - almond halwa for the stuffing. They were delectable and remained softer till they were finished. They could be refrigerated for at least a week.

Ingredients: (for about 10 polis)
2 cups atta / wheat flour
1 cup minus 2 Tbsp milk (or as needed to form a firm dough)
2 tsp oil
& carrot - almond filling (Find the recipe here. Note to add a few more Tbsp of sugar when using as stuffing.)

Method:
* Combine the flour and oil in a mixing bowl. Gradually add milk and form firm dough. Let rest for at least an hour.
* Pinch out a lime sized portion of the dough and roll into a circle of about 4 inches diameter. Place about 2 -3 Tbsp carrot almond filling in the center. Bring the ends of the rolled disc together and cover the filling. Roll it carefully into a thin circle taking care that the stuffing does not spill out.
* Heat a tawa (Indian style iron griddle) or a shallow pan. Place the rolled poli and toast it until it turns golden brown both sides, using a tsp of ghee / oil.


Here is the hot, steaming Poli :)


Repeat the procedure with the remaining dough and the stuffing.


These polis were really thinner though they seem the opposite in the close up shot. :)

Here is one more wheat dish though I could not post all the entries as planned, for my Cooking with Seeds - Wheat event.  

Wheat - Lentil Stew


Here is a wholesome, healthy, filling one pot meal.

Ingredients for 2 - 3 servings:
1/2 cup wheat berries (soaked for at least 24 hours)
1 cup lentils (masoor dal)
1 cup chopped veggies (beans, carrot, potato)
Salt to taste
Chili powder to taste
1/4 tsp garam masala / coriander powder / cumin powder
Lemon juice

Method:
Cook the wheat berries, masoor dal and vegetables either in a pressure cooker or stove top till the wheat berries turn tender.
Add salt, chili powder and any spice powder if using. Mix well and simmer for a couple of minutes more.
Squeeze some lemon juice while serving.

They both go to my Cooking with Seeds - Wheat, an event originally started by Priya Suresh.

Comment

Monday, March 28, 2011

Godhuma Halwa / Wheat (Berries) Halwa


At my home, I prefer to prepare simple Indian sweets since only two people consume them while the other two do not even care. Halwas and kheers top my 'preference' list since they are usually quick and easy besides being delicious. They can be prepared ahead if serving guests and also they freeze well. The flavors and textures offered by fruits and veggies in halwas are also lovable factors.
I had heard several times from my mother that she had prepared wheat halwa when she was a novice cook and the taste was really good. I had therefore jotted down this recipe over than a dozen years ago but didn't try since extracting milk / liquid from wheat berries seemed such a laborious task. Last weekend, however I was in a mood to try this wheat halwa, "traditional and tedious" written all over it. I thought if my mother had the zeal to try this with a traditional stone grinder, how difficult this would be for me with all the modern kitchen gadgets and so tried this. 
What is wheat halwa, you ask? Wheat berries are soaked for a day or two and then ground adding water. The liquid and solid parts are separated. Then the sugar is added to this liquid and cooked till a smooth, thick consistency is reached. 
I chickened out from trying this all these years because of the wheat grinding part but my food processor made the job a simple one. Actually the tricky portion of the recipe is the stirring part. It will start to form lumps if you are away from the stove for a minute or so and it is hard to smoothen those lumps. I had to filter twice in between to fix those lumps. I am not trying to make this halwa seem a difficult task but it demands your complete attention, patience and some strength. Seriously, you can't wander away for a while when dealing with this halwa. You wish you had hired some help before turning on that stove. :) Luckily I prepared this on a weekend and my husband was there to lend me a hand.


Ingredients:
2 cups wheat berries
2 cups sugar
4 - 6 Tbsp ghee (or more if you are not counting calories)
1 tsp cardamom powder
1 Tbsp cashews
1 Tbsp slivered almonds
A little food color (optional)

Method:
* Wash and soak the wheat berries in water for about 24 hours. This ensures easy grinding of the berries. Throw away the water used to soak and rinse the berries.
* Grind the berries fine, using water as needed.


* Filter the ground mixture using a clean, thin, cotton cloth. Do this in batches. Place a portion of the ground mixture in the center of the cloth, pull the edges of the cloth together and squeeze out the milk / liquid as much as possible. Collect this liquid into a bowl. Set aside the thick solid residue (the picture below).

(Thick solid residue left after extracting the liquid)

And again repeat the step until extracting the liquid from the entire ground mixture is completed. I think cheese cloth will not work for this step since the wheat particles also pass through.
* Now add some water to the left over residue and grind again. Extract the milk again using the procedure above. Repeat the grinding and extracting liquid process one more time. That means, totally the wheat berries are ground three times to squeeze out as much liquid as possible.
* Leave the liquid to settle down. After a few minutes, you notice that thick extract settles down at the bottom while water separates out to the surface.
I added very little water while grinding berries the first time and so I had very thick extract and there was no trace of water in that liquid bowl, when left to settle down. (The bowl in the background in the picture below.) It's totally a different matter that my hands turned arthritic after the first squeezing. :) Then I added more water while grinding for the second and third times and squeezing the liquid out of that ground wheat wrapped in a cloth was a cinch. Here is a tip for you from my experience. You can add as much water as needed to grind the mixture. It will any way separate out from the thick liquid if the container is untouched for a few minutes.

* Now throw away the water that is collected at the surface and save the thick liquid filtrate. (That is the extract at the bottom in the front bowl in the above picture.) Measure the quantity. You are going to need as much sugar as this filtrate's quantity for this recipe. I had over 2 cups of filtrate and I had used 2 cups of sugar.
* Add sugar and a little water to a non stick, deep pan. Heat the mixture. Cook till the sugar reaches soft ball consistency (theega paakam). Then immediately add the thick wheat extract and start stirring. You have to keep stirring for the next 50 - 60 minutes adding ghee in intervals, to avoid lumps.
* When the mixture starts to come together, add the cardamom powder, slivered almonds and ghee toasted cashews. Mix well.
* Leftovers can be refrigerated.


The two 'sweet toothed' people at home liked it and it was worth the effort. :) :)

This goes to my "Cooking with Seeds - Wheat", an event originally started by Priya Suresh.


Post a Comment

Thursday, March 24, 2011

Cilantro Flavored Cracked Wheat Pulao


My son has been recovering from a bout of fever and viral infection this week while the youngest one is dealing with it with out complaining. Well spent spring break. :) Now the infection is at us, the adults at home with vengeance. Life is still going on, though right now it is perfectly gloomy outside and inside, literally. Outside, I see snow covered grass (Yeap, I know it is already spring and gardening season for some of you lucky guys out there.) and greyish surroundings, nothing to be cheerful about.
Even my last post was a scheduled one and I have not sat in front of the computer for almost a week now. I haven't been even responding to the entries I am receiving for my Cooking with seeds - Wheat event or visiting any blogs and apologise for the same. Hopefully, I will be in full swing by next week. And now an added trouble, I have misplaced my camera with the memory stick in it. I am the organized one at home and usually put away things back at the right place. The rest are the kinds who can not find things right under their noses and so it is solely my job to find it if I need to post the entries for my own event. :) :)
In the meanwhile I go and search that camera, you guys enjoy this cilantro flavored cracked wheat pulao. Don't get fooled by the picture and think this as a spicy version of upma. Use coarser variety cracked wheat for the real feel of pulao. I had run out of the coarser variety and used the finer one that is used to make upmas. Basmati rice can be substituted for an authentic version. This can be refrigerated or kept frozen.

Ingredients for about 6 servings:
2 cups cracked wheat (can be dry toasted before adding but it is entirely optional)
1/4 - 1/2 cup washed cilantro leaves
1/4 cup green beans (cut into 1 inch pieces)
1/4 cup fresh / frozen peas
1/4 cup chopped carrot
1 each - onion & tomato (chopped)
1 tsp ginger
2 cinnamon + 2 cardamom + 4 cloves + 1/2 tsp peppercorns
2 1/4 tsp salt or to taste
1 - 2 Tbsp oil
3.5 cups water

Method:
1. Whiz the cilantro and ginger in a blender to a fine paste.
2. Heat the oil and add the onion and spices. Fry the onions until softened and golden brown in color.
3. Add the peas, beans, carrot and sauté for 3 - 4 minutes. Then add the tomato and cook for a couple of minutes more.
4. Add the cilantro paste and fry for about 2 minutes.
5. Then add the water and salt and bring it to a rolling boil. Lower the heat and add the cracked wheat. Cook covered till done, about 4 -5 minutes.
Serve with raita or yogurt.


Comment

Monday, March 21, 2011

Barley Pongal


Ingredients:
1/2 cup barley
1/2 cup moongdal
3 cups milk / water + some extra
Salt to taste
1 tsp Peppercorns
1/8 tsp turmeric powder
For tadka: 2 Tbsp ghee, 1 Tbsp cashews, 1 tsp grated ginger, 1 tsp cumin seeds, 1/2 tsp freshly pounded pepper and few curry leaves

Method:
Roast the moongdal on low flame for a couple of minutes and remove from fire. Add barley, moong dal, turmeric powder and peppercorns to a sturdy pot and also add about 3 cups of milk (or water) and keep cooking on medium flame. Keep stirring in between and add any extra water needed while the cooking progresses. Cook till the barley & dal are cooked or until the desired texture of barley is reached and add salt.
Or to quicken the process, cook the dal and barley in a pressure cooker adding the liquid as needed for about 7 -8 whistles.
Now heat ghee in a small pan and add the cashews. Toast them till they turn golden, remove them with a slotted spoon and keep aside. Then add the grated ginger to the same ghee and fry until it starts to brown. Add the remaining tadka ingredients and sauté for a few more seconds. Remove from heat, add it to the cooked pongal and mix well.
Serve with chutney and / or sambhar.


This goes to Sanjeeta's Wholesome Wholegrain Cooking - hosted by Priya this month with the theme Barley for Breakfast.

Thursday, March 17, 2011

Guilt Free Snacks ~ Wheat - Methi Chips

Inspiration: Tortilla Chips

I should say these crispy, yummy wheat - methi chips happened in my kitchen when I was looking for a guilt free snack yesterday. These chips are baked and so are a healthier option over the greasy stuff. Kids asked for a second and third serving and my husband also praised them. What does that mean? It is going to be a part of my repertoire to avoid the store bought chips.
I added chili powder and dried fenugreek leaves to the dough so that the chips would be spicy and flavorful. They are completely optional ingredients and can be substituted with any other flavors. Here is how I made wheat - methi chips / roti chips, an ideal candidate for guilt free snacking for the entire family. 

Ingredients: (Yields about 12 rotis / 96 chips)
2 cups wheat flour
Chili powder to taste
Salt to taste
2 Tbsp kasuri methi / dried fenugreek leaves (optional)
1/4 tsp turmeric powder (optional)
2 tsp oil + some extra for brushing the chips

Method:
Combine all the ingredients (except the extra oil) in a mixing bowl. Add water gradually and make firm dough like the roti dough. Allow it to rest for 30 minutes.
Pinch about a lime sized dough, flatten it and roll it into a circle as thin as possible.


Toast it lightly without oil on a tawa / shallow pan. Repeat the process with the remaining dough. Cut each roti into about 8 wedges.


Preheat the oven to 400 deg F. In the meanwhile, lightly brush each wedge with oil and place them on a baking tray. Bake them for about 3 - 4 minutes each side, taking care not to burn them. For the first batch I baked for about 4 minutes, flipped them over and again baked for 4 minutes. For the next batches, I did 3 + 3 minutes. It is therefore better to keep an eye while baking to determine the timings for baking. 
Cool and store in a sealed bag or container.


This goes to my Cooking with Seeds - Wheat event, Priya being the creator of this event.


Thursday, March 10, 2011

Goan Arroz Com Coco

From microwave to the table

Today happens to be the final day of this week long blogging marathon number 3.  So far, my culinary journey has taken me to
1. Maharashtra - Kothimbir Vadi
2. Sindh - Tosha
3. Uttar Pradesh - Nimona
4. Gujarat - Sev Tameta Nu Shaak
5. Bengal - KamlaLebur Kheer
6. Andhra - Mamidi Allam Pachadi

Check out the other bloggers doing this Blogging Marathon.
30 minute meals: Priya Mahadevan, Pavani
Entries for the ongoing events: Priya Suresh, Harini & me
Kid friendly dishes: Vatsala, Jay, Kamalika
Rice dishes: Veena KrishnaKumar, Padma Rekha, Priya Srinivasan


I had recently borrowed a cookbook titled "Indian Essence" by Mr. Atul Kochhar from my local library. A few recipes in there caught my attention and the first dish I tried was this "Arroz Com Coco" that is supposedly a Goan specialty. The name sounded so fancy though I knew what arroz meant. This dish is supposedly to be made with the local red rice and goes well with most of the curries of West Indian origin. Arroz com coco literally means coconut rice in Portuguese. Goa was under Portuguese power for centuries and so it seemed logical to have a local dish with a Portuguese name. So far so good.
Then I googled to see if I can find anything else about this mild, yummy rice. The search took me almost every time to a sweeter version from Columbia "Arroz Con Coco". M even enquired his Goan colleague only to find out that he had never even heard the name. LOL. :) And I began to wonder whether there was a printing mistake in the book until I found a similar recipe over the web with the same title labeled under Goan dishes.
After trying this dish, I thought what's in a name and when particularly it comes to cooking, what ultimately matters is how delectable or flavorful the dish is. The fragrant basmati rice cooked in rich coconut milk with mild spices is surely a treat. This "Arroz Com Coco" aka Coconut rice happens to be a tasty, mild base for any spicy curry and can be served to even little ones because it is not hot.


Ingredients (Serves 3 - 4) :
1 & 1/2 cups Basmati rice
2 onions / About 1 cup sliced onions
1.5 cups each - coconut milk & water (I used 1 coconut milk can + 1.5 cups water.)
3 tsp oil
2 one inch pieces of cinnamon / cassia bark + 8 - 10 pepper corns, 3 - 4 cardamoms + 2 cloves
1/4 tsp turmeric powder
1 tsp ginger - garlic paste (I used 1 tsp grated ginger)
Salt to taste (or about 2 & 1/4 tsp)


Method:
I prepared this dish in the microwave but it is generally done on stovetop.
1. Wash the rice in several changes of water and then soak in cold water for about 15 minutes. Drain and set aside.
2. Heat the oil in a microwave safe bowl and sauté the whole spices.
Then add the ginger garlic paste and sauté for a couple of minutes more. I actually added the ginger and spices together and sautéed them.
3. Next add the onions and cook until golden brown, stirring in between. It would take around 3 -4 minutes.
4. Add the rice and sauté for a minute.
5. Stir in the coconut milk, salt, turmeric and water. Cook uncovered, until rice is done. It took me around 22 minutes to cook in the microwave.

This goes to MEC - Rice event, guest hosted by Priya Mitharwal, an event originally created by Srivalli.

Comments

Wednesday, March 9, 2011

Mamidi Allam Pachadi


I have been cooking long enough that I don't need to call my mother for recipes. However, there are some exceptions. Yes, as usual. :) One of those exceptions is pickle making since I don't happen to make them regularly as finding certain key ingredients locally is next to impossible. I still manage to prepare whatever is feasible here since spicy pickles are an integral part of our cuisine. Andhra households need pickles to perk up their food and especially, a good variety of them to beat the humdrum. This mamidi allam pachadi is one of those and the recipe comes from my mother.
As the name suggests, mamidi allam / mango ginger is a root vegetable belonging to the ginger family. The regular ginger and the mango ginger differ in the flavor factor. Exploding with fragrance and flavors of a raw mango and ginger combo, the mango ginger stands way apart from the regular ginger though appearing similar. Check Bharathy's blog for the image of the ginger mango. The ones I get here are smaller versions of the ones available in India and almost similar to turmeric roots in appearance. I think her image is the better representation of the real deal. :)
I usually post about the stuff I have made in my kitchen. This particular pickle recipe and the quantities are from my mother. My mother said that this is a standard recipe but she gave approximations for the jaggery, salt and chili powder quantities. And so follow your discretion while following this. :)
This can be stored for longer periods. I have mine over for three years now, refrigerated. It can be eaten with rice and ghee or can be served as an accompaniment to many Indian breakfast dishes.

Ingredients:
250 gms mango ginger
100 gms tamarind
4 -5 Tbsp chili powder
2 Tbsp salt
2 Tbsp jaggery
Tadka: Oil, 1 tsp mustard seeds and a pinch of asafoetida
And a moisture free area to work

Method:
1. Wash the mango ginger roots and let dry. Then peel and grate them.
2. Grind all the ingredients into a smooth paste with out adding any water.
3. Heat the oil and add the mustard seeds and asafoetida. When the mustard seeds start to crackle, turn off the stove. Let cool and then add this tadka to the ground pachadi and mix well. Store in a clean, dry ceramic / glass jar.

This goes to Hima's Pickle / Achar / Uragayi Mela.

Check out the other bloggers doing this Blogging Marathon.
30 minute meals: Priya Mahadevan, Pavani
Entries for the ongoing events: Priya Suresh, Harini & me
Kid friendly dishes: Vatsala, Jay, Kamalika
Rice dishes: Veena KrishnaKumar, Padma Rekha, Priya Srinivasan

Comments

Tuesday, March 8, 2011

KamlaLebur Kheer / Kamla Kheer


The title kamlalebur kheer itself sounds so fancy. How does one describe it? Sinful, decadent and rich. Or "orange kheer" from West Bengal to put it in simple terms. The idea of sweet, succulent orange segments dunked in chilled, thick, creamy milk itself is mouth watering. This recipe do not need many ingredients and also the process is a simple one. It is a perfect dessert when you have company, especially during summer. I noticed it for the first time at Sharmi's blog and then at Sandeepa's and was bowled over. I could not put it together until now though planned it several times earlier. We thoroughly enjoyed it and I thought of sharing it.

Ingredients for 3 servings:
2 cups milk
7 oz / 200 gm condensed milk (1/2 can condensed milk)
2 Tbsp sugar or as per taste (if using unsweetened condensed milk, adjust the quantity)
2-3 oranges (any sweet variety)

Method:
1. Bring the milk to boil in a nonstick pan. Then simmer on low flame till it reduces to half the original quantity, stirring intermittently. Using a nonstick pan and stirring is to avoid scorching.
2. Add the condensed milk and sugar to the pan and stir well. At this point you can continue boiling till the milk thickens attaining a creamy hue. Or for more convenience, add this mixture of milk and condensed milk to a microwave safe bowl and put it in the microwave for 2 -3 minutes, checking in between to avoid spilling. The final product should be a very thick, smooth mixture. Let cool.
3. In the meantime, get those oranges out of the refrigerator. Peel them and separate the segments. Remove the thin film clinging to those segments and cut each segment into two or three pieces.
4. Stir in the orange pieces to the cold milk in step 2 and refrigerate it for 3 -4 hours.
5. Serve chilled.


This yummy entry is on it's way to the 
"Bookmarked Recipes", an event by Priya & Aipi.

Check out the other bloggers doing this Blogging Marathon.
30 minute meals:Priya Mahadevan, Pavani
Entries for the ongoing events: Priya Suresh, Harini & me
Kid friendly dishes: Vatsala, Jay, Kamalika
Rice dishes: Veena KrishnaKumar, Padma Rekha, Priya Srinivasan

Comments

Monday, March 7, 2011

Sev Tameta Nu Shaak

Shaak - Gujrati word for subzi / curry

Over the years, I have noticed this shaak in so many websites / blogs featuring Gujarati cuisine that I didn't have to put it in my "favorites folder" but instead it remained in my memory folder for so long. When I am exploring regional cuisines of India during this marathon, I thought why not post this today. Tomato - onion subzi is a common preparation through out the Indian subcontinent but what sets this shaak apart is the interesting addition of sev - the deep fried strands of spicy chickpea flour batter, to it. The fine variety sev is used in this particular shaak and the crispy, crunchy sev definitely makes the simple subzi "special". I used both besan and tomato sevs.

Ingredients for 2 -3 servings:
2 big onions (1.5 cups chopped/ thinly sliced)
3 tomatoes (2 cups chopped)
1/2 - 3/4 cup fine sev (store bought / home made.)
2 -3 tsp oil
1 tsp each - mustard seeds & cumin seeds
1/4 tsp turmeric powder
1/2 tsp sugar (optional)
Minced cilantro for garnish

Method:
1. Heat oil in a kadai / pan. Add mustard seeds and cumin seeds.
2. When mustard seeds start to crackle, add the onions and turmeric. Fry the onions on low flame till they turn translucent.
3. Then add the tomatoes and continue to cook till they turn into a fine mush.
4. Add the salt, chili powder and sugar if using. Stir well and let it cook for a couple of minutes more and turn off the stove.
5. Just before serving, add the sev to the cooked tomato - onion mixture and stir once to combine. Garnish with cilantro.
This goes well with all Indian breads.


This goes to Sanyukta's Cooking with the Whole Foods - Tomato, an event originally started by Kiran.

Check out the other bloggers doing this Blogging Marathon.
30 minute meals:Priya Mahadevan, Pavani
Salad: Ila, Divya Vikram
Entries for the ongoing events: Priya Suresh, Harini & me
Kid friendly dishes: Vatsala, Jay, Kamalika
Rice dishes: Veena KrishnaKumar, Padma Rekha, Priya Srinivasan

Comments

Sunday, March 6, 2011

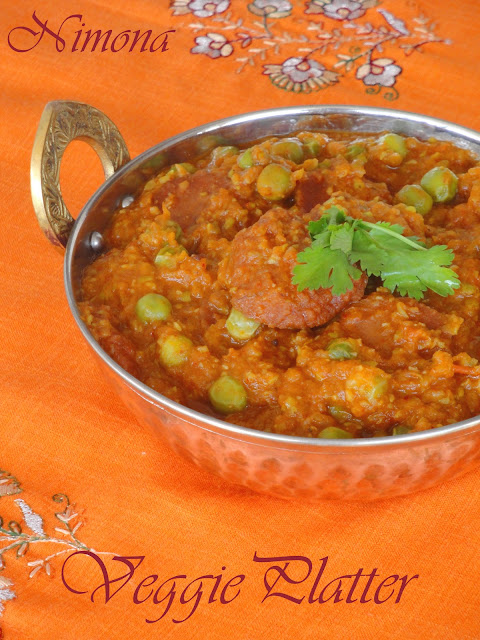
Nimona


On this third day of marathon, I have again cleared two recipes from my 'favorites folder' to create this wonderful home style preparation called Nimona. The name of the recipe itself drew my attention when the first time I came across it. Sounded like a pretty girl. :) This delectable dish from Awadh is packed with protein. Mungodis / wadis (vadiyalu) - the spiced, dehydrated lentils and the fresh peas cooked in a pea-onion-tomato base with a right balance of spices is a true delight to our palettes. The author mentions that  fresh chickpeas can replace peas. If you don't have mungoris, combination of other vegetables works too. It reminded me one of the variations prepared in my home state, vadiyala pulusu.
I made Priya Mitharwal's methi mungodis during summer after seeing her post and I used them today for nimona. Rememeber that they are very hard and could not be eaten like these fried uraddal ones / minapappu vadiyalu along with some rice.

Ingredients to make about 2 cups of mungoris:
2 cups - Moongdal
1.5 Tbsp - Salt
2 Tbsp Kasuri methi / dried fenugreek leaves(optional)
Green chillies (optional and the quantity depends upon the spiciness preferred)
A pinch of asafoetida powder (optional)

Making Mungoris:
Soak moongdal overnight or for a minimum of 3 hours.
Grind together moongdal, salt, chilies and asafoetida powder to a thick and smooth batter. Add kasuri methi to it and mix well.

Mungoris drying in the sun

Choose a spot where there would be plenty of sunshine (from morning to evening) like your backyard or terrace if in India. Pour the batter in about tsp sized heaps on a thick plastic sheet and sundry them until they turn crisp without any trace of moisture. It may take 2 -3 days to sundry them. Store them in an airtight container and use them when needed. They stay good for at least a couple of years if stored well.

Mungoris / Mungodis

Nimona making:
Ingredients for 5 servings:
1 & 1/2 cups Peas
3/4 - 1 cup mungoris
2 onions
2 tomatoes (I added a tomato & 3 Tbsp tomato paste)
1 tsp grated ginger
1/8 tsp turmeric powder
1.5 tsp chili powder
pinch of asafoetida
2 bay leaves
1 tsp cumin seeds
Powder - 3 cardamoms + 3 cloves + 1 inch pieces of cinnamon
(I also added 2 pinches of garam masala)
Salt to taste

Minced cilantro for garnish
Oil

 Onion- tomato paste, spices, coarse paste of peas & fried mungoris

Method:
1. Heat a tbsp oil and add ginger. Sauté for a few seconds and then add the onion. Fry till they turn translucent and then add the tomatoes. Continue frying till they turn mush. Cool and grind the mixture to a paste.
2. Meanwhile, coarsely grind 3/4 cup of peas with out adding any water. Add 2-3 tsp of oil to a pan and fry until the raw smell of the peas disappear, about 3 -4 minutes.
3. Fry the mungoris in oil till they turn brown and keep aside.
4. Now heat about 2 tsp oil in a pan and add cumin seeds. When they start to brown, add bay leaves and asafoetida and sauté for a few seconds. Then add the ground tomato onion paste and fry for 3 -4 minutes. Then add the fried mungoris, ground peas, the remaining 3/4 cup peas, salt, chili powder, turmeric powder, spice powder and about 2 cups of water. Let it simmer for about 15 - 20 minutes till the mungoris turn tender. Garnish with cilantro. Discard the bayleaves while serving.
Serve with warm rotis.


Check out the other bloggers doing this Blogging Marathon.
30 minute meals:Priya Mahadevan, Pavani
Salad: Ila, Divya Vikram
Entries for the ongoing events: Priya Suresh, Harini
Kid friendly dishes: Vatsala, Jay, Kamalika
Rice dishes: Veena KrishnaKumar, Padma Rekha, Priya Srinivasan

This goes to MLLA -33, hosted at Ammalu's Kitchen and an event started originally by Susan.

Comments

Saturday, March 5, 2011

Tosha


My theme for the marathon - Entries for the ongoing events.

Here is another recipe from my 'favorites folder', on the second day of blogging marathon 3. When I noticed Toshas for the first time on Satya's space, they seemed very appealing but I could not recall whether I had seen them earlier anywhere in India. After a little googling, I came to know that tosha is a Sindhi delicacy though I could not find many recipes for it, a common thing with the regional specials that are not that popular. The ones that I found over the web follow the same basic recipe and here is my interpretation of it. :)
Toshas are something like oblong badushas, if I could put it that way. :)  They are deep fried, dunked in the sugar syrup and then immediately removed so that the final product has a thin layer of sugar coating over it. Also tastewise, they remind you badushas, another delicacy popular through out the Indian region.
The process of tosha preparation is a pretty simple and quick one.


Ingredients for making about 30 toshas:
1 cup all purpose flour / maida
1/2 tsp baking soda (A couple of my toshas crumbled. Maybe I need to reduce the quantity next time to 1/4 tsp)
1/2 tsp salt
5 Tbsp yogurt
3 Tbsp oil
Oil to fry
2 cups sugar
1 cup water

Method:
1. Sieve the flour, salt and baking soda into a mixing bowl. Gradually add oil and yogurt to the bowl and form into a firm dough. I needed only the above mentioned quantities of yogurt and oil though the original recipe uses more. Follow your discretion while adding them.
2. Meanwhile, add sugar and water to a sauce pan and cook till a two thread consistency / very thick syrup is formed.
3. Pinch a marble sized portion from the dough and form it into an oblong shaped one like a date. Repeat the same with the remaining dough.
4. Heat the oil in a kadai / deep pan for frying. Fry the dough pieces on medium flame flipping them in between, until they turn brown. Drain on absorbent towels. Drop the fried toshas in the sugar syrup and roll them well so that they are coated well with the syrup. Remove them and let cool. Store them in an airtight container.

Toshas after the sugar syrup has completely dried.

This goes to  Food Palette - Brown hosted at Torview.

Check out the other bloggers doing this Blogging Marathon.
30 minute meals:Priya Mahadevan, Pavani
Salad: Ila, Divya Vikram
Entries for the ongoing events: Priya Suresh, Harini
Kid friendly dishes: Vatsala, Jay, Kamalika
Rice dishes: Veena KrishnaKumar, Padma Rekha, Priya Srinivasan

Comments

Friday, March 4, 2011

Kothimbir Vadi


The Blogging Marathon 3 has started today. Srivalli has it running this time with two groups and I happen to be in group 2 with these wonderful bloggers. Divya Vikram, Harini-Jaya, Ila, Jay, Kamalika, Padma Rekha, Pavani, Priya Mahadevan, Priya Suresh, Priya Vasu, Vatsala, Veena KrishnaKumar

This marathon is going to be for a week, meaning the marathoners have to post for 7 days without a miss, selecting any one theme from the following list.
1. 30 Minute Meals
2. Baked Goodies
3. Entries for the ongoing events
4. Healthy Breads
5. Kid Friendly Dishes
6. Rice Dishes

7. Salads
8. Going with each one from the above themes

And I am going with "entries for the ongoing events", meaning my posts in this marathon must be eligible to participate in the ongoing food related events in the blogosphere. I chose to go with this theme just to be able to participate in the lovely events that are going around here, which I usually happen to miss because of trivial reasons. The other adult at home thinks that my cooking (or at least my blog posts) revolves around the blog events and probably he would be shaking his head disgustedly if he happens to read this. :)

I am going with these spicy, crispy, filling and very delicious kothimbir vadis from Maharasthra for the first day of Marathon. I have stuffed the 'Favorites' on the browser window with hundreds of recipes, much to the annoyance of M since I don't try to even glance back after adding them. He has been gently reminding me to get rid of those. In order to do so, I had tried a couple of recipes this week. One among those happens to be these yummy kothimbir vadis (or loosely translated cilantro vadas) from One Hot Stove. As the name suggests, kothimbir or the aromatic herb cilantro plays the key role in this recipe. Minced cilantro, besan (and other flours if using) and the flavorful spices are combined to make a thick batter, then steamed, cut into wedges and shallow fried until crisp. This is the essence of the recipe in a nutshell. Kannadigas have a chanadal recipe on the same lines except that they are not fried after steaming. I had tried that earlier and can't say we liked it that much. Nupur mentions that these vadis are good to go even with out frying. I was thinking they would be a spicier version of Dhoklas (after all it is steamed besan) if we skip the frying part but I was wrong. They stand way apart from dhoklas. Kothimbir vadis are kothimbir vadis and dhoklas are dhoklas. Both are delicious in their own ways. Period.

Ingredients: (4 Servings as a tea time snack)
Besan / Chickpea flour - 1 cup
2 Tbsp each - rice flour, ragi flour, wheat flour
1 Tbsp sesame seeds
1 tsp poppy seeds
1/4 tsp baking soda
1/4 tsp turmeric powder
Pinch of asafoetida
Salt to taste
Garam masala (I used 1/8 tsp)
1 bunch of cilantro (about 1 cup minced cilantro)
1 tsp grated ginger
3 finely minced green chillies (I used Serrano Peppers.)
2 tsp lime juice
1/4 cup oil for frying


Method:
* Sieve the besan. (I usually prefer sieving the besan before using it in any dish to avoid the lumps.) Then mix all the ingredients in a bowl, except the oil.
* Add enough water to make a thick batter (I used approximately about 1/2 cup but use your discretion. It should be thicker than idli batter) and stir well to remove any lumps if present.
* Grease a vessel or a plate with at least one inch depth and pour the batter into it. (Remember not to fill the batter up to the brim if using 2 plates one above other like I did. Leave some space for the rising stuff). Steam until a skewer inserted in the middle comes clean, about 20 minutes. I had used my plate idli stand for the purpose and put it in my pressure cooker with out the weight on.

* Let the steamed vadis cool. Then run a sharp spoon around the edges and flip over to unmold them. Cut into slices.
* Heat about 1/4 inch oil in a skillet / pan and fry the slices till crispy and golden.


They can be served as lunch too since they are filling. They were spicy enough to eat alone or serve with some ketchup / green chutney.

This goes to 
1. Flavors of Maharasthra hosted by PJ, originally started by Naina.
2. Food Palette - Brown hosted at Torview
3.  MLLA -33, hosted at Ammalu's Kitchen and an event started originally by Susan.