HOME        |        ABOUT        |        COPYRIGHT        |        CONTACT        |         RECIPE INDEX        |         INDIAN THAALIS        |         MILLET RECIPES        |        EVENTS' ROUNDUP        

Thursday, March 29, 2012

Basundi


I was not well when Valli announced this edition of blogging marathon's themes and I guess I was delirious when I made the choices. I did not realise until later that baking and festive sweet themes would result in loads of sweet stuff. Half of my family don't touch sweets and so I froze whatever I could last week. And this week I prepared sweets in small portions and completely avoided frying stuff. With lots of sweets already posted at my blog, not repeating the same set of sweets as per the marathon condition (Example - we couldn't post more than one halwa / laddu / burfi), eliminating frying stuff and some ingredients missing in my pantry - I was left with racking my brain this week for ideas. I didn't know what I was going to cook until the moment came. However I could whip up some easy and quick stuff even without planning. :)

Here is a recap of what I cooked this week -
Vermicelli Halwa
Kalakand (Microwave) 
Sago - Carrot Kheer
Dates - Almond Laddu
Kobbari Paala Thalikalu
Nuvvula Kudumulu

And here is yummy basundi for the final post. I should say that it is an opt one for sultry summer days. It is a little time consuming dessert but the process is a simple one even for novice cooks. The only skill needed is stirring milk with out scorching. The milk is simmered slowly until thickened, sweetened, then flavored with cardamom and garnished with nuts & saffron to make it more flavorful and colorful.

Ingredients for 2 servings:
3 cups whole milk
2 - 3 Tbsp sugar
1/4 tsp cardamom powder
1/4 tsp saffron strands soaked in about a tsp of warm milk
Nuts to garnish (Pistachios, almonds and/or charoli can be used.)


Method:
* Heat the milk preferably in a non stick saucepan on low flame to avoid milk from scorching. Keep stirring in between and simmer the milk until it reduces to half of the original quantity.
* Then add the sugar and let it dissolve. Next add the cardamom powder, saffron strands and the slivered nuts. Turn of the stove.
* Refrigerate the basundi and serve chilled. Garnish with extra nuts while serving, if desired.


Check out the blogging Marathon page for the other Blogging Marathoners doing BM#

Comments

Wednesday, March 28, 2012

Nuvvula Kudmulu


Growing up, I remember my mother used to prepare kudumulu for ganesh chaturthi every year. We, kids carefully used to remove the outer wrap and trash it before promptly eating the delicious coconut - jaggery stuffing. My mother who watched it for years finally gave up and stopped making them and started opting for these kajjikayalu instead. In adulthood somehow, I started to appreciate these kudumulu wholly though never tried to get a recipe from my mom. I was not in a mood to do any fried sweets this week and was thinking about the traditional dishes I need to post yet and suddenly these popped up. It was almost midnight in India by the time and didn't want to wake up my mother at that odd time for a silly reason. I generally had an idea and so went along with it. I wanted them to be quickly done and so went with sesame filling instead though the filling on a festive day would be with cardamom flavored coconut and jaggery mixture. My mother prepares crescent shaped ones. However they can be just rolled into balls or tear shaped ones as I did though I didn't make them perfect. :) Also the sun was gone by the time I took pictures.
However they turned out delicious and to my surprise, even my son liked them.

Ingredients:
A little ghee for greasing palms
For wrap:
1 cup water
1 cup rice flour
A pinch of salt (optional)
For stuffing:
1/2 cup grated jaggery
1/2 cup dry roasted sesame seeds
1/2 cup sweetened coconut flakes or grated dry coconut (optional)

Method:
1. Coarsely grind the stuffing ingredients into a coarse powder and keep aside. You can shape them into balls if desired for stuffing or you can just spoon the stuffing mixture as needed into the outer wrap.
2. Add salt to water and bring it to a boil. Add rice flour little by little, stirring all the while until a uniform dough is formed. Take care that no lumps are formed and turn off the stove. Or you can pour water little by little into the rice flour and mix it with a ladle. When it is easy to handle, just knead the dough once to make sure that there are no lumps. Divide it into 12 portions.
3. Grease your palms with ghee. Take a dough portion, roll it into a ball and flatten it thinly on your left palm. Put the stuffing in the middle and bring the edges of the wrap together. (You can use as much as stuffing as it holds.) You can close it to form a ball or a tear shaped one. Or you can place the filling on one half of the dough circle and close the other half and seal the edges to form crescent shaped ones. Repeat the steps with the remaining dough and filling.
3. Place the shaped dough balls with stuffing on a greased plate and steam them for about 10 - 12 minutes. I used a pressure cooker to steam them. Remove them and serve warm.
Check out the blogging Marathon page for the other Blogging Marathoners doing BM#

Comments

Tuesday, March 27, 2012

Kobbari Paala Thalikalu


For Day 5 of blogging marathon, here is a traditional sweet dish from Andhra called paala thalikalu. Honestly speaking, I have never eaten this before or seen anyone in our households preparing this even though we are from the region. Over the years, I however have seen it online and on cook shows. When I chose "Festive Sweet dishes" theme for the marathon, I wanted to try a traditional dish that I had never tasted before and this paala thalikalu perfectly fit the bill. Though a little consuming from my standards, it absolutely needs no supervision and that's the charm of this recipe.

Tiny rice flour strings are cooked in sweetened and cardamom flavored milk on low flame until they are done and the slow cooking results in melt in mouth kind strings in a rich milk base. A regular version of paala thalikalu doesn't include coconut and so it is optional but the addition definitely enhances the flavor factor.

Ingredients:(4 servings)
2 cups full fat milk
1/2 cup water
1/2 cup rice flour + extra for dusting
1/4 cup fresh, grated coconut
1/4 cup+2 Tbsp sugar
A pinch of cardamom powder

Method:
* Bring water to a rolling boil in a pan, add coconut to it and lower the heat. Then add rice flour gradually and constantly stir the mixture so that no lumps are formed. There is no need to cook the rice flour but stir well so that a uniform mixture is formed. Turn off the stove and let cool the mixture so that it becomes easy to handle.


* Pinch a small portion from the rice dough, roll into a ball and shape into small string. Use rice flour for dusting if needed. Repeat the steps until all the dough is used. Some use chakli press to speed up the process.
* Meanwhile, heat milk, sugar and cardamom together in another pan, preferably a nonstick one. Drop the shaped strings into the milk pan and cook on low flame until done. The strings do not usually break while cooking. It would take around 30 minutes on lowest heat setting for the rice strings to completely cook through.

Stirring a couple of times in the middle is needed to make sure the strings are uniformly cooking. There is no need to constantly stir the mixture.


Note:
If shaping the dough into strings seems tedious, shape the mixture into tiny balls and cook in the milk mixture. It may take a little longer to cook than the strings.

Check out the blogging Marathon page for the other Blogging Marathoners doing BM#

Comments

Monday, March 26, 2012

Dates - Almond Laddu


These are absolutely my favorite and I can't stop popping them if they are around me. Apart for neivedyam, I prepare them for quick snacking. I should say these are my kind of laddus - quick and simple. It is "no cook" version and done under a couple of minutes. Also there is no particular recipe to follow. Dates and almonds can be used in whatever proportion one prefers. If preferred, jaggery and cardamom can be added as well.

Ingredients: (Makes about 8)
1 cup pitted dates (about 20)
3/4 cup almond meal (or grind almonds)
1/4 cup sweetened coconut flakes (optional)


Method:
Pulse all the ingredients together in a food processor until a coarse mixture is formed. Divide the mixture into 8 equal portions and shape them into laddus.


Check out the blogging Marathon page for the other Blogging Marathoners doing BM#

Comments

Sunday, March 25, 2012

Sago - Carrot Kheer


I have been recently making "prasadams" on a daily basis and that was one of the reasons why I chose "Quick and easy festive sweet dishes" as my theme during this week's blogging marathon. I don't opt for elaborate dishes when going for prasadams and usually keep it simple as this kheer for example. The delicious sago kheer gets better by the addition of sweet, juicy carrots here.
To avoid the starchiness of the sago and to make it quicker, I usually cook the sago in the pressure cooker and throw away the water used to cook it. If you choose to cook it in a pan on stove top do it separately and then add to the carrot.

Ingredients:
1/4 cup sago/ sabudana
1 cup grated carrot
2 cups milk
5 - 6 Tbsp sugar
1/4 tsp cardamom powder
1 Tbsp ghee
1 Tbsp each - cashews & raisins

Method:
* Heat ghee and toast raisins and cashews. Remove them with a slotted spoon and keep them aside.
* In the same ghee, fry the carrot for a couple of minutes. Then add the milk and keep cooking on low flame until done.
* In the meanwhile, rinse sago. Add 1 to 2 cups of water to it and cook in a pressure cooker.
* Add the cooked sago, sugar and cardamom to the milk mixture when carrot turns softer. Wait until the sugar dissolves and turn off the stove.
* Add the toasted cashews and raisins to the prepared kheer and serve warm.


Comments

Saturday, March 24, 2012

Kalakand (Microwave Version)


Kalakand is a rich, milk based dessert from the Indian subcontinent and needs loads of patience and stirring if made from scratch. I have eaten the store bought version umpteen number of time but never thought of preparing it at home until I saw Sandeepa's version when she posted it. Today I finally got the chance to prepare it for the BM#14, of course a short cut version. Less than 15 minutes of work in a microwave yields a delectable, melt in mouth kind kalakand.
The recipe involves mainly two ingredients - condensed milk and ricotta cheese used in equal proportions. They are cooked until they come together, flavored with cardamom powder and garnished with pistachios.

Ingredients:
One 14 oz / 400 gms can of condensed milk
Ricotta cheese (Same measure as condensed milk. Use the same tin of condensed milk to measure the cheese.)
A pinch of cardamom powder
Few sliced pistachios for garnish (optional)

Method:
Combine condensed milk, cheese and cardamom. Add the mixture to a greased, microwave safe dish. Microwave the mixture for about 8 - 10 minutes. Keep an eye on the mixture so it does not boil over. Through out the process, keep stirring in between and whenever the mixture starts to spill over, stop the microwave, stir the mixture and start microwaving again. The liquid would have been considerably thickened by this time. The next 4 -5 minutes is crucial. Stop the microwave after each minute and check the consistency.
By the end of approximately about 15 minutes, the mixture would have turned light brown. It would be thick and slightly grainy with some moisture still left, not dry and hard. Let cool for about an hour or so and then slice them into squares and garnish with pistachios.
(I used only half the above mentioned quantity and microwaved the mixture for about 8 minutes.)

Note:
The time varies depending upon the microwave used. Pay constant attention during the preparation to avoid burning the mixture.


Friday, March 23, 2012

Happy Ugadi & Vermicelli Halwa


My ugadi wishes to everyone and here is a simple and quick halwa for the occasion. This delicious vermicelli halwa also fits my theme of "Sweet prasadam dishes under 30 minutes" of BM#14.

Ingredients:
1 cup vermicelli
2 cups milk
1/2 - 3/4 cup sugar
1 tsp cardamom powder
1 Tbsp ghee
1 Tbsp cashews
1 Tbsp raisins

Method:
* Toast the vermicelli on low flame until golden brown.
* Also toast the cashews and raisins in ghee and keep aside.
* Heat the milk and add the toasted vermicelli. Mix well so that no lumps are formed. Cook on low flame until the vermicelli is cooked.
* Add sugar and cardamom powder to the vermicelli. Cook until all the sugar melts and incorporates into the mixture.
* Add the toasted cashews and raisins to the cooked halwa and mix well.


Thursday, March 22, 2012

Strawberry Scones


My blogging marathon for this week under the theme "Eggless baking with fruits / nuts" ends today and on the final day, here are some yummy strawberry scones with bread like texture.

My posts so far this week have been
1. Banana - Chocolate Chip Bread
2. Eggless Apple Muffins
3. Mexican Wedding Cookies
4. Eggless Orange - Nut Cake
5. Chewy Granola Bars
6. Eggless Apricot Jam Biscuits

Ingredients:
2 cups flour (I substituted 1/4th quantity with wheat flour.)
1/4 cup sugar (They are subtly sweet and so the quantity can be increased by 1/4 cup more.)
1/2 teaspoon salt
1/2 teaspoon baking powder
1/2 teaspoon baking soda
1/2 cup + 2 Tbsp milk, at room temperature
1 Tbsp vinegar
1/4 cup melted butter

1 cup strawberries - washed and chopped


Method:
* Preheat oven to 350 degrees.
* Sift together dry ingredients. Add vinegar to milk in a separate bowl.

* Mix together wet and dry ingredients and the strawberries until mixture leaves bowl and is easy to handle.
* Form dough into a flat round; press by hand until about 3/4-inch thick. Divide into 6 - 8 wedges.

* Place on baking sheet and bake for about 20 minutes, until lightly browned.


Wednesday, March 21, 2012

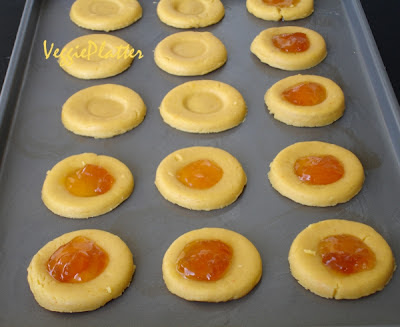
Eggless Apricot Jam Biscuits


I was looking for a jam cookie recipe as we are great fans of strawberry shortbread cookies and landed here. However at the last minute, I substituted apricot preserves instead of strawberry jam. I had a bottle of apricot preserves lying in the refrigerator for months without anyone touching it and finally found a delicious way to use it. This recipe yields crispy, subtly sweet cookies.

Ingredients: (Yield about 20 - 22)
3/4 cup flour
3/4 cup vanilla custard powder (I replaced some with flour.)
1/4 cup cornstarch / corn flour
1/2 cup icing sugar
1/2 cup butter (I used about 5-6 Tbsp)
3 Tbsp yogurt
1/2 tsp vanilla extract


Method:
* Cream butter, sugar and vanilla together until light and fluffy.
* Add the flours and mix well. Stir in the yogurt and form a smooth dough.
* Roll out the dough, into about 5 mm thickness. Cut them into desired shapes using a mould and make an impression in the centre to fill in the jam. (I used a round cookie cutter and made the impression in the center using a small bottle cap. If you don't have the mould, use your thumb to make the impression.)


* Place them on a greased baking tray. Fill the impressions with the jam. Bake for about 15 minutes or until done.

After baking

Check out the page to see what other marathoners are cooking during this BM#14.

Comments

Tuesday, March 20, 2012

Chewy Granola Bars


These granola bars, inspired from here are easy to put together, taste delicious and can be versatile depending upon the ingredients you have on hand. Great for snacking or breakfast.

Ingredients:
1 & 2/3 cup quick rolled oats
1/3 cup oat flour
1 cup brown sugar
1/4 tsp salt
2 - 3 cups mixed nuts and dry fruits (I used almonds, dates, raisins, walnuts, coconut flakes and sesame seeds.)
1/4 cup honey, maple syrup or corn syrup
1/4 cup melted butter / vegetable oil
1 tsp vanilla extract
1 Tbsp of water if needed

Method:
* Preheat the oven to 350 deg F. Lightly grease a 9" x 13" pan.
* Combine all the dry ingredients in a bowl.
* In a separate bowl, whisk together all the liquid ingredients.
* Mix together the dry and wet ingredients until the mixture is evenly crumbly.
* Spread the mixture evenly in the pan, patting down gently with the fingers.
* Bake the bars for 20 - 25 minutes, until they are golden brown around the edges.
* Remove them from the oven and slice them into bars when they are still slightly warm. Separate them when they completely cool down.


Comments