HOME        |        ABOUT        |        COPYRIGHT        |        CONTACT        |         RECIPE INDEX        |         INDIAN THAALIS        |         MILLET RECIPES        |        EVENTS' ROUNDUP        

Showing posts with label Ragi Flour. Show all posts

Tuesday, August 24, 2021

Ragi - Rave Idli / Finger Millet - Semolina Idli / Ragi - Rava Idli

Rave idli aka semolina idli was created by MTR during second world war when rice was in short supply. This idli was a variation to the standard idli recipe which of course needed rice. Semolina idlis are a quick version idlis which need no grinding or fermenting and a popular one at restaurants and homes across the south Indian state of Karnataka. 

A few years ago, MTR came up with a spin off of this version called ragi - rava idli / semolina and finger millet idlis. The addition of finger millet flour to semolina idlis obviously make it healthier and guilt-free. This is my attempt to recreate that version at home. I have used semolina and finger millet flour in equal proportions here though semolina quantity can be increased if one is skeptical about finger millet. We are used to finger millet and so we found the idlis delicious. 

These idlis are not gluten-free or vegan as most of the idli recipes I posted in the series so far. They are intsant version idlis and need no grinding or fermenting. However both semolina and finger millet flour are soaked in yogurt for at least 30 minutes. Grated carrot, peas, or coconut can be added to make them more nutritious and tasty. Or one can even stick to the basic version. I found that these idlis need to be steamed longer compared to the standard version. These idlis make a healthy breakfast / brunch item and is diabetic friendly. It makes a wholesome dish when served with side dishes like vegetable saagu, sambhar or chutney.

Ingredients: (Yield - 18 idli)
1 tbsp. oil
1 tbsp. cashews
1/2 tsp. mustard seeds
1/2 tsp. skinned black gram / urad dal
1 sprig of curry leaves
1 cup semolina / rava 
1 cup finger millet flour / ragi flour
Salt to taste 
1 cup yogurt
1/2 cup grated carrot
2 tbsp. minced cilantro
3/4 cup water + extra only if needed 
1/4 tsp. Eno's fruit salt
Directions:
* Heat oil in a pan and toast cashews until golden brown. Remove them with a slotted spoon and keep them aside. To the same pan, add mustard, and black gram. Sauté until the black gram turns golden brown and add curry leaves. Toast for few seconds and add semolina. On medium flame, toast semolina until it starts to change color slightly and start to smell the aroma of it. Turn off the stove and let the mixture cool down. This step can be done in advance and the toasted semolina can be stored in a container.
2. Add finger millet flour / ragi flour and salt to the semolina bowl.
3. Add salt, yogurt, carrot and cilantro to the semolina - flour mixture and mix well. Add water as needed to prepare a thick, pourable consistency batter. Cover and allow it to rest for about 30 minutes.
4. Check the consistency of the batter after the resting period. Add extra water only if the mixture appears dry. 
* Heat about 2 cups of water in a idli cooker base or a idli cooker or a steamer on medium heat. 
5. Add 1/4 tsp. of Eno's fruit salt to the batter and sprinkle a tsp. of water over it. (or add a pinch of baking soda instead of fruit salt.) Gently stir the batter with a ladle until the mixture turns frothy.
6. Grease the idli moulds with ghee / oil. Place a toasted cashew at the center of each mould. (Or cashews can be added directly to the batter.) Fill the moulds with batter.
* Place the idli stand in the prepared cooker / steamer and close the lid. Don't use the valve for the lid if using a pressure cooker.
7. Steam the idlis on low heat setting until done. (The idlis should not stick when touched with moist fingers. It takes longer to steam these idlis compared to the standard rice - urad dal version.) Check the water level in the steamer base and add extra if needed.
* Wait for about 10 minutes and then remove the idlis by running a spoon around the edges.
* Drizzle melted ghee over the idlis and serve them with a chutney and /or sambhar. Mine were served with roasted gram chutney and sambhar.
* Refrigerate any left over idlis and use in a day or two. Or they can be cooled down immediately after preparation and frozen to use later. Just nuke them in a microwave, covered and enjoy hot, piping idlis when needed. 

Tuesday, September 22, 2020

Mandua ki Roti / Ragi Roti / Finger Millet Flatbreads

I grew up in Karnataka, a south Indian state where finger millet aka ragi is one of the staple crops. Many eat ragi muddhe / finger millet balls instead of rice on a daily basis in the area where I grew up. I therefore have affinity towards finger millet and I try to include the flour in our diet as much as possible. Don't be put off by it's color. It is a whole grain with high nutritional value and is a good source of carbohydrates. It is gluten free as well and good for diabetics. The millet is cultivated in various parts of India and go by the names ragi, nachni, kodo and mandua. It is a hardy crop which can grow even in high altitudes and withstand harsh weather conditions and has been traditionally grown even in the hilly / pahadi areas of Himalayas.
Various dishes are made with finger millet flour in Uttarakhand including rotis. The rotis here are made in two ways, either the dough is patted with fingers or just rolled as rotis. The first time I heard about these rotis was through an online video I saw a few years ago. I make the Karnataka version thicker rottis regularly in my home but the idea of rotis sounded interesting. The patted version obviously yields thicker rotis and are made with a dough of finger millet flour alone adding a bit of salt and water. The ones that are rolled to make it thinner like the regular wheat version rotis are made with a mixture of finger millet and wheat flours. Finger millet has no gluten and it hard to roll though I saw a Pahadi chef doing it in a video which did not seem easy even to him and they were smaller in size. If looking for a gluten free version of finger millet flatbread, check this recipe of ragi rotti. You can find more finger millet recipes on my blog, clicking here.
These finger millet aka mandua ki roti are regularly made in my home over the past few years. I have tried these rotis adding various proportions of wheat flour in the beginning and now I have settled with using both wheat and finger millet flours in equal proportions. That proportion works fine for me and the dough is very easy to roll. The other thing I follow is to allow the dough to rest for a couple of hours after it is made, for the gluten to develop. The resting time helps as I don't knead much while preparing the dough. I have noticed that I have a hard time rolling when using a dough that was not rested. Also generously flour the working surface / chapathi  board while rolling these rotis as it helps in rolling the rotis without sticking. Just pat away any excess flour before toasting the rotis.


These healthy and tasty rotis are on a rotation in our home and in fact, even the picky daughter doesn't complain. I have made them at least twice in the past month and I happened to take pictures both times. And that's why you get to see two sets of pictures, one with north Indian style side dishes where pickle / achaar, aloo jhol, a potato preparation from Uttarakhand, kadhi, raita and dal were served. The other one is where I had made them to include in our south Indian lunch where capsicum curry, sambhar and rice were made.

Ingredients: (Yield 10 rotis)
1 cup finger millet flour / mandua ka atta / ragi flour
1 cup wheat flour / gehu ka atta
Salt to taste
Oil to toast rotis

Directions:
* Combine both the flours and salt in a mixing bowl. Add water as needed and knead into a smooth, soft dough. Cover and rest the dough for a couple of hours.
I add almost close to a cup of water for this proportion. There is nothing to worry in case if extra flour or water was added. If the dough appears dry, add a little extra water and knead. If the dough appears too wet, fix it by adding a little flour.
* Divide the mixture into 10 portions and roll them into balls. Work with one ball at a time keeping the rest covered. If new to roti making, then some rotis can be rolled first and then they can be toasted. Otherwise rolling and toasting the rotis can be done simultaneously. 
* Heat a griddle or a shallow pan on medium flame.
Flatten a ball and dust it with flour.
Roll it into a thin circle of about 5 inches diameter

* Place the rolled out dough circle on the griddle. 
* Cook it until the surface darkens and then flip it.
* Let the other side cook as well until bubbles start to appear.
* Add a little oil around the edges and rub the back side of the spoon over the surface. Cook it for few seconds.
* Flip it and cook until the brown spots appear on both sides and remove the roti from the pan.
* Repeat the steps with the remaining dough. Serve hot with a side dish.

Wednesday, October 17, 2018

Ragi Malt

Finger millet aka ragi is a cereal grain that is widely grown and consumed in southern parts of India. The highly nutritious grain is consumed mainly in the form of flour. The ragi flour is used to prepare nutritious dishes ranging from flat breads to desserts, catering from young to old. Today's recipe ragi malt which has regional names such as java / kanji is one such drink which can be served from toddlers to adults. It can be prepared two ways - one with milk sweetened with jaggery / sugar and the other served with salted buttermilk. My version today is a sweetened version that can be served as a healthy, gluten free breakfast or as a part of a breakfast meal. This is one of the healthy and nutritious beverages I like to start my day with and it goes to 'Blogging Marathon' under the theme 'Easy Breakfasts'.
I usually go with huri hittu to prepare ragi malt. Huri hittu is the toasted, popped and powdered ragi / finger millet grain. It has the unmistakable distinct roasted aroma. It is commercially available everywhere in Bangalore and usually my sister gifts me some packets when visiting India. My neighborhood Patel stores have started to stock these packets recently. I have noticed two varieties from the stash I usually get from India. One is a sweetened version with the addition of nuts and coconut flakes where as the other one is plain toasted one. I use the unsweetened huri hittu to prepare this malt. Even the plain finger millet flour can be toasted before using it in the ragi malt preparation though it is an optional step.

Ingredients: (1 serving)
3/4 + 1/2 cup water
1/4 cup hurihittu / finger millet flour / ragi flour
2 tbsp. powdered jaggery
2 pinches of ground cardamom 
3/4 cup boiled and cooled milk
Nuts to garnish (optional)

Directions:
* Bring 3/4 cup water to a boil in a sauce pan, preferably a non stick one.
* Combine 1/2 cup water and flour in a cup and mix well without any lumps.
* Add the flour mixture to the boiling water slowly and stir slowly so that no lumps are formed. Cook on slow flame stirring now and then until a glossy, thick consistency is noticed. If not sure whether it is cooked / when to stop, just blindly cook the mixture for about 6 - 8 minutes. 
* Add jaggery and cardamom and stir until the jaggery melts.
* Add milk to the cooked ragi mixture and stir to combine. Add extra milk if needed to get pourable consistency. 
* Pour the mixture into glasses, garnish with slivered almonds / chopped nuts and serve.

Note:
1. Sugar can be substituted for jaggery but jaggery adds more flavor to the malt.
2. Water, flour and milk can be mixed together at the beginning and cooked as well.

Comments

Thursday, April 21, 2016

A - Z Andhra Recipes ~ R for Ragi Sangati / Ragi Muddha

From palatial kitchens, we move towards the humble abodes of the working class for today's 'R' recipe. My choice of ingredient is ragi and the dish is 'Ragi Sangati' / 'Ragi Muddha' which is truly rustic and unpretentious. The word 'sangati' is also colloquially called 'sankati' though the correct written form would be 'sangati'.

Anhra pradesh is one of the Indian states (along with it's neighbors) where ragi is widely grown and consumed. Ragi is eaten in Rayalaseema area more compared to the coastal regions where it is not that popular. May be because of the abundance of  rice yield in the coastal areas which gives the state it's status of being the 'Rice bowl of India'. The other misconceived notion being that ragi is a poor man's crop though slowly it's regaining the popular status it deserves. If someones gives a bag of ragi to any one of my aunts who all are from the coastal areas, they wouldn't probably know what to do with it. My guess is mainly because brahmin households prefer rice over any grain and especially this sangati doesn't fall under their radar. 
  
I grew up in Bangalore area where ragi is cherished. There, a 'ragi muddhe', the ball of cooked mixture of finger millet flour is as mandatory as rice in the other southern states or rotis in northern parts of India. It is always served at the lunch and dinner tables, irrespective of economic class and especially in non-brahmin homes. I personally know many adult males who feel like they are deprived of a meal when a muddhe is not served. A muddhe served with bassaru / soppina saaru and they are set. Boards outside small eateries / restaurants announcing that 'a ragi muddhe lunch' served is norm in the state. I know I hopped over to the neighboring state while talking about Andhra but couldn't stop myself from pointing out Kannadigas love for ragi.
  
While Karnataka's ragi muddhe is prepared with the finger millet flour alone, Rayalaseema's version of sangati is a cooked mixture of rice and finger millet flour. Sangati is not something you fall in love with when you eat it for the first time. It is an acquired taste and honestly there is nothing special to write about. One dips a morsel of it in a spicy side dish which is usually a gravy kind and swallows it. If you try to chew and slowly savor it like any other foods, it gets stuck to the palate as it is gummy. On the sunny side, ragi is valuable as it is nutritious, healthy being rich in iron and calcium and keeps you fuller for long time. It is diabetic friendly and cheaper compared to the other grains like rice and wheat. Whereas it is another story in U.S. where ragi flour is expensive as it has to come from India. And if you haven't tried ragi before, there are more appealing dishes to try from here.

I am fond of ragi and eat in many forms but to be honest, not in the form of sangati. Why? It is because my mother never cooked it and I didn't grow up eating it. Her simple logic was no one in our families ever made ragi sangati and she finds it unappetizing, one of the common complaints among the non eaters. My sister however as a toddler picked up the habit of eating it, from the sneaky neighbors who fed her without my mother's knowledge. My paternal aunt who lived in the Rayalaseema area had learnt how to prepare it and during her visits, she would prepare some for my sister and father. My mother and I wouldn't touch the stuff then but now I can eat it in small quantities as I happen to prepare it now at least once or twice a month for my husband who loves it. I have been making it for years now that I have mastered the recipe at least while preparing in small quantities.
  
As I mentioned above, ragi sangati is prepared in Rayalaseema areas and it seems that my mother in law would prepare it occasionally on a weekend for the whole family, which by the way was a huge one. My husband has fond memories attached to rainy days when his mother would serve hot sangati along with some onion-eggplant sambhar. My grandmothers who had been her contemporaries would of course have been clueless if presented with ragi flour, I bet. I know I am digressing again but couldn't help thinking about them. And onto the topic again, a gravy kind side dish would be best suited to serve along with sangati, in my opinion. It makes eating sangati more easier. I follow my MIL here and usually make eggplant sambhar to go with sangati.

This is the traditional way of cooking sangati but if in a hurry, cooked rice can be used to save time but the water quantity has to be reduced accordingly. I have posted another version here which is rice free and a lot quicker one. The following proportions yield three small sized balls pictured above. It makes one full meal for an adult or two mini meals.

Ingredients: (2 big or 3 small sized balls)
3 & 1/4 cups water
1/4 cup rice (I use sona masuri.)
1/2 cup ragi flour / finger millet flour
Salt to taste
1 tsp. ghee or oil (optional)

Method:
* Rinse and soak rice in water for about 15 minutes and drain.
* Heat water in a pan and then add rice, salt and ghee / oil. Cover the pan with a lid and cook on low flame until rice is done (or appears soft). 
I prefer a non stick pan for mess-free preparation.
 
 * At this stage, dump the ragi flour onto the cooked rice and again cover the pan. Do not stir or mix the flour at this point.
* Cook for about 5 to 6 minutes. Then remove the lid and stir the ragi flour well with a wooden spoon, so that there are no lumps and the flour gets incorporated well into the rice mixture.
 
 (I prepare a small quantity of ragi sangati and usually a wooden spoon works fine for me. When prepared in large quantities, usually a wooden stick specially meant for the purpose is used.)
* Cover again and cook for about 20 minutes.
* Wet your hand with cold water and make balls. Drizzle with ghee and serve the ragi balls immediately with sambar or any of the side dishes preferred.

And 'R' ingredients in the Andhra kitchen.
Raati puvvu - Stone flower / dagad phool
Ragi - Finger Millet
Ragi pindi - Finger Millet flour
Rava - Semolina
Regi pandu - Jujube / Chana ber 

So far on my 'A - Z' Andhra Cuisine,
A for Alasanda Vada
B for Bellam Garelu
C for Chiyali
D for Dondakaaya Kaarapu Kaaya
E for Endu Kobbari Podi
F for Fine Biscuits 
G for Gongura - Mamidikaya Pappu
H for Halwa Holigalu
I for Idli Karam Podi
J for Janthikalu
K for Kobbari Koora

Check out the Blogging Marathon page for the other Blogging Marathoners doing BM# 63.
 
An InLinkz Link-up

Comments

Saturday, January 16, 2016

Ragi Rotti / Finger Millet Flour FlatBreads

 
This post has been long due considering the frequency at which these rottis are made in my home. I usually prepare them for our dinners and so never had a chance to capture them until recently. Ragi rotti is one of the most traditional and rustic breakfasts from the Karnataka state. I prefer to make them slightly on the softer side and these healthy and nutritious flatbreads can make a great meal anytime of the day. They can be eaten alone if made spicier or can be served along with a preferred side dish of one's choice. 

Below are some of the 'rottis' posted here so far.
Brown Rice Flour - Vegetable Rotti
Moong Rotti
Southekayi Rotti / Cucumber - Rice flour Flatbread
Thapala Chekkalu
Oats Rotti

Ingredients: (Yield 4 to 5 rottis)
1 & 1/2 cups ragi flour / finger millet flour
2 small onions, peeled and finely chopped 
1/2 cup fresh, shredded coconut
2 spicy green chillies, finely chopped
2 tbsp. cilantro, finely minced (optional)
Salt to taste
3/4 cup warm water
Oil to make rottis

Method:
* Combine all the ingredients in a mixing bowl except water and the oil mentioned at the end, using your fingers. Add lukewarm water as needed to form a firm dough.
If one do not like to bite on the chillies, coconut and green chillies can be ground together adding a little water and then can be added to the flour while preparing the dough.

* Divide the dough into 4 or 5 portions and roll each one into a ball. Work with one dough portion at a time and keep the rest covered.
* Pour a tsp. of oil in the center of a cast iron griddle / non stick skillet and place the dough ball at the center of the griddle. Pat it using fingers until a thin, flat circle is formed. (It doesn't need to be super thin like tortillas.)  The rottis can me made as big as the griddle size or to a medium size of 5 to 6 inches. Poke some holes randomly using index finger if you wish or just leave it out.
 
* Pour a tsp oil around the edges of the dough circle and over it. Cover with a lid and turn on the stove. Let it cook on a low - medium flame and flip it using a wide spatula when golden brown spots develop on the bottom side and the upper side doesn't look raw. It may take around 6 to 7 minutes.
 

* Add half a tsp of oil around the edges again if needed. Cover it again and cook for about 3 to 4 minutes or until the other side is cooked as well. Turn off the stove and remove the cooked rotti.
* Repeat the above steps with the remaining dough portions, making sure that the griddle is cool each time before it is used. Wash the griddle with cold water after each use to quicken the cooling process or use 2 griddles to cook simultaneously. 
* Serve immediately.

This goes to Blogging marathon #60 under the theme 'Regional Cuisine - Karnataka'. Check the link to see what other marathoners are cooking.


Comments

Tuesday, November 3, 2015

Double Chocolate - Finger Millet Muffins / Eggless Ragi Muffins

 
Though ragi aka finger millet is regularly used in my home, it ends up being consumed only by the adults. My daughter who prefers her visual sense than palate to choose her food had long ago decided that ragi is not one of her favorites and my other non picky kid too has not shown any affinity to this earthy, iron rich grain. However I realized recently that ragi could be sneaked into baking and my kids have no problem finishing any of that stuff. They haven't yet figured out that they have been eating ragi and I could fool even the younger one with the chocolaty additions.

The inspiration for today's muffins came from the over ripe bananas that I had to finish off sooner, my daughter's love for chocolate and the 'whole grains' event, hosted by Kalyani. I used a banana muffin recipe that I have been using for years now as the base recipe. I substituted half of the flour with ragi based one and made suitable changes to come up with these yummy muffins. As I mentioned above, it is hard to notice the ragi flavor in these muffins and is an easy way to sneak in ragi in your kids' diet, if you are planning so.


Ingredients : (yield 6 / 7)
6 tbsp. finger millet flour / ragi flour
6 tbsp. whole wheat flour
1/2 tsp. baking powder
1/2 tsp. baking soda
1/8 tsp. salt
1/2 cup mashed banana
2 tbsp. brown sugar
2 tbsp. Nutella
3 tbsp. yogurt
2 tbsp. oil
6 tbsp. semi sweet chocolate chips

Method:
* Preheat the oven to 375 deg. F. Grease or line the muffin tin.
* Sieve together flours, baking soda, baking powder and salt into a mixing bowl and keep it aside.
* Combine the rest of the ingredients except the chocolate chips in another bowl and whisk well. Add the dry ingredients to the wet ingredients' bowl and stir gently to just combine. Fold in the chocolate chips.
* Fill the muffin cups with batter up to 2/3rds. Bake in the preheated oven for 15 minutes. Lower the heat to 350 deg. F and bake for another 10 - 15 minutes or until  a toothpick inserted at the center comes out clean.

This is my entry to
1. Blogging marathon #58
 
2. Srivalli's Kids' Delight event, hosted by Kalyani this month under the theme 'Cooking with Whole Grains'.

Comments

Tuesday, September 30, 2014

Tri colored Multi Grain Flour Roti

 
I am pretty sure that mothers with school age kids across the globe constantly face the 'lunch box' conundrum. In an ideal world or in a food commercial, a mother lovingly packs a substantial, healthy meal for the kids and they return home with empty boxes and happy faces. In reality, the scenario would be quite the opposite. The kids sometimes come home with untouched boxes and sour faces, giving lame excuses. 'The most favorite food in the world' keeps on changing for every few days. The conundrum turns nightmarish especially when the kids are picky eaters and moms have to wreck their heads for creativity. 

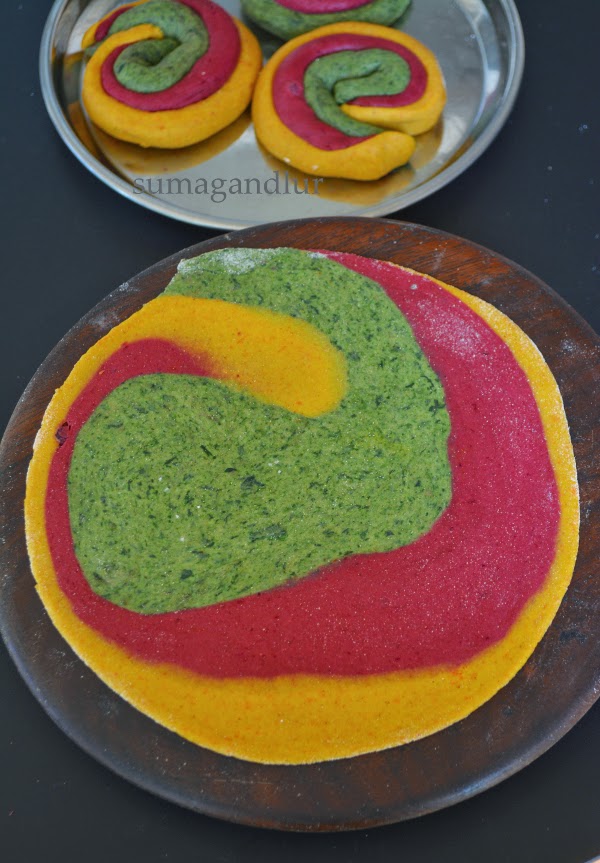
Probably all mothers agree with me when I say that packing a nutritious meal that appeals to kids' senses can get quite challenging sometimes. I have been packing my kids' lunch boxes for more than a decade now but it is still hard to please my younger one sometimes. These rotis are for kids like her who do not prefer carrying a side dish along with rotis or refuse to touch stuffed parathas. These colorful rotis are prepared with multi grain flour and vegetable puree to make them more nutritious and healthy. You can of course pack a side dish / yogurt / ketchup for kids if they prefer or add spices directly to the dough so that little ones can just roll them and eat. Three different kinds of vegetable based doughs are prepared. A small portion of each one is rolled into a log and then coiled tight to form a disc. It is rolled into a thin circle and toasted like regular rotis. These patterned colorful rotis are visually very much appealing to little ones and may not even realize that they are eating vegetables with the surprise thrown at them. Of course one need not go with my choice of vegetables and substitute them with their favorite vegetables. 

Ingredients: (Yield about 7 large rotis or about a dozen small rotis)
3 cups multi grain flour (See the notes below)
Salt to taste
Chili powder to taste
1/2 tsp. coriander powder
1/2 tsp cumin powder
1/2 tsp garam masala  
1/2 cup peeled and chopped carrot cubes
1/2 cup peeled and cubed beetroot
1/2 cup spinach puree
Milk / yogurt / water to grind the vegetables
Canola / vegetable oil 
Extra wheat flour for dusting
(The quantities of spices can be changed or omitted according to one's choice).

Method:
* Combine the flour, salt and spices if using in a mixing bowl. Divide the mixture into three parts.
*  Add carrots to a blender and grind finely using as little liquid as possible. (I use milk / yogurt for grinding, to make the rotis more nutritious and keep them softer.)
* Similarly grind beetroot pieces separately and keep it aside.
* Blanch the spinach if using fresh leaves or thaw in the microwave for 4 -5 minutes if using frozen spinach. Grind it into a fine puree and keep it aside. If you don't prefer the strong flavor of ground spinach, just wash and chop the spinach leaves finely.
* To one part of the flour add carrot puree and about 1 tbsp of oil. Combine to form a firm, pliable dough. (If the dough appears to be sticky, add some extra flour and if the dough is too dry then add some extra liquid.)
* To the second part of the dough, add beetroot puree and a tbsp. of oil. Again form a firm dough and keep it aside.
* To the third part of the flour add the spinach puree / finely chopped spinach and a tbsp. of oil and prepare the dough.

* Keep the dough balls covered for minimum 30 minutes. I left it on my counter-top for about an hour. 
* Pinch small lime sized balls from each colored dough.
* If you want to make small sized rotis, you can make still smaller sized balls. Roll each ball into a log of about 6 inches long and 1/2 inch wide. 
* Bring the logs together and twist them together to form a disc.
* Flatten the disc lightly with your fingers and gently roll it into a thin circle, dusting intermittently with flour if necessary.
* Transfer the rolled out disc onto a hot griddle. Flip after about 30 seconds and pour 1/2 tsp of oil around the edges and 1/2 tsp on the surface. Gently press down with a flat spatula and cook until golden spots appear on both sides. Remove the cooked roti and transfer onto a plate.
* Repeat the steps of rolling and frying with the remaining dough. Work with one portion at a time and keep the rest of the dough covered. Keep covered the toasted rotis in a towel or in a covered box or a hot pack box.
* Serve with a side dish if serving adults. For kids, ketchup / a small box of yogurt can be packed.

Notes:
1. Multi grain atta can be store bought or home made. For home made versions, try to keep the ratio of wheat to the other grains combined 5:1 or 4:1. If you are lucky enough to have a local flour mill, you can grind wheat kernels along with ragi, oats, barley, soya beans, maize and chana dal and store the flour in an airtight container. 
After learning what is present in the store bought flour, I instead started to combine the flours I have at home just like this dosa flour. For today's version, I combined 2 & 1/2 cups of atta / wheat flour, 2 tbsp. each of besan / garbanzo flour, corn flour, finely ground oats, and 1 tbsp. each of ragi flour and soy flour.
2. If planning to make the rotis for lunch boxes, this dough can be prepared the previous night itself. Cover and store it in the refrigerator until ready to use in the morning. Just before making the rotis, thaw the dough in the microwave. Place the dough covered in the microwave and heat for about 30 to 60 seconds depending upon the quantity of dough you have. and then proceed with the recipe as usual.
3. Other vegetables can be substituted. 

This is my contribution to Indusladies Recipe book with the theme "Kids Lunch Box".

Recipe Contest Logo

Comments    

Friday, April 25, 2014

Sikkim Platter ~ Chambray, Kodo ki Roti, Til ko Alu & Tamatar Chutney


Indian state: Sikkim 
Other names: Shikim / Sukhyim
Capital city: Gangtok
Predominat religions: Hinduism and Buddhism
Original inhabitants: Lepcha

This landlocked northeastern state of India is located in the Himalayan region and has the only open land border between India and China. I was surprised to learn that this state has 11 official languages - Nepali, English, Sikkimese, Limbu, Lepcha, Tamang, Newari, Rai, Gurung, Magar and Sunwar. 

According to wiki, the name "Sikkim" is supposedly combination of two words in Limbu language - "Su" meaning new and "Khyim" meaning palace / house. Besides, the different groups of Sikkim have different names for it. The Tibetian name is Denjong which means the "Valley of Rice". The Bhutiyas (Sikkimese and Nepalese of Tibetian ancestry) call it Beyul Demazong, which means "The hidden Valley of rice". The Lepcha people, the original inhabitants of Sikkim called it Nye-mae-el meaning paradise. Hindu religious texts referred it as Indrakil - the garden of the God Indra.

Sikkimese are traditionally rice eaters. Nepalese cuisine is very popular in Sikkim as it is an ethnic Nepali majority state. Noodle based dishes such as thukpa, chowmein, thanthuk, gyathuk and wonton are common. Momos are a popular snack. Tongba, a millet based alcoholic beverage is popular. Local breads include kodo ki roti - a pancake made from finger millet and phapar ki roti, made from buckwheat. Interesting vegetarian preparations include til ko alu, Nepali-style potato curry with sesame seeds and sishnu, a nettle leaf soup. 
Chambray:
Ingredients (3 - 4 servings)
1 cup rice
1/2 inch piece of cinnamon
2 -3 bay leaves
1 tbsp. ghee / oil
1 tsp black cumin seeds
1/8 tsp turmeric powder
Salt to taste

Method:
* Soak rice with bay leaves and cinnamon in water for about 15 - 20 minutes, such that rice is submerged in water. After the soaking period, shift rice to a colander to drain the water completely. 
* Heat ghee in a wok / non stick sauce pan or a pressure cooker directly. Add cumin seeds and sauté for about 30 to 40 seconds. Add the drained rice along with the cinnamon piece and bay leaves. Sauté for a couple of minutes.
* Next add salt, turmeric powder and about 2 cups of water. Bring the water to a simmer, set the heat to the lowest setting and cover the wok / pan so that no steam escapes.
* Cook until the rice is done and each grain stands separate. It takes about 18 - 20 minutes to get the rice cooked. Don't be tempted to peek and stir in the middle.
If using a pressure cooker, cover it with it's lid, put the whistle on and cook for 2 -3 whistles. Or you can transfer all the contents into a stainless steel container and place it in a pressure cooker and cook as directed.
* Serve chambray hot with til ko alu.

Kodo ki Roti: 
I found a recipe here and thought it was easy to prepare this roti style instead. I added some green chillies also for some spice but it is optional.


Ingredients: (Yield 3 rotis)
1 cup finger millet flour / ragi flour
1 tbsp. ghee / oil
Salt to taste
1 green chili finely minced (optional)
Oil to make rotis

Method:
* Combine all the ingredients in a mixing bowl. Gradually add warm water and form a stiff dough. The ragi dough usually would be non sticky and somewhat elastic compared to the regular roti dough prepared using wheat flour. There is no need to rest ragi dough to make rotis but I let it rest for about 30 minutes since I was busy with other things in the kitchen.
* Divide the dough into three portions and shape them into balls. While working on one portion, keep the other balls covered to prevent them from drying out.
* Pour a tsp of oil at the center of an iron griddle / a nonstick pan. Place the ball and gently pat it into a thin circle of about 4-5 inches in diameter, using your right hand fingers.

It is common for the dough to break at the edges. Just gently pinch with your fingers and fix them. However if there are cracks around the edges, don't fret over it. It is common with ragi rotis.
* Pour a tsp of oil around the edges and cover it with a lid. Place the griddle over medium heat and cook until the bottom side appears cooked with a few brown spots over it.
* Flip it and pour another tsp of oil around the edges. Cover and cook again until it appears cooked. This side takes less time than the first side getting cooked.

Remove the roti from the griddle and let the griddle cool down a bit to pat the next roti. If in a hurry, just place the griddle under running water to cool it down.
* Repeat the steps with the remaining dough balls.

Til ko Alu:

This Nepali version of potatoes seem to be quite popular in Sikkim. I have never combined potato-sesame seeds in a curry before and this was a new dish to me. As a non-local, this was a mediocre one compared to the standard aloo fry.

Ingredients: (yield 4 servings)
1 - 2 tbsp. oil
2 onions, chopped
3 - 4 green chilies sliced lengthwise (I used 2 long, hot Serrano peppers )
4 medium sized potatoes, peeled and cubed
4 tsp white sesame seeds
Salt to taste

Method:
* Chop the onions. Slice lengthwise or chop fine the chilies. Peel and cube the potatoes.
* Dry toast the sesame seeds in a small pan until they start to crackle. Cool and grind them fine.
* Heat oil in a pan / wok and add green chilies and onion. Fry until onions turn golden brown.
* Next add potato cubes and 1-2 tbsp of water to the onion and cook until done. Or if preferred, potatoes can be cooked in a microwave until done and can be added to the cooked onion.
* Next add the ground sesame seeds and salt to the potato mixture. Cook for about 3 - 4 minutes and turn off the stove. 

Tamatar Chutney:
I am guessing this must be a rustic dish, By pounding in a stone mortar-pestle, it will turn out into a coarse paste but my blender turned out it into a puree.

* Cook a tomato and peel of the skin. Grind it along with 2 chillies and salt in a stone mortar and pestle.