HOME        |        ABOUT        |        COPYRIGHT        |        CONTACT        |         RECIPE INDEX        |         INDIAN THAALIS        |         MILLET RECIPES        |        EVENTS' ROUNDUP        

Showing posts with label Blogging Marathon. Show all posts

Friday, February 11, 2022

Brown Rice Flour & Vegetable Rotti

 
Rotti is a staple of Karnataka cuisine and these unleavened flat breads are usually prepared using rice flour or finger millet flour or sorghum flour. Jolada rotti / Sorghum flour rotti are a specialty of the North Karnataka region and they are commonly eaten for meals there whereas akki rotti, the rice flour based ones are commonly prepared through out the state with variations. These akki rottis are frequently eaten as a breakfast at homes and they also become convenient lunch box item for kids. ('Akki' is rice in the local language). 

I replaced a portion of white rice flour with brown rice one in these rotti to make them healthier. (The brown rice flour I buy at 'Whole Foods' is not very fine ground and so need some regular rice flour to bind the dough.) Rotti can be kept simple with the addition of green chilis, salt, onions and coconut, which are called masale rotti in some parts. Or vegetables can be added to add nutition. Fenugreek leaves can be substituted with amaranth or spinach leaves. The combination of veggies I have added here, especially the cucumber helps in keeping the rotti softer longer. 

The dough can be prepared the previous night and refrigerated which saves time during the morning rush. The dough can be taken out and used in the morning even without thawing. The rottis can be made thinner than what I have made here. Each rotti takes less than 10 minutes to make and doesn't even need constant supervision. One standard tawa / griddle sized rotti would be sufficient if packing a kids' lunch box. These rotti do not need any side dishes in general. They are served with jaggery or some chutney pudi (for older kids / adults), which are staples in any south Indian kitchen. 

Ingredients: (Yield - 5 rotti)
1 cup brown rice flour
1/2 cup rice flour (Store bought can be used.)
Salt to taste
1 carrot
1 small cucumber
1/4 to 1/2 cup fenugreek leaves / methi leaves
1 or 2 green chili
1/4 to 1/2 cup shredded, fresh coconut
A handful of cilantro leaves, finely minced
Oil to make rotti


Preparing the dough:
*
Peel and grate the cucumbers. If the cucumbers are not tender, quarter them vertically, remove the seeds and then grate.

* Peel and grate the carrot. Wash and roughly chop the fenugreek leaves.
* Chop green chili very finely. (Green chili can be pulsed with  coconut in a food processor / mixer without adding water, to avoid biting on them. This method is helpful, if especially cooking for kids.)
* First combine the flours and salt in a mixing bowl. Then add all the other ingredients except oil in a mixing bowl.

* Add water as needed to form a firm dough. The rotti can be made immediately at this point, following the below method. Or the dough can be refrigerated in a container with a tight fitting lid. Plan to use the dough within a couple of days.
 
* Divide the dough into 5 equal portions. Work with one portion at a time and keep the rest covered. Shape one portion into a ball.
* Pour a tsp. of oil in the center of a griddle / skillet you are going to use to make rottis. Place the dough ball at the center of the griddle and pat with your fingers till you form a thin, flat circle. (There is no need to make it super thin like pancakes.) The rotti size depends on one's preference. Some prefer to make it griddle sized and some go with smaller ones. Poke a hole in the middle with your index finger if you wish or just leave it out.
 
* Pour a tsp. of oil around the edges of the dough circle and over it. Cover with a lid and turn on the stove. Let it cook on a low - medium flame and flip it when golden brown spots develop on the bottom side and the upper side doesn't look raw. It may take around 5 to 6 minutes. 
 
 * Add 1/2 tsp.  of oil around the edges again if needed. Cover it again and cook for about 3 -4 minutes or until the other side turns light brown too. Turn off the stove and remove the cooked rotti with a spatula.
* Repeat the above steps with the remaining dough balls. However be sure to turn off the stove and cool the griddle before using it again. If in a hurry, the hot griddle can be held under running water to cool it down quickly. Or simultaneously 2 griddles can be used to quicken the cooking process.
* Rotti are usually served with chutney pudi. Some even serve with butter or yogurt, especially ragi / fingermillet rottis. When serving kids, they go with a combo of jaggery and ghee. The latter combo remains my favorite even though I am no longer a kid. :)

This is going to be my contribution to this week's Blogging marathon, with the theme 'Quick Breakfasts'. Check the page link to see what other marathoners are cooking.


Comment

Thursday, February 10, 2022

Hummus - Vegetable Sandwich

Here is a simple and quick sandwich recipe that needs just basic kitchen skills. This easy sandwich is a favorite at our home. It can be packed as a lunch for kids as well besides being a breakfast item prepared in no time. It is a diabetic friendly recipe as well, given that the bread used is a whole grain one.

Any whole grain bread and your choice of hummus can be used to make this bread. I have used oatnut bread and roasted red pepper hummus for this sandwich today. And I have used only cucumber and tomato slices, as my daughter prefers only those in this sandwich. Vegetables of one's choice can go into this preparation.

This sandwich preparation is so simple that no recipe is actually needed. The above picture is self explanatory. This sandwich needs five ingredients - some whole grain bread slices, hummus spread, vegetable slices, salt and pepper.  Toasting the bread slices is first step in the preparation. Spread the hummus evenly on one side of each toasted bread slice. Place the vegetable slices on the hummus spread side of a bread slice. Sprinkle salt and pepper to taste. Cover it with the other bread slice, with hummus side facing down. Chop the sandwich diagonally and serve.

This is going to be my contribution to this week's Blogging marathon, with the theme 'Quick Breakfasts'. Check the page link to see what other marathoners are cooking.


Wednesday, January 19, 2022

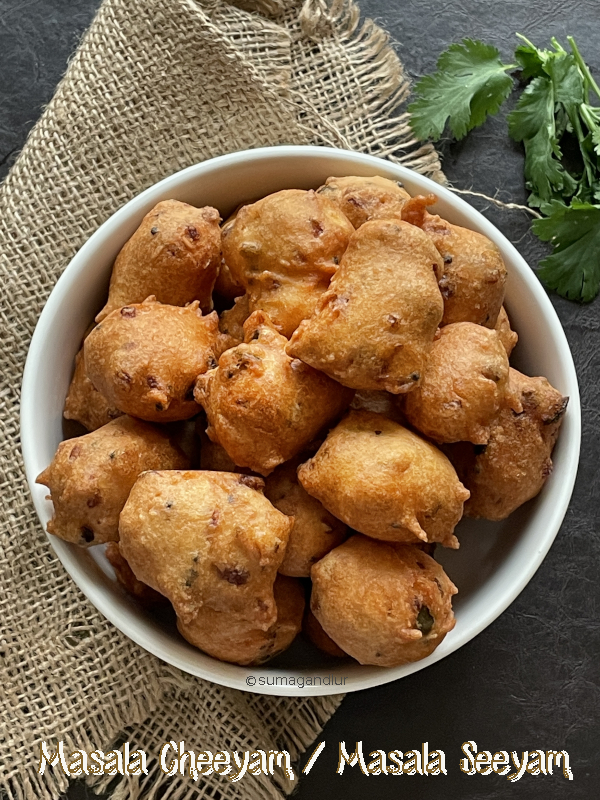
'A - Z' Tamil Nadu Recipe Series ~ C for Chettinad Masala Cheeyam / Masala Seeyam

Southern India is predominantly a rice growing region and the various local cuisines reflect the fact. I did not realize until now that the recipes I planned for this week were all rice based. Akkaravadisal is a sweet rice pudding usually served as an offering to god while brinji is a rice and vegetable based spicy one pot meal. Today's post cheeyam or seeyam is also rice based and is a popular snack from Chettinad cuisine.
 
Chettinad cuisine is perhaps the most well known one among the various regional cuisines of Tamil Nadu, though surprisingly Chettinad / Chettinadu region relatively forms a smaller portion of the state in a geographical sense. It is located mainly in the Sivaganga district and some portion of Pudukottai district. Chettinad is the home of a prosperous banking and business community called Natukottai Chettiars / Nagarathars and in fact, Chettinadu literally means 'Land of Chettiars'.

The Chettiars are known to be traders of salt and spices which is reflected in their cuisine where dishes are made with freshly ground spices. They also use a lot of dried meats and salted vegetables owing to the dry environment of the region. Most of the dishes are either eaten with rice or rice based. The cuisine boasts of both vegetarian and non vegetarian dishes.
Some of the dishes I have previously tried from Chettinad region are

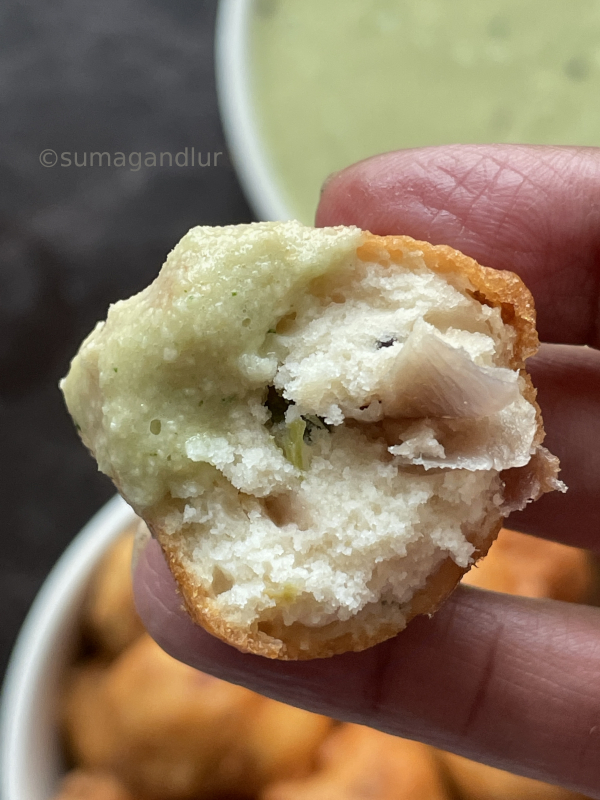
Today's masala cheeyam / masala seeyam also come from Chettinad region as I mentioned above. They are a popular snack from the region, made with a ground batter of rice and skinned black gram. This is a spicy version while there is also a sweet version of seeyam. These delicious fritters make a great evening snack and I read somewhere that people who are fasting also prepare this as an evening meal. 

This spicy version needs advance planning as the rice and black gram needs to be soaked for 2 - 3 hours. Grind the batter fluffy and fine like one does idli batter. Remember not to make it runny. Onions and green chilis are sautéed and added to the batter which add flavor to these fritters though I think the step of sautéing onions can be skipped. Adding raw onions to the batter is not  going to make that of a big difference as they are going to be deep fried anyway.
Ingredients:
1/2 cup rice
1/2 cup skinned black gram / urad dal
Salt to taste
Oil to deep fry 
Ingredients for sautéing:
1 tbsp. oil
1/2 tsp. mustard seeds
1 small sprig of curry leaves, finely minced
1 or 2 green chilies, finely minced
1 medium sized onion, finely minced
2 tbsp. fresh, shredded coconut

Directions:
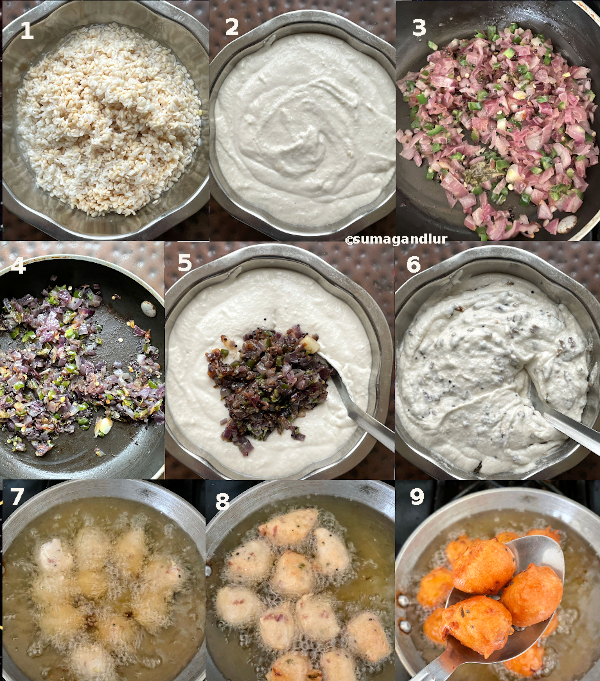
1. Rinse and soak rice and skinned black gram in water for at least two hours. Drain the water completely after the soaking period.
2. Grind them together into a thick, fluffy batter adding water in small increments. Do not make the batter runny. (Using a grinder would help to use small quantity of water to while grinding. If the batter turns runny, adding a small quantity of rice flour would help but adding too much would turn the cheeyam harder.)
3. Meanwhile, heat a tbsp. oil in a pan and add mustard seeds. When they start to sputter add, green chili and curry leaves. Stir them for few seconds and add onions and salt enough for the onions.
4. Sauté until onion turns translucent and add the coconut. Stir once and turn off the stove.
5 & 6. Add the sautéed onions and salt to the batter. (Keep in mind that onions contain salt too). Mix the batter well with a spoon and keep aside.
7. Heat oil for deep frying in a frying pan on medium heat. Drop a pinch of batter to the oil. If it swims to the surface, the oil is ready for frying. If not, heat the oil a little more. Dip your fingers / hand into the batter and shape a small ball. Gently drop into the oil. Repeat the step and drop as many balls as the pan can hold, without overcrowding. (There is no need to fret over the shapes. They don't to be exactly round.)
8. First they sink and soon float to the surface. Keep gently flipping them with a perforated spoon. Lower the heat to low - medium setting and fry until they turn golden brown throughout.
9. Remove them when done and transfer them onto a plate laden with paper towels to absorb the extra grease.
10. Reheat the oil if needed and repeat the steps with the remaining batter.
11. Serve them warm and enjoy with a spicy chutney or some ketchup.

This is going to be my contribution to this week's Blogging marathon, with the theme 'A -Z Series'. Check the page link to see what other marathoners are cooking.


Monday, January 17, 2022

'A- Z' Tamil Nadu Recipe Series ~ A for Akkaravadisal / Akkara Adisal


Starting from this month, I am going to explore one of the flavorful cuisines from the southern parts of India, from Tamil Nadu to be exact. I grew up in a neighboring state and so, I am kind of familiar with and fond of the cuisine. I am doing a vegetarian recipe series in a 'A- Z' style and each month, three recipes from the region are going to be posted. Previously, I have covered two more southern states, mentioned below.

'A - Z' Karnataka Vegetarian Recipe Series

'A' is the alphabet of the day and here are few 'A' dishes from the state. There is the popular breakfast combo, adai - avial which can also be served as a light dinner. Adai are the protein rich crepes made with rice - lentil batter while avial is vegetable based curry in a coconut base. Azhagar kovil dosai are dosa that are served as a prasadam to devotees in a Lord Vishnu Temple located near Madurai. Arisi upma is a spicy breakfast dish made with cream of rice. There is aadi koozh, a healthy porridge made in the month of aadi (around July). 

Here are ammini kozhukattai, steamed and tempered rice balls that make a guilt-free snack. A simple and quick one pot meal from Kongu nadu is arisi paruppu sadam that is prepared with rice and lentils. There is arachuvitta sambhar, a Tambram, lentil and vegetable based side dish made with toasted and ground spices. There is another gravy dish called arai puli kuzhambu. There are arakeerai and avarakkai, amaranth greens and broad beans respectively with which many side dishes are prepared to go with rice. There is aval aka flattened rice that is used to make many dishes such as upma, payasam, laddu, kozhukaatai, etc. Athirasam is a popular and deep fried sweet dish prepared with rice flour and jaggery. Arcot makkan peda is another sweet delicacy. (This is not an extensive list. I have mentioned those off the top of my head.)

And there is a festive dish called akkaravadisal or akkara adisal, with which I am starting this A- Z series. Akkaravadisal is a sweet rice pudding made as an offering to god during auspicious occasions at temples and homes across the state. Akkara means jaggery / sugar in Tamil while the second part vadisal refers to the cooking part, as cooking rice in this instance.

I have made this a few times before and coincidentally had again prepared it a few days back on Sankranthi day. An authentic Iyengar recipe, akkaravadisil sounds similar to sweet pongal or sakkari pongal at first glance. However akkaravadisal is more richer, creamier and delicious since the rice and moong dal mixture is cooked entirely in milk and oodles of ghee also goes into the preparation. 

Akkaravadisal can be prepared in a pressure cooker or in an instant pot, for a short-cut method. The rice, moong dal and milk can also be cooked together in a pot on stovetop until it reaches a creamy consistency. Using a non stick pan avoids the rice sticking to the bottom of the pan and burning. The mixture needs to be frequently stirred and the milk quantity needs to be adjusted as needed. Leaving a ladle in the pan prevents the milk from boiling over.

Using jaggery that is darker in color lends an inviting hue to the dish. Warm the jaggery with water until it melts and strain the mixture if it has impurities. Powdered jaggery can be directly added to the cooked rice at the end and mixed if the jaggery is clean. A portion of jaggery can be replaced by sugar. A large quantity of ghee is added traditionally but can be cut down to a minimum. The rice is cooked in full fat milk for a richer taste but again, it can be cooked in fat-free milk to cut down the calories. A pinch of edible camphor added at the end makes it absolutely divine.

 Akkara vadisal is on a thicker side and the mixture thickens while cooling down. Add milk accordingly. I took these images soon after cooking and it thickened to right consistency after cooling down.

Ingredients: (Yield 4 servings)
1/2 cup rice (I used sona masuri rice.)
2 tbsp. yellow moong dal
3/4 cup powdered jaggery
2 to 2.5 cups of milk
2 - 3 tbsp. ghee
2 tbsp. cashews
1/8 tsp. ground cardamom 

Directions:
* Boil about a cup milk on stove top or in a microwave and let it cool down.
1. Rinse and soak rice and moong dal in water for about 10 minutes and drain.
2. Meanwhile, heat jaggery and about 1/3 cup water in a pan until the jaggery melts. Let it cool a bit and strain the syrup if any impurities are present (I did not have to strain mine.)
3. Heat ghee in a pan and add cashews. Toast them on low flame, stirring continuously until they turn golden brown. (They burn quickly and so keep an eye). Transfer the toasted cashews onto a plate. 
4. To the same ghee pan, add the rice and moong dal mixture and sauté for couple of minutes, on low medium flame. Turn off the stove.
5. Transfer the mixture directly to small pressure cooker or a to steel container that fits into a pressure cooker. Add 1.5 cups milk to the rice mixture. Cook for 6 - 8 whistles and turn off the stove.
6 &7. When the valve pressure is gone, mash the rice-dal mixture well with the back of a ladle.
8. Add the melted jaggery, (boiled and cooled) milk as needed, ground cardamom, toasted cashews with the remaining ghee and mix well with a ladle.
* Serve it warm, as part of a festive meal or as a dessert. 

This is going to be my contribution to this week's Blogging marathon, with the theme 'A -Z Series'. Check the page link to see what other marathoners are cooking.


Monday, January 10, 2022

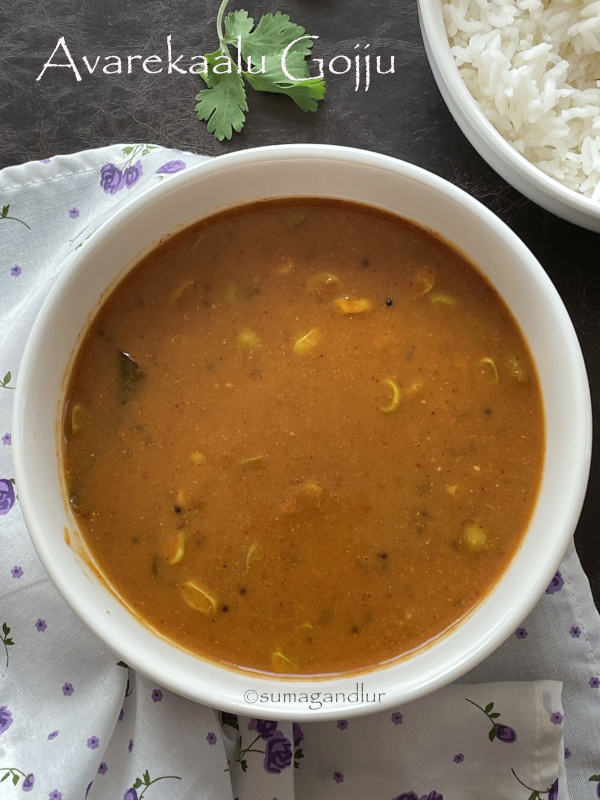
Avarekaalu Gojju

Avarekaalu, the fresh field beans is the most awaited winter produce in and around Bangalore. Come December, every kitchen is flooded  with avarekalu preparations, ranging from breakfast dishes to desserts. In fact, 'thindi beedi' aka eat street in V.V.Puram which has become a focal point for street food in Bangalore in the recent years hosts an annual 'avarekayi mela'. It has been a hit among patrons, which showcases avarekayi delicacies. 

Here are some of the recipes I have posted previously featuring avare kaalu aka fresh field beans.

Today, I thought of posting a gojju recipe using avarekaalu. Gojju, a sweet and spicy gravy made with some select vegetables or even fruits is a side dish from Karnataka. A special spice powder goes into the preparation and is commonly prepared at homes or even served at functions / festive meals in the region. I have made this gojju following the traditional method but I have seen preparations online using tomato, onions and other spices.

Here are some of the gojju recipes I have posted previously.

The preparation is quite simple and don't be put off by the long list of the ingredients given here. Some go into tempering and some for grinding. Try this if you haven't earlier and you would not be disappointed. A large batch of gojju pudi can be prepared in advance and stored, which makes this gojju preparation, a quick and easy one. 

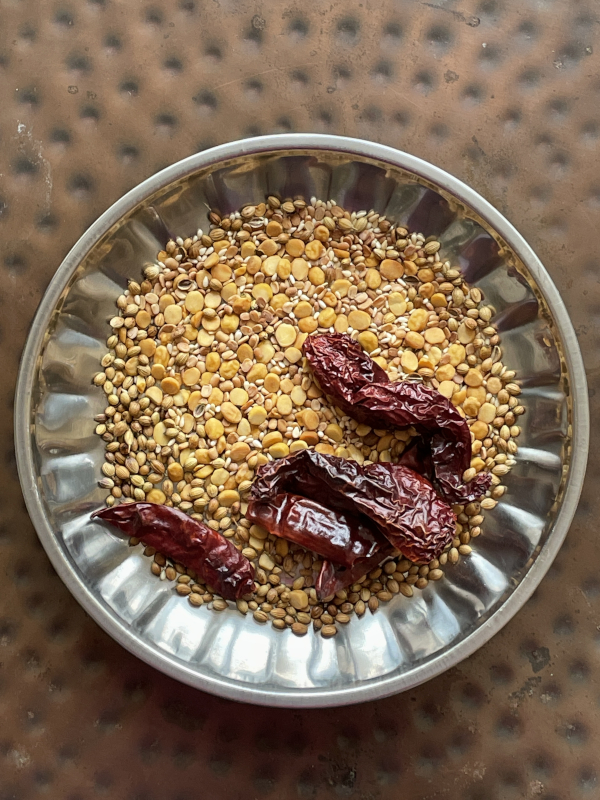
Ingredients for spice powder / gojju pudi:
1 tbsp. Bengal gram / split chickpeas / chana dal
1/2 tbsp. skinned black gram / urad dal
1 tbsp. coriander seeds / sabut dhaniya
3 red chilis, spicy variety
2 Byadagi red chilis
1 tsp. white sesame seeds
1/4 cup grated, dry coconut

Ingredients for gojju:
1 tsp. oil
1/2 tsp. mustard seeds
2 pinches asafetida powder
1 sprig of curry leaves
1/8 tsp. turmeric powder
1/2 tsp. salt
Jaggery to taste (I used 2 stevia packets.)
1 cup water
2 tbsp. thick, tamarind pulp or to taste* 
1/2 cup avarekaalu
1/4 cup gojju powder
* Use tamarind to taste

Preparing spice powder:
* Toast Bengal gram and skinned black gram separately in a sauté pan till they turn reddish and remove. Add coriander seeds to the pan and sauté on low flame till they turn a few shades darker. Similarly toast sesame seeds, methi seeds and chilies for a few seconds.
 
* Cool the toasted ingredients and grind into a fine powder adding coconut. (Oil can be used to toast the spices but I skip it.)
Preparing gojju:
* Soak a big lemon sized tamarind in water, in advance. Squeeze The tamarind well using fingers to collect the thick pulp.  
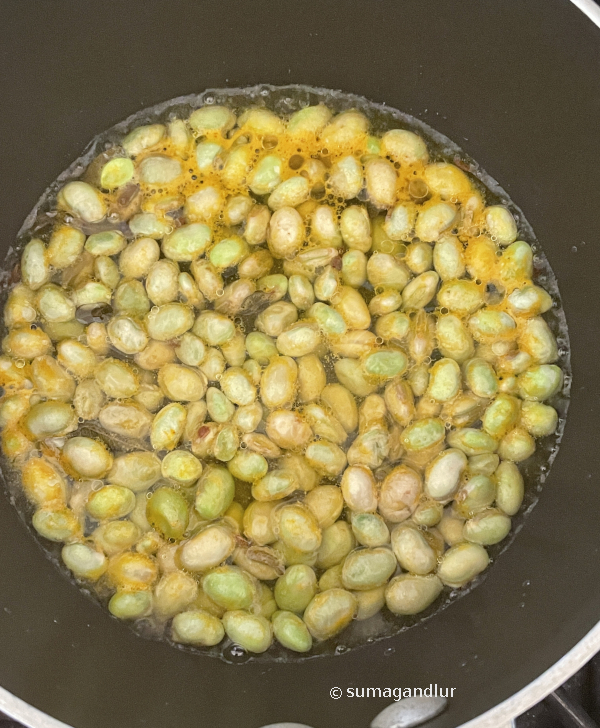
* Heat oil in a kadai/pan and add mustard seeds. When the they start to sputter, add asafetida powder and curry leaves. Then add the avare kaalu / fresh field beans, turmeric powder, salt and about 1/2 cup of water. Cook until the avarekaalu turn fork tender. (Avarekaalu can be cooked in advance in a microwave with a little water.)
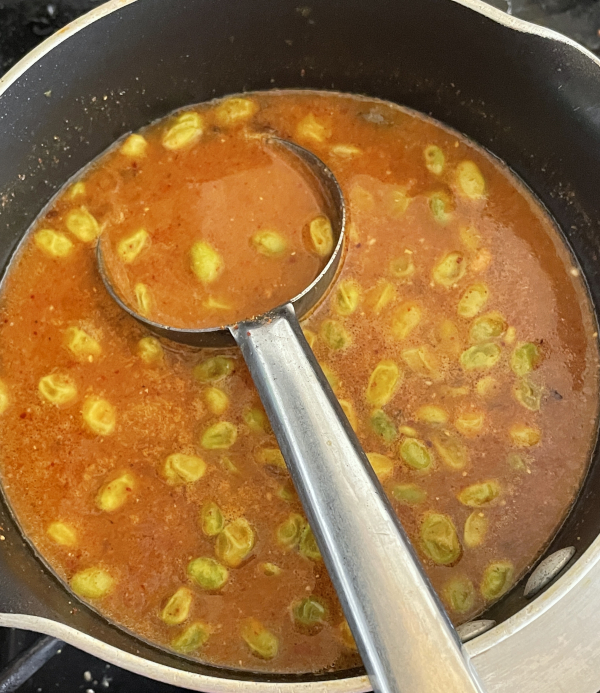
* Then add the gojju powder, tamarind, jaggery, and about a cup of water (or as needed). Stir well and let the mixture cook on medium flame. Check the flavor and adjust the seasonings, if any needed.
* Let the mixture come to a boil. Lower the heat setting and cook until the gojju thickens.
* Serve it warm with rotis / rice.

This is going to be my contribution to this week's Blogging marathon, with the theme 'Winter Produce'. Check the page link to see what other marathoners are cooking.

Monday, January 3, 2022

Aloo Thechauni / Aloo Thechwani / Aloo Thichodi

I would like to start the first post of the year by wishing all my readers a happy, healthy and prosperous new year. Let us hope the chaos going around for the past couple of years will come to a stop this year.  

I am going to post three potato based dishes this week and the first one is going to be a curry. Potato curry happens to be a popular side dish to go with breads or rice in Indian cuisine and one can find myriad versions of the same, with regional variations thrown in. Today's curry comes from the Uttarakhand region which is a locally popular one that is usually served along with rice though it can be served with rotis as well. 
Going by the list of ingredients, this pahadi subzi / curry from the Himalayan region seems to be another mundane version of potato curry that gets prepared across homes in India. The dish varies from the other curry preparations in the way how the potatoes are chopped and use of a local variety wild mustard seeds called jakhiya. I was looking for an authentic version of this curry and stumbled upon this recipe from a local girl. Usually onions are sautéed first, followed by tomatoes and then potatoes are cooked in the mixture, adding water. In her recipe, onions, potatoes, and tomatoes are sautéed in that order and water is added at the final stage. 
The interesting part here is one doesn't chop potatoes. The unpeeled potatoes are roughly pounded  into fine pieces, using a suitable tool like pestle, stone or hammer. In fact, the dish gets it name from the word 'theechna' meaning pounding in the local dialect. Potatoes can be replaced with local radish. Of course the potatoes need to be scrubbed before using and any parts that need to be discarded should be peeled. I peeled the potatoes anyway and realized while mashing that it is not that easy when you have big potatoes on hand. Use small potatoes while preparing the dish which makes it suitable for the pounding part.  

Ingredients:
3 potatoes (about 2 cups roughly mashed potatoes)
1 - 2 tbsp. oil
1 tsp. jakhiya / mustard seeds *
1 bay leaf
A pinch of asafoetida
1 tsp. ginger - garlic paste
1 green chili, finely chopped 
1 big sized onion, finely minced
Salt to taste
2 pinches of ground turmeric
1/2 tsp. coriander powder
1/2 tsp. chili powder or to taste
1 big sized tomato, finely chopped
1 cup water
1 /2 tsp. garam masala
* Locally grown wild mustard seeds used in Garhwali cuisine
Directions:
* Scrub the potatoes well and peel any parts that need to be discarded. Pound or mash the potatoes roughly into small pieces using a pestle.  
* Heat oil in a pan and add mustard seeds. When they start to pop, add bay leaf, asafoetida and garlic - ginger paste. Sauté for few seconds and add green chili. Stir for few seconds.
* Next add onion and sauté until onion are cooked and add pounded potatoes. Stir for about a minute. Add salt, turmeric, coriander powder and chili powder to pan and mix well. Cover and cook until potatoes soften. 
* Next add chopped tomato to teh potato pan and mix well once. Again cover and cook until tomatoes are done.
* Next add about a cup of water and bring it to a boil. Add garam masala and cook the mixture about five minutes and turn off the stove. 
* Serve warm with hot steamed rice or rotis.
This post is an entry for Blogging Marathon and check the link to find out what other marathoners are cooking.

Wednesday, November 24, 2021

Edamame - Millet Khichdi

I picked 'easy dinner ideas' as my theme for this week's marathon which required the dish to be a meal by itself or can be served as a main course. This healthy and tasty khichadi happens to be a one pot meal, prepared with millet, spinach and edamame and one that can be cooked at the last minute. It is quite a simple and easy preparation as all you do is dump everything into a cooker / pot and cook them. I cooked the khichadi directly in a small sized pressure cooker but of course it can be cooked in any sturdy pot on stove top, under 30 minutes. 
Edamame pronounced 'eh-dah-maa-may' is the Japanese term for the young soybeans that are harvested before they get ripened. They are available both in pods / shelled forms, fresh or frozen. They are great to snack on or tossing them in a stir fry or salad. I have used frozen ones here and added them along with spinach and potato to boost the nutrition factor of this khichdi. I used the yellow colored millet commonly available in US stores and threw in a handful of Basmati rice as well. Substitute any long grain / Basmati rice or a combination of rice and millets or any other quick cooking grain in place of millets. This edamame and millet khichdi is a quick, wholesome and nutritious meal that can be prepared under 30 minutes.  

Ingredients:
2 tbsp. ghee and/or oil
1 tsp. cumin seeds
2 cloves
2 cardamom pods
1 inch piece cinnamon
1 bay leaf
2 green chilies or according to spiciness preferred
1/2 inch piece ginger, grated and crushed
1 big onion, sliced
1 big tomato
1 potato, chopped
1/2 cup edamame (I used about a cup of edamame and that quantity seemed more.)
2 cups chopped spinach
A pinch of asafoetida
1 tsp. garam masala (optional but recommended.)
1/8 tsp. ground turmeric
Salt to taste
1/2 cup millets
1/4 cup yellow moong dal
2 cups + extra water
Directions:
* Wash millets and moong dal, drain and keep aside.
* Heat ghee / oil directly in a pressure cooker and add cumin seeds, cloves, cardamom, cinnamon and bay leaf. Toast for few seconds until you start to smell fragrance of the spices.
* Add the chopped green chillies and ginger and saute for few seconds. Next add onion and saute until golden brown. After onions are done, add tomatoes and cook until they soften.
* Next add potatoes, spinach, edamame, turmeric, salt (I used about 2 tsp.), garam masala, millets, moong dal and about 2 cups of water.
* Close the lid, put the valve on and pressure cook for 3 whistles. 
* When the valve pressure is gone, remove the lid and check the consistency. Do the taste testing to check the seasonings. If needed, add salt / chili powder. If the khichdi appears too thick, add a cup of water (or as needed). Simmer for few minutes until it starts to bubble, stirring in between to avoid the khichdi sticking to the bottom of the cooker. 

Friday, November 12, 2021

A - Z Idli Series ~ A Recap

Here is a collection of 26 idli recipes that I have been posting in an alphabetic series these past few months. For the uninitiated, idlis are soft and fluffy steamed cakes prepared with a fermented batter of rice and skinned black gram. This traditional dish which originated centuries ago in south India is an iconic breakfast dish of the region and enjoyed by millions of Indians. The idlis are usually served with a savory chutney and a lentil stew called sambhar making the vegetarian combination a wholesome, and nutritious meal.

My husband loves idlis and he wouldn't get tired if I served idlis for breakfast day after day, for the rest of our lives. A casual conversation with my husband one day about the possible variety of idlis gave me idea to try this series. On the spur of the moment during that conversation, I had told him that I could probably come up with at least 50 kinds of idlis, if not 100. And indeed I could put more than 50 varieties on paper the next day and this was how this series started. In fact, I can easily start another idli series next year if I wish since I have many other varieties already cooked and clicked. 

Many idlis below are traditional ones and some with twists to the well known versions. I have been making millet idlis for years now substituting millets for a portion of rice in the recipe which I have included in the list. Green gram idli, steel cut oats idli, and navadhanya idli were experiments in my kitchen. I have tried to include as many quick, instant versions as possible sticking to the alphabet format. The others need planning as it involves soaking and grinding the ingredients and fermenting the batter. Most of the idli varieties I posted in the series are gluten-free and vegan. Some varieties like dal idli, green gram idli, uddina idli and yellow moong idli are made with just lentils and are protein rich and nutritious. Fox tail millet idli, lauki idli, ragi rava idli, wheat rava - green peas idli and also the above mentioned protein rich idlis are ideal for diabetics. Oats, quinoa, pearl millet, and sorghum idlis are also healthy variety of idlis to try. 

Hopefully there is something for every idli lover out there to try and enjoy from this series which includes 26 variety of idlis. Click on the links below to access the recipe pages of idlis. 

A for Avarekayi Idli - Instant idlis prepared using fresh field beans
B for Bajra Flour Idli - Idlis prepared using pearl millet flour
C for Cornmeal Idli - Idlis prepared with cornmeal and black gram
D for Dal Idli - Idlis prepared with black gram and moong dal
E for Elaneer Idli - Idli batter is ground with coconut water.
F for Foxtail Millet Idli - Idlis prepared with foxtail millet
G for Green Gram Idli - Instant idlis made with green gram batter
H for Halasina Hannina Idli - Idlis made with rice rava and jackfruit
I for Idli - Idlis prepared with idli rice and skinned black gram
J for Jowar Idli - Idlis prepared with sorghum flour
K for Kumbalakaayi Idli - Idlis prepared with grated pumpkin
L for Lauki Idli - Semolina and bottle gourd idlis 
M for Mallige Idli - Soft, fluffy idlis from Karnataka
N for Navadhanya Idli - Idlis prepared using nine seeds
P for Poha Idli - Idlis amde with flattened rice
Q for Quinoa Idli - Idlis made with quinoa
R for Ragi Rave Idli - Finger millet and semolina idlis
S for Sabbakki Idli / Sago Idli - Idlis made with tapioca pearls
T for Thatte Idli - Bigger sized idlis from Karnataka
U for Uddina Idli - Idlis made with only skinned black gram
V for Vendaya Idli - Idlis made with rice and fenugreek seeds
X for Xacuti Masala Aloo Stuffed Idli - Idlis with potato stuffing
Y for Yellow Moong Dal Idli - Idlis made with skinned mung beans
Z for Zucchini Idli - Idlis made with zucchini and cream of rice
This post is an entry for Blogging Marathon with 'A - Z' theme and check the link to find out what other marathoners are cooking.