HOME        |        ABOUT        |        COPYRIGHT        |        CONTACT        |         RECIPE INDEX        |         INDIAN THAALIS        |         MILLET RECIPES        |        EVENTS' ROUNDUP        

Showing posts with label Breakfast. Show all posts

Wednesday, January 19, 2022

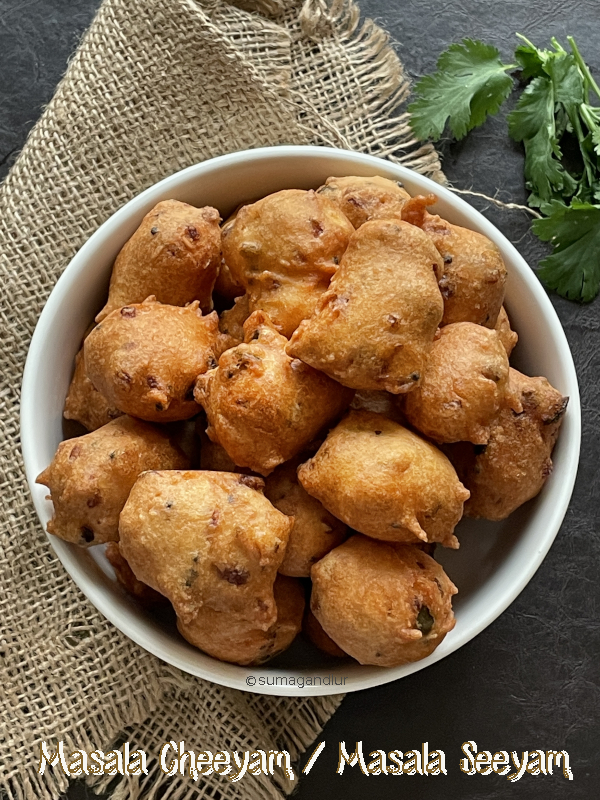
'A - Z' Tamil Nadu Recipe Series ~ C for Chettinad Masala Cheeyam / Masala Seeyam

Southern India is predominantly a rice growing region and the various local cuisines reflect the fact. I did not realize until now that the recipes I planned for this week were all rice based. Akkaravadisal is a sweet rice pudding usually served as an offering to god while brinji is a rice and vegetable based spicy one pot meal. Today's post cheeyam or seeyam is also rice based and is a popular snack from Chettinad cuisine.
 
Chettinad cuisine is perhaps the most well known one among the various regional cuisines of Tamil Nadu, though surprisingly Chettinad / Chettinadu region relatively forms a smaller portion of the state in a geographical sense. It is located mainly in the Sivaganga district and some portion of Pudukottai district. Chettinad is the home of a prosperous banking and business community called Natukottai Chettiars / Nagarathars and in fact, Chettinadu literally means 'Land of Chettiars'.

The Chettiars are known to be traders of salt and spices which is reflected in their cuisine where dishes are made with freshly ground spices. They also use a lot of dried meats and salted vegetables owing to the dry environment of the region. Most of the dishes are either eaten with rice or rice based. The cuisine boasts of both vegetarian and non vegetarian dishes.
Some of the dishes I have previously tried from Chettinad region are

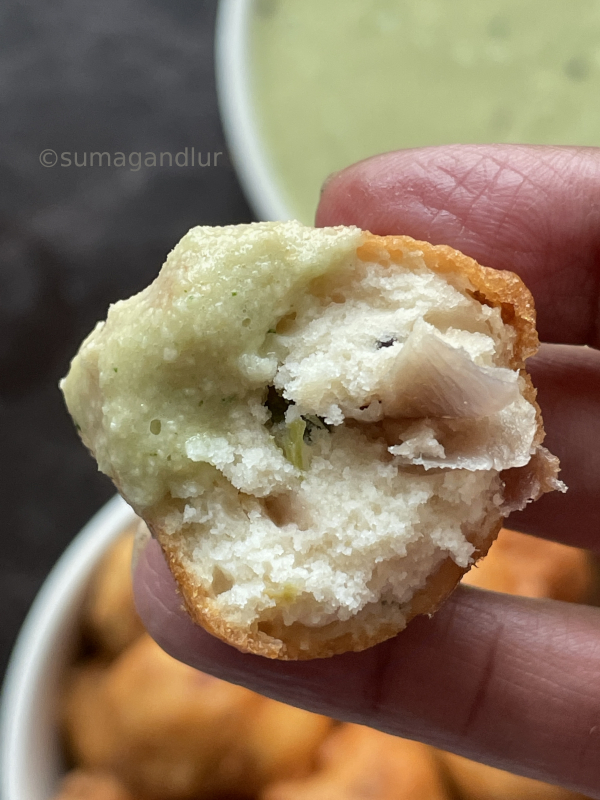
Today's masala cheeyam / masala seeyam also come from Chettinad region as I mentioned above. They are a popular snack from the region, made with a ground batter of rice and skinned black gram. This is a spicy version while there is also a sweet version of seeyam. These delicious fritters make a great evening snack and I read somewhere that people who are fasting also prepare this as an evening meal. 

This spicy version needs advance planning as the rice and black gram needs to be soaked for 2 - 3 hours. Grind the batter fluffy and fine like one does idli batter. Remember not to make it runny. Onions and green chilis are sautéed and added to the batter which add flavor to these fritters though I think the step of sautéing onions can be skipped. Adding raw onions to the batter is not  going to make that of a big difference as they are going to be deep fried anyway.
Ingredients:
1/2 cup rice
1/2 cup skinned black gram / urad dal
Salt to taste
Oil to deep fry 
Ingredients for sautéing:
1 tbsp. oil
1/2 tsp. mustard seeds
1 small sprig of curry leaves, finely minced
1 or 2 green chilies, finely minced
1 medium sized onion, finely minced
2 tbsp. fresh, shredded coconut

Directions:
1. Rinse and soak rice and skinned black gram in water for at least two hours. Drain the water completely after the soaking period.
2. Grind them together into a thick, fluffy batter adding water in small increments. Do not make the batter runny. (Using a grinder would help to use small quantity of water to while grinding. If the batter turns runny, adding a small quantity of rice flour would help but adding too much would turn the cheeyam harder.)
3. Meanwhile, heat a tbsp. oil in a pan and add mustard seeds. When they start to sputter add, green chili and curry leaves. Stir them for few seconds and add onions and salt enough for the onions.
4. Sauté until onion turns translucent and add the coconut. Stir once and turn off the stove.
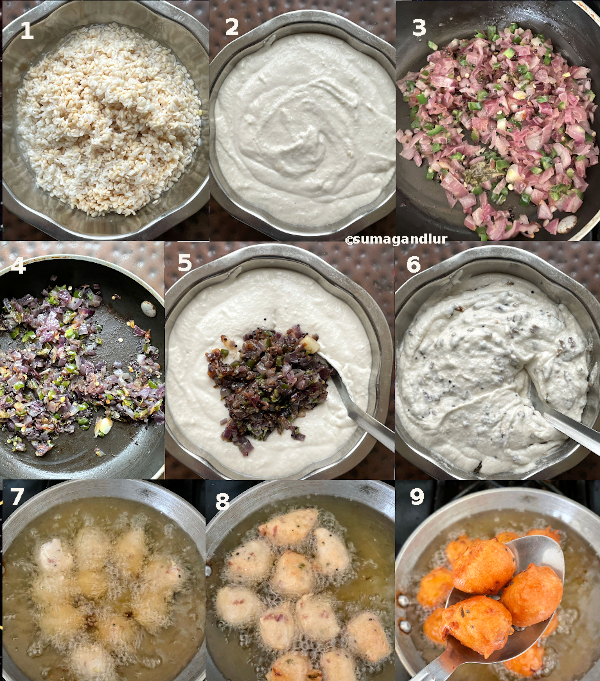
5 & 6. Add the sautéed onions and salt to the batter. (Keep in mind that onions contain salt too). Mix the batter well with a spoon and keep aside.
7. Heat oil for deep frying in a frying pan on medium heat. Drop a pinch of batter to the oil. If it swims to the surface, the oil is ready for frying. If not, heat the oil a little more. Dip your fingers / hand into the batter and shape a small ball. Gently drop into the oil. Repeat the step and drop as many balls as the pan can hold, without overcrowding. (There is no need to fret over the shapes. They don't to be exactly round.)
8. First they sink and soon float to the surface. Keep gently flipping them with a perforated spoon. Lower the heat to low - medium setting and fry until they turn golden brown throughout.
9. Remove them when done and transfer them onto a plate laden with paper towels to absorb the extra grease.
10. Reheat the oil if needed and repeat the steps with the remaining batter.
11. Serve them warm and enjoy with a spicy chutney or some ketchup.

This is going to be my contribution to this week's Blogging marathon, with the theme 'A -Z Series'. Check the page link to see what other marathoners are cooking.

Wednesday, January 5, 2022

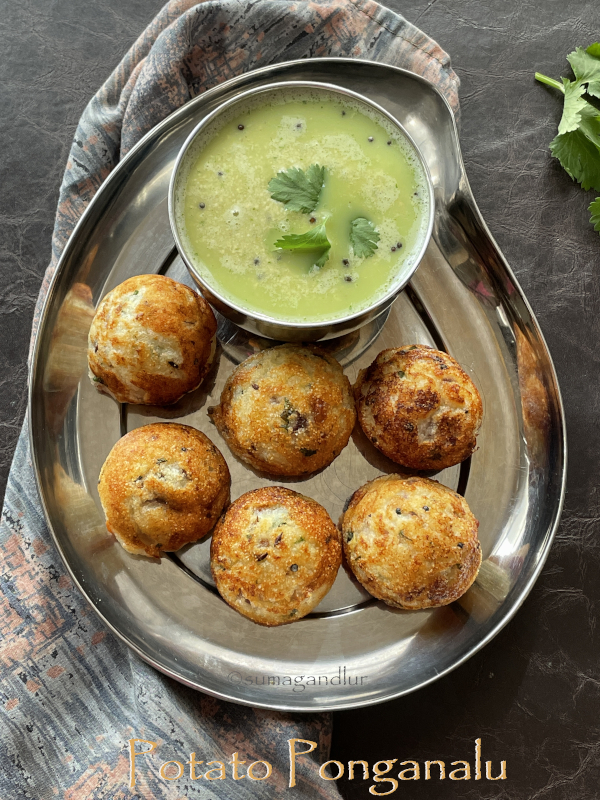
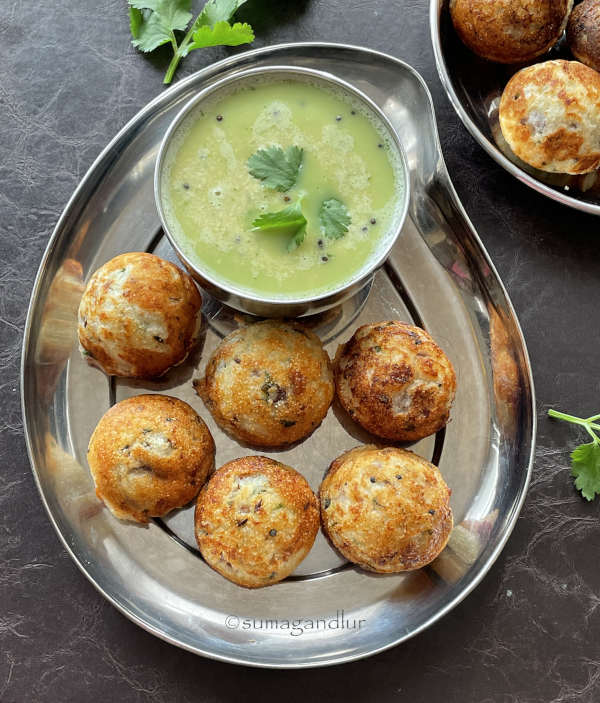
Potato Appe / Aloo Appe / Aloo Ponganalu

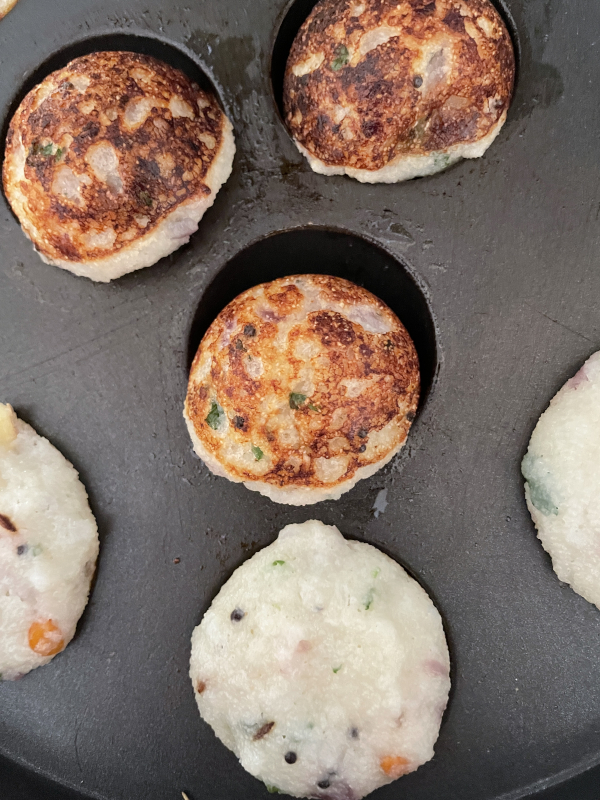
Appe / ponganalu / paniyaram / paddu are a breakfast or a snack item from the south Indian cuisine. They are prepared either using a fresh batter or using leftover batters used to make idli / dosas, the most popular breakfasts of the region. The batters are made with soaked rice and lentils that are ground and fermented, which usually needs advance planning.

There are a few instant versions as well like the one using semolina. Here is an interesting, instant kind that uses potato. I had bookmarked it from a weekly magazine a while ago because of the usage of potato in an appe recipe though I was equally skeptical because of the same reason. 

I kept wondering until the last minute of  preparation whether the mixture is going to stick to the pan and whether I should use the batter to prepare something else. There was no need to worry as they rise well and can be easily flipped if one waits patiently to let the bottom sides cook. They appear fragile at the beginning stages of cooking compared to the ones made with fermented batter. And they taste fabulous, served warm with a chutney on side.
 
Ingredients for tempering:
2 tsp. oil
1 tsp. each - Bengal gram (split chickpeas), mustard seeds, & cumin seeds 
1 tbsp. minced curry leaves
Ingredients for appe: (Yield - 18 - 20)
1 tbsp. flattened rice / poha 
1/2 cup semolina
2 tbsp. rice flour 
1 large sized potato / 1/2 cup mashed potato 
Salt to taste
1 green chili, finely minced
1 onion, peeled & finely chopped
1 tsp. finely grated ginger
A handful of cilantro, finely minced 
1/2 to 3/4 cup milk (Skim milk will do.)
1/4 tsp. baking soda or Eno's fruit salt
Oil to make appe

Prep work:
* Peel a large potato, cut into chunks and boil in water. Let it cool down and mash it finely.
* Wash and soak the flattened rice / poha in water for 5 to 10 minutes. Drain the water.
* Chop onion, ginger, chili, curry leaves and cilantro. 
* Heat 2 tsp. oil in a small pan. Add Bengal gram, mustard seeds, and cumin seeds to the oil. When Bengal gram starts turning reddish, add the minced curry leaves.

Directions:
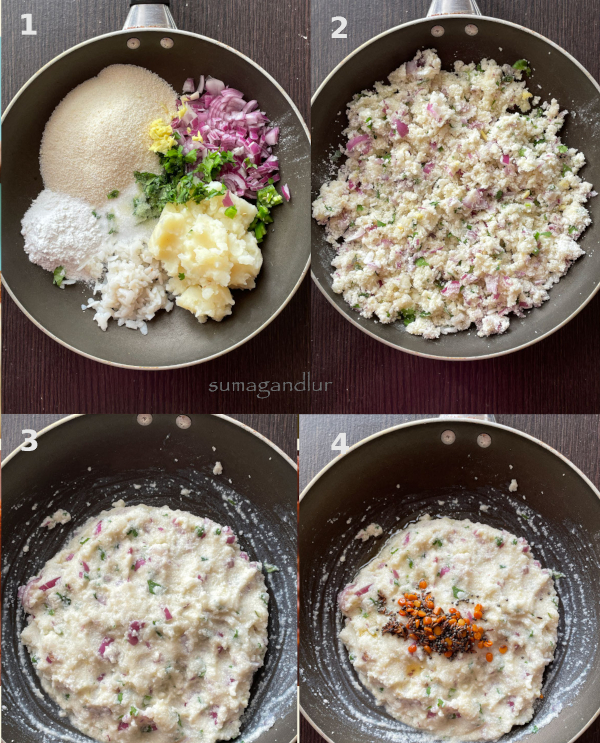
1. Add semolina, rice flour, poha and mashed potato to a bowl. Next add minced onion, cilantro, ginger, chili, and salt to the bowl.
2. Mix all the ingredients well to combine. Make sure that there are no potato lumps in the mixture.
3. Pour 1/2 cup milk to the mixture and stir well to combine. Cover and let the mixture sit for about 15 - 30 minutes. 
4. Add the tempering / tadka to the semolina mixture. Add extra milk if needed at this point and stir well. (I soaked the mixture for about 30 minutes and added extra 1/4 cup milk.)
5. Heat the ponganalu / appe skillet and add a few drops of oil in each mold. 
6. Add baking soda or fruit salt to the mixture and mix well vigorously. (I added about a little more than 1/4 tsp. Eno's fruit salt, sprinkled a tbsp. water over it and mixed well.)
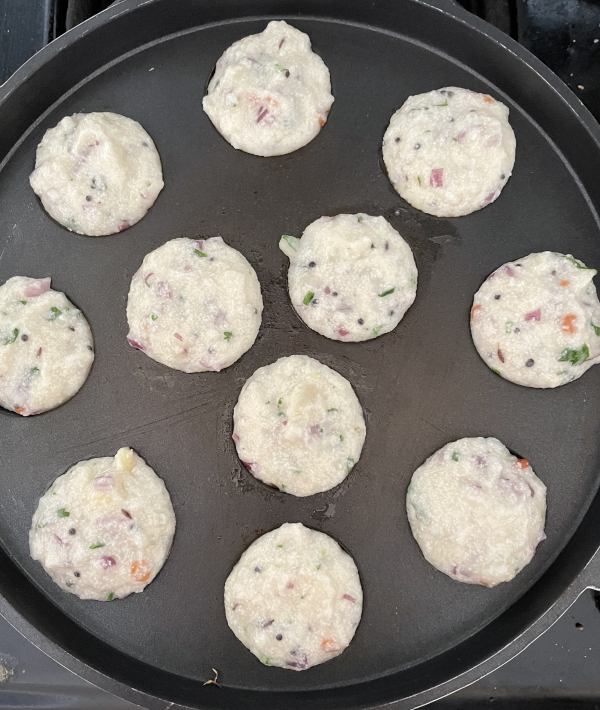
7. Fill the molds with batter, cover the skillet with a lid and cook on low medium heat until the batter doesn't appear raw on the surface. Or use a skewer and gently lift to check the bottom to notice if any golden brown spots formed.
8. If golden brown spots are formed, add a drop or two of oil on the surface of each of the ponganalu and flip them using a flat spoon/skewer. 

9. Cook until the other side lightly browns as well. (The appe would be slightly fragile compared to the regular appe because of the addition of potato. Be careful while flipping them and wait until the bottom sides of the appe are cooked well.)
10. Remove them and repeat the process with the remaining batter. Serve them warm with a chutney of your choice.  

This is going to be my contribution to this week's Blogging marathon. Check the page link to see what other marathoners are cooking.
Monday, July 19, 2021

Uthappam Waffles / Dosa Waffles

Dosa waffles or uthappam waffles are those made with leftover, savory dosa batter and these make a filling breakfast or dinner. Dosa batter is needed for this recipe to start with and here is the recipe for dosa batter. These waffles can be made in less than half an hour if you have the batter ready.

Waffles are a fun way to use any leftover dosa batter besides using them to make uthappam, ponganalu, onion dosa and such. Mixed veggies can be added to make the waffles more nutritious. Serve these gluten-free, vegan waffles with coconut or peanut chutney for a delicious breakfast or dinner.
Ingredients: (About 3)
2 cups dosa batter
Salt if needed
1 small red onion, chopped
1 small tomato, chopped 
1 small carrot, peeled and grated 
1 or 2 green chilis, finely chopped
2 tbsp. cilantro, finely minced
Oil to grease the waffle pan
Directions:
1. Left over dosa / idli batter is needed for this recipe. Add salt only if it was not added earlier to the batter. Add few tbsp. of water if the batter appears too thick.
2 & 3. Add chopped vegetables, green chilis, and cilantro to the batter and mix well with a ladle.
4. Preheat the waffle maker and brush the grooves with oil. 
5. Pour the prepared batter into the waffle maker.
6. Cook the waffles according to the instructions in the manual of your waffle maker. 
* Once done, gently remove the cooked waffle from the waffle maker. Use the remaining batter and prepare waffles. 
* Serve them warm with chutney of your choice.
This post is an entry for Blogging Marathon. Check the link to find out what other marathoners are cooking.

Sunday, July 18, 2021

Cornmeal Idli

Idlis are a classic south Indian breakfast item that are prepared with skinned black gram (urad dal) and parboiled rice or cream of rice. My version today is a twist to the standard version, using cornmeal. Cornmeal is ground, dried yellow corn which ranges from coarse to fine textures. Mine is the coarsely ground version, similar to idli rava aka cream of rice typically used in idli preparation. 

Corn is naturally gluten free but be sure to read the labels since other gluten products may be processed in the same facility. Cornmeal is a good source of carbohydrates, phosphorous and iron. These idlis are obviously vegan and gluten free and make a great breakfast or dinner option. Serve them warm with some side dishes like chutney and sambhar for a filling meal. Ours were served with vegetable saagu and chutney. 
Ingredients: (Yield - about 20)
1 cup cornmeal
1/2 cup skinned black gram / urad dal
3/4 cup water
1.5 tsp. salt or to taste

Directions:
1. Rinse black gram / urad dal thoroughly twice with water by rubbing between fingers. Drain and soak in water in a container for about 3 hours. Similarly rinse cornmeal with water and soak in water in another bowl. 
2 & 3. Drain the water from both black gram and cornmeal containers. Squeeze out the water from the cornmeal as much as possible.
4. Add black gram, salt and water (as needed) to a blender and grind finely. (It took me less than two minutes to grind in the blender. Skip adding salt while grinding if living in a hot climate. Add salt to the fermented batter before making idlis.)
5. When the black gram is ground, add cornmeal to the blender.
6. Run the blender for a couple of minutes just to blend the mixture.
7. Transfer the batter to a container and cover it. Leave it in a warm place to ferment overnight. The final batter should be of thick, pouring consistency.
* If living in a cold place, leave the batter container in the oven with the light on. Don't turn on the oven. The batter may take 8 - 10 hours to ferment in a warm place. It may take longer to ferment in cold climate. 
* Heat water in a idli cooker / pressure cooker / steamer base on medium heat.
8. Stir the fermented batter with a ladle.
* Grease the idli plates and fill the moulds with the batter. Place the idli stand in the steamer and close the lid. Don't use the pressure valve if using pressure cooker.
* On low medium flame, steam for about 20 - 25 minutes or until when the surface of the idlis don't stick when touched with moist fingers. Turn off the stove and let sit for about 10 minutes.

* Run a sharp spoon around the edges of idlis and remove the idlis.
* Serve them warm for breakfast drizzling some melted ghee over idlis, along with coconut chutney and/or sambhar. Ours were served with vegetable saagu and chutney. 

Thursday, June 24, 2021

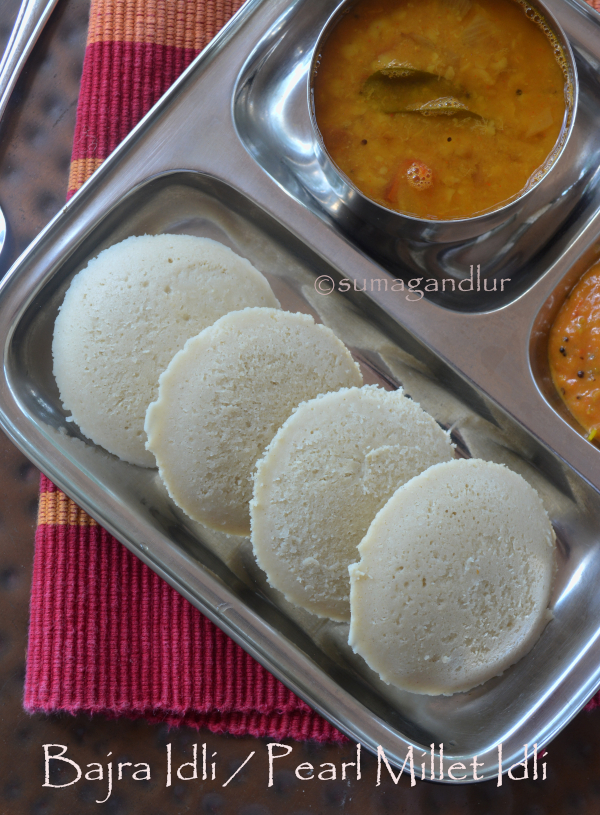
A - Z Idli Series ~ B for Bajra Flour Idlis

These healthy idlis are made using ground pearl millet or bajre ka atta / bajra flour. Bajra / pearl millet / sajja, a whole grain has been grown from ancient times in Indian sub-continent and Africa and used in cooking, both in grain and ground forms. Bajra has been a poor man's staple food in many regions of India and only recently, bajra and other millets have been gaining popularity among the urban class for their nutritional value. 

Pearl millet is a gluten-free grain, nutritious, rich in protein, iron, and fiber making it a great alternative over rice and wheat. It is also a complex carbohydrate, which takes longer to digest thus help managing blood sugar spikes after meals, making it suitable for diabetics. These idlis are obviously gluten-free, vegan and makes a wholesome and filling meal, when served with a lentil side dish like a sambhar.
Flat breads and porridges / khichdis are the most common preparations in India using this grain. However many south Indian breakfast dishes can be given a healthy twist by incorporating millets into recipes. I have replaced a portion of rice with pearl millet / bajra flour in my idli recipe to make them healthier. I have also tried a version, replacing rice with bajra rava / coarsely ground pearl millet. I have not completely replaced the rice in both the cases since I am not sure the flour alone would lend structure to the idlis. These idlis are not very different texture or tastewise from the standard version and can be easily incorporated into one's diet.

Ingredients: (Yield - 27 idlis)
1/2 cup bajra flour / pearl millet flour
1/2 cup idli rice
1/2 cup  urad dal / skinned black gram
1 tbsp. poha / flattened rice 
1/4 tsp. methi / fenugreek seeds
Salt to taste
Water to grind (I used slightly less than 1.5 cups of water.)
Directions:
* Rinse and soak idli rice, skinned black gram, flattened rice and fenugreek seeds in water for about 3 - 4 hours and drain the water. Let the water level be at least an inch above the level of the ingredients during the entire soaking period.
* Grind the soaked ingredients along with pearl millet flour / bajra flour adding salt and water as needed to form a thick, smooth batter. The final batter should not be runny. (I used less than 1.5 cup water to grind the ingredients.)
* Transfer the batter to a container and cover it. Allow the batter to rest in a warm place overnight. The batter may take anywhere between 8 to 16 hours to ferment depending upon the local weather. 
* Stir the fermented batter and fill the greased idli plates. 
* Heat water in a steamer / idli cooker / pressure cooker on medium flame. Place the idli stand in it and cover the lid. There is no need to put the pressure valve on if using the pressure cooker to steam idlis.
* Cook on low medium flame until idlis are done, about 20 minutes. (To check whether idlis are done, touch the surface of the idlis with wet fingers. If they are not sticky then that means idlis are cooked perfectly. If they are sticky, cook for some more time.)

* Turn off the stove and wait for at least 5 minutes and carefully remove the idli stand. Run a spoon around the edges of idli and remove them.
* Serve with a spicy chutney and / or sambhar. Our idlis were served with tomato chutney and sambhar.

Note:
The batter may not raise as much as the regular idli batter. Especially for those living in cold climates, if the batter smells sour and has not raised even after enough fermentation, add a little Eno fruit salt / baking soda to the batter and make idlis. (I haven't tried it but it will definitely be helpful.)

Friday, June 11, 2021

Kumbalakayi Idli / Sihi Kumbalakayi Idli / Savory Pumpkin Idli

Kumbalakayi idli is a traditional breakfast dish from the south Indian state of Karnataka. The pumpkin is called kumbalakayi in Kannada. As the title suggests, kumbalakayi / pumpkin is the star ingredient of the dish and hence use Indian variety pumpkin if available, for an authentic flavor. I have used the American one since that is what I get even in my local Indian store. 

Pumpkin idlis come in both savory and sweet versions and today I am sticking to the former though I made both. One can make both for breakfast to balance the flavors or can go with one version. Yes, the sweet version is also made for breakfast and not served as a dessert. These savory idlis I am posting today are an interesting and delicious option for those who are bored eating the regular idlis. Besides, it is an instant version for an added bonus. 
These are gluten-free, vegan and as I mentioned earlier, instant variety idlis. One can skip the usual rigmarole of idli making here which puts off many to try the idlis in the first place. One doesn't need to soak the ingredients, grind them or ferment them in this case. Rice rava is mixed with grated pumpkin, coconut and spices and rested for about an hour or less. The batter is then used to make idlis. There is no need to add any leavening agents here. Rice rava, though a traditional choice can be easily replaced with idli rava. 

These delicious idlis don't need any elaborate side dishes. A simple coconut chutney will be a perfect accompaniment. The leftovers can be refrigerated. They freeze well as well and when needed, just remove them from the freezer and microwave them covered in a glass bowl for few minutes and you will have hot piping idlis to serve.

Ingredients: (Yield 6 idlis)
1 to 2 tbsp. split chickpeas / chanadal / Bengal gram
1/2 cup rice rava / idli rava (I used idli rava.)
1/2 cup grated pumpkin (1/2 cup more can be added.)
1/2 grated fresh coconut (I added 2 fistfuls of coconut.)
1/2 inch piece of ginger
1 spicy green chili 
2 tbsp. minced cilantro
3/4 tsp. salt or to taste
Water as needed (I added about 1/4 cup.)
1/4 tsp. ground pepper (I didn't use any.)
Oil to grease idli plates
Directions:
* Soak Bengal gram in water for a couple of hours or until dal can be broken when pressed between thumb and forefinger. Drain the water used to soak the Bengal gram. (One can soak the dal the previous night and refrigerate to use it in the morning.)
* Rinse the idli rava and squeeze out all the water completely. Add it to a bowl. 
* Pulse the coconut, ginger and green chili to a coarse paste. (This is optional. (Instead one can add shredded coconut, finely minced chili and grated ginger directly to the rava bowl.)
* Add the soaked Bengal gram, ground coconut mixture, grated pumpkin, salt, minced cilantro and 2 tbsp. water to the idli rava bowl and stir well to combine.
* Cover and let the mixture sit for about an hour. If in an hurry, it can be soaked for 30 - 40 minutes.
 
* Check the consistency of the batter after the resting period. Add 1 - 2 tbsp. of water if needed. The mixture should look thick but if you squeeze it, some water should come out of it.
* Heat water in a idli cooker / pressure cooker / steamer base on medium heat.
* Grease the idli plates and fill the moulds with the batter and press them with fingers to shape them. 
* Place the idli stand in the steamer and close the lid. Don't use the pressure valve if using pressure cooker.
* On low medium flame, steam for about 20 minutes or until when the surface of the idlis don't stick when touched with moist fingers. 
* Turn off the stove and let it sit for about 10 minutes.

* Run a sharp spoon around the edges of idlis and remove the idlis.
* Serve them warm with ghee if desired and coconut chutney.

Tuesday, May 4, 2021

A - Z Idli Series ~ H for Halasina Hannina Idli / Halasina Hannina Kadubu (Jackfruit Idlis)

The inspiration for my idli series came from Karnataka cuisine which has a wide range of traditional idli recipes. These jackfruit  idlis are one among the bunch which are commonly prepared in the South Canara region. These idli indeed are unique compared to the other versions tastewise and in terms of preparation. They are usually steamed in envelopes of teak leaves which lend their aroma and color to the dish. In lieu of it, banana leaves are used and of course in absence of both, idli moulds or small cups can be used to make these idlis.

Jackfruit is extensively used in cooking in the coastal areas of Karnataka. It is called halasina hannu in Kannada, pelakayi in Tulu and ponosu in Konkani and so the dish goes by different names. Gujje gatti is a local name. Jackfruit idlis are called halasina hannina kadubu / gatti / idli in Kannada. The names pelata gatti or pelakayi gidde in Tulu allude to teak leaves that are used to steam them. They go by ponsa muddo in Konkani if they are steamed in leaves or else ponsa idli. 
These idlis are a common preparation during the jackfruit season in Mangalore / Udupi areas and the same batter can be used to prepare fritters by adding some extra rice flour. The idlis are usually on a sweet side, redolent with the fruit flavor. Jackfruit is the star ingredient of the dish and one cannot miss either the flavor or the  fragrant aroma of the bulbs in the dish. 

These idlis are made with a batter prepared using rice/rice rava, jackfruit, coconut and jaggery. The amount of jaggery used in the recipe depends upon the sweetness of the jackfruit bulbs used. If jack fruit bulbs are sweeter then less jaggery is used and vice versa but it should be noted that these idlis are on a sweeter side. I used tinned jack frit bulbs which were sweet. The jackfruit idlis can be prepared using either rice or rice rava / idli rava or even toasted semolina. I have used rice rava here. If using rice, it needs to be soaked for a couple of hours and then ground into a slightly coarse paste.
These idlis are served for breakfast along with coffee with no side dishes or served with just some ghee / honey. I enjoyed them on their own. The extras can be refrigerated and should be finished with in a day or two. They can be frozen as well as I have done. Just nuke them in a microwave when needed in a microwave safe dish, covered and they come out soft and piping hot.

Ingredients: (Yield - about 10 idli)
2 cups jackfruit pieces
1/2 cup shredded fresh coconut 
1 cup jaggery, powdered (or adjust as needed)
2 cardamom pods
A pinch of salt
3/4 cup rice rava / idli rava (Fine cracked rice)
2 - 3 tbsp. water 
Ghee to grease the idli plates

Directions:
* Add jackfruit pieces, coconut, jaggery, cardamom and salt together to a blender / food processor.
* Blend the ingredients together to a paste.
 * Add rice rava to the bowl and just pulse to combine. (If using soaked rice instead of rava, drain the water completely from the rice and add it to the jackfruit puree. Blend it into slightly coarse paste without adding water.)
* Transfer the rice rava - jackfruit mixture to a bowl. Cover and keep it aside for about 20 - 30 minutes.
* The mixture should be thicker than the regular idli batter. However if the mixture appears too thick after the resting period, add a few tbsp. of water to the bowl and mix well. (I added about 2 tbsp. of water.)
* Heat water in a idli cooker / pressure cooker / steamer base on medium heat.
* Grease the idli plates and fill them with the jackfruit batter. Place the idli stand in the steamer and close the lid. Don't use the pressure valve if using pressure cooker.

* On low medium flame. steam for about 20 minutes or until when the surface of the idlis don't stick when touched with moist fingers. Turn off the stove and let sit for about 10 minutes.
* Run a sharp spoon around the edges of idlis and remove the idlis. 
* They can be served plain or with ghee or honey. Serve them warm for breakfast along with coffee.
This post is an entry for Blogging Marathon #122 and check the link to find out what other marathoners are cooking.
Sunday, April 18, 2021

A - Z Idli Series ~ E for Elaneer Idli

I was fixated on a recipe from Karnataka for today's 'E' post until I came across Mallika Badrinath's elaneer idli recipe, in a millet version. Inspired by the idea, I used coconut water in my regular idli recipe here but one can replace rice with any millet to make them more healthier. These idlis are gluten free and vegan if idli moulds are greased with oil. Coconut water and the white flesh from a young coconut are used to grind the idli batter instead of water in this case. It makes a difference in the final outcome and one cannot miss how the idlis turn out light, airy and spongy. 

Elaneer means tender coconut water in Tamil and Kannada and hence the name for the idli. Use a young coconut if accessible and add all the pulp / soft white flesh from it while grinding the batter. I had to manage with canned coconut water which was super sweet and contained about a spoon of tiny coconut pieces but not much pulp. The quantity of coconut water mentioned below in the recipe needs to be adjusted if using the soft flesh as well. The coconut flavor is not much noticeable in idlis if using only coconut water (and no white flesh) to grind the batter though the idlis  come out soft and spongy.

Ingredients: 
1 cup idli rice
1/2 cup skinned black gram / urad dal
1 young coconut / Coconut water with soft coconut flesh as needed 
(I used about 1 and 3/4 cups coconut water with no flesh. With coconut flesh, may be less liquid is needed.)
Salt as needed

Directions:
* Rinse idli rice and black gram and drain. Soak them together in water, in a bowl for about 4 - 5 hours and drain the water used to soak completely.
* Add soaked idli rice, black gram, salt, and coconut flesh to a grinder / blender. Next add coconut water as needed and grind them into a smooth and thick batter with pouring consistency. (I used my Oster 16 speed blender to grind them.)
* Transfer the batter to a container and cover it. Allow it to ferment overnight (if the batter was ground in the evening) or as needed in a warm place or in an oven with the lights on.
* Heat about 2 cups of water in a idli cooker base or a idli cooker or a steamer on medium heat. Grease the idli moulds with ghee / oil and spoon the batter into idli plates.
* Place the idli stand in the prepared cooker / steamer and close the lid. Don't use the valve for the lid if using a pressure cooker.
* Steam the idli on low heat setting for about 20 - 25 minutes or until done. (The idlis should not stick when touched with moist fingers.)
* Wait for about 10 minutes and then demold the idlis by running a spoon around the edges.
* Serve them warm with  chutney / sambhar.