HOME        |        ABOUT        |        COPYRIGHT        |        CONTACT        |         RECIPE INDEX        |         INDIAN THAALIS        |         MILLET RECIPES        |        EVENTS' ROUNDUP        

Showing posts with label South Indian Breakfast. Show all posts

Wednesday, January 5, 2022

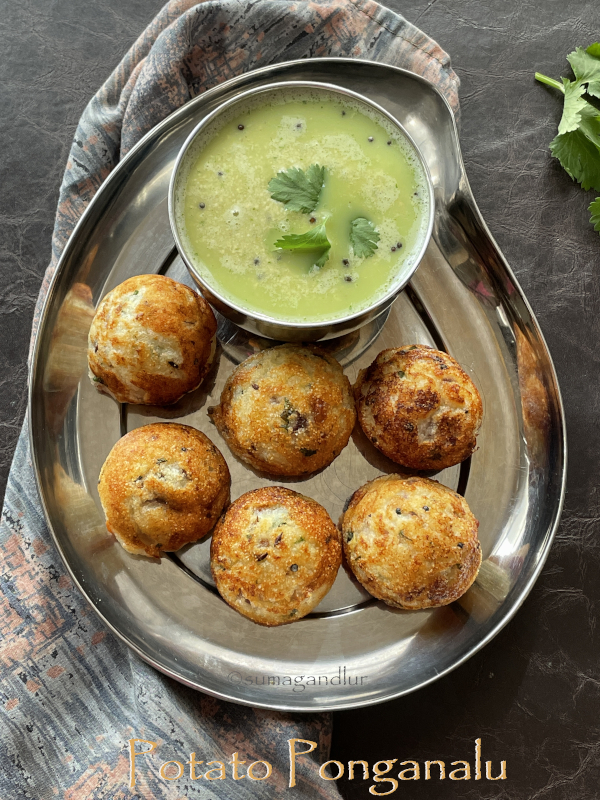
Potato Appe / Aloo Appe / Aloo Ponganalu

Appe / ponganalu / paniyaram / paddu are a breakfast or a snack item from the south Indian cuisine. They are prepared either using a fresh batter or using leftover batters used to make idli / dosas, the most popular breakfasts of the region. The batters are made with soaked rice and lentils that are ground and fermented, which usually needs advance planning.

There are a few instant versions as well like the one using semolina. Here is an interesting, instant kind that uses potato. I had bookmarked it from a weekly magazine a while ago because of the usage of potato in an appe recipe though I was equally skeptical because of the same reason. 

I kept wondering until the last minute of  preparation whether the mixture is going to stick to the pan and whether I should use the batter to prepare something else. There was no need to worry as they rise well and can be easily flipped if one waits patiently to let the bottom sides cook. They appear fragile at the beginning stages of cooking compared to the ones made with fermented batter. And they taste fabulous, served warm with a chutney on side.
 
Ingredients for tempering:
2 tsp. oil
1 tsp. each - Bengal gram (split chickpeas), mustard seeds, & cumin seeds 
1 tbsp. minced curry leaves
Ingredients for appe: (Yield - 18 - 20)
1 tbsp. flattened rice / poha 
1/2 cup semolina
2 tbsp. rice flour 
1 large sized potato / 1/2 cup mashed potato 
Salt to taste
1 green chili, finely minced
1 onion, peeled & finely chopped
1 tsp. finely grated ginger
A handful of cilantro, finely minced 
1/2 to 3/4 cup milk (Skim milk will do.)
1/4 tsp. baking soda or Eno's fruit salt
Oil to make appe

Prep work:
* Peel a large potato, cut into chunks and boil in water. Let it cool down and mash it finely.
* Wash and soak the flattened rice / poha in water for 5 to 10 minutes. Drain the water.
* Chop onion, ginger, chili, curry leaves and cilantro. 
* Heat 2 tsp. oil in a small pan. Add Bengal gram, mustard seeds, and cumin seeds to the oil. When Bengal gram starts turning reddish, add the minced curry leaves.

Directions:
1. Add semolina, rice flour, poha and mashed potato to a bowl. Next add minced onion, cilantro, ginger, chili, and salt to the bowl.
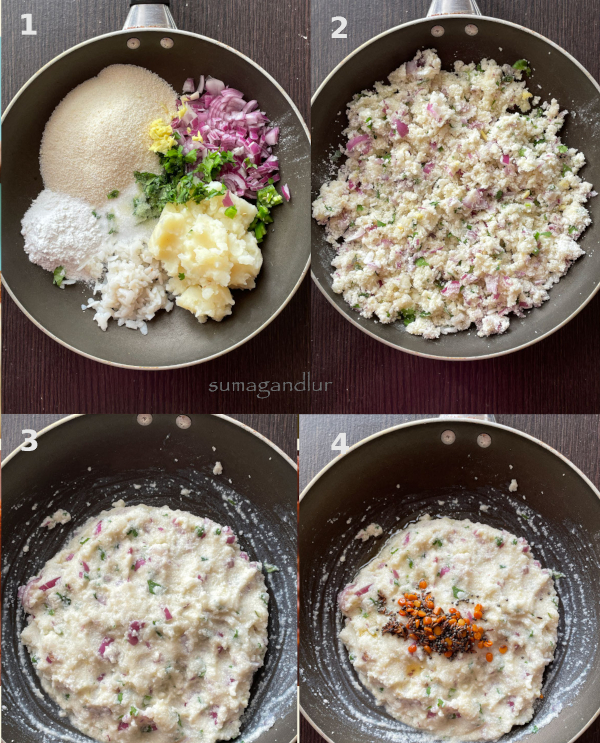
2. Mix all the ingredients well to combine. Make sure that there are no potato lumps in the mixture.
3. Pour 1/2 cup milk to the mixture and stir well to combine. Cover and let the mixture sit for about 15 - 30 minutes. 
4. Add the tempering / tadka to the semolina mixture. Add extra milk if needed at this point and stir well. (I soaked the mixture for about 30 minutes and added extra 1/4 cup milk.)
5. Heat the ponganalu / appe skillet and add a few drops of oil in each mold. 
6. Add baking soda or fruit salt to the mixture and mix well vigorously. (I added about a little more than 1/4 tsp. Eno's fruit salt, sprinkled a tbsp. water over it and mixed well.)
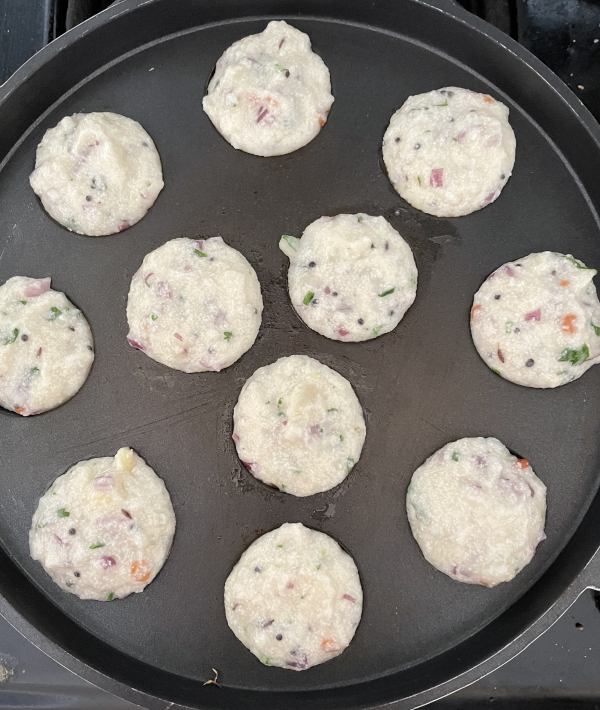
7. Fill the molds with batter, cover the skillet with a lid and cook on low medium heat until the batter doesn't appear raw on the surface. Or use a skewer and gently lift to check the bottom to notice if any golden brown spots formed.
8. If golden brown spots are formed, add a drop or two of oil on the surface of each of the ponganalu and flip them using a flat spoon/skewer. 

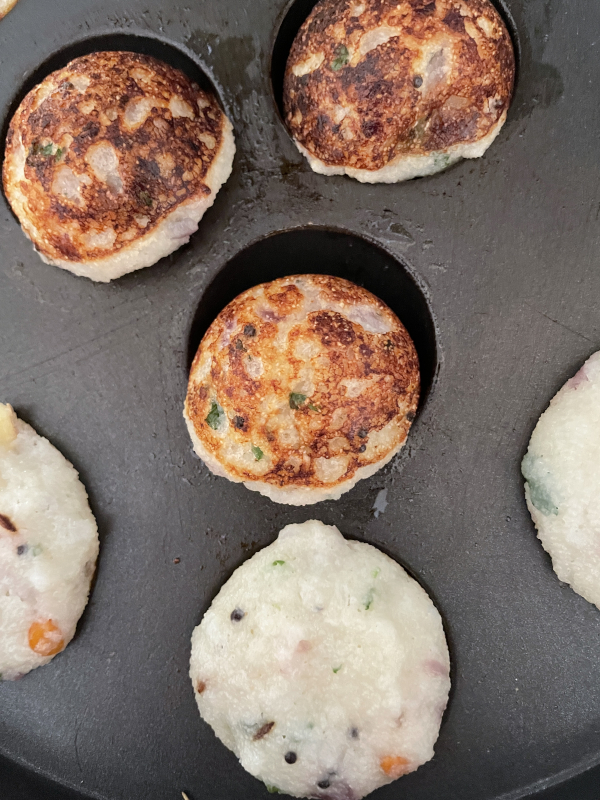
9. Cook until the other side lightly browns as well. (The appe would be slightly fragile compared to the regular appe because of the addition of potato. Be careful while flipping them and wait until the bottom sides of the appe are cooked well.)
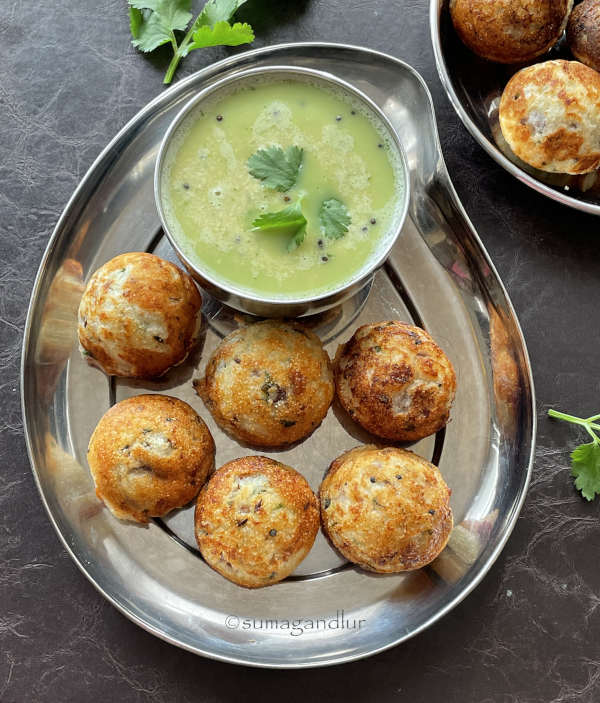
10. Remove them and repeat the process with the remaining batter. Serve them warm with a chutney of your choice.  

This is going to be my contribution to this week's Blogging marathon. Check the page link to see what other marathoners are cooking.

Tuesday, October 12, 2021

A - Z Idli Recipes ~ X for Xacuti Masala Aloo Stuffed Idlis

These idlis are inspired by these stuffed idlis, I posted a couple of years ago. A spicy potato filling stuffed inside idlis makes an interesting and tasty variation to the standard idlis. All one needs to make this variety idlis are fermented idli batter, and a curry which is kept on a dry side, making it suitable for stuffing. A watery or gravy curry is not going to work to use as stuffing here. Idli recipe can be found here. I prepared regular potato curry, replacing green chilis with xacuti masala to suit my 'X' post in this idli series. 

So far in this eries,
Ingredients: (Yield - 16 idlis)
Fermented idli batter
Potato curry using xacuti masala
Ghee to grease the idli plates

Directions:
* Heat water in a steamer or a idli cooker or a cooker base.
1. Stir the fermented batter well with a ladle. 
2. Prepare the curry on a dry side and keep it aside.
3. Grease the idli moulds and pour batter into a mould, filling up  only half of it. Take a big lemon sized portion of curry and roughly pat into a disc shape. Place it at the center of the idli mould and pour extra batter over it, enough to fill the mould.
* Repeat the steps with the remaining batter and the curry.
* Place the idli stand in the steamer, cover the lid and cook on low flame until done. (If using pressure cooker, don't put on the whistle). Add extra water to the steamer if water evaporates in the middle of steaming, taking care not to pour over the cooking idlis. 

4. Steam them on low flame until they are done. (One way to figure out if the idlis are done is to touch the idlis with moist fingers. If they don't stick then idlis are done. If they are sticking then they need more steaming. I usually steam for about 20 minutes on low flame while making idlis.)
* Turn off the stove and let them sit for about 5 - 10 minutes before removing them from moulds.
* Enjoy the stuffed idlis with chutney and/or sambhar.

Comments

Saturday, June 12, 2021

Lauki Idli / Sorekayi Idli / Sorakaya Idli / Bottle Gourd Idli

I had two kind of idlis on my mind for alphabet 'L' and in fact, I had already cooked one of those 'L' idlis, about an year ago. Lauki idlis / bottle gourd idlis was not on that list and to be honest, the idea did not even occur to me. The suggestion came from my husband at the last minute. Bottle gourd is one of those low calorie vegetables and I try to sneak in our diet as much as possible and so, I thought why not? A quick google search showed me that there are enough creative minds who had already experimented with the idea. 

I would have thought of a different batter if I had time but I had to keep it quick since these were made for today's breakfast with no advance preparation. I used an instant batter made with semolina aka rava idli batter for these idlis. And so there is no soaking, grinding or fermenting the batter. If one has toasted semolina on hand or a MTR rava idli packet, 😀 the idli preparation becomes a breeze. One can do the toasting semolina part in the recipe in advance and keep it handy. If one has never tried idli making, rava idli is an easy and instant version to try. 
The semolina is toasted with a seasoning and soaked in yogurt for about 20 -30 minutes and the batter is ready to go. I usually add grated carrot and peas to the rava idli batter to make it nutritious and today, bottle gourd went in instead. They turned out good and one would not even notice the difference between regular rava idlis and these. They make a great meal anytime of the day though these are considered a breakfast dish. We enjoyed them today with a chutney made with fried gram sans coconut. Vegetable saagu would be a delicious accompaniment to these idlis.
Ingredients: (Yield - 14 idli)
2 tbsp. oil
1 to 2 tbsp. cashews 
1 tsp. split chickpeas / Bengal gram / chana dal
1 tsp. skinned black gram / urad dal
1/2 tsp. mustard seeds
1 tsp. cumin seeds
1 inch ginger piece, finely chopped / grated
1 or 2 green chili, finely chopped
1 sprig of curry leaves
1 & 1/2 cups semolina (medium coarse)
3/4 cup peeled & grated bottle gourd
1/2 cup yogurt
3/4 cup water
1 tsp. salt or to taste
2 tbsp. minced cilantro
1/2 tsp. Eno's fruit salt

Directions:
1. Heat oil in  a pan and add cashews. Toast them until golden brown, by turning them once. Transfer them into a small bowl with a slotted spoon.
* Add Bengal gram, skinned black gram, mustard and cumin seeds to the same oil. When the lentils start to turn reddish brown, add ginger, green chillies and curry leaves. Sauté for about a minute. 
2. Next add semolina to the pan and toast on medium flame, continuously stirring until you start to smell the aroma and it starts to slightly change the color.
* Turn off the stove and transfer the mixture into a bowl and let it come to room temperature. (This can be done in advance and the mixture can be stored in air tight container for weeks.)
3. Add grated bottle gourd, salt and minced cilantro to the semolina bowl.
4. Next add yogurt and water to the bowl and mix well. Cover and keep it aside for about 30 minutes.
5. Stir the mixture once and if the mixture appears too thick, add some water. 
* Grease the idli moulds with oil / ghee. Place a cashew at the center of each idli mould. (Or the cashews can be added to the batter.)
* Heat about 2 cups of water in a idli cooker base or a idli cooker or a steamer on medium heat.
6. Add Eno's fruit salt to the semolina bowl just before making idlis and sprinkle a tsp. of water over it and mix well. 
* Ladle the batter into the idli moulds.
* Place the idli stand in the prepared cooker / steamer and close the lid. Don't use the valve for the lid if using a pressure cooker.
* Steam the idlis on low heat setting for about 20 - 25 minutes or until done. (The idlis should not stick when touched with moist fingers or a toothpick / knife inserted in the center should come out clean.) Check the water level in the steamer base and add extra if needed.
* Wait for about 10 minutes and then remove the idlis by running a spoon around the edges.
* Drizzle melted ghee over the idlis and serve them with a chutney / saagu.
* Refrigerate the left over idlis and use in a day or two. Or they can be cooled down immediately after preparation and frozen to use later. Nuke them covered in a microwave, and enjoy hot, piping idlis when needed. 

Wednesday, May 5, 2021

A - Z Idli Series ~ I for Idli (Idli Rice Version)

So far in the series,
Today is the turn for the basic version of idli which happens to be the standard for all the idli variations out there and cherished by South Indians. For the uninitiated, idli is an iconic South Indian breakfast dish which are soft and fluffy steamed cakes. They are prepared using a fermented batter of rice and skinned black gram. This traditional dish is considered to be one of the healthiest breakfasts from the region, easily digestible and fit enough to be prescribed for the ill and convalescing. The dish needs an advanced preparation as the ingredients need to be soaked, ground and then the batter needs to be fermented before steaming it in special moulds. Idlis taste bland on their own. However drizzle some melted ghee over them and dig in with delicious accompaniments like a chutney, usually a coconut based one, a lentil dish called sambhar and spicy lentil powders, thus making it a filling and enjoyable meal for any time of the day. They are obviously gluten free and vegan if you skip the ghee.

My idli turn out super fluffy and soft. To be honest, I grew up watching idli being made around me on a regular basis and I don't fret about the idli preparation. I know however it is a daunting task for those who are not well versed with the process. I tried to explain the process in as much detail as possible here for anyone who needs some tips and the post has turned out to be a lengthy one. Idli making involves four steps - soaking the ingredients, grinding, fermenting and steaming the idlis. Grinding the batter to the correct consistency and it's proper fermentation are the important factors which decides the fate of the idlis. Idli making is an easy task with the modern conveniences we have in the kitchen compared to the olden days when the women had to manually grind the batter in stone grinders and steam on wood / kerosene stoves.
Usually if one lives in a warmer climate like India, soaking the ingredients in the afternoon and grinding it in the evening works fine, if planning for next day's breakfast. My husband's hometown is like a hot oven during summers and so, my mother in law would grind the batter around 9 at night so that the fermented batter would not go sour by morning breakfast time. I live in a cold climate and so my routine in recent years has been to soak the ingredients as soon as I wake up. I grind the ingredients around 11 am and leave the batter in oven with the light on. There are instances where my batter took around 24 hours or more to ferment, during the peak winter time.

Ingredients used in idli preparation:
Idli preparation needs two basic ingredients, skinned black gram / urad dal and rice. Skinned black gram, either whole or split can be used. (My grand mother used to use the whole black gram to make dosas and idlis but it is a pain to sit and rinse off the skins off the soaked beans.) 

Idli rice that is used in the recipe is the short, fat parboiled rice that also goes by the name Salem rice. In lieu of idli rice, idli rava aka cream of rice can be used. In that case soak separately black gram and idli rava. Some use fenugreek seeds / methi and flattened rice / poha as well in the recipe.
 
The black gram and rice proportions used also vary from home to home. The rice used varies from 2 to 4 times the quantity of black gram used. I go with 1:2 ratio whereas my mother uses 1:3 ratio. In Andhra and Karnataka, dosa and idli batters are different but I have noticed that some use the same batter for the both the dishes. 
Step 1 - Soaking the ingredients:
Soaking period is about 4 hours but two minutes are needed to rinse and soak the ingredients. Some soak the ingredients individually but I don't see any merits and soak them together which works fine for me. Rinse them twice thoroughly with water and soak them in enough water so that the water level is higher through out the soaking period. (About 3 hours is enough if using idli rava instead of idli rice and the ingredients are soaked individually in that case.)

Step 2 - Grinding the ingredients:
The ingredients are ground to a smooth batter either in a wet grinder or an Indian style mixer / blender. I have a wet grinder but I prefer grinding in my Oster 14 speed blender which works good for me. (The grinder takes more time than the blender and I hate cleaning the grinder.) I haven't watched the time but the amount of ingredients I mentioned in the recipe can be ground in one batch, which takes around 10 minutes. Don't grind the batter too thick or runny. Too thick batter will not ferment and thin batter will yield flat and not well cooked idlis. Salt can be added while grinding if living in a cold climate and in warmer climates, add salt before steaming the idlis. If using idli rava, grind black gram first, squeeze out the water from the idli rava (that has been soaking in water) and add the rava to the batter and run the blender for a couple of minutes to blend.

Step 3 - Fermenting the batter:
This is the important part of the idli preparation. The ground batter needs to be covered and placed in a warm place to ferment. The time of fermentation depends upon the local weather. It may take around 8 to 10 hours to double that time. Place it in an oven with the light on (without turning the oven on) if living in a cold climate. The yogurt setting in an instant pot works too. The final fermented batter would increase in volume, be airy and have a slightly sour smell to it. If the batter turns out thin for some reason, use it to make dibba rotte instead of idlis. 

Step 4 - Steaming the idlis:
If living in a warm place, salt can be added to the batter at this point. Gently stir the fermented batter a couple of times to uniformly aerate the batter and ladle the batter into greased moulds. If you don't own a idli stand, they can be steamed in small steel cups / glasses. Or even in a steel plate with high edges in a similar fashion to dhokla and cut them into wedges. The idlis can be steamed in a idli cooker, pressure cooker or a steamer. Don't use the safety valve if using a pressure cooker. Steam the idlis on low medium setting and it takes around 20 - 25 minutes on my gas stove to steam them. Moisten your fingers with water and check the top of idli to check whether they are done. They will not stick if done. If the idli top sticks to your moist fingers, then it needs to be steamed further.
Storing the batter and idlis:
I never refrigerate the idli batter but my mother recommends the refrigerated batter to be used within three days. She adds salt only to the portion she is going to use to make idlis and refrigerates the rest of the batter. She leaves the batter on the counter for a while before using it the next time. The refrigerated batter can be used to make again idlis, dibba rotte or ponganalu.
 
I instead usually make a big batch of idlis and freeze as many idlis as I need. (This works if you don't have power cuts in your area.) I cool down the idli immediately after preparation and freeze them to use later. They need to be just warmed in a microwave, covered until hot to enjoy them when needed. 

Ingredients: (Yield - 20 - 22 idlis)
1/2 cup skinned black gram / urad dal
1 cup idli rice
1 & 3/4 tsp. salt or to taste
1 & 1/4 cup water
Ghee to grease the idli moulds and drizzle over idlis while serving

Directions:
* Rinse idli rice, and skinned black gram together and drain. Soak them together in water, in a wide bowl for about 4 - 5 hours and drain the water used to soak completely.
* Grind them together adding salt and water just enough to grind them into a smooth and thick batter. (The salt can be added just before making idlis if living in a warm climate. I add it while grinding since I live in a cold climate and the batter takes longer to ferment.)
* Transfer the batter to a container large enough to hold the fermented batter. (The batter raises while fermenting and so plan accordingly and use a big container.) Cover the container and allow it to ferment overnight (if the batter was ground in the evening) or for about 10 - 12 hours in a warm place. If living in a cold climate, leaving the batter in an oven with the lights on (without turning on the oven) helps. Or use yogurt setting in an instant pot.
* The fermented batter looks like below - thicker than when grounded, airy, and slightly sour smelling.
 
* Heat about 2 cups of water in a idli cooker base or a idli cooker or a steamer on medium heat. 
* Grease the idli moulds with ghee / oil. 
* Gently stir the batter a couple of times with a ladle. 
* Ladle the batter into the idli  moulds carefully without spilling.
* Place the idli stand in the prepared cooker / steamer and close the lid. Don't use the valve for the lid if using a pressure cooker.
* Steam the idlis on low heat setting for about 20 - 25 minutes or until done. (The idlis should not stick when touched with moist fingers.) Check the water level in the steamer base and add extra if needed.
* Wait for about 10 minutes and then remove the idlis by running a spoon around the edges.
* Drizzle melted ghee over the idlis and serve them with a chutney, sambhar and/or spicy podi. Mine were served with roasted gram chutney, sambhar and nalla karam podi.
* Refrigerate the left over idlis and use in a day or two. Or they can be cooled down immediately after preparation and frozen to use later. Nuke them in a microwave, covered and enjoy hot, piping idlis when needed. 

Monday, April 19, 2021

A - Z Idli Series ~ F for Foxtail Millet Idli

Today's idli are made of foxtail millet, a millet that has been grown in India since ages. The millet is rich in fiber, calcium and has a low glycemic index making it an ideal choice for diabetics. These idlis are made only with foxtail millet and skinned black gram, thus  making it a healthy and nutritious breakfast choice for anyone. I sometimes replace a portion of millet with rice but rice free version is obviously healthier. These idlis when served with chutney and/or sambhar make a filling and delicious breakfast / brunch. Obviously, these are gluten-free and vegan if  idli moulds are greased with oil.   
Ingredients: (Yield - 18 - 20 idlis)
1 cup foxtail millet
1/2 cup skinned black gram / urad dal
1/2 tsp. fenugreek seeds
Salt to taste
Water to grind the batter

Directions:
* Rinse foxtail millet, black gram and fenugreek seeds and drain. Soak them together in water, in a bowl for about 4 - 5 hours and drain the water used to soak completely.
* Grind them together adding salt and water just enough to grind them into a smooth and thick batter .
* Transfer the batter to a container and cover it. Allow it to ferment overnight (if the batter was ground in the evening) or for about 10 - 12 hours in a warm place or in an oven with the lights on if living in a cold climate until it ferments.
* Heat about 2 cups of water in a idli cooker base or a idli cooker or a steamer on medium heat. 
* Add Eno's fruit salt to the batter if the fermented batter doesn't raise much. Add 1/2 tsp. fruit salt over the batter and sprinkle a little over it and quickly stir the batter to combine.
* Grease the idli moulds with ghee / oil and spoon the batter into idli plates.
* Place the idli stand in the prepared cooker / steamer and close the lid. Don't use the valve for the lid if using a pressure cooker.
* Steam the idlis on low heat setting for about 20 - 25 minutes or until done. (The idlis should not stick when touched with moist fingers.)
* Wait for about 10 minutes and then demold the idlis by running a spoon around the edges.
* Serve them warm with a chutney / sambhar. 
* Leftovers can be refrigerated.

Sunday, April 18, 2021

A - Z Idli Series ~ E for Elaneer Idli

I was fixated on a recipe from Karnataka for today's 'E' post until I came across Mallika Badrinath's elaneer idli recipe, in a millet version. Inspired by the idea, I used coconut water in my regular idli recipe here but one can replace rice with any millet to make them more healthier. These idlis are gluten free and vegan if idli moulds are greased with oil. Coconut water and the white flesh from a young coconut are used to grind the idli batter instead of water in this case. It makes a difference in the final outcome and one cannot miss how the idlis turn out light, airy and spongy. 

Elaneer means tender coconut water in Tamil and Kannada and hence the name for the idli. Use a young coconut if accessible and add all the pulp / soft white flesh from it while grinding the batter. I had to manage with canned coconut water which was super sweet and contained about a spoon of tiny coconut pieces but not much pulp. The quantity of coconut water mentioned below in the recipe needs to be adjusted if using the soft flesh as well. The coconut flavor is not much noticeable in idlis if using only coconut water (and no white flesh) to grind the batter though the idlis  come out soft and spongy.

Ingredients: 
1 cup idli rice
1/2 cup skinned black gram / urad dal
1 young coconut / Coconut water with soft coconut flesh as needed 
(I used about 1 and 3/4 cups coconut water with no flesh. With coconut flesh, may be less liquid is needed.)
Salt as needed

Directions:
* Rinse idli rice and black gram and drain. Soak them together in water, in a bowl for about 4 - 5 hours and drain the water used to soak completely.
* Add soaked idli rice, black gram, salt, and coconut flesh to a grinder / blender. Next add coconut water as needed and grind them into a smooth and thick batter with pouring consistency. (I used my Oster 16 speed blender to grind them.)
* Transfer the batter to a container and cover it. Allow it to ferment overnight (if the batter was ground in the evening) or as needed in a warm place or in an oven with the lights on.
* Heat about 2 cups of water in a idli cooker base or a idli cooker or a steamer on medium heat. Grease the idli moulds with ghee / oil and spoon the batter into idli plates.
* Place the idli stand in the prepared cooker / steamer and close the lid. Don't use the valve for the lid if using a pressure cooker.
* Steam the idli on low heat setting for about 20 - 25 minutes or until done. (The idlis should not stick when touched with moist fingers.)
* Wait for about 10 minutes and then demold the idlis by running a spoon around the edges.
* Serve them warm with  chutney / sambhar.