HOME        |        ABOUT        |        COPYRIGHT        |        CONTACT        |         RECIPE INDEX        |         INDIAN THAALIS        |         MILLET RECIPES        |        EVENTS' ROUNDUP        

Thursday, August 26, 2021

Maduros

Maduros are fried sweet plantains that are prepared throughout Latin America and Caribbean regions. Basically ripe plantains are sliced and fried in oil until golden and cooked through and are served as a side dish. These are made with very ripened plantains but not the firm green colored plantains and are very delicious to snack on. The unripe, green ones are more suited to make yummy chips or one more yummy snack, the twice fried tostones / patacones

In case ripened plantains are not readily available at your local stores, buy green plantains and leave them outside refrigerator a few days to ripen. Plantains soften and develop more sugar as they turn yellow and then black eventually. Plantain that has a dull yellow color with black patches / spots or almost black are used to make maduros. Very ripe plantains yield really sweet maduros but I used that have not yet turned dark which yield a little starchy and not too sweet maduros.

Ingredients: 
Ripened plantains 
Neutral oil to fry (I used canola oil.)
Salt (optional) 

Directions: 
* Chop the ends of the plantain and cut a slit along the length of plantain, avoiding cutting into the flesh. Remove the peel by pulling it sideways than lengthwise. Or use a peeler instead if not comfortable using a knife to peel. Chop plantains into one inch thick diagonal slices.

* Heat about 1/8 inch oil in a wide pan / skillet over medium heat. There is no need to bring the oil to a smoking point. Gently drop a plantain piece and see whether it bubbles vigorously. If it does then the oil is ready to fry. Otherwise, heat the oil some more. Once the oil is ready, add the plantain slices, as many as the pan can fit without overcrowding.

* Fry the plantain pieces until they start to lightly brown. Lower the heat and continue to cook, turning them occasionally, until they turn deep golden brown. (Lowering the heat is important since the plantains can burn / brown quickly without getting properly cooked.)

* Transfer them to a paper towel lined plate / tray. Sprinkle with salt / sugar if desired and serve them warm.

This post is an entry for Blogging Marathon and check the link to find out what other marathoners are cooking.

Comments

Wednesday, August 25, 2021

Kele Ki Tharuva / Kele Ki Tharua


Tharua / tharuva are crisply fried, vegetable slices that are served as a side dish / snack from Bihar and Jharkhand regions. I came across them on a YouTube video featuring a Bihari meal, from Mithila region to be particular. The home-cook showed tharuva made with both plantains and bitter gourds. The vegetables are peeled, sliced lengthwise and then sprinkled with a mixture of rice flour and spices and then are shallow fried. Mustard oil which is the local cooking medium is used but tharua can be fried using any neutral tasting cooking oil. Making tharuva is quite simple and straight forward and they remain crisp for a longer time. They can be therefore made a couple of hours before serving unlike bhajiya which turn soggy if sitting longer. 

The cook had used small sized green plantains which are widely available in India and chopped them once lengthwise. If chopped in that fashion, one is basically ending up with two thick and long slices from each plantain. I have made this plantain tharua three times so far, each time cutting plantains in different sizes. The first time, I kept the size of the pieces similar to the one I saw on the video and it took longer to cook them. My mother had coincidentally called when I was frying them. She mentioned seeing a similar dish on a cook show and suggested to chop the plantains into small, thin strips, which I followed this time. I have also tried chopping them into thin dices which I enjoyed the most though they may not be the traditional style. Whatever method you chose, try to keep the pieces in similar size and thickness so that they get fried at the same time, uniformly. Peel and remove the seeds if using bitter gourds for tharua.

Ingredients:
2 big sized plantains
3 or 4 tbsp. rice flour
1 tsp. coriander powder
1 tsp. chili powder or to taste
Salt to taste
1/4 tsp. turmeric powder
Oil to fry 

Directions:
* Chop the ends and peel the plantains. Cut each plantain lengthwise into two pieces. Chop each piece lengthwise into three portions. Depending upon the length of each piece, cut them into two or three crosswise.

* Combine rice flour, coriander powder, chili powder, salt and turmeric powder in  a wide plate. Roll the chopped plantain pieces in the mixture and sprinkle a tbsp. or two of water over the pieces to bind. (There may be some leftover rice flour mixture if the plantains are smaller in size.)

* Heat about 1/8 inch oil on medium flame in a wide skillet. There is no need to bring the oil to a smoking point. Drop gently plantain pieces into the hot oil. Add as many as the skillet can fit without overcrowding. Fry them for about a minute and lower the heat. Continue frying, turning them over occasionally until they turn golden brown. 
* Serve them as part of a Bihari thali or as a side dish or as a snack.

This post is an entry for Blogging Marathon and check the link to find out what other marathoners are cooking.

Comments

Tuesday, August 24, 2021

Aratikaya Allam Pachimirchi Koora

My 'Blogging Marathon' theme of the week is to pick one ingredient and cook three dishes with it. I chose to go with 'plantain' as my star ingredient and there are going to be three recipes based on it. Plantains are a good source of dietary fiber and potassium like bananas and is a staple food across tropical regions of the world. Especially in south India where I grew up, plantains are used to prepare curries and chips. 

The curry preparations of course vary region wise and today's version is a traditional one from Andhra. Cooked aratikaya / plantain is sauteed with a paste of ginger and green chili (allam - pachimirchi) and finished off with a drizzle of lemon juice. Plantains in the recipe can be substituted with peeled and cooked potatoes. This is a very tasty curry and enjoyed with some hot steamed rice and a spoon of ghee.

Here are some other plantain based curries.
Aava Pettina Aratikaya Koora
Plantain Fry
Plantain - Moongdal Curry
Vazhakkai Podimas

Ingredients:
2 plantains, peeled and cubed (About 3 cups)
1/8 tsp. turmeric powder
2 spicy green chilies or to taste
1 inch piece of ginger
2 tsp. oil
1/2 tsp. mustard seeds
1 tsp. split chickpeas / chana dal
1 tsp. split, skinned black gram / urad dal
10 curry leaves
Salt to taste
1 tsp. lemon juice

Directions:
* Pressure cook plantain cubes adding about 1/4 cup of water and turmeric, for 3 whistles and drain.
* Grind together chilies and ginger to a fine paste or grate them finely.
* Heat a pan and add mustard seeds, split chickpeas, black gram. When the dals turn reddish, add curry leaves and the chili - ginger paste. Fry the paste for a minute and add the cooked plantain, and salt. Gently mash the plantain, mix and cook the mixture for about a minute.
* Turn off the stove and add lemon juice to taste. Mix well and serve with warm rice.

This post is an entry for Blogging Marathon and check the link to find out what other marathoners are cooking.

Comments

Ragi - Rave Idli / Finger Millet - Semolina Idli / Ragi - Rava Idli

Rave idli aka semolina idli was created by MTR during second world war when rice was in short supply. This idli was a variation to the standard idli recipe which of course needed rice. Semolina idlis are a quick version idlis which need no grinding or fermenting and a popular one at restaurants and homes across the south Indian state of Karnataka. 

A few years ago, MTR came up with a spin off of this version called ragi - rava idli / semolina and finger millet idlis. The addition of finger millet flour to semolina idlis obviously make it healthier and guilt-free. This is my attempt to recreate that version at home. I have used semolina and finger millet flour in equal proportions here though semolina quantity can be increased if one is skeptical about finger millet. We are used to finger millet and so we found the idlis delicious. 

These idlis are not gluten-free or vegan as most of the idli recipes I posted in the series so far. They are intsant version idlis and need no grinding or fermenting. However both semolina and finger millet flour are soaked in yogurt for at least 30 minutes. Grated carrot, peas, or coconut can be added to make them more nutritious and tasty. Or one can even stick to the basic version. I found that these idlis need to be steamed longer compared to the standard version. These idlis make a healthy breakfast / brunch item and is diabetic friendly. It makes a wholesome dish when served with side dishes like vegetable saagu, sambhar or chutney.

Ingredients: (Yield - 18 idli)
1 tbsp. oil
1 tbsp. cashews
1/2 tsp. mustard seeds
1/2 tsp. skinned black gram / urad dal
1 sprig of curry leaves
1 cup semolina / rava 
1 cup finger millet flour / ragi flour
Salt to taste 
1 cup yogurt
1/2 cup grated carrot
2 tbsp. minced cilantro
3/4 cup water + extra only if needed 
1/4 tsp. Eno's fruit salt
Directions:
* Heat oil in a pan and toast cashews until golden brown. Remove them with a slotted spoon and keep them aside. To the same pan, add mustard, and black gram. Sauté until the black gram turns golden brown and add curry leaves. Toast for few seconds and add semolina. On medium flame, toast semolina until it starts to change color slightly and start to smell the aroma of it. Turn off the stove and let the mixture cool down. This step can be done in advance and the toasted semolina can be stored in a container.
2. Add finger millet flour / ragi flour and salt to the semolina bowl.
3. Add salt, yogurt, carrot and cilantro to the semolina - flour mixture and mix well. Add water as needed to prepare a thick, pourable consistency batter. Cover and allow it to rest for about 30 minutes.
4. Check the consistency of the batter after the resting period. Add extra water only if the mixture appears dry. 
* Heat about 2 cups of water in a idli cooker base or a idli cooker or a steamer on medium heat. 
5. Add 1/4 tsp. of Eno's fruit salt to the batter and sprinkle a tsp. of water over it. (or add a pinch of baking soda instead of fruit salt.) Gently stir the batter with a ladle until the mixture turns frothy.
6. Grease the idli moulds with ghee / oil. Place a toasted cashew at the center of each mould. (Or cashews can be added directly to the batter.) Fill the moulds with batter.
* Place the idli stand in the prepared cooker / steamer and close the lid. Don't use the valve for the lid if using a pressure cooker.
7. Steam the idlis on low heat setting until done. (The idlis should not stick when touched with moist fingers. It takes longer to steam these idlis compared to the standard rice - urad dal version.) Check the water level in the steamer base and add extra if needed.
* Wait for about 10 minutes and then remove the idlis by running a spoon around the edges.
* Drizzle melted ghee over the idlis and serve them with a chutney and /or sambhar. Mine were served with roasted gram chutney and sambhar.
* Refrigerate any left over idlis and use in a day or two. Or they can be cooled down immediately after preparation and frozen to use later. Just nuke them in a microwave, covered and enjoy hot, piping idlis when needed. 

Wednesday, August 18, 2021

Quinoa Idli

So far in this series -

D for Dal Idli


J for Jowar Idli
L for Lauki Idli

O for Oats Idli
P for Poha Idli

Idli is one of the healthiest breakfast dishes one can pick from the south Indian menu. Idlis are made with black gram and rice / cream of rice and I have replaced half the portion of rice with quinoa here though quinoa quantity can be increased. Adding protein rich quinoa obviously makes the dish more healthier and makes a filling breakfast / brunch item. I have used tricolored quinoa which has given the color to the idlis though ivory colored quinoa can be used. These are gluten free and vegan and taste delicious when served with sambhar and / or chutney.

Ingredients: (Yield - 20 idlis)
1/2 cup quinoa
1/2 cup idli rice
1/2 cup skinned black gram / urad dal
1/2 tsp. fenugreek seeds / methi seeds
1.5 tsp. salt
Water to grind (I added a little over 3/4 cup of water.)
Directions:
1. Rinse quinoa 2 - 3 times by rubbing between fingers and drain.  Similarly rinse idli rice, skinned black gram, and fenugreek seeds together and drain. Soak them together in water, in a wide bowl for about 4 to 5 hours and drain the water used to soak completely.
2. Grind them together adding salt and water, only as much needed to grind them into a smooth and thick batter. (The salt can be added just before making idlis if living in a warm climate. I add it while grinding since I live in a cold climate and the batter takes longer to ferment.) Transfer the batter to a container and cover it.
3. Allow the batter to ferment overnight (if the batter was ground in the evening) or for about 10 - 12 hours in a warm place. If living in a cold climate, leaving the batter in an oven with the lights on (without turning on the oven) helps. Or use yogurt setting in an instant pot.
The fermented batter looks like above in the picture - thicker than when grounded, airy, and slightly sour smelling. It however doesn't raise much as in case of the standard idli version. Gently stir the batter a couple of times with a ladle. 
* Heat about 2 cups of water in a idli cooker base or a idli cooker or a steamer on medium heat. 
4. Grease the idli moulds with ghee / oil. Ladle the batter into the idli moulds carefully without spilling.
 * Place the idli stand in the prepared cooker / steamer and close the lid. Don't use the valve for the lid if using a pressure cooker.
* Steam the idlis on low heat setting for about 20 - 25 minutes or until done. (The idlis should not stick when touched with moist fingers.) Check the water level in the steamer base and add extra if needed.
* Wait for about 10 minutes and then remove the idlis from idli stand. Remove the idlis by running a spoon around the edges.
Serving the idlis:
Drizzle melted ghee over the idlis and serve them with a chutney, and sambhar if preferred. Mine were served with a mixed vegetable sambhar.

What to do with leftover idlis:
1. Refrigerate the left over idlis and use in a day or two. 
2. Or they can be cooled down immediately after preparation and frozen to use later. Nuke them in a microwave, covered and enjoy hot, piping idlis when needed. 

Tuesday, August 17, 2021

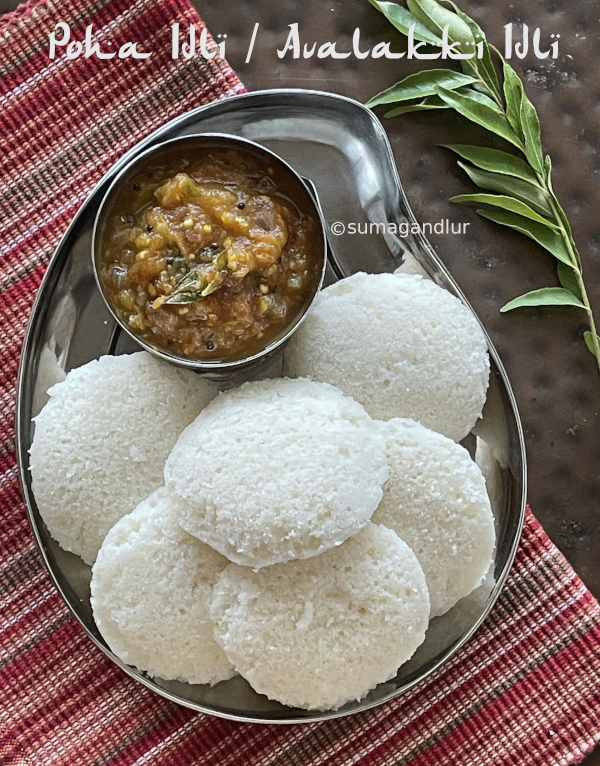
Poha Idli / Avalakki Idli / Flatenned Rice Idli


So far in this series -
D for Dal Idli
J for Jowar Idli
L for Lauki Idli
O for Oats Idli
Here are some super soft and quick version idlis made with flattened rice and cream of rice aka idli rava. These idlis need no advance planning as the batter needs a minimal amount of grinding and does not need fermentation as the standard version idlis. In fact, these idlis can be prepared in less than an hour, including the prep work and steaming the idlis. These idlis are obviously gluten free and vegan and can be served with a side dish of your choice - chutney / sambhar / podi. 
These idlis tend to be softer than the standard version because of the flattened rice used in the recipe. Thick or thin flattened rice / poha can be used in this recipe. My mother uses poha, idli rava and yogurt in the same proportion while making these idlis but I use more idli rava compared to the poha quantity being used. Poha needs to be soaked in yogurt until it softens and then ground finely. Idli rava is then mixed to it and soaked for a short period of time. A pinch of cooking soda or Eno's fruit salt is added just before steaming idlis as the batter is not fermented in this case. However don't go overboard using fruit salt since the idlis get ruined. They tend to spread and turn out crumbly. 1/8 to 1/4 tsp. fruit salt would be enough. 
Ingredients: (Yield 10 idlis)
1/2 cup thick variety flattened rice / poha
1 cup yogurt
3/4 cup idli rava
Salt to taste
Water as needed (I added about 1/2 cup.)
1/4 tsp. Eno's fruit salt
Oil / ghee to grease the idli plates
Directions:
1. Add flattened rice / poha in yogurt to a mixing bowl and mix well. (I added 1/2 cup yogurt for soaking poha and 1/2 cup yogurt while grinding.) 
2. Cover and leave the mixture until it softens. (The thick variety poha I get locally softens very quickly. Thin variety poha can be substituted if the thick variety poha available takes longer to soak.)
3. Add the mixture to a blender and grind the mixture finely. Then add idli rava and salt to the ground poha. 
4. Pulse the mixture a few times just to combine. There is no need to finely grind the mixture.
5. Transfer the mixture to the bowl and add water if needed to bring to a thick, pouring idli batter consistency. Let the mixture sit for about 20 minutes. 
* Heat about 2 cups of water in a idli cooker base or a idli cooker or a steamer on medium heat. 
6. Add 1/4 tsp. of Eno's fruit salt and sprinkle a tsp. of water over it. (or add a pinch of baking soda instead of fruit salt.) Gently stir the batter with a ladle until the mixture turns frothy.
7. Grease the idli moulds with ghee / oil and fill them with batter.
* Place the idli stand in the prepared cooker / steamer and close the lid. Don't use the valve for the lid if using a pressure cooker.
8. Steam the idlis on low heat setting for about 20 - 25 minutes or until done. (The idlis should not stick when touched with moist fingers.) Check the water level in the steamer base and add extra if needed.
* Wait for about 10 minutes and then remove the idlis by running a spoon around the edges.
* Drizzle melted ghee over the idlis and serve them with a chutney and /or sambhar. Mine were served with tomato - cilantro chutney.
* Refrigerate any left over idlis and use in a day or two. Or they can be cooled down immediately after preparation and frozen to use later. Just nuke them in a microwave, covered and enjoy hot, piping idlis when needed.