HOME        |        ABOUT        |        COPYRIGHT        |        CONTACT        |         RECIPE INDEX        |         INDIAN THAALIS        |         MILLET RECIPES        |        EVENTS' ROUNDUP        

Showing posts with label Yogurt. Show all posts

Sunday, September 5, 2021

Dahi Aloo ~ Potatoes in Spicy Yogurt Gravy

 
Today's recipe 'dahi aloo' is a quick and easy side dish that has it's roots in the North Indian cuisine. As the name indicates, the two main ingredients of this recipe are dahi and aloo which are yogurt and potatoes and the rest of the ingredients used are a few spices / spice powders, which are all staples of an Indian kitchen. The dish can be cooked under 15 minutes if one has cooked potatoes handy.  

Dahi aloo is prepared in the north Indian states with minor variations. The preparation is along similar lines of a 'kadhi' sans chickpea flour. Using onions and tomatoes in the dish is optional. Garam masala / kasuri methi can be added as well for flavoring if preferred. The cooked potatoes are roughly mashed and used in the recipe. The potatoes are neither completely mashed into a mush nor cooked as in a potato fry recipe. The whisked yogurt along with spices is added and cooked on a low heat setting. The flavors used in the recipe are quite basic ones and this dish is a perfect example of  a 'home cooked meal' where simple flavors shine through. 

Use yogurt which is slightly on the sour side or add some amchur / lemon juice to the dish for some tanginess. One of the things to keep in mind while cooking dahi aloo is not to curdle the yogurt. Avoid adding yogurt to the hot pot since chances of it curdling are high if done so. Whisking a tsp. of chickpea flour / rice flour / corn starch, along with yogurt also helps. I have added some tips in the recipe directions below, that I use to avoid curdling yogurt when making these kind of dishes.

Ingredients: (yield 2 servings)
2 big potatoes / 4 small ones
2 tsp. ghee / oil
1 tsp minced / grated ginger
1 green chili, finely chopped
A pinch of asafoetida
1/2 cup yogurt 
1 cup or slightly more water
1 tsp. chickpea flour / besan
Salt to taste
1/8 tsp. turmeric powder
1/2 tsp. coriander powder to taste
1/4 tsp. chili powder or to taste
Minced cilantro to garnish

Directions:
* Peel and cut potatoes into big cubes. Pressure cook them for 2 or 3 whistles adding enough water. Or alternatively, they can be cooked in a pot on stove top or in a microwave until fork tender. Add the potatoes to a colander and drain. Run cold water over them. (I do this to keep everything at room temperature when adding the yogurt to avoid it from curdling.)
* Add ghee / oil to a pan and heat it. Don't bring it to a smoking point. Add cumin seeds and when they start to brown, add chilies and ginger. Saute for 30 to 40 seconds and add asafoetida powder. Stir well once and turn off the stove. 
* Transfer the pan to another burner which is not hot or place on a trivet and add the cold, drained potatoes and 1/4 cup water to it. It is to make sure that the pan is not hot while adding the yogurt to it. 
* Whisk yogurt, remaining water and chickpea flour together. (I use a blender for a homogeneous mixture.) 
* Now add yogurt mixture, salt, turmeric, coriander powder to the pan. Stir well and taste. Next add chili powder as needed.
* Turn on the heat and put the pan on stove. Cook on low flame, stirring quite often. If the heat used to cook is high, the yogurt mixture starts to curdle. Cook until the mixture slightly thickens, about 10 - 12 minutes. Taste and cook longer if needed.  Also note that the mixture thickens slightly after cooling.
* Garnish with chopped cilantro and serve hot with rotis / pooris / rice.

bmlogo
This post is an entry for Blogging Marathon and check what other marathoners are cooking, clicking at the link.

Comments

Tuesday, August 17, 2021

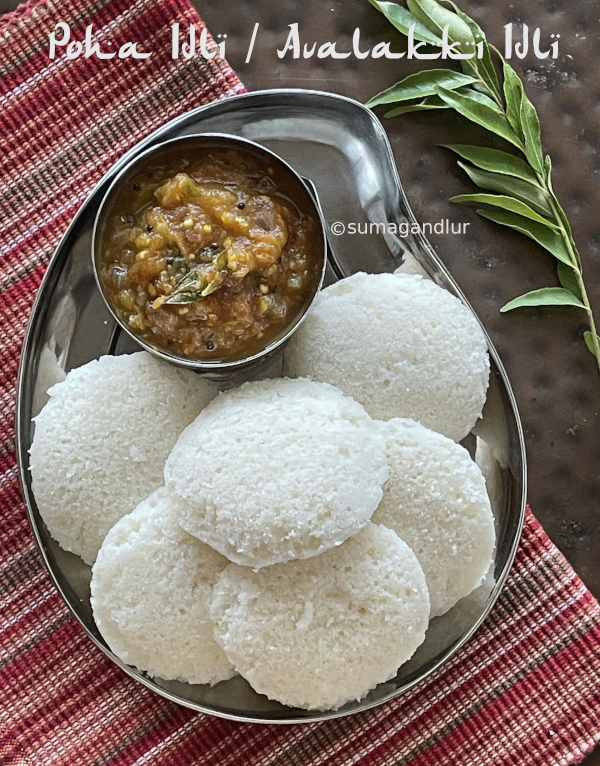
Poha Idli / Avalakki Idli / Flatenned Rice Idli


So far in this series -
D for Dal Idli
J for Jowar Idli
L for Lauki Idli
O for Oats Idli
Here are some super soft and quick version idlis made with flattened rice and cream of rice aka idli rava. These idlis need no advance planning as the batter needs a minimal amount of grinding and does not need fermentation as the standard version idlis. In fact, these idlis can be prepared in less than an hour, including the prep work and steaming the idlis. These idlis are obviously gluten free and vegan and can be served with a side dish of your choice - chutney / sambhar / podi. 
These idlis tend to be softer than the standard version because of the flattened rice used in the recipe. Thick or thin flattened rice / poha can be used in this recipe. My mother uses poha, idli rava and yogurt in the same proportion while making these idlis but I use more idli rava compared to the poha quantity being used. Poha needs to be soaked in yogurt until it softens and then ground finely. Idli rava is then mixed to it and soaked for a short period of time. A pinch of cooking soda or Eno's fruit salt is added just before steaming idlis as the batter is not fermented in this case. However don't go overboard using fruit salt since the idlis get ruined. They tend to spread and turn out crumbly. 1/8 to 1/4 tsp. fruit salt would be enough. 
Ingredients: (Yield 10 idlis)
1/2 cup thick variety flattened rice / poha
1 cup yogurt
3/4 cup idli rava
Salt to taste
Water as needed (I added about 1/2 cup.)
1/4 tsp. Eno's fruit salt
Oil / ghee to grease the idli plates
Directions:
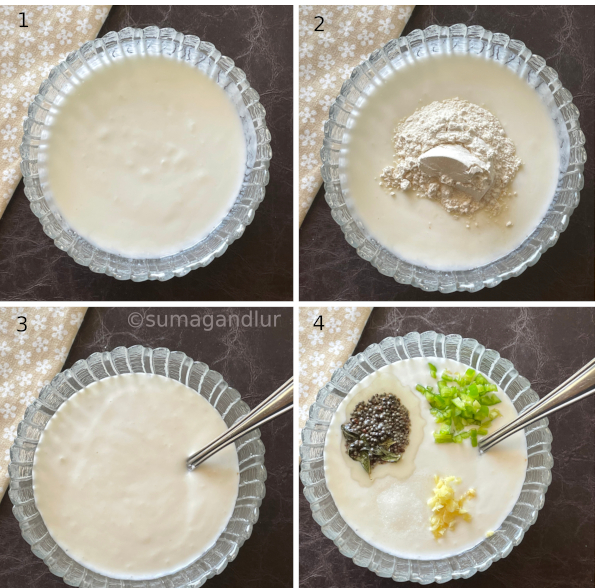
1. Add flattened rice / poha in yogurt to a mixing bowl and mix well. (I added 1/2 cup yogurt for soaking poha and 1/2 cup yogurt while grinding.) 
2. Cover and leave the mixture until it softens. (The thick variety poha I get locally softens very quickly. Thin variety poha can be substituted if the thick variety poha available takes longer to soak.)
3. Add the mixture to a blender and grind the mixture finely. Then add idli rava and salt to the ground poha. 
4. Pulse the mixture a few times just to combine. There is no need to finely grind the mixture.
5. Transfer the mixture to the bowl and add water if needed to bring to a thick, pouring idli batter consistency. Let the mixture sit for about 20 minutes. 
* Heat about 2 cups of water in a idli cooker base or a idli cooker or a steamer on medium heat. 
6. Add 1/4 tsp. of Eno's fruit salt and sprinkle a tsp. of water over it. (or add a pinch of baking soda instead of fruit salt.) Gently stir the batter with a ladle until the mixture turns frothy.
7. Grease the idli moulds with ghee / oil and fill them with batter.
* Place the idli stand in the prepared cooker / steamer and close the lid. Don't use the valve for the lid if using a pressure cooker.
8. Steam the idlis on low heat setting for about 20 - 25 minutes or until done. (The idlis should not stick when touched with moist fingers.) Check the water level in the steamer base and add extra if needed.
* Wait for about 10 minutes and then remove the idlis by running a spoon around the edges.
* Drizzle melted ghee over the idlis and serve them with a chutney and /or sambhar. Mine were served with tomato - cilantro chutney.
* Refrigerate any left over idlis and use in a day or two. Or they can be cooled down immediately after preparation and frozen to use later. Just nuke them in a microwave, covered and enjoy hot, piping idlis when needed.

Saturday, July 3, 2021

Aloo Raita / Indian Potato Yogurt Dip

Potato is one of the limited vegetables that is allowed during fasting in some parts of India. Plantain, sweet potato, colocasia, bottle gourd, pumpkin, cucumber, raw papaya and yam are the other ones. Fruits, dairy products and a few spices are allowed as well. I made this quick and nutritious raita using aloo / potato and other allowed 'vrat' ingredients.

Freshly made, full fat yogurt is what used in raita preparations but I went with fat-free yogurt as that is what eaten at our home. Sendha namak / saindhava lavanam / rock salt is used instead of regular salt during fasting in some parts of India and that is what I have used in this raita. Regular salt can be added if not following the fasting diet. 

The raita can be made just with the base recipe I mentioned below, without adding any optional ingredients, the one which I personally prefer. Cumin powder and black pepper are 'allowed' during fasting and I have added those as well to my raita bowl as my husband absolutely loves them. 

My husband always sprinkles chili powder, black salt and chaat masala to any raita I make and he enjoyed this raita adding those to his portion. Some consume these spice powders and some don't while fasting and so they can be added accordingly. I personally don't prefer that much of spices in my raita and omit them. 

Ingredients:
1 cup peeled and cubed potato cubes
1 tsp. oil
1/2 tsp. cumin seeds
1 spicy green chili, finely chopped
1 cup yogurt (I used homemade fat-free yogurt.)
Sendha namak / rock salt to taste or use regular salt
1 tsp. grated ginger
Minced cilantro to garnish

Optional ingredients that can be added if fasting:
1/2 tsp. toasted and ground cumin 
Ground black pepper to taste 

Optional ingredients that can be added if not fasting:
Chili powder
Black salt 
Chaat masala 

Directions:
* Cook potatoes adding water as needed, in a microwave or on stove-top until done. Drain them and keep aside. Mash the potato when they come to room temperature.
* Heat oil in a small pan and add cumin seeds. When they start to change color, add green chillies and sauté for 20 to 30 seconds and turn off the stove.
* Add yogurt and sendha namak / rock salt to a bowl. (Use regular salt if not fasting.) Beat the yogurt with a spoon for a smooth consistency.
* Add the mashed potatoes, cumin -green chili tadka, grated ginger and minced cilantro to the bowl. Mix them with a spoon to combine. (One can certainly stop at this point and serve this.)
* Add ground cumin and black pepper if preferred and stir to combine. (These are allowed during fasting.)
* Chili powder, black salt and chaat masala are other flavorful additions that can be used if not fasting. (Some eat these spice powders as well during fasting and so need to be used accordingly. I added these spice powders to a portion of raita which is not pictured here.) 
* Serve this with 'allowed breads' during fasting like parathas made with amaranth flour, water chestnut flour or barnyard millet pulao and such.
This post is an entry for Blogging Marathon and check the link to find out what other marathoners are cooking.

Thursday, June 3, 2021

Uddina Hittu / Uddinittu

Generally speaking, uddina hittu means urad flour / ground black gram in Kannada. The recipe I am posting today is for a traditional dish that also goes by the same name and is a side dish from Udupi region. This thick, creamy, and spicy dish is prepared using yogurt and urad flour. This protein rich dish is a simple and quick one that can be put together under five minutes and would be an apt choice when one is short on time or too lazy to cook. 

Using thick, fresh yogurt is recommended for this raita preparation rather than runny one. I sometimes prepare it with sour yogurt too and enjoy it equally. Fat-free yogurt will work too. Add a tbsp. or two of water if the mixture is too thick. I usually stock store bought urad flour and have used that in the recipe. Urad dal / skinned black gram can be toasted lightly, ground finely and can be used in the recipe. Using coconut oil in seasoning and also while serving enhances the flavor of this dish. Uddina hittu is served along with rice, a drizzle of coconut oil and sandige menasu (butter milk soaked and sundried chili). 

What I have in my lunch plate below (clockwise) are rice, mixed vegetable curry, uddina hittu, spinach dal, tomato chutney, and sandige menasu.
Ingredients: (Yield - 2 servings)
1 cup yogurt (preferably fresh)
2 tbsp. uddina hittu / urad flour / ground black gram
Salt to taste
1/2 inch piece of ginger, grated or finely chopped
1 or 2 green chili, finely chopped
2 tsp. coconut oil
1/2 tsp. mustard seeds
A pinch of asafoetida powder
A small sprig of curry leaves

Directions:
* Add yogurt, urad flour and salt to a bowl and stir well such that the flour is well blended with the yogurt. (Passing the mixture through a sieve does a quick and neat job besides yielding a lump-free mixture.)
* Heat oil in a small pan and add mustard seeds. When mustard seeds start to splutter add curry leaves and asafoetida and turn off the stove.
* Add this seasoning, ginger and green chili to the yogurt bowl and mix well. 
* Serve it with rice, drizzling with little coconut oil and sandige menasu, butter milk soaked and sundried chili.
bmlogo

This post is an entry for Blogging Marathon under the theme 'Protein rich dishes'. Check the link to find out what other marathoners are cooking.

Comment

Monday, April 26, 2021

Pistachio Lassi

Lassi is a summer coolant native to India. This traditional beverage that is locally popular has yogurt as it's base and comes both in sweet and salted versions. A fresh batch of yogurt made with full fat milk is best suited for lassi preparation. The basic version needs only yogurt, water and salt / sugar which is filling, nourishing and cooling. Adding spices and herbs makes it more flavorful though optional. Twists to the traditional drink has lead into many variations that include nuts / fruits and so on. 

My version today contains pistachios in the lassi as the name suggests and the lassi is flavored with cardamom and sugar. This creamy, cool beverage is a perfect foil for the summer heat. Here are some lassis that have been posted earlier.

Ingredients:
2 cardamom pods / 1/2 tsp. ground cardamom
6 tbsp. pistachios
2 cups chilled, full fat yogurt
4 tsp. sugar or to taste
Crushed ice as needed
Directions:
* Separate the seeds from cardamom pods. Grind pistachios and cardamom seeds together coarsely. Transfer the ground pistachio to a bowl. 

* Save some of the ground pistachio for garnishing. Blend yogurt, sugar, remaining ground pistachio, cardamom and ice until smooth and frothy. 
* Pour lassi into serving glasses and garnish with crushed pistachio. Serve immediately.

Sunday, April 25, 2021

Doddapatre Thambuli / Thambli

Thambli / Thambuli is a age old dish from the south Indian state of Karnataka which is usually prepared as a coolant in summer months. Yogurt is the base for any thambli dish and there are many varieties of thambli prepared using brahmi leaves, spinach leaves, curry leaves and so on. Menthe thambuli is one among the variety. A herb / vegetable / spice is ground along with coconut and spices and is added to yogurt and is served as a first course of the meal.

Today's star of the dish is doddapatre / karpooravalli / ajwain plant leaves that is known for it's medicinal properties. The leaves have been used as a home remedy for cold / cough and minor stomach ailments in India, for ages. My mother always has a pot of this herb at her home and this used to be her quick cold remedy for my son when he was an infant which used to work like a charm. 

My sister in law is the one who prepared this during my last visit to India and I just took some pictures during the process. This thambli recipe is a quick and fuss-free one and a beginner recipe. The leaves have a strong and distinct aroma which makes this thambli a delicious side dish to steamed rice with a drizzle of ghee.

Ingredients for thambli:
1 tsp. oil / ghee
1 tsp. cumin seeds
2 green chili
2 cups doddapatre / karpooravalli / Indian borage
1/2 cup coconut, shredded or in pieces.
Yogurt as needed
Salt to taste
Ingredients for seasoning:
1 tsp. oil
1/2 tsp. mustard seeds

Directions:
* Heat ghee/oil and add cumin seeds. When they start to brown, add green chilis and doddapatre soppu. 
* Fry until water almost evaporates, about 5 minutes. The leaves change the color and reduce in quantity. Keep it aside and let it cool.

* Grind the leaves along with the coconut. It will come around to about a cup of paste. This ground paste can be used immediately or refrigerated and used within  2 to 3 days.
* Add the paste and salt to yogurt and mix well. Thambli would be slightly on thicker side and so add yogurt accordingly.
* Heat oil for seasoning in a small pan and add mustard seeds. When the seeds start to splutter, remove from heat and add it to the yogurt mixture.

Monday, August 10, 2020

A - Z Karnataka Recipe Series ~ S for Sajjige Rotti

So far in my 'A - Z' Karnataka Recipe Series,
Akki Halbai
Biscuit Roti
Congress Kadalekayi
Davanagere Benne Dose
Ellu Pajji
Field Beans / Avarekalu Payasa
Girmit
Hitakida Avarekalu Huli
Iyengar Bakery Style Masala Toast
Jolada Vade
Kumbalakayi Idli
Limbe Hannina Gojju
Mysore Pak
Nuchinunde
Oodhalina Bisibele Bhath
Welcome back on this culinary journey across the state of Karnataka. My first choice for today's letter was sakkare achchu, the sugar figurines which are associated with the harvest festival in the region, Sankranthi. I was planning to visit India this summer and this achchu making was on the cards for the marathon. Achu making requires expertise and patience and I was planning to reacquaint with the process along with my mother who has stopped making them in the recent years. Unfortunately, the trip and the achchu did not happen for the obvious reasons. Going by the chaos happening around right now, this should be of least concern, I know.😟

I chose to go with something made with sajjige aka semolina and so here are some sajjige rotti if one is looking for some filling, tasty and healthy breakfast ideas. A rotti conjures up an image of thick and sometimes crisp flat breads which are a very popular breakfast choice in Karnataka. They can be made with rice flour and finger millet aka ragi flour which are the most common ones served for breakfast. Then there is jola/sorghum based flour ones which are a routine lunch item in North Karnataka homes. 

Today's semolina rotti aka rave or sajjige rotti is slightly different than those and can can be made in two ways. One is where a firm dough is prepared like the akki masaale rotti or the ragi ones and patted on the griddle and toasted. Or a thick batter is prepared with a similar consistency to idli batter and are prepared as thick dosas. However they do not have any resemblance to another popular version of  semolina pancakes in south India called the rava dosa either in texture or taste. They take a little longer to cook than the regular dosas and make an instant, no ferment dosas though the semolina needs to be soaked in yogurt for a short time. I make dosas sometimes adding turmeric as well and so there are both yellow and brown colored rottis pictured here.

Some other 'S' Dishes of the region:
* Sabbakki payasa - Tapioca pearl kheer
* Sajjappa - A festive dish with a sweet filling of coconut and semolina.
* Shaavige payasa - Vermicelli kheer
* Sukkinunde - Stuffed and fried sweet dumplings
* Shenga holige - Peanut poli
* Saasive - A raita prepared with a paste of coconut and mustard seeds with a tempering of spices. 
* Shenga hindi - North Karnataka style peanut powder
* Saaru - Rasam
* Saarina pudi - Rasam powder
* 'Sandige' aka sun-dried vadi 
* Sandige huli - A gravy made with steamed lentil dumplings
* The 'Set dose' which is served as a stack of three thick, spongy dosas served with vegetable saagu and coconut chutney. 
* Shaavige bhath / uppittu - Vermicelli upma
* The savory and sweet versions of 'Surnoli', dose / pancake from the Konkan region. 
* Southekayi rotti - Flat breads made with rice flour and cucumber
* Susla / Sushila - A puffed rice based snack from North Karnataka.
* Dishes made with the following vegetables would also fall under 'S' category. 

'S' kitchen ingredients / produce in Kannada:
* Sabsige soppu  aka dill leaves which is a commonly used greens in the region. 
* Soppu in general means greens. 
* Seeme badanekayi - chayote / chow chow
* Southekayi - cucumber. 
* Sorekayi - bottle gourd 
* Shunti - ginger
* Suvarna gadde - elephant yam / suran
* Sapota hannu - chikoo fruit
* Sebu or sebina hannu - apple
* Seebe hannu - guava
* Seethaphala - custard apple
* Saame - little millet
* Sakkare - sugar
* Sabbakki - sago, tapioca pearls
* Sajje - pearl millet / bajra
* Sasive / Sasive kaalu - mustard seeds
* Sihi - sweet
* Siri dhanya - millets
* Shavige - vermicelli
Ingredients: (Yield 8 dosas)
1 cup semolina
3/4 cup yogurt
3/4 cup water
Salt to taste
1 tsp. cumin seeds
2 pinches of asafoetida powder
2 pinches of turmeric powder (optional)
2 sprigs of curry leaves, finely chopped
A handful cilantro leaves, finely chopped
2 green chilies, finely chopped
1 tsp. ginger finely chopped
A handful of fresh / frozen grated coconut
Ghee / oil to make dosas

Directions:
* Combine semolina and salt in a bowl. Add yogurt and water to it and mix well. Leave it aside for at least 15 to 30 minutes.
* If using frozen coconut, thaw it in the microwave before adding it to the batter.
 * Add the remaining ingredients except the ghee / oil to semolina bowl and mix well.
* Heat a tawa / shallow pan on medium pan. Sprinkle a little water on the pan to check whether the pan is ready to make rotti. It is ready if the water sizzles and evaporates immediately. If not, heat the pan some more but don't bring it to a smoking point. 
* Pour a ladleful of batter at the center. Spread it as thin as possible. The traditional way is to spread the batter thickly using fingertips.  A ladle can be used instead to be on a safer side though these can not be spread as thinly as the regular dosa.

* Pour a 1/2 tsp. oil / ghee around the edges and cook until the batter appears dry on the surface, around 2 minutes and flip. Cook the other side as well for about a minute and remove the dosa with a spatula.
* Repeat the rotti making with the remaining batter and serve warm with a chutney.


Comments

Wednesday, June 3, 2020

Peanut - Carrot Raita

 I had made this peanut - carrot raita recently to go along with jowar vade. This is a simple and quick raita made with chilled yogurt, peanuts and carrots. Carrot and the crunchy peanuts are a perfect foil to the creamy yogurt here. Go with full fat yogurt that has been chilled in advance. Some grated cucumber can be added as well if preferred. It is a perfect coolant during the hot weather and also fit my theme of the week 'protein rich dishes'. This raita is a creamy and lightly spiced side dish that goes well with stuffed parathas or a spicy rice dish. I sometimes prefer to eat this as it is since it makes a very refreshing and protein rich snack and tastes delicious. 

Ingredients:
1 cup yogurt
2 to 3 tbsp. roasted and skinned peanuts
1/4 cup grated carrot
Salt to taste
1/2 tsp. ground sugar
A generous pinch of cumin powder
Ground pepper to taste

Directions:
* Coarsely crush the peanuts. 
* Whisk the chilled yogurt, salt, sugar, cumin powder and pepper powder in a bowl to combine.
* Add the crushed peanuts and grated carrot to the yogurt. Taste and adjust the seasonings if needed.
* Serve with a spicy main dish or spicy flat breads.

Comments

Monday, May 4, 2020

Bendakaya Perugu Pachadi / Andhra Style Okra Raita


Today's recipe is a perugu pachadi made with bendakaya / okra. A perugu pachadi is a spicy raita, Andhra style. It is not made with fresh yogurt as the north Indian, chilled and creamy raitas. It is made with sour yogurt and usually contains a cooked vegetable added to it. The other common vegetables used in the preparation are eggplants / snake gourd. A perugu pachadi is usually eaten as a dip to go with rice and mudda pappu, cooked lentils just seasoned with salt. Or as  a side dish to go with rice.

Ingredients for tempering:
1 tsp. oil
1 tsp. mustard seeds
1/2 tsp. cumin seeds (optional)
1 pinch of asafoetida powder
Few curry leaves
A pinch of turmeric powder
Ingredients for pachadi / raita:
1 tbsp. oil
10 to 15 okra / lady fingers
1- 2 spicy chilis + 1/2 tsp ginger roughly crushed
2 cups sour yogurt
Salt to taste
Minced cilantro to garnish

Directions:
* Heat a tsp. oil and add mustard seeds and cumin seeds. When the mustard seeds start to splutter, add curry leaves, asafoetida and turmeric. Stir them once and turn off the stove. Keep it aside.
* Rinse and wipe dry the okras. Trim the edges and chop them thin, crosswise.
* Heat a tbsp. oil in a wide pan and add the okra pieces. Toast them on low medium flame until the pieces are cooked. (I toasted them in an air fryer instead.)
* Grind the chili and ginger finely adding a little yogurt if needed.
* Whisk yogurt, green chili - ginger paste and salt together in a bowl and add the cooked / toasted okra pieces. Add the tempering and minced cilantro. Mix well and serve.

Comments

Sunday, May 3, 2020

Kumaoni Raita

Here is a simple and flavorful raita from the Uttarakhand region. This cool and refreshing side dish contains grated cucumber and ground mustard seeds which add a piquant flavor to it. However since the mustard seeds flavor is an acquired taste, add only as much as needed. Add a pinch of toasted and ground fenugreek seeds as well if preferred. The raita goes well with any stuffed parathas or any pulao kind of rice dishes. I served it along with stuffed horse gram parathas / gehat ke parathea

Ingredients:
1/2 to 1 tsp. mustard seeds
1 small sized cucumber
2 cups yogurt
Salt to taste
A pinch of turmeric powder
1 or 2 green chilis, finely minced

Directions:
* Lightly toast the mustard seeds and let cool. Grind them finely.
* Peel and grate the cucumber. Squeeze out water from the cucumber and keep aside.
* Whisk yogurt, mustard powder, salt, turmeric and green chillies in a bowl. Add cucumber to the bowl and mix well. (Taste and add mustard powder as much as preferred. The mustard powder is an acquired taste and so use as needed, more or less.)
* Serve the raita with any spicy rice or stuffed parathas.

Comments

Thursday, March 19, 2020

Dahiwaali Toovar Dal

After the black gram and the split chick peas based dals, here is a dal prepared using toor dal / yellow lentils. Toor dal or pigeon peas is used in my kitchen almost on a daily basis and is a pantry staple like many households of India. In fact, for the south Indian folks who eat a rice platter served with a vegetable preparation, lentil based side dish and yogurt for their lunch and dinners, these lentils are the most commonly used ones. Today's dal however doesn't come from a south Indian kitchen and I happened to try this version from Tarla Dalal. This dal is a simple one with an unusual addition of yogurt to it. A good addition to everyday kind of dals to rotate.

Ingredients:
1/2 cup pigeon peas / toovar dal
1/8 tsp. turmeric powder
1/2 cup low fat yogurt
1/2 tsp. chickpea flour / besan
1 tbsp. oil
1 tsp. cumin seeds
1 onion, finely chopped
Salt to taste
Chili powder to taste
1 tsp. cumin powder
1 tsp. coriander powder
2 tbsp. minced cilantro to garnish

Directions:
* Rinse and pressure cook pigeon peas adding a cup of water and turmeric for three whistles or until the lentils are softly cooked. When the valve pressure is gone, remove the lid and mash the lentils well.
* Whisk together yogurt and chickpea flour together in a bowl and keep aside.
* Heat oil in a non stick pan and add cumin seeds. When they start to brown, add onion. Fry until the onion turns light brown. Lower the heat and add mashed dal, salt, chili powder, cumin powder, coriander powder and the yogurt mixture. Stir well and add about 1/4 cup of water. Cook the mixture for about 5 minutes. Turn off the stove.
* Garnish with cilantro and serve warm with rice / rotis.

Sunday, September 29, 2019

Dahi Gujiya

Today's recipe 'Dahi Gujiya' comes from the state of Uttar Pradesh. These dahi gujiyas are a treat where literally melt in mouth vadas stuffed with raisins and cashews are served in a spicy yogurt base. The recipe is a variant of another popular north Indian snack dahi bhalle and shaped in the form of a gujiya, a dessert popular in the region. Both use deep fried vadas made with a ground batter of urad dal / skinned black gram that are then soaked in a yogurt base and flavored with spice powders and chutneys. The vadas in case of dahi bhalle are shaped round and fried directly whereas in case of dahi gujiyas, the vadas are stuffed and shaped as half moons. The outer shell in these gujiyas is not the dough made using all purpose flour as in sweet versions which is easy to roll but the urad dal batter which is a little tricky to shape. I kept postponing trying this recipe until last week thinking that it would be a hard one to nail. It was quite easy shaping them in my hands instead of using cloth / sheet  and the gujiyas were done in no time. I made a dozen dahi gujiyas and used the rest of the batter to prepare Andhra style perugu vadalu as my husband is a fan of those.

A filling of raisins, cashews, ginger, pepper / chillies and chironjis are used. Shredded fresh coconut would also be a flavorful addition. Use a tiny quantity of filling to each gujiya and don't go overboard with the filling. A moist cloth stretched and tied over a wide cup or a plastic sheet can be used to shape the gujiyas. Remember to keep your hands and the work surface moist all the while shaping gujiyas. Don't go on greasing the work surfaces with oil as it doesn't work. If one has hard time transferring the shaped gujiyas from the sheet / cloth.  shape them on your moist hands instead as I have shown below. They will come off easily without sticking to hands given that hands are moist. Remember to wet your hands with water each time you work with a gujiya.

Ingredients for the outer layer:
1 cup urad dal
Salt to taste
Ingredients for stuffing:
Raisins
Chopped cashews
Grated ginger
Freshly cracked black pepper
Fresh, shredded coconut (optional)
Chironji (optional)
Ingredients for soaking water:
6 cups water
1/4 tsp. ground asafoetida
1/2 tsp. salt
Ingredients for dahi gujiya:
Yogurt 
Salt / Black salt to taste
Green chutney
Sweet chutney
Cumin powder
Chili powder
Chaat masala 

Prep work:
* Rinse and soak urad dal for about 3 hours. Drain the water completely and grind the soaked dal finely, without adding any water. The heavy duty Indian style grinder works best for this. At the most add a tbsp. of water if needed. It is essential that the batter is quite thick since the outer covering for the gujiya is made using this batter.
 * Add salt and beat the batter for about 5 minutes or so using a spoon or hand, to make it fluffy.
 * Keep the stuffing that is going to be used for the gujiyas ready.
* Keep ready a bowl of water with a pinch of asafoetida and 1/2  tsp. salt added.
* Whip yogurt and keep refrigerated. Add salt and also a pinch of sugar if needed. (Yogurt made with full fat milk is traditionally used but I used homemade fat-free variety.)

Directions:
* Heat oil in a medium sized wok / frying pan on medium heat. Drop a pinch of batter into the hot oil. If it immediately swims to the surface then the oil is hot enough to fry. If it sinks to the bottom then oil needs some more heating. Don't bring the oil to a smoking point.
* Wet a plastic sheet and your hands. Place a lemon sized ball at the center.

*  Pat it with fingers into a thin circle of about 3 inches diameter. 

* Place 1/2 to 1 tsp. filling on one half of the circle, taking care to leave the edges free for sealing. (Don't go stuffing too much as we do in case of sweet gujiya versions.) 

* Gently lift the plastic sheet to cover the other half over the filled side. Pull away the plastic sheet and seal the edges carefully tapping with the moist fingers. Gently transfer into hand and drop it into hot oil. Instead of a moist plastic sheet, a moist cloth can be used to shape the gujiyas.
Or 
Alternatively, the gujiyas can be shaped on a hand which I found to be a foolproof method. Follow this method if you have difficulty transferring the shaped gujiya to hand from the sheet / cloth. Pinch a big lemon sized portion from the ground mixture and place it on your left hand. Pat it into a round disc using right hand fingers. Don't make it too thick or thin. Add the stuffing onto one half of the circle, keeping the edges free. Fold the other half over it, matching the edges. Carefully seal the edges, patting with moist fingers.
* Carefully drop the shaped gujiya into the hot oil. In the same manner, go on shaping and dropping the gujiyas in hot oil one by one. Add as many gujiyas as the pan can accommodate. Fry them on low medium heat, flipping them intermittently until golden brown. The batter needs to thoroughly cook and so don't go on frying on high heat setting.
* Remove the fried gujiyas with a slotted spoon, draining as much oil as possible and drop them into the salted water bowl.  Use the remaining batter and prepare gujiyas this way.
* Add all the fried gujiyas to the water and let them soak for about 15 minutes.
* Gently squeeze the water from the gujiyas by pressing each one between your palms. Drop them into the prepared yogurt. The gujiyas must be well immersed in the yogurt. This can be left in the refrigerator until the time of serving. They stay good for few days.

* When ready to serve, transfer a couple of gujiyas along with the yogurt to each serving bowl. 

* Add green and sweet chutneys over the gujiyas and yogurt in each bowl.

* Sprinkle the spice powders of your choice and enjoy immediately.

So far my recipes in the series of 'Indian Snacks and Sweets' are below.

First week - Indian Traditional Sweets
Malaadu / Hurigadale Unde
Dry Gulab Jamun
Coconut Burfi / Kobbari Mithai
Almond Halwa / Badam Halwa
Elaneer Payasam
Godhuma Sojjappalu

Second week - Snacks from Gujarat, India
Damni Dhokla
Doodhi Muthia / Lauki Muthia
Dal Pandoli
Methi Khakhra
Pressure Cooker Khandvi

Jhal Muri
Jowar Kothimbir Vadi
Kalmi Vada
Ooty Varkey


Check out the Blogging Marathon page for the other Blogging Marathoners doing BM#104.
You are invited to the Inlinkz link party!
Click here to enter
Comments