HOME        |        ABOUT        |        COPYRIGHT        |        CONTACT        |         RECIPE INDEX        |         INDIAN THAALIS        |         MILLET RECIPES        |        EVENTS' ROUNDUP        

Showing posts with label Grains and By-Products. Show all posts

Thursday, November 25, 2021

Barley Khichdi / Spicy Barley - Lentil Stew

(This was originally published on 3/13/2011.)

When trying out new grains and that too when I am not sure how well our palates are going to receive the new textures, I prefer to go back to my own cuisine to borrow ideas. The south Indian cuisine, the familiar zone seems so comforting and forgiving like a mother. When I have to deal with the unfamiliar grains for the first time, I prefer to combine the typical ingredients used in my (south Indian) kitchen and add spices for more layers of flavor. This barley dish is a proof of it.

Though barley is available in India, it was never used in my mother's or any relatives' kitchens. I used barley for the first time when I prepared this barley - raisin bread. The barley I have been left with has gone in to the preparation of typical Indian style dishes.

Barley has a chewy texture when cooked that I am not very fond of. I have therefore allowed the barley to cook until it reached a fall apart stage, where you don't feel its texture at all. As I mentioned above, this dish relies on South Indian style cooking and is somewhat a cross between Karnataka's Bisibelebhath and Tamilnadu's Kadamba Saadam. I simply called it a khichdi since I didn't want to wreck my brains in search of a perfect name for this dish. This was a wholesome, healthy and hearty meal that was liked by everyone at our home.

 Ingredients: (Yield - 4 servings)
1/2 cup barley
1/2 cup pigeon peas / toordal
1 cup chopped mixed veggies (I used carrots, green beans, potatoes, peas)
A pinch of ground turmeric 
Salt to taste
2 to 3 tbsp. thick tamarind juice (extracted by soaking about lemon sized tamarind in water) 
Ingredients for seasoning:
2 tsp. ghee / oil
1 tsp. mustard seeds
A sprig of curry leaves
Ingredients for spice powder:
2 tbsp. split chickpeas / bengal gram / chanadal
1 tbsp. skinned black gram / uraddal
1 tbsp. coriander seeds
1/4. tsp fenugreek seeds / methi seeds, 
6 - 8  or to taste, dried red chilies, 
2 tbsp. grated dry coconut 
3 - 4 black stone flower / dagad phool / rathi puvvu

Directions:
* Soak barley for at least an hour and this step is optional if you are using a pressure cooker. 
* Add barley, lentils, vegetables, turmeric powder and about 2 cups of water to a pressure cooker and cook until done. If you cook rice for 3 whistles, then let this go for 12 - 15 whistles.
* Meanwhile, add split chickpeas and skinned black gram to a small pan and dry toast them on medium flame. Continuously stir them , until they start to change the color. Transfer them onto a plate. Next add coriander seeds, fenugreek seeds, red chilis and stone flower to the same pan and dry toast them on low flame until coriander seeds start to change a shade darker. Add the coconut and turn off the stove. Transfer them on to the plate. Once cool, grind them finely. 
* When the cooker's valve pressure is gone, remove the container, and check the barley consistency. If you wish to cook it further, add the mixture to a pan. Add water as needed and cook further until the desired consistency is reached. Also if you prefer your veggies crunchier, you can cook them separately instead of adding them to the pressure cooker.
* Add salt, tamarind puree and the spice powder to the barley mixture. Taste and adjust the seasonings if needed. Simmer the mixture for a couple of minutes more.
* Heat the ghee / oil in a pan. Toast the mustard seeds and curry leaves and add to the barley mixture.

Saturday, June 12, 2021

Lauki Idli / Sorekayi Idli / Sorakaya Idli / Bottle Gourd Idli

I had two kind of idlis on my mind for alphabet 'L' and in fact, I had already cooked one of those 'L' idlis, about an year ago. Lauki idlis / bottle gourd idlis was not on that list and to be honest, the idea did not even occur to me. The suggestion came from my husband at the last minute. Bottle gourd is one of those low calorie vegetables and I try to sneak in our diet as much as possible and so, I thought why not? A quick google search showed me that there are enough creative minds who had already experimented with the idea. 

I would have thought of a different batter if I had time but I had to keep it quick since these were made for today's breakfast with no advance preparation. I used an instant batter made with semolina aka rava idli batter for these idlis. And so there is no soaking, grinding or fermenting the batter. If one has toasted semolina on hand or a MTR rava idli packet, 😀 the idli preparation becomes a breeze. One can do the toasting semolina part in the recipe in advance and keep it handy. If one has never tried idli making, rava idli is an easy and instant version to try. 
The semolina is toasted with a seasoning and soaked in yogurt for about 20 -30 minutes and the batter is ready to go. I usually add grated carrot and peas to the rava idli batter to make it nutritious and today, bottle gourd went in instead. They turned out good and one would not even notice the difference between regular rava idlis and these. They make a great meal anytime of the day though these are considered a breakfast dish. We enjoyed them today with a chutney made with fried gram sans coconut. Vegetable saagu would be a delicious accompaniment to these idlis.
Ingredients: (Yield - 14 idli)
2 tbsp. oil
1 to 2 tbsp. cashews 
1 tsp. split chickpeas / Bengal gram / chana dal
1 tsp. skinned black gram / urad dal
1/2 tsp. mustard seeds
1 tsp. cumin seeds
1 inch ginger piece, finely chopped / grated
1 or 2 green chili, finely chopped
1 sprig of curry leaves
1 & 1/2 cups semolina (medium coarse)
3/4 cup peeled & grated bottle gourd
1/2 cup yogurt
3/4 cup water
1 tsp. salt or to taste
2 tbsp. minced cilantro
1/2 tsp. Eno's fruit salt

Directions:
1. Heat oil in  a pan and add cashews. Toast them until golden brown, by turning them once. Transfer them into a small bowl with a slotted spoon.
* Add Bengal gram, skinned black gram, mustard and cumin seeds to the same oil. When the lentils start to turn reddish brown, add ginger, green chillies and curry leaves. Sauté for about a minute. 
2. Next add semolina to the pan and toast on medium flame, continuously stirring until you start to smell the aroma and it starts to slightly change the color.
* Turn off the stove and transfer the mixture into a bowl and let it come to room temperature. (This can be done in advance and the mixture can be stored in air tight container for weeks.)
3. Add grated bottle gourd, salt and minced cilantro to the semolina bowl.
4. Next add yogurt and water to the bowl and mix well. Cover and keep it aside for about 30 minutes.
5. Stir the mixture once and if the mixture appears too thick, add some water. 
* Grease the idli moulds with oil / ghee. Place a cashew at the center of each idli mould. (Or the cashews can be added to the batter.)
* Heat about 2 cups of water in a idli cooker base or a idli cooker or a steamer on medium heat.
6. Add Eno's fruit salt to the semolina bowl just before making idlis and sprinkle a tsp. of water over it and mix well. 
* Ladle the batter into the idli moulds.
* Place the idli stand in the prepared cooker / steamer and close the lid. Don't use the valve for the lid if using a pressure cooker.
* Steam the idlis on low heat setting for about 20 - 25 minutes or until done. (The idlis should not stick when touched with moist fingers or a toothpick / knife inserted in the center should come out clean.) Check the water level in the steamer base and add extra if needed.
* Wait for about 10 minutes and then remove the idlis by running a spoon around the edges.
* Drizzle melted ghee over the idlis and serve them with a chutney / saagu.
* Refrigerate the left over idlis and use in a day or two. Or they can be cooled down immediately after preparation and frozen to use later. Nuke them covered in a microwave, and enjoy hot, piping idlis when needed. 

Monday, August 10, 2020

A - Z Karnataka Recipe Series ~ S for Sajjige Rotti

So far in my 'A - Z' Karnataka Recipe Series,
Akki Halbai
Biscuit Roti
Congress Kadalekayi
Davanagere Benne Dose
Ellu Pajji
Field Beans / Avarekalu Payasa
Girmit
Hitakida Avarekalu Huli
Iyengar Bakery Style Masala Toast
Jolada Vade
Kumbalakayi Idli
Limbe Hannina Gojju
Mysore Pak
Nuchinunde
Oodhalina Bisibele Bhath
Welcome back on this culinary journey across the state of Karnataka. My first choice for today's letter was sakkare achchu, the sugar figurines which are associated with the harvest festival in the region, Sankranthi. I was planning to visit India this summer and this achchu making was on the cards for the marathon. Achu making requires expertise and patience and I was planning to reacquaint with the process along with my mother who has stopped making them in the recent years. Unfortunately, the trip and the achchu did not happen for the obvious reasons. Going by the chaos happening around right now, this should be of least concern, I know.😟

I chose to go with something made with sajjige aka semolina and so here are some sajjige rotti if one is looking for some filling, tasty and healthy breakfast ideas. A rotti conjures up an image of thick and sometimes crisp flat breads which are a very popular breakfast choice in Karnataka. They can be made with rice flour and finger millet aka ragi flour which are the most common ones served for breakfast. Then there is jola/sorghum based flour ones which are a routine lunch item in North Karnataka homes. 

Today's semolina rotti aka rave or sajjige rotti is slightly different than those and can can be made in two ways. One is where a firm dough is prepared like the akki masaale rotti or the ragi ones and patted on the griddle and toasted. Or a thick batter is prepared with a similar consistency to idli batter and are prepared as thick dosas. However they do not have any resemblance to another popular version of  semolina pancakes in south India called the rava dosa either in texture or taste. They take a little longer to cook than the regular dosas and make an instant, no ferment dosas though the semolina needs to be soaked in yogurt for a short time. I make dosas sometimes adding turmeric as well and so there are both yellow and brown colored rottis pictured here.

Some other 'S' Dishes of the region:
* Sabbakki payasa - Tapioca pearl kheer
* Sajjappa - A festive dish with a sweet filling of coconut and semolina.
* Shaavige payasa - Vermicelli kheer
* Sukkinunde - Stuffed and fried sweet dumplings
* Shenga holige - Peanut poli
* Saasive - A raita prepared with a paste of coconut and mustard seeds with a tempering of spices. 
* Shenga hindi - North Karnataka style peanut powder
* Saaru - Rasam
* Saarina pudi - Rasam powder
* 'Sandige' aka sun-dried vadi 
* Sandige huli - A gravy made with steamed lentil dumplings
* The 'Set dose' which is served as a stack of three thick, spongy dosas served with vegetable saagu and coconut chutney. 
* Shaavige bhath / uppittu - Vermicelli upma
* The savory and sweet versions of 'Surnoli', dose / pancake from the Konkan region. 
* Southekayi rotti - Flat breads made with rice flour and cucumber
* Susla / Sushila - A puffed rice based snack from North Karnataka.
* Dishes made with the following vegetables would also fall under 'S' category. 

'S' kitchen ingredients / produce in Kannada:
* Sabsige soppu  aka dill leaves which is a commonly used greens in the region. 
* Soppu in general means greens. 
* Seeme badanekayi - chayote / chow chow
* Southekayi - cucumber. 
* Sorekayi - bottle gourd 
* Shunti - ginger
* Suvarna gadde - elephant yam / suran
* Sapota hannu - chikoo fruit
* Sebu or sebina hannu - apple
* Seebe hannu - guava
* Seethaphala - custard apple
* Saame - little millet
* Sakkare - sugar
* Sabbakki - sago, tapioca pearls
* Sajje - pearl millet / bajra
* Sasive / Sasive kaalu - mustard seeds
* Sihi - sweet
* Siri dhanya - millets
* Shavige - vermicelli
Ingredients: (Yield 8 dosas)
1 cup semolina
3/4 cup yogurt
3/4 cup water
Salt to taste
1 tsp. cumin seeds
2 pinches of asafoetida powder
2 pinches of turmeric powder (optional)
2 sprigs of curry leaves, finely chopped
A handful cilantro leaves, finely chopped
2 green chilies, finely chopped
1 tsp. ginger finely chopped
A handful of fresh / frozen grated coconut
Ghee / oil to make dosas

Directions:
* Combine semolina and salt in a bowl. Add yogurt and water to it and mix well. Leave it aside for at least 15 to 30 minutes.
* If using frozen coconut, thaw it in the microwave before adding it to the batter.
 * Add the remaining ingredients except the ghee / oil to semolina bowl and mix well.
* Heat a tawa / shallow pan on medium pan. Sprinkle a little water on the pan to check whether the pan is ready to make rotti. It is ready if the water sizzles and evaporates immediately. If not, heat the pan some more but don't bring it to a smoking point. 
* Pour a ladleful of batter at the center. Spread it as thin as possible. The traditional way is to spread the batter thickly using fingertips.  A ladle can be used instead to be on a safer side though these can not be spread as thinly as the regular dosa.

* Pour a 1/2 tsp. oil / ghee around the edges and cook until the batter appears dry on the surface, around 2 minutes and flip. Cook the other side as well for about a minute and remove the dosa with a spatula.
* Repeat the rotti making with the remaining batter and serve warm with a chutney.


Comments

Friday, January 3, 2020

Celebrating Blog's 13th Anniversary with Akki Haalubai / Akki Halbai

Wish you all a joyous new year ! Hopefully the new year will usher in health and happiness to everyone around us and my readers. I am back after a brief hiatus which was very much needed from a personal point of view. In the meanwhile, my blog completed 13 years this past month when I was away. A blog which was supposed to be an online recipe diary has somewhat turned into a hobby and habit of mine in the process. Also this turned out to be a pursuit that has lasted longer without me losing attention along the way. A big hug for those who follow and appreciate my posts and for people in my life who share and inspire to continue this blog. 

And now to the main event of this week. I am planning to do a vegetarian recipe series on Karnataka cuisine starting this month. Karnataka is one of the states in southern India where I grew up and is dear to me. The format would be in an alphabetical order, that is A to Z style though the alphabets in the local languages are different. I am going to post 3 recipes on the first week of each month. There are going to be 3 recipes this week that start with letters A, B and C. The next three recipes with names starting with D, E and F are going to be posted in February and so on. I am starting the series with a sweet recipe, also to celebrate my blog's milestone. 

Today's post is the first in the series featuring letter 'A'.  The first alphabet in the local language in the state of Karnataka or for that matter in most of the Indian languages sounds like 'au'. The words starting with that sound typically fall under 'A' recipes of Karnataka though I am not making a comprehensive list here. I am just noting down some of the common Kannada culinary terms, Kannada being the widely spoken and official language of the state. We will start with the basics like aduge, aduge mane (au-do-gay  ma-nay), and aduge bhatta which respectively mean cooking, the kitchen and the cook who cooks / caters for a group. In everyday usage, aduge becomes 'adige (ah-d-gay) most of the times. A also stands for the two staple and indispensable ingredients of the region, akki and anna. While Akki (pronounced uck-e) means the rice grain, anna (un-na) is the cooked version of rice. Coarsely ground rice is akki tari (tha-ri), finely ground version would be akki hittu and akki shavige is rice noodles. While avalakki is the beaten rice flakes, arka is kodo millet and aralu would be the popped grain. There are plenty of breakfast dishes made with avalakki / beaten rice flakes.

Aloo gadde would be the ubiquitous potato while amtekai is the hog plum. Ananas would be pineapple while arishina is ground turmeric which is an integral part of an Indian spice box. The roots (kombu) and leaves (ele) are used in cooking. Alasande is the black eyed peas while the most important beans of all for the region or at least for us, the Bangaloreans would be the fresh hyacinth beans called avarekalu. Anabe, the mushroom is not part of a traditional, vegetarian kitchen.

A also stands for a tasty snack aambode, the popular south Indian masala vada sans onions. Appe huli is the famous green mango rasam from the coastal and Malenadu regions. A ton of dishes are made with avarekayi aka hyacinth beans whose names obviously start with avarekayi. Similar in the case of akki aka rice. The famous one has to be the rotti, the flat breads that are mainly prepared in three different ways. Today's sweet is also made with rice and hence the name akki halbai.

The first one in the series is going to be a sweet recipe of the old era kind where grand mothers used to whip up a treat for the eagerly waiting grand kids. The kids of those times who didn't have a zillion number of calorie laden, ultra-processed snack options would have definitely found halbai alluring. It is a traditional dish from Karnataka and also called as manni in the coastal areas of the state, if I am not wrong. It doesn't need any fancy ingredients and uses the basic staples of a south Indian kitchen as many other traditional delicacies do. Kids of the present may or may not appreciate this old world 'sihi' (sweet) before the allure of the modern desserts but I certainly has a weakness for it. The ground batter of rice, coconut and jaggery is cooked until thickened, cut into bite shaped pieces and served. Don't be fooled by the burfi shaped halbai, It is basically a dish with a soft and literally 'melt in mouth' kind of consistency as that of a halwa. Haalu means milk in Kannada.

It is a festival dish, mostly made on Nagara panchami day though it can be made on other occasions too. Halbai can be prepared with wheat and ragi too instead of rice. I have noticed there are versions with fine semolina and even beaten rice flakes (Chiroti rave and avalakki). Halbai making actually doesn't need any other skills than stirring. However this is a recipe where one cannot ignore the proportions of the ingredients mentioned. The dish would end up being a disaster if one eyeballs the measurements as many Indians do with most of the dishes. The ratio of rice and water is always 1:3 in this recipe. The trick is to cook until the mixture is no longer sticky. 

The process appears tedious to many, especially during the first half part of the cooking as lumps start forming if not constantly stirred. I would recommend a non stick pan for this recipe. The whole cooking process took me about 20 minutes and I paid constant attention only for the first ten minutes. I was also preparing a small quantity and so the process didn't bother me at all. Besides I was trying a recipe that had been on my mind for more than two decades. I never got a chance to try this rice version though my mother and I have tried wheat and ragi versions before. I am not sure if it is an acquired taste but it is delicious for people like me who has a sweet tooth, especially biased towards traditional south Indian 'rice' based sweets. 

Cooking time: About 20 minutes
Yield: 8 - 9 pieces
Ingredients:
1/4 cup rice
1/4 cup fresh / frozen shredded coconut (I used 2 tbsp. more)
1/4 cup + 2 tbsp. jaggery
3/4 cup water (divided)
2 cardamom pods
1 tbsp. ghee (divided)
Cashews to garnish
  
Prep work:
1. Soak rice in water for about 3 hours. Drain the water after the soaking period and rinse with water twice and drain the water completely.
2. If using frozen coconut, thaw by heating it in the microwave for 20 to 30 seconds.
3. Finely grind the cardamom seeds.
4. Grease a small rectangular or a circular plate with ghee. Choose a plate with some depth.

Directions:
1. Finely grind the soaked (and drained) rice and coconut adding 1/4 cup water. 

Add jaggery next and grind until it is incorporated into the batter. Grinding jaggery is optional. Jaggery can be added to the pan later too while the rice - coconut mixture is cooking. (See notes if the jaggery being used is not clean.)
2. Add the ground mixture and 1/2 cup of water to a pan, preferably a nonstick one to make the stirring job easier. Start cooking on low flame, stirring constantly. Add jaggery now if it was not added to rice and coconut while grinding. 

3. The mixture needs constant attention at the early stage as it turns easily lumpy if not stirred continuously. 
4. The mixture looks like this after about 10 minutes of cooking. Add cardamom and a tsp. of ghee and keep cooking on low medium heat, stirring continuously. 

5. The mixture looks like this after 15 minutes of cooking. 

6. Add one more tsp. of ghee and keep cooking on low medium heat, stirring continuously.

7. After 3 - 4 minutes, the mixture should start coming together and leave edges of the pan, forming a single mass like halwa. Add the remaining ghee and stir well to combine.

7. Turn off the stove when the mixture doesn't stick when touched with wet fingers. It means that halbai is ready. 

8. Transfer the mixture to the greased plate, level it with the back of a spatula, Cut into square or diamond shapes when it is slightly warm and garnish with cashews if desired and serve. (I forgot to take pictures for this step.)

Notes:
In case if the jaggery being used is not clean then skip adding it to the ground rice - coconut mixture. Add it to a separate pan along with 1/2 cup water and heat until the jaggery melts. Turn off the stove and filter the jaggery water to remove any impurities present. Add the filtered jaggery solution in the step 1 and omit the addition of water in step 2. The total water used in the recipe should not exceed 3/4 cup for this measurement.

Friday, April 27, 2018

A - Z Indian Street Foods ~ W for White Dhokla / Safed Dhokla / Khatta Dhokla


White dhokla aka safed dhokla, khatta dhokla and idada is a classic snack recipe from the state of Gujarat. It is not an instant version like the yellow one that is prepared with chickpea flour. Instead these healthy and nutritious dhoklas are prepared with a ground and fermented batter of rice, black gram, yogurt and spices. These steamed rice-lentil cakes are quite light and airy and make a great gluten free breakfast or snack. 

These can be prepared with black gram and rice used in a proportion of 1:2 or 1:3. Or if you are used to making idli batter, feel free to use it. Any rice will do here. As the title indicates, khatta dhoklas means sour dhoklas and they are sourer and spicier than idlis. Thanks to the use of sour yogurt / lemon juice and spices to the batter. In short, these are like the spongy south Indian idlis with a twist. We have recently become fans of these white dhoklas. 
Ingredients:
1 to 1.5 cup rice (I used idli rice)
1/2 cup urad dal / skinned, split black gram
1/4 cup sour yogurt
Salt to taste
1.5 tsp. grated ginger / ginger paste
1.5 tsp. green chili paste
1 tsp. oil
1 tsp. lemon juice (Use only if needed.)
1 Eno's fruit salt packet / 1/4 tsp. baking soda
Crushed pepper corns / red chili powder
Method:
* Rinse and soak rice and urad dal together for about 3 hours. Drain and grind into a thick, smooth batter adding yogurt. Add water if needed. The batter should resemble the idli batter.
* Transfer the batter to a container big enough to hold it in when raised during fermentation. Add salt to the batter and mix well. Cover the container and leave it to ferment in a warm place overnight. (If you live in warmer places, about 6 hours should be enough for fermentation. If you live in colder places, leaving the batter covered in a lighted oven would help.)
* Check the batter in the morning to see if the fermented batter is sour enough. If not, add the lemon juice and stir. (This step is optional.)
* Heat a dhokla maker / steamer or pressure cooker with water. (It should cover 1 inch of base of the container.)
* Grease a dhokla container or a wide container with 1 inch depth that can fit into the steamer. (Or a container with more depth can be used which will hold more batter and gives the height to dhoklas.)
(I used half of the batter and used a 8 inch diameter container with 2 inch depth.)
* When the water at the base of the dhokla maker / steamer / pressure cooker is boiling, add oil, ginger paste and chili paste to the batter and mix well. Finally add eno's salt and quickly stir. Pour the batter into the greased container up to 1/2 and sprinkle ground black pepper and/or chili powder uniformly. Cover the steamer with the lid. Don't put the valve on the lid if using pressure cooker. 

* Steam on low flame until a knife inserted at the center comes out clean. 
* Turn off the stove and let it rest for about 5 to 10 minutes. Gently run a spoon around the perimeter of the cooked dhokla and demould if needed. Cut into diamonds or squares. 
* Serve with green chutney or any spicy chutney.

Note:
1. One may use container with one inch depth and fill it with half the batter. It may take around 10 - 15 minutes to steam. 
I used 2 containers with 8 inch diameter and 2 inch depth which gave me tall dhoklas, for this amount of batter. It took me around 20 minutes to steam on low flame. 
2. Idli batter can be used to make these dhoklas. I used idli batter and added lemon juice to make it sour.
3. Ginger and chili paste can be directly added while grinding.
3. Skip pepper and chili powder topping and instead, one can do a garnish with spluttering mustard seeds, sesame seeds and curry leaves in hot oil and pout it over dhokla and finely top it with minced cilantro.

BMLogo
Check out the Blogging Marathon page for the other Blogging Marathoners doing BM# 87

Saturday, February 10, 2018

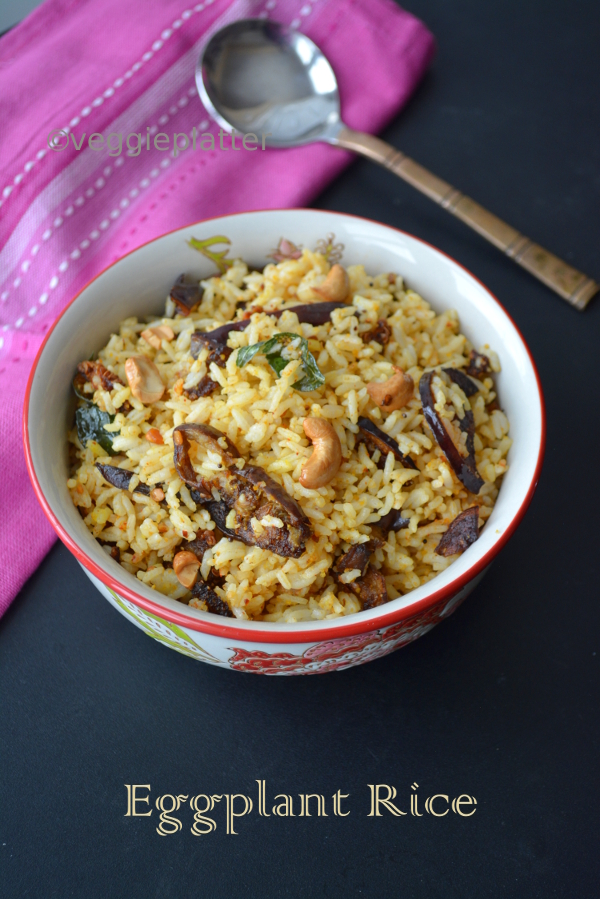
Eggplant Rice


Here is a delicious rice choice for eggplant lovers. Crisply fried eggplants paired with spicy lentil powder yield a great flavor to this rice. The spice powder can be prepared ahead and can be stored in an air tight container for months. I prefer to fry the eggplants but calorie conscious folks can cook eggplants with little oil though crispy eggplants taste better.
 
Ingredients for spice powder:
1 tbsp. chanadal
1.5 tsp. uraddal
1.5 tsp. coriander seeds
2 tbsp. shredded dry coconut (copra)
5 spicy variety dries red chillies

Ingredients for part 2:
1 cup rice (I used sona masuri rice.)
3 big sized round egg plants (I had about 3 cups eggplant slices.)
Oil to fry the eggplant slices (I used canola oil.)

Ingredients for part 3:
4 tsp. oil
1 tbsp. cashew halves
1 tsp. split roasted chickpeas / chana dal
1 tsp. split black gram / urad dal
1/2 tsp. mustard seeds
10 - 12 curry leaves
1/8 tsp. turmeric powder
1.5 tsp. salt
Red chili powder (if needed) 

Part 1: Preparing spice powder
Toast chanadal and uraddal individually in a saute pan until they turn reddish brown. Saute the coriander seeds till they turn slightly brownish and add the red chillies at the end. Let them cool and grind all the ingredients finely.

Part 2:
* Rinse rice with water and drain. Pressure cook adding 2 cups of water and let it cool.
* Cut off the eggplant stalks and cut them lengthwise into two. Slice them thinly.
* Heat oil in a pan and fry the eggplant slices in batches on medium flame until crisp and golden brown. Drain them on absorbent paper towels.

Part 3:
* Heat oil in a kadai or a big non stick pot. Add the cashews and toast them till they turn golden brown. Remove them with a slotted spoon and keep aside. Add split roasted chickpeas, split black gram
and mustard seeds to the same oil and sauté until roasted chickpeas turns reddish. Then add curry leaves and turmeric powder.
* Add 3 tbsp. spice powder, salt and fried eggplants to the pan and mix properly so that the eggplant slices are well coated.
* Then add the cooked rice and mix well. Taste and adjust the seasonings if needed. Garnish with the toasted cashews.  

This post goes to Blogging marathon #85 under the theme "Rice /  Gravy recipes". Check out the page to read what other marathoners are cooking.
 bmlogo

Comments

Sunday, June 11, 2017

Oats Khichdi


Here is a healthy, tasty and quick version of khichdi using oats and masoor dal. I opted for masoor dal here since it is one of those lentils that cook faster even without a pressure cooker but moong dal or toor dal can also be substituted here. This is a great recipe to try if looking for ways to incorporate oats in spicy dishes.

Ingredients: (Yield 2 - 3 servings)
1 cup rolled oats
3/4 cup to 1 cup masoor dal / red lentils
1 to 1.5 cups chopped mixed vegetables (I used beans, carrots and peas.)
1/8 tsp. ground turmeric
1 tbsp. ghee
1 tbsp. cashews
1/2 tsp. grated ginger
1/2 tsp. mustard seeds
1/2 tsp. cumin seeds
2 to 3 red chillies, broken into bits
A pinch of asafoetida powder
1/4 tsp. ground pepper (optional)
Salt to taste
 
Method:
* Wash masoor dal / lentils in two exchanges of water and drain. Add masoor dal, chopped vegetables, about 2 cups of water and turmeric to a sauce pan. Cook on medium flame, stirring intermittently and add water if needed. 
* Add oats and salt when the dal is cooked and continue cooking for about 8 to 10 minutes or until the oats soften.
* Heat ghee in a small pan and toast cashews until they turn golden brown. Remove them with a slotted spoon. Next add ginger to the same ghee and saute until it starts to turn golden. Add mustard seeds, cumin seeds, red chillies and asafoetida. When the mustard seeds start to splutter, turn off the stove and add it to the cooked oat - dal mixture.
* Add the toasted cashews and ground pepper to the oats and mix well.
* Serve warm with pickle and papad.
bmlogo
This post goes to Blogging marathon #77 under the theme "Healthy Lunches". Check out the page to read what other marathoners are cooking.

Comments 

Saturday, March 25, 2017

Minumala Annam / Urad Dal Rice


Here is a simple and quick south Indian style rice idea using black gram / urad dal. This rice does not need even vegetables and does not involve any elaborate prep work or cooking. I saw the mention of this rice as part of a prasadam to be offered in a 'Rama Paarayan' book. To be honest, I had never heard about it before and I am still not sure if there is a standard version out there for this rice preparation. I went ahead with my own version keeping it simple and basic. I liked the rice and feel that it is a great idea when you have left over rice and looking for a quick meal option or have run out of vegetables.
 
Ingredients:
2 cups cooked rice (I used sona masuri rice.)
1 tbsp. whole black gram /  sabut urad dal
1/2 tbsp. split chick peas / chana dal
1 to 2 tbsp. grated dry coconut
3 dried red chillies
Ingredients for tadka:
2 tbsp. oil
1 tbsp. peanuts
1 tsp. split chickpeas / chana dal
1 tsp skinned and split black gram / urad dal
1 tsp. mustard seeds
10 - 12 curry leaves
1/8 tsp. turmeric powder
3/4 tsp. salt or to taste
2 pinches of asafoetida powder

Method:
* Dry toast black gram, split chick peas, dry coconut and red chillies together on medium flame until the split chickpeas starts to change color to a reddish hue. Transfer the ingredients to a wide plate and let them cool. Grind the ingredients to a fine powder.
* Heat oil and add peanuts, split chickpeas, split black gram and mustard seeds in that order. When peanuts and split chickpeas turn golden brown, add curry leaves, turmeric and asafoetida and stir once. Turn off the stove and add the ground powder and salt. Stir well until the powder is coated with the oil and add the rice. Mix well until all the rice grains are coated well with the powder, breaking any rice lumps if present. 
* The rice can be served immediately. 
bmlogo
This goes to Blogging marathon #74, under the theme 'Bookmarked Recipes'. Check out the page to read what other marathoners are cooking.

Sunday, February 12, 2017

Poha Laddu / Sweetened Beaten Rice Flakes' Balls / Atukula laddu

 
Here are some delicious laddus which happen to be a quick preparation. These are very easy even for a novice and are apt sweet choice for festivals like Diwali, and Krishnasthami.
Ingredients: (Yield 10 laddus)
2 cups beaten rice flakes / poha / atukulu
1/2 cup sweetened desiccated coconut / grated dry coconut
3/4 cup powdered jaggery *
2 cardamoms
2 tbsp. ghee
1 tbsp. each - cashews and raisins
2 tbsp. melted ghee or milk at room temperature to shape the laddus
* Adjust the quantity of the jaggery depending upon it's sweetness
 
Method:
* Toast rice flakes on medium flame in a wide pan until crisp. Transfer the flakes to a wide plate and let cool.
* Toast cashews and raisins in ghee until the cashews turn golden and the raisins turn plump. Keep them aside.
* Grind the cardamom seeds finely.
* Grind the beaten rice flakes, coconut, jaggery and cardamom in a blender / food processor finely. Remember to grind the mixture fine since coarsely ground poha bits are hard to chew.
* Transfer the ground mixture to a wide plate and add the toasted cashews and raisins along with the ghee. Mix well and add extra ghee / milk as needed to shape the mixture to balls.
* Make lime sized balls using the mixture. Store them in a bottle or a container with a tight lid. Refrigerate them if milk was used to shape the balls.
 
This goes to Blogging marathon #73, under the theme 'Sweets prepared in less than an hour'. Check here to find out what the other marathoners are cooking as part of the BM.

Comments

Monday, December 5, 2016

Baked Vermicelli - Vegetable Cutlets


Here are some guilt free and flavorful vermicelli and vegetable based cutlets or tikkis to munch on along with a cup of tea in the evenings. I have used potato, carrot and beans here though other veggies like peas, cauliflower or greens can be added too. Vermicelli here can be replaced with other kind of noodles but I find the Indian variety short strands of vermicelli more convenient to use here. The tikkis of course can be pan fried or deep fried too instead of baking. (The tikkis in the background plate were pan fried.)
Ingredients: (Yiled 12 cutlets)
1 cup cooked vermicelli*
1 cup peeled, chopped and cooked vegetables (I used potato, carrot and beans.)
1/8 tsp. turmeric powder
1/2 tsp. chaat masala
1/2 tsp. chili powder or to taste
3/4 tsp. amchur powder
Salt to taste
1/2 cup (or as needed) bread crumbs
Oil to spray 
* Indian style 1/2 inch vermicelli strands
Method:
* Drain the cooked vermicelli and set aside to cool. Squeeze out any extra water if present.
* Drain the cooked vegetables taking care that no water is present. Coarsely pulse them using a food processor.
* Preheat the oven to 350 deg F. Line a baking sheet with aluminum foil if preferred and spray it with cooking oil and keep it aside.
* Add the cooked vermicelli, prepared veggies, turmeric, spice powders and salt to a mixing bowl and mix well with a spoon or hand. Add bread crumbs as needed and mix to form a cohesive mixture. 
* Pinch out lemon sized portions and shape them into discs. Arrange them on the prepared baking sheet and spray the tops with oil again.
* Bake them until the bottom portion turn golden brown and flip them and continue to bake until the other side browns too. (I forgot to record the time of baking but it may take around 30 minutes or so.)

This goes to Blogging marathon #71, under the theme 'One Ingredient - Three Courses'. Check here to find out what the other marathoners are cooking as part of the BM.

Comments