HOME        |        ABOUT        |        COPYRIGHT        |        CONTACT        |         RECIPE INDEX        |         INDIAN THAALIS        |         MILLET RECIPES        |        EVENTS' ROUNDUP        

Showing posts with label Radish / Daikon. Show all posts

Wednesday, February 18, 2015

Mooli Parathas ~ Stuffed Radish / Daikon FlatBreads


The second entry under "Indian Bread Basket" theme this week is going to be these soft and yummy mooli parathas. Mooli is the Hindi word for radish while the parathas are the unleavened flat breads. The white colored one is the commonly available variety of radish in India and so that is what gets used in these parathas for the stuffing. Daikon is however a very good substitute for radish in this recipe and I regularly substitute it for radish in other recipes as well. Mooli paratha is one of the stuffed breads commonly prepared in north Indian kitchens and needs no special side dishes to go along with it. A spicy pickle and some good home made yogurt will do.
Preparing stuffed parathas like these need some experience since there is the possibility of the stuffing spilling out while rolling out the parathas, making it a frustrating experience, especially to a novice. Another fool proof method of preparing a stuffed paratha is rolling out 2 identical sized parathas, placing the stuffing on one paratha and covering it with the other one. Seal the edges and roll it again. Coming to the stuffing, it can be kept simple and raw as I have done. Or spices can be added according to one's preference and further the radish can be sauteed to make sure that it is dry to stuff. I use it raw and it doesn't make any difference with the final result.

Ingredients: (Make 8 parathas)
Oil / ghee to make parathas
 For the outer layer dough:
1.5 cups wheat flour / atta + extra for dusting
1 - 2 tbsp oil (optional)
Salt to taste
For the stuffing:
1.5 to 2 cups peeled and grated radish / daikon
Salt to taste
2 tbsp. minced cilantro
2 finely minced green chili


Preparation of dough:
* Combine wheat flour, salt and oil in a mixing bowl. Add the radish water if using. Add water as much as needed to form a soft, pliable dough. Cover and leave to rest for about an hour.

Preparation of stuffing:
* Add salt and grated radish to a bowl or a colander and just mix to combine. Keep it aside for about 30 minutes to an hour.

* Working with a handful of mixture at a time, squeeze out the water as much as you can from the radish. This is done in order to have a dry stuffing. The radish water can be either discarded or used to prepare the roti dough.
* Add minced cilantro and chillies to the squeezed radish and mix well.

Stuffing the parathas:
* Divide the dough into 8 portions and shape them into balls by rolling between your palms. Work with one dough ball at a time while keeping the rest covered.
* Roll a dough ball into 3 - 4 inch disc and place about 1 - 2 tbsp. of filling, depending upon how comfortable you are with the rolling
part. Try with a little amount of stuffing initially, if you are a beginner. Place the stuffing at the center of the disc, leaving the edges free.
* Bring the edges together so that there are no gaps and the stuffing is inside intact.
* Press it into a disc taking care that there are no gaps anywhere so that the stuffing wouldn't spill out while rolling.
* Roll the disc carefully into a 5 to 6 inch thin circle, dusting with flour if necessary. Take care not to break it or let the filling coming out. Repeat the steps of paratha making with the remaining dough. One can roll out parathas and fry them simultaneously. A beginner may roll out 4- 5 parathas at once and then start the frying process. Remember to cover the other rolled out parathas.
Making Parathas:
Heat a shallow non stick pan or an iron griddle. Place the paratha at the center of the griddle and fry until there are brown spots on both sides, drizzling with oil / ghee in between. Click here for a picture tutorial on how to toast the parathas.

This goes to Blogging Marathon #49, under the theme of "Indian Bread Basket".

Comments

Sunday, June 19, 2011

Easy Breezy Ragi Muddhe & Radish Sambhar

Photobucket

A ragi muddhe served with some spicy sambhar is totally a satisfying and fulfilling meal. Muddhe pronounced as  mu - they with a stress on they. Muddhey refers to the circular shaped big morsel of cooked ragi flour.

The state of Karnataka accounts for almost half of the total production of ragi (finger millet) in India and no wonder that it is one of their chief crops. However ragi is popular mostly in the Southern regions of that state and here the grain is eaten in one form or another in most of the households. Ragi has been prized for its health benefits for centuries. It is rich in iron and calcium, diabetic friendly and is said to cool one's body. The facts that it is available abundantly at a cheaper price and is comfortably fulfilling make it more popular among the economically weaker section.
Ragi rotti and ragi muddhe have to be the most quintessentially popular ones among the ragi dishes prepared. I have to however stress that all Kannadigas don't eat muddhe and rotti scores more points over it since it is eaten widely through out the state. Ragi muddhe rules over rice especially in and around regions of Bangalore. A big muddhe + saaru lunch and dinner is a pretty common sight in most of the households, irrespective of one's social / economic status. This is not a restaurant item, though. I remember seeing some military hotels displaying the 'muddhe ready' boards outside. I don't know whether the new eateries presenting 'themed' food now serve muddhe in the name of traditional food. Sadly, I am no longer familiar with the Bangalore scenario except eating at the Indiranagar Shantisagar once or twice in the last decade.
Liking 'ragi' is an acquired taste and liking a 'muddhe' is more so. Many may not find the earthy flavor of ragi very inviting unless they are used to it or want to reap the benefits of this healthy grain. If you are a new user, I would recommend rottis / huri hittu to try. Probably ragi muddhe is the last thing to attempt because of its flavor and texture. Also preparing it in the traditional way is said to be trickier and needs expertise. I must admit that I was not a fan of muddhe until a couple of years ago even though I grew up eating all the other delicious ragi preparations. When M mentioned that his mother used to prepare ragi sankati (ragi - rice preparation) and all his siblings used to enjoy it, I hopped onto the blogosphere looking for an easier version and landed at Madhu's place. She happens to be one of my early blogger buddies and blogs no longer after her move to India.
Coming back to the recipe, this is a very easy version and is hard to mess up. All one need to do is just follow the measurements and instructions precisely. I have been making this for years now and the recipe is a keeper.

Ingredients:
1 cup - Ragi flour
2 cups - Water
Salt to taste (I usually don't add it.)
(Basically ragi flour : water ratio needs to be 1 : 2)

Method:
* Bring a cup of water to boil in a pan.
* Meanwhile, combine a cup of ragi flour and a cup of water to form a smooth paste. Keep it aside.
* While water is boiling, slowly add the ragi paste and salt to it. Keep stirring with a wooden spoon until it comes together with out any lumps. When it appears cooked, remove from the fire. 
When the cooked dough is still warm, wet your hands and shape it into balls of desired size. (I skip this step since I make small quantity and eat it once done. Mine is done in around 8 - 10 minutes.)

One would not sit and chew ragi muddhe morsels like one usually does with rice. They usually dip a small portion of the muddhe in a generous amount of a spicy saaru / gravy (bassaru / massappu / a spicy green leafy vegetable stew) and just swallow/gulp it since it sticks to the roof of the mouth if eaten leisurely.
M loves with eggplant sambhar but recently I have started to serve ragi muddhe with all kinds of sambhars and so it was radish sambhar this time. Now here is the recipe for radish sambhar.

Photobucket

Ingredients: (For 6 servings:)
2/3 cup toor dal / pigeon peas
1 cup radish pieces (Radish peeled and cut into thin discs. Regular long white ones  / daikon can be substituted. )
1/8 tsp turmeric powder
1 Tbsp sambhar powder
Salt to taste
1.5 tsp chili powder
4 Tbsp or as needed - tamarind juice (a lime sized tamarind soaked in water and juice squeezed.)
For tadka: 2 tsp oil, 1 tsp mustard seeds, 1 tsp cumin seeds, a pinch of asafoetida powder and few curry leaves

Making sambhar:
* Wash the toordal in two exchanges of water. Add 1.5 cups of water, radish discs and turmeric powder to the dal container and place it in a pressure cooker and cook till the dal is almost mushy. Alternatively, it can be cooked on stovetop in a kadai / deep based pan adding water as needed and stirring in between.
* Take a kadai / pan and add the cooked dal and vegetable. Mash it a little bit with the back of a ladle. Then add sambhar powder, chili powder, salt and tamarind juice. Add extra water to bring to sambhar consistency. Mix well and turn on the heat. Taste and adjust the seasonings if needed. Bring it to a rolling boil. Lower the heat and allow the sambhar to simmer for a couple of minutes more.
* Meanwhile, heat oil in a small pan and add mustard seeds, cumin seeds and curry leaves. When the mustard seeds start to sizzle, add the asafoetida powder and turn off the stove. Add this tadka to the cooked sambhar and mix well.

Note:
1. There is another version, where rice is added to muddhe while cooking.
2. Traditionally, a wooden gadget called muddhe kolu is used to stir the muddhe. I find a wooden spatula does the job and using a nonstick pan makes it further easier.

This is my 'Ragi' themed post on the fourth day of this BM#6. Check what the other marathoners are cooking.

Comments

Wednesday, January 19, 2011

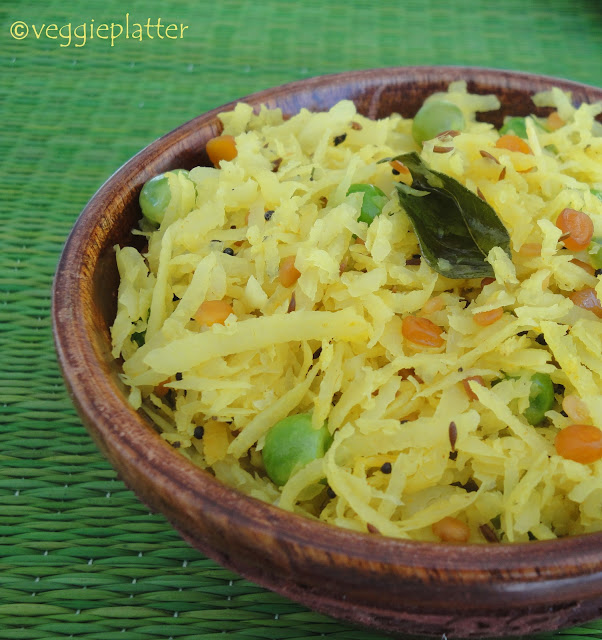
Simple & Quick Subzis ~ Black Radish - Peas Subzi / Mullangi Bataani Koora


I have been eyeing these radishes for years now in our local grocery store but never thought of trying them. Mainly because I would get the regular radish / daikon at half the price and didn't want to shell out the extra bucks for the black peel that would end up in the garbage. Last weekend, however I was in a generous mood I guess and brought home some.
Black radishes - well, as the name suggests are another variety of radishes with a black skin. They are about the size of turnips / kohlrabis. They smell and taste similar to the regular white radishes, the tiny pink ones or the daikons. I used some in the methi mooli rotis and some to prepare this koora today. Any radish / daikon can be used to prepare this simple and quick curry. And here is the recipe for radish lovers.


Ingredients for about 2 servings:
1 cup peeled and grated radish
1 Tbsp green peas
2 (or 3) finely chopped green chillies
Salt to taste
1 - 2 Tbsp oil
For tadka:
1/2 tsp each - chana dal, urad dal, cumin seeds & mustard seeds, few curry leaves, 1/4 tsp turmeric powder

Subzi making:
Heat oil in a small kadai / a non-stick pan. Add the tadka ingredients in the order mentioned except the turmeric. When the dals turn reddish, add the green chillies and turmeric. Stir for a few seconds and then add radish and peas, if they are fresh. Turn the heat to low setting and cook covered, stirring in between. Sprinkle a few Tbsps of water if the mixture appears very dry. If adding frozen peas, do so almost at the end of the cooking. Add salt and mix well.  Turn off the heat.


Serve with rotis / rice.

Comments

Tuesday, January 18, 2011

Methi - Mooli Rotis / Fenugreek Greens - Black Radish Flatbread


For the past few weeks, my daughter's favorite lunch box item has been 'colorful rotis'. I am trying to keep them interesting and nutritional as well since lunch box is being brought home empty. Touch wood. I however don't know how long this 'favorite' is going to last. I am trying to sneak in vegetables in the dough itself since she goes 'I need plain rotis and no koora' (no subzi). It was methi -mooli turn today. I had bought some black radishes last week and used one of those. White / pink radish or daikon can be substituted for the black radish. Even with a cup of plain yogurt, these rotis make a complete meal.

Ingredients for 10 rotis:
2 cups atta + some extra for dusting*
1 cup washed and coarsely chopped methi / fenugreek greens
1/2 cup peeled and grated radish
1/2 tsp Chili powder (optional. Or substitute finely chopped / paste of green chillies & ginger)
1/2 tsp turmeric powder
1 tsp cumin seeds
Salt to taste
Milk / water as needed to make a firm dough (I used 3/4 cup fat free milk)
A few Tbsp oil to make rotis
* Whole wheat flour sold at Indian grocers

Preparing the dough:
Combine the atta, salt, chili powder, turmeric powder and cumin seeds in a mixing bowl. Mix in the methi leaves and grated mooli / radish. Gradually add the milk / water as needed to form a firm but pliable dough. Allow it to rest for a couple of hours. If rotis are not being made at this point, the dough can be refrigerated for 2 -3 days. When it need to be used, place it covered in a microwave for about 15 - 20 seconds and it would be ready.

Making rotis:
* Pinch a lime sized portion of the dough. Flatten it into a disc and roll it into a thin circle using a rolling pin. Use some atta for dusting, if needed. 
* Heat a tawa / shallow pan. Place the rolled out roti on the pan. Cook till both sides are done, adding 1/2 tsp of oil along the edges and flipping in between.
* Repeat with the remaining dough. Simultaneously the dough can be rolled out and toasted at the same time.


Comments

Wednesday, February 14, 2007

Daikon - Coconut Chutney / Mullangi - Kobbari Pachchadi


When Nupur invited us, the fellow bloggers to participate in the alphabetical journey of Indian (vegetables) cooking, I began to wonder which vegetable began with the letter 'D'. I searched my refrigerator and found only one vegetable which started with the letter 'D'. So, I tried to remember the other names for the vegetabes I had. Then I realised the poor Daikon did not even figure out in my list. I use that name only when I see it in grocery shop. I grew up learning the vegetable's name as radish and still it remains the same even after living for 9 years in USA. I think, my people back home would not even remotely link that word to a vegetable, if I mention it. I hope Nupur would accept this entry as daikon is available in India , even though not under the same name (as far as I know).
Now let me come to the recipe. I have been preparing Daikon / Mullangi chutney from a long time, for which I got the recipe from a popular Kannada website. This time, I thought of giving an Andhra twist and prepared it in an entirely different way. I followed the method my mom employs when preparing chutneys using vegetables. You can also prepare this using those red colored, round shaped radish.


Ingredients required for the chutney:
Peeled and sliced Daikon - 1 cup
Grated fresh coconut - 1/4 cup
Tamarind extract - 1 tsp
Salt - 3/4 tsp
Oil - 1 Tbsp
Red chillies - 6 - 8 (8 worked for me. If you prefer it to be less spicy, go with 6 chillies)
Mustard seeds - 1 tsp
Urad dal - 2 tsp
Fenugreek seeds (Methi Seeds) - A few (Half of 1/4 tsp)
Asafoetida (Hing) - A few pinches (Half of 1/4 tsp)


Method:
Soak tamarind in water to get the extract.
Heat oil in a pan. Add urad dal and mustard seeds. When urad dal start to turn slightly brown, add methi seeds, hing and red chillies. When the mustard seeds and methi seeds turn reddish brown in color, add the sliced daikon. (Methi seeds fry fast. So, don't add at the begining and also use only a small quantitiy as mentioned. Otherwise, it turns chutney bitter).
Stir once, close the pan with a lid and lower the heat. Let it cook till the daikon slices turn tender. Stir once or twice in between. Remove the pan and let the daikon mixture cool down.
Grind this mixture with the coconut, tamarind and salt in a mixer / blender till smooth. I had to add about a tbsp of water to grind it.
Remove and collect the chutney in a bowl.
Serve with rice, rotis or any breakfast dishes.


Post a comment