HOME        |        ABOUT        |        COPYRIGHT        |        CONTACT        |         RECIPE INDEX        |         INDIAN THAALIS        |         MILLET RECIPES        |        EVENTS' ROUNDUP        

Tuesday, June 12, 2018

Mudda Pappu & Mamidikaaya Theeya Pulusu


There are plenty of combo dishes in Indian cuisine where two dishes gel well and are always served together. Like today's pair of lentils and gravy that comes straight from my kitchen or any Andhra kitchen for that matter. 

Muddha pappu is basically cooked lentils with just a seasoning of salt. It literally means lentils cooked to a thick consistency. It is also called otti pappu or chappa pappu which means that the dish is plain / bland.  A similar preparation of plain lentils can be found through out the regions in India. However this pappu holds a significant place in Andhra cuisine. Kids in their growing years start their solid food with a little mashed rice, mudda pappu with ghee spooned over. Toddlers and adults have a similar affinity to this dish. My high school going daughter loves this pappu so much that she eats it at least 3 or 4 times per week. Even our extended family members know her love for this and save some plain dal for her during our visits. 


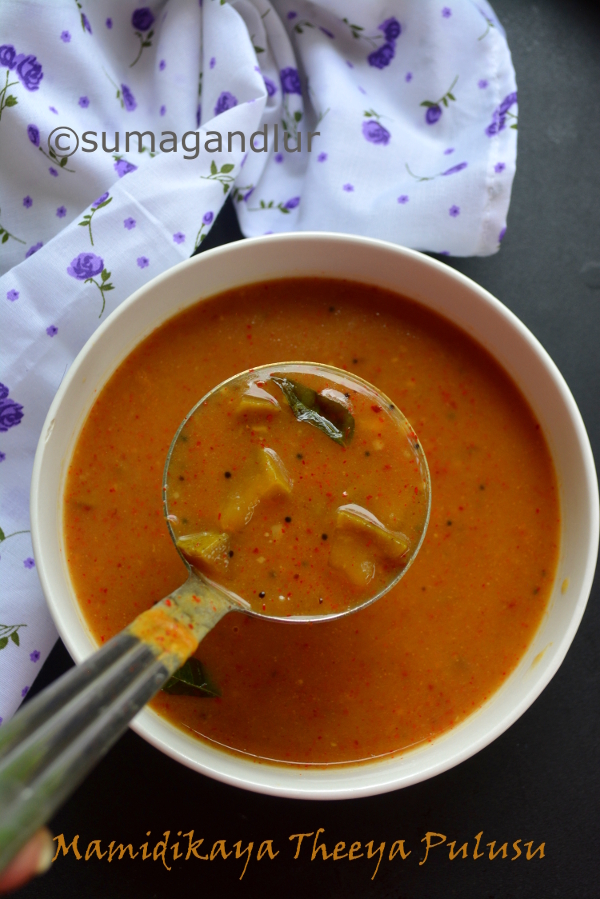
Muddha pappu served with hot steamed rice and ghee with aavakaaya on side is the ultimate combo food for a person form Andhra. The other popular pairings that go with this dal rice are majjiga pulusu (Andhra style kadhi), perugu pachadi (Andhra style spicy raita), charu aka lentil based rasam. This mudda pappu is also served when otti pulusu or theeya pulusu is prepared. Otti pulusu or theeya pulusa is a gravy prepared similar to Andhra style dal called pulusu sans lentils. These dishes are never eaten alone with rice in our homes. Usually rice is mixed with mudda pappu and mixed with a tsp. of ghee and dipped in any of these side dishes and eaten. 


I prepared otti pulusu today and mudda pappu to go along with it as part of our meal today. Usually otti pulusu is made thinner and no lentils are used. A tsp. of ric eflour is added to slightly thicken the gravy. The dish is a balance of flavors - hot, sour and sweetness and need a little practice to be able to come up with a gravy where all  flavors gel well.

Ingredients for mudda pappu:
1 cup lentils / toor dal / arhar dal
2 cups water
1/8 tsp. ground turmeric 
Salt to taste

Method:
* Wash toor dal in two exchanges of water and drain. Pressure cook the dal along with water and turmeric for three whistles. 
* When the valve pressure is gone, mash the cooked dal with the back of a ladle slightly. 
* Add salt to the cooked dal and mix well to combine.
Ingredients: (Yield 3 servings)
1 cup peeled and cubed green mango pieces
1 tsp. oil
1 tsp. mustard seeds
A sprig of curry leaves
2 pinches of asafoetida
1/8 tsp. turmeric powder
2 tsp. chickpea flour / senaga pindi *
1&1/2 cups water
1/2 tsp. chili powder
Salt to taste
2 tbsp. tamarind juice
1 to 2 tbsp sugar / jaggery (I used 3 gm / 3/4 tsp. Splenda)
( * or a paste made with 2 tsp. rice flour and water can be used.)

Method: 
* Soak about a big lemon sized tamarind in water until it softens or nuke the tamarind and water in a microwave for 3 minutes. Squeeze the pulp and extract thick juice.
* Cook the mango pieces with little water in a microwave, without turning them mushy.
* Add chickpea flour / rice flour and a few tbsp. of water to a small cup and make a smooth paste. (Rice flour or chickpea flour is used to thicken the stew here since lentils are not used.)
* Heat 1 tsp. oil in a sauté pan and add mustard seeds. When mustard seeds start to pop, add curry leaves, asafoetida and turmeric. (If mango pieces were not cooked in the microwave before, they can be added along with the water now and cooked until done.)
* Next add the cooked mango pieces along with the water used to cook them, tamarind juice, jaggery, chili powder, salt, chickpea flour (or rice flour paste) and about 1&1/2 cups of water to the pan. 
* Mix everything with a ladle and check the consistency. It thickens while cooking and the final pulusu should be of pourable consistency like sambhar. Add extra water if necessary and bring the mixture to a boil. Taste and adjust the seasonings, if needed. There must be a balance between the dominant flavors of the dish but the dish is slightly sweeter.
* Lower the heat and simmer for a couple of minutes more. 
* Serve with rice, dal and ghee, as part of a Andhra meal.

bmlogo
This goes to Blogging marathon # 89, under the 'Combo dishes' theme. Check out the page here to read what other marathoners are cooking.

Comments

Monday, June 11, 2018

Boondi Raita

Raita is a popular accompaniment to go with aromatic, spicy biryanis whether laden with meat or substituted with vegetarian options. A raita is a yogurt based condiment that originated in the Indian subcontinent. It is usually served with spicy main course rice dishes such as biryani or pulao and also parathas - the spicy, stuffed flatbreads from the region. Pairing raita with a spicy dish is logical considering the fact that yogurt acts as a coolant. Boondi raita was an accompaniment to methi-potato rice for our lunch today.

Of course there is no one standard raita dish and variations are possible as the main ingredient can be altered or the ground spices that go into the dish can change. Today's raita is made from the plain, salted variety boondi. Now what is boondi ? They are prepared with chickpea flour and look like tiny golden pearls. A medium consistency batter is prepared using chickpea flour, salt and water and it is passed through a multi holed sieve into the hot oil and deep fried. The so prepared boondi can go into savory snack mixes or into the classic sweet dish from India, boondi laddu or motichoor laddu. One can easily find this plain boondi at snack aisles in any Indian store or at Indian sections in stores that sell international food.
Boondi is the star ingredient of today's raita and the preparation is quite a child's play when you use store bought boondi like I did. Boondi raita is an yummy accompaniment to any spicy rice dish or a paratha. The chilled raita can be even eaten as a snack on it's own since the cool, sweet yogurt, boondi and the spices gel beautifully well in this dish. The spices can be added or omitted according to one's preference and the quantities of the ingredients can be tailored to one's needs as well.
Ingredients: (Yield 2 servings)
1 cup full fat yogurt, chilled
1/2 cup boondi 
Salt to taste
1/4 tsp. red chili powder 
1/4 tsp. roasted cumin powder
Cilantro or mint leaves to garnish
(Chaat masala / black salt and/or ground black pepper can also be interesting additions but I don't use any.)

Method:
* Soak boondi in warm water for about five minutes. 
* Add salt to the yogurt and lightly whisk it for a uniform consistency.
* Gently squeeze the water from boondi without crushing them and add to the whisked yogurt. Add spices of your choice and stir to combine. 
* Garnish with minced coriander or mint leaves and serve as an accompaniment to the rice dish.

bmlogo
This goes to Blogging marathon # 89, under the 'Combo dishes' theme. Check out the page here to read what other marathoners are cooking.

Comments

Sunday, June 10, 2018

Mathura Ke Dubkiwaale Aloo & Bedmi Poori

I thought of posting recipes under the theme of 'combo meals' from an Indian perspective this week. A 'combo meal' in terms of Indian culinary context is not the same as the western one. Most of the Indian households prepare a well balanced meal on a daily basis and the menu typically do not imitate a restaurant one where combo meals and super sized beverages are served. If at all, the 'combo dishes' theme has to be applied for a typical lunch in Indian homes, it may consist of either a rice based item or a wheat / millet based flatbread and a spicy side dish / gravy to go with. Water is served and consumed commonly during any meal and most of the Indians do not feel the need of any extra beverage during meals. Tea may be served after a meal in northern parts where as coffee / teas are not expected after lunch in a southern household. They may go with a glass of salted butter milk if at all they feel the need of a beverage.


Today's combo meal is a puffed bread and a curry from northern India. The puffed bread is called bedmi poori or urad dal poori, where ground urad dal / black gram batter is added to the wheat flour while forming the dough for the bread. I had posted the recipe for pooris in April and the link is here. It is commonly served with a potato gravy called dubkiwaale aloo from Mathura, a holy city for Hindus.  I wish I had remembered to taste this curry at the city when I visited during one of my last trips to India but alas I did not.

The name 'dubkiwaale aloo' is in reference to the thin consistency of the spicy gravy, the word dubki being 'to swim' since the potato bits seem to be swimming in the gravy. The curry is quite simple one to prepare and uses no onion - garlic that are standard ingredients in most of the northern style curries. The cooked potato pieces are slightly mashed and they add body to the gravy. Also the spices can be adjusted to one's preference and the curry can be made more spicier or the opposite. I even added a little bit of chili powder but this curry was not hot to us. This aloo can be served with kachoris, pooris or parathas.

Ingredients:
2 large potatoes, cubed and boiled 
1 tbsp. ghee / oil
1/2 tsp. cumin seeds
1/4 tsp. fenugreek seeds (methi seeds)
2 dried red chilles, broken into pieces
1 tsp. finely grated ginger (optional)
One large pinch of asafoetida powder
1/8 tsp. turmeric powder
1/4 tsp. garam masla
1/2 tsp. dried mango powder / amchur powder
Salt to taste
Minced cilantro to garnish

Method:
* Heat ghee in a saute pan and add cumin, fenugreek seeds and red chillies. When the seeds start to brown, add ginger and red chillies. Saute for few seconds and add asafoetida, turmeric, garam masala, amchur and salt to taste. Saute them for few seconds and add the potatoes. 
* Coarsely mash the potatoes and add water. Check the flavor and adjust the seasonings if needed. 
* Simmer for 10 to 15 minutes for the flavors to mingle. 
* The quantity of water added must be enough to prepare a thin consistency gravy. If the curry appears to be dry during cooking, add extra water and continue to cook. 
* Turn off the stove and garnish with cilantro. 
* Serve hot with kachoris, pooris or rotis. 
bmlogo
This goes to Blogging marathon # 89, under the 'Combo dishes' theme. Check out the page here to read what other marathoners are cooking.

Comment

Tuesday, June 5, 2018

Saggubiyyam - Kobbari Payasam / Sago and Coconut Kheer

A sweet pudding made with sago, jaggery and coconut

Growing up, the standard payasams cooked at home were either rice based paramannam or sago based one until the ready made vermicelli started selling in the market. To be honest, I did not use to appreciate the sago payasam as I do now. Sago kheer started to a become a regular feature somehow when I had my own home and hearth, and acquired the status of being a favorite payasam

I decided to switch to jaggery this time and also threw some coconut at the last moment. The resulting payasam was tasting so good that I have decided to stick to this new version in the future. The final payasam is creamy and delicious and has no resemblance to the stand version in any manner. Give this a try if you are looking for a payasam recipe and I assure that you would not get disappointed. 
Ingredients: (Yield 2 servings)
1/4 cup sago / saggubiyyam
1/4 cup shredded fresh coconut
1 cup milk
1/2 powdered jaggery
2 cardamom pods
1 tsp. ghee
1 tbsp. cashew nuts


Method:
* Rinse and soak sago for about 10 minutes in water. Drain and wash away the starch powder. I do it to get rid of some of the starch but this step is however optional.
* Choose preferably a non stick pot or a non stick sauce pan to cook kheer. Add drained sago and a cup of water and cook on low flame, stirring occasionally. Cook until all the sago pearls become transparent. 
(Starch keeps building up while cooking the sago and tends to stick to the bottom of the pan if not stirred intermittently. If one finds cooking sago tricky because of the starch buildup, follow this step. When the water used to cook sago becomes starchy, add another cup of cold water. Sago pearls go to the bottom of the pan and then throw away all the (starchy) water from the pan. Add a fresh cup of water to the sago and continue to cook. This step can be repeated one more time while cooking sago.)
* Crush the cardamom pods using a mortar and pestle. Grind the cardamom seeds fine. 
* Throw away all the water in the pan when the sago pearls become transparent. Add fresh coconut, jaggery, milk and cardamom to the pan. Cook on low flame until the jaggery melts and milk starts to boil. Turn off the stove.
(I usually add milk and jaggery together and it has never curdled. Touch wood. In case, if you feel milk is going to curdle because of the addition of jaggery, milk may be separately boiled in another pan, cooled and added finally.)
* Heat ghee in a small pan and add cashews. Toast them until they turn golden brown. Add them to the kheer along with the ghee and give a quick stir.
* The kheer can be served warm or chilled.

bmlogo
This goes to Blogging marathon # 89, under the 'Indian Sweets - Payasams' theme. Check out the page here to read what other marathoners are cooking.

Comments

Monday, June 4, 2018

Dry Fruits & Nuts Kheer

This dry fruits - nuts kheer is easy to prepare and sinfully rich and delicious. The milk is boiled along with ground nuts until it turns thick and creamy. One can use any dry fruits or nuts they have on hand. It takes some time to reduce the milk quantity but it's worth it. 
Ingredients: (Yield 2 servings)
1 & 3/4 cups full fat milk
1/4 cup assorted nuts (I used cashews, almonds and pistachios.)
1 tsp. ghee + 2 tbsp dry fruits (I used raisins and dried sweetened cranberries.)
2 cardamom pods
2 to 3 tbsp. sweetened condensed milk
Coarsely chopped nuts to garnish

Method:
* Heat the milk, preferably in a non stick pan. When it starts to boil, reduce the heat to lowest setting and continue to heat it for about 15 to 20 minutes, stirring in between.
* Meanwhile, toast the nuts in a saute pan on low flame for a couple of minutes and keep it aside to cool. Once cool, grind them fine. 
* Heat ghee in a small pan and add the raisins and cranberries. When they plump up, remove them with a slotted spoon onto a plate and keep aside.
* Crush the cardamom pods in a mortar and pestle and grind the seeds to a fine powder. Don't throw away the husks.
* Add the ground nuts, ground cardamom along with the husks and condensed milk to the milk pan. Continue to cook for another ten minutes, stirring occasionally. By the time, the milk reduces a bit in quantity and becomes thicker.
* Turn off the stove and add the toasted raisins and cranberries.
* Garnish with chopped nuts and serve it either warm or chilled.
bmlogo
This goes to Blogging marathon # 89, under the 'Indian Sweets - Payasams' theme. Check out the page here to read what other marathoners are cooking.


Comments

Sunday, June 3, 2018

Paal Payasam ~ South Indian Milk Pudding


The past month for us marked two birthdays, visits from extended family members and a bout of illness that affected every one at home. After that unplanned month break, I am back in business with a traditional sweet dish from the southern parts of India. Payasam, the south Indian term and kheer, the north Indian name basically refer to the same dish - an eggless sweetened milk pudding cooked on stove top adding either a grain or lentil or vegetable and so on. Milk is the star ingredient in today's payasam where only a tiny quantity of rice is added, similar to the case of a kheer preparation. Usually milk and water are cooked until the quantity is reduced to half here, allowing a slow caramelization that lends the payasam a light cream colored hue. 

To be honest, I have never seen my mother or grand mothers preparing this since this seems to be a typical preparation from Tamil nadu and Kerala. Our go to dish when it comes to traditional payasams in Andhra happens to be paramannam. I am not sure how many modern kitchens still prepare it but it also happens to be a rice based payasam. 
I just went through recipes from online when I tried it for the first time, that were basically the same. One either cooks in a pot that happens to be the traditional aka tedious process or use a pressure cooker which cuts down the cooking time considerably. The short cut method however doesn't compromise in the taste department and so I usually go with it.
Ingredients:
4 cups milk / 1 litre milk
1 tsp. ghee
2 to 3 Tbsp. rice
1/4 cup + 2 tbsp. sugar (or according to taste)
2 cardamom pods
1 tbsp. cashews 


Method:
* Heat the ghee in a small saute pan and fry the cashews if using, to golden brown. Transfer the cashews onto a plate with a slotted spoon. 
* Add rice to the same ghee and fry rice for a couple of minutes on a slow flame. Next pulse the rice a couple of times just to break the grains. There is no need to coarsely grind the rice. 
* Grease inside bottom of the cooker with little ghee and add the broken rice grains and milk to it. Drop a small spoon into the milk to prevent the milk from spilling over while pressure cooked. 
(I usually drop a spoon even when I am boiling the milk in a pot or leave a ladle in the pan to avoid the milk from boiling over.)
* Cook the milk on lowest setting of heat for one whistle. When the pressure subsides, remove the lid and continue to cook on low flame until the milk turns thick and creamy or until the milk coats the back of the ladle.
* Next add the sugar and ground cardamom seeds and continue to cook until the sugar dissolves. Turn off the stove and add the toasted cashews. 
* Serve warm or cold.
bmlogo
This goes to Blogging marathon # 89, under the 'Indian Sweets - Payasams' theme. Check out the page here to read what other marathoners are cooking.

Comments