HOME        |        ABOUT        |        COPYRIGHT        |        CONTACT        |         RECIPE INDEX        |         INDIAN THAALIS        |         MILLET RECIPES        |        EVENTS' ROUNDUP        

Showing posts with label Urad Dal. Show all posts

Wednesday, January 19, 2022

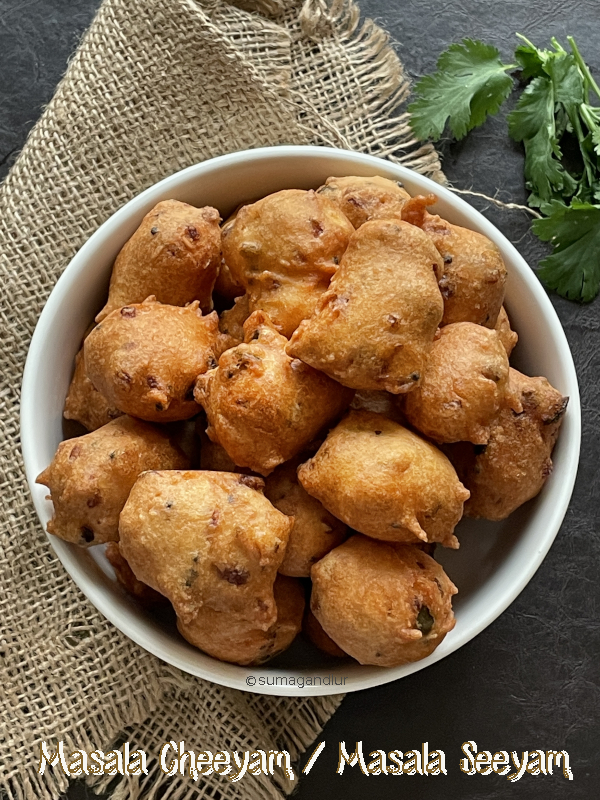
'A - Z' Tamil Nadu Recipe Series ~ C for Chettinad Masala Cheeyam / Masala Seeyam

Southern India is predominantly a rice growing region and the various local cuisines reflect the fact. I did not realize until now that the recipes I planned for this week were all rice based. Akkaravadisal is a sweet rice pudding usually served as an offering to god while brinji is a rice and vegetable based spicy one pot meal. Today's post cheeyam or seeyam is also rice based and is a popular snack from Chettinad cuisine.
 
Chettinad cuisine is perhaps the most well known one among the various regional cuisines of Tamil Nadu, though surprisingly Chettinad / Chettinadu region relatively forms a smaller portion of the state in a geographical sense. It is located mainly in the Sivaganga district and some portion of Pudukottai district. Chettinad is the home of a prosperous banking and business community called Natukottai Chettiars / Nagarathars and in fact, Chettinadu literally means 'Land of Chettiars'.

The Chettiars are known to be traders of salt and spices which is reflected in their cuisine where dishes are made with freshly ground spices. They also use a lot of dried meats and salted vegetables owing to the dry environment of the region. Most of the dishes are either eaten with rice or rice based. The cuisine boasts of both vegetarian and non vegetarian dishes.
Some of the dishes I have previously tried from Chettinad region are

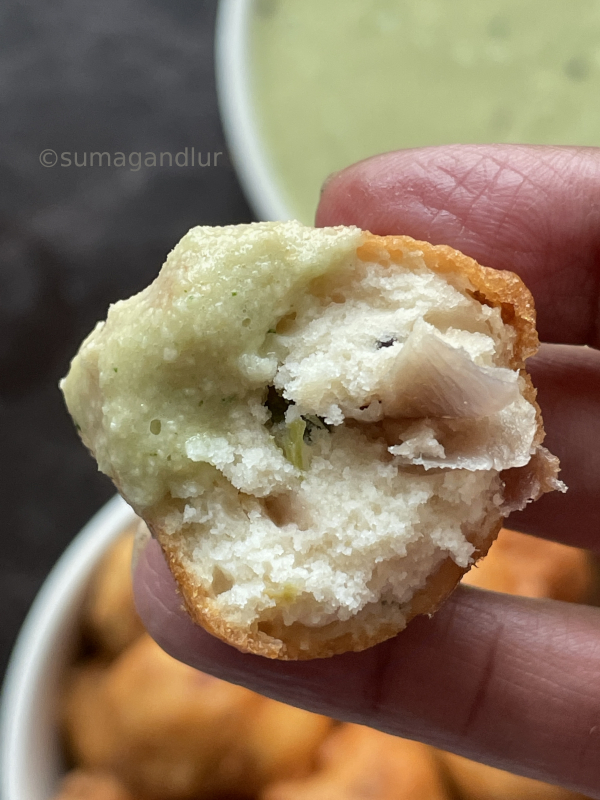
Today's masala cheeyam / masala seeyam also come from Chettinad region as I mentioned above. They are a popular snack from the region, made with a ground batter of rice and skinned black gram. This is a spicy version while there is also a sweet version of seeyam. These delicious fritters make a great evening snack and I read somewhere that people who are fasting also prepare this as an evening meal. 

This spicy version needs advance planning as the rice and black gram needs to be soaked for 2 - 3 hours. Grind the batter fluffy and fine like one does idli batter. Remember not to make it runny. Onions and green chilis are sautéed and added to the batter which add flavor to these fritters though I think the step of sautéing onions can be skipped. Adding raw onions to the batter is not  going to make that of a big difference as they are going to be deep fried anyway.
Ingredients:
1/2 cup rice
1/2 cup skinned black gram / urad dal
Salt to taste
Oil to deep fry 
Ingredients for sautéing:
1 tbsp. oil
1/2 tsp. mustard seeds
1 small sprig of curry leaves, finely minced
1 or 2 green chilies, finely minced
1 medium sized onion, finely minced
2 tbsp. fresh, shredded coconut

Directions:
1. Rinse and soak rice and skinned black gram in water for at least two hours. Drain the water completely after the soaking period.
2. Grind them together into a thick, fluffy batter adding water in small increments. Do not make the batter runny. (Using a grinder would help to use small quantity of water to while grinding. If the batter turns runny, adding a small quantity of rice flour would help but adding too much would turn the cheeyam harder.)
3. Meanwhile, heat a tbsp. oil in a pan and add mustard seeds. When they start to sputter add, green chili and curry leaves. Stir them for few seconds and add onions and salt enough for the onions.
4. Sauté until onion turns translucent and add the coconut. Stir once and turn off the stove.
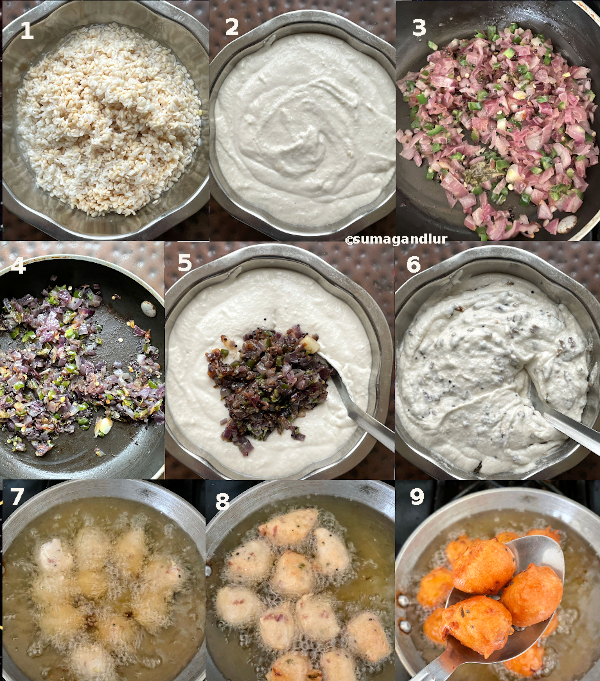
5 & 6. Add the sautéed onions and salt to the batter. (Keep in mind that onions contain salt too). Mix the batter well with a spoon and keep aside.
7. Heat oil for deep frying in a frying pan on medium heat. Drop a pinch of batter to the oil. If it swims to the surface, the oil is ready for frying. If not, heat the oil a little more. Dip your fingers / hand into the batter and shape a small ball. Gently drop into the oil. Repeat the step and drop as many balls as the pan can hold, without overcrowding. (There is no need to fret over the shapes. They don't to be exactly round.)
8. First they sink and soon float to the surface. Keep gently flipping them with a perforated spoon. Lower the heat to low - medium setting and fry until they turn golden brown throughout.
9. Remove them when done and transfer them onto a plate laden with paper towels to absorb the extra grease.
10. Reheat the oil if needed and repeat the steps with the remaining batter.
11. Serve them warm and enjoy with a spicy chutney or some ketchup.

This is going to be my contribution to this week's Blogging marathon, with the theme 'A -Z Series'. Check the page link to see what other marathoners are cooking.


Friday, September 10, 2021

A - Z Idli Series ~ S for Sabbakki Idli / Sabudana Idli / Saggubiyyam Idli / Sago Idli

There is an instant version sabbakki / tapioca pearls idli in Karnataka cuisine which is made with the tiny sized tapioca pearls soaked in yogurt. The idlis prepared with the batter are usually thinner than the standard version that are made with skinned black gram and rice. The idea to these idlis came after a conversation with my mother where we wondered whether tapioca pearls can be added to the regular idli batter. I experimented adding them to idli batter, without changing the proportions of rice and black gram. I found those idlis slightly on the dry side and so replaced a portion of rice with tapioca pearls instead. 
These soft and fluffy idli look cute with the tapioca pearls studded like tiny pearls through out. They make a great breakfast or brunch item when served with chutney and / or sambhar. These idlis are obviously vegan, gluten free and also are fatfree. 
So far in this series -
Ingredients: (Yield - 16 idlis)
1 cup idli rice / idli rava
1/2 cup skinned black gram / urad dal
1/2 cup sago / tapioca pearls / sabudana / sabbakki
2 tsp. salt
3/4 cup water
Ghee / oil to grease the idli moulds

Directions:
1. Add black gram and idli rice to a bowl.  
2. Rinse idli rice and skinned black gram with water, rubbing between fingers and drain. Soak them together in water for about 4 - 5 hours. (If using idli rava instead of idli rice, soak it and black gram separately). 
3 & 4. Rinse and soak tapioca pearls in water in another bowl.
5. Drain the water from rice - black gram mixture and add them to a grinder / blender. Grind the mixture adding salt and enough water to a smooth and thick batter with pourable consistency. (Grind black gram first if using idli rava. Then add the soaked and drained idli rava and mix well. There is no need to grind the idli rava. Salt can be added just before making idlis if the local weather is warmer. )
* Transfer the mixture to a container, big enough to allow some space for the batter to rise during fermentation. 
6. Drain the water that was used to soak tapioca pearls as well, squeezing them gently if needed. Add these tapioca pearls to the ground batter and mix well. 
7. Cover and leave the mixture to ferment overnight, in a warm place especially if the weather is cooler. 
8. The batter may take anywhere between 8 to 16 hours to ferment, depending upon the local weather. 
* Grease the idli moulds with ghee / oil.  Fill the moulds with batter.
* Place the idli stand in the prepared cooker / steamer and close the lid. Don't use the valve for the lid if using a pressure cooker.
7. Steam the idlis on low heat setting until done. (The idlis should not stick when touched with moist fingers.) Check the water level in the steamer base and add extra if needed.
* Wait for about 10 minutes and then remove the idlis by running a spoon around the edges.
* Drizzle melted ghee over the idlis and serve them with a chutney and /or sambhar. Mine were served with peanut chutney and sambhar.
* Refrigerate any left over idlis and use in a day or two. Or they can be cooled down immediately after preparation and frozen to use later. Just nuke them in a microwave, covered and enjoy hot, piping idlis when needed. 

Monday, July 19, 2021

Uthappam Waffles / Dosa Waffles

Dosa waffles or uthappam waffles are those made with leftover, savory dosa batter and these make a filling breakfast or dinner. Dosa batter is needed for this recipe to start with and here is the recipe for dosa batter. These waffles can be made in less than half an hour if you have the batter ready.

Waffles are a fun way to use any leftover dosa batter besides using them to make uthappam, ponganalu, onion dosa and such. Mixed veggies can be added to make the waffles more nutritious. Serve these gluten-free, vegan waffles with coconut or peanut chutney for a delicious breakfast or dinner.
Ingredients: (About 3)
2 cups dosa batter
Salt if needed
1 small red onion, chopped
1 small tomato, chopped 
1 small carrot, peeled and grated 
1 or 2 green chilis, finely chopped
2 tbsp. cilantro, finely minced
Oil to grease the waffle pan
Directions:
1. Left over dosa / idli batter is needed for this recipe. Add salt only if it was not added earlier to the batter. Add few tbsp. of water if the batter appears too thick.
2 & 3. Add chopped vegetables, green chilis, and cilantro to the batter and mix well with a ladle.
4. Preheat the waffle maker and brush the grooves with oil. 
5. Pour the prepared batter into the waffle maker.
6. Cook the waffles according to the instructions in the manual of your waffle maker. 
* Once done, gently remove the cooked waffle from the waffle maker. Use the remaining batter and prepare waffles. 
* Serve them warm with chutney of your choice.
This post is an entry for Blogging Marathon. Check the link to find out what other marathoners are cooking.

Sunday, July 11, 2021

A - Z Idli Series ~ N for Navadhanya Idli


I had planned another traditional idli recipe from Karnataka for today but could not source an ingredient needed for it and had to discard the idea. I then went ahead and as an experiment, prepared these idlis using navadhanya. To be honest, the idea would never have occurred to me if not for this series and these protein rich idlis turned out soft and fluffy. Navadhanya refers to the nine grains used in Hindu religious rituals - Bengal gram, black gram, black sesame seeds, chickpeas, green gram, horse gram, rice, wheat, and white colored beans (I used black eyed peas for it). 

These idlis are simple to make though advanced planning is needed as the ingredients need to be soaked, ground and fermented before steaming the batter in the idli moulds. Though the process sounds tedious, the steps are quite simple and doesn't need much of one's energy. The idlis can be made in advance and can be refrigerated or even frozen to have a healthy breakfast ready in the morning rush hours with a simple step of reheating them in a microwave.

Navadhanya idli turned out fluffy with a subtle flavor to them, because of the wheat used in the recipe. These navdhanya idlis served with chutney and / or sambhar  make a filling breakfast or dinner option as they are super healthy, nutritious and vegan. Ours were served with peanut chutney and erra karam, Andhra style onion chutney.
I used navadhanya as I mentioned above but some ingredients may be substituted or omitted from the recipe as per preference. Brown rice can also be replaced with idli rice. Wheat can be completely omitted from the recipe as well if it's flavor in the idli is not to your taste. Whole black gram can be replaced with skinned variety as it needs only a couple of hours of soaking and also doesn't need thorough rinsing to get rid off the skins. Omitting one or two beans that are not on hand works too.

Some of the beans used here like chickpeas, black gram and horse gram need to be soaked overnight or for at least 8 hours. It is hard to sort out and soak the ingredients individually according to their soaking periods and therefore I soaked rice, wheat, Bengal gram, green gram, black eyed peas, chickpeas and horse gram in water in one container and black gram in another bowl. The black gram needs some thorough rinsing to get rid off the skins as much as possible and so they were soaked separately.

I soaked the ingredients overnight and ground the batter in the morning. The batter fermented quickly, in about 7 hours which never happens with my regular idli batter. It maybe partly because of the quantity of the beans used in the recipe and partly because of the weather the day I made these idlis, at 80 deg F / 27 deg C. I would recommend to grind the batter in the morning to keep an eye on the fermentation process. I am not sure but guessing that too much fermentation may cause the batter to start smelling foul because of the beans used here.

Ingredients: (Yield - 28 idlis)
1 cup idli rice 
1/2 cup brown rice
1/4 cup wheat kernels
1/2 cup + a handful of black gram *
6 tbsp. each - Bengal gram, green gram, black eyed peas, chickpeas, and horse gram **
Toasted black sesame seeds as needed
Salt to taste (I used about 2.5 tsp. salt.)
Water to grind the ingredients
Notes:
* I used whole black gram but it can be substituted with skinned black gram which takes only about 2 hours of soaking. 
** Some of the ingredients used here like black gram, chickpeas, horse gram need overnight or about 8 hours of soaking.

Directions:
1. Add idli rice, brown rice, wheat, Bengal gram, green gram, black eyed peas, chickpeas and horse gram to a container. Rinse them with water twice and drain. Add enough water and soak them overnight or for at least 8 - 10 hours.  
* Add black gram to another bowl and rinse. Drain and add water to the bowl and soak it also overnight or for at least 8 hours. (Or skinned black gram can be substituted which needs soaking for only a couple of hours.)
After the soaking, drain the water from the rice - lentil container and rinse again twice with water and keep aside. However the black gram needs some thorough rinsing to get rid off the skins as much as possible. I used whole black gram since it is used in navdhanya but skinned black gram can be substituted to skip the rinsing part.
2. Add all the soaked and drained ingredients to a grinder. Grind them adding salt and enough water into a smooth and thick batter. If using a mixer then grind them in 2 batches. (The salt can be added just before making idlis if living in a warm climate. I add it while grinding since I live in a cold climate and the batter takes longer to ferment.)
* Transfer the batter to a container large enough to allow the batter to raise during fermentation. Cover the container and allow it to ferment for about 7 - 8 hours. (It took me about 7 hours to ferment the batter when the temperature was about 80 deg F / 27 deg C and it may take longer in  cold climate. Leaving the batter out after fermentation may turn smelly.)
3. The fermented batter looks like above in the picture 3. Refrigerate the batter if not using immediately and use within a couple of days. Leave the refrigerated batter on the counter for a couple of hours before using.
* Heat about 2 cups of water in a idli cooker base or a idli cooker or a steamer on medium heat. 
4. Grease the idli moulds with ghee / oil and sprinkle black sesame seeds over them.
5. Gently stir the batter a couple of times with a ladle. Pour the batter into the idli moulds carefully without spilling.
6. Place the idli stand in the prepared cooker / steamer and close the lid. Don't use the valve for the lid if using a pressure cooker.
Steam the idlis on low heat setting for about 20 - 25 minutes or until done. (The idlis should not stick when touched with moist fingers.) Check the water level in the steamer base and add extra if needed.
7. Wait for about 10 minutes and then remove the idlis from idli stand. Remove the idlis by running a spoon around the edges.

Serving the idlis: 
* Drizzle melted ghee over the idlis and serve them with a chutney, and sambhar if preferred. Mine were served with peanut chutney and erra karam / Andhra style onion chutney.

What to do with leftover idlis:
1. Refrigerate the left over idlis and use in a day or two. 
2. Or they can be cooled down immediately after preparation and frozen to use later. Nuke them in a microwave, covered and enjoy hot, piping idlis when needed.

Saturday, July 10, 2021

A - Z Idli Series ~ M for Mallige Idli

So far in my idli series,
D for Dal Idli
J for Jowar Idli
L for Lauki Idli

Here are some spongy and pillowy soft idlis from Karnataka called mallige idli, for some breakfast indulgence. These idlis which are popular in the Mysore area are made with rice, urad dal, along with the addition of flattened rice and tapioca pearls. These idlis are named after another specialty of the region, Mysore mallige, a renowned variety of jasmine flowers in the state. It is an allusion to the color and texture of these idis.
The texture of these plump and soft mallige idlis is so splendid that I would recommend it to all idli connoisseurs out there. This is a 'must try' idli and I prefer them over the regular version idlis any day.  There is a similar version of idlis  in Tamil Nadu called khusboo idli, named after a popular south Indian actress. 
The recipe of these idli vary from home to home and this dish needs some advance planning as the ingredients need to be soaked, ground and fermented. The secret behind 'perefct' idlis is always well fermented batter and here are some tips to make good idlis. These idlis pair superbly with coconut chutney and serve it with sambhar to make it a complete meal. We enjoyed our mallige idli with peanut chutney and tomato - onion chutney.

Ingredients: (Yield - 32 idlis)
2 cups idli rice / Selam akki
1/2 cup / skinned black gram / urad dal / uddina bele
1/2 cup flattened rice / poha / avalakki
1/4 cup tapioca pearls / sago / sabudana / sabbakki
Water to grind (I used about 1 & 3/4 cups.)
2 tsp. salt or to taste
Directions:
1. Rinse idli rice, skinned black gram, flattened rice and tapioca pearls together and drain. Soak them together in water, in a wide bowl for about 4 to 5 hours and drain the water used to soak completely.
2. Grind them together adding salt and water, only as much needed to grind them into a smooth and thick batter. (The salt can be added just before making idlis if living in a warm climate. I add it while grinding since I live in a cold climate and the batter takes longer to ferment.)
2. Transfer the batter to a container large enough to allow the batter to raise during fermentation. (Compare the pictures 2 and 3 to see the volume of the batter increasing after fermentation). Cover the container and allow it to ferment overnight (if the batter was ground in the evening) or for about 10 - 12 hours in a warm place. If living in a cold climate, leaving the batter in an oven with the lights on (without turning on the oven) helps. Or use yogurt setting in an instant pot.

3 & 4. The fermented batter looks like above in the picture - thicker than when grounded, airy, and slightly sour smelling. 
* Heat about 2 cups of water in a idli cooker base or a idli cooker or a steamer on medium heat. 
* Grease the idli moulds with ghee / oil. 
* Gently stir the batter a couple of times with a ladle. 
5. Ladle the batter into the idli moulds carefully without spilling.
 Place the idli stand in the prepared cooker / steamer and close the lid. Don't use the valve for the lid if using a pressure cooker.
6. Steam the idlis on low heat setting for about 20 - 25 minutes or until done. (The idlis should not stick when touched with moist fingers.) Check the water level in the steamer base and add extra if needed.
7. Wait for about 10 minutes and then remove the idlis from idli stand. 
8. Remove the idlis by running a spoon around the edges.

Serving the idlis:
Drizzle melted ghee over the idlis and serve them with a chutney, and sambhar if preferred. Mine were served with peanut chutney and tomato - onion chutney.

What to do with leftover idlis:
1. Refrigerate the left over idlis and use in a day or two. 
2. Or they can be cooled down immediately after preparation and frozen to use later. Nuke them in a microwave, covered and enjoy hot, piping idlis when needed. 

Thursday, June 10, 2021

Jowar Flour Idli / Jonna Pindi Idli / Sorghum Flour Idli

Sorghum, a millet is an important cereal crop grown in the world, for ages. This grain which is called jowar in Hindi, jonnalu in Telugu, jola in Kannada and cholam in Tamil is a traditional staple in south and western parts of India. Sorghum is gluten-free, nutritious, rich in protein and iron, making it a great alternative to rice. It is also a complex carbohydrate, meaning it takes longer to digest thus helping manage blood sugar spikes after meals, making it suitable for diabetics.

I have been trying to incorporate millets in our diet as much as possible in the recent years. These idlis which are made with this healthy grain is one such experiment. The standard, traditional version of idlis are made with urad dal / skinned black gram and rice or cream of rice. I have been making idlis replacing a portion of rice with jowar flour to make them healthier. 
I use rice / rice rava and sorghum flours in equal proportions or sometimes slightly more sorghum flour than rice in the recipe. I am guessing that replacing the entire rice with sorghum flour will interfere with the texture of the idlis. I don't have access to sorghum grain, either in whole or cracked form and so I haven't experimented much with the proportions or replaced the rice entirely with sorghum. Maybe using sorghum grain works if rice needs to be completely eliminated. I will update the recipe when I can get hold of some sorghum grain.

Using rice rava / idli rice and sorghum flour in equal proportions will yield soft, fluffy idlis and one would not find these idlis any different from the regular version. They make a healthy, gluten free and guilt free meal for anytime of the day. Serve them warm with chutney and sambhar. Here is a version made with idli rice and sorghum flour and check the recipe to know the consistency of the idli batter.
Ingredients: 
3/4 cup sorghum flour / jowar flour 
3/4 cup cream of rice / idli rava
1/2 cup skinned black gram / urad dal
1 & 3/4 tsp. salt
Water to grind the batter (I used a little more than a cup.)
Directions:
* Rinse black gram / urad dal thoroughly twice with water and soak in water in a container for about 3 hours. Similarly rinse cream of rice / idli rava with water and soak in water in another bowl. 
* Drain the water from both black gram and cream of rice containers. Squeeze out the water from the idli rava as much as possible.
* Add black gram, salt and water (as needed) to a blender and grind finely. (Skip adding salt while grinding if living in a hot climate. Add salt to the fermented batter before making idlis.)
* When the black gram is ground, add cream of rice / idli rava and run the blender for a couple of minutes to blend. Next add the sorghum flour and again run the blender to combine. Add extra water if needed. The final batter should be of thick, pouring consistency.
* Transfer the batter to a container and cover it. Leave it in a warm place to ferment overnight. 
 If living in a cold place, leave the batter container in the oven with the light on. Don't turn on the oven. The batter may take 8 - 10 hours to ferment in a warm place. It may take longer to ferment in cold climate, may be up to 16 - 18 hours.
* Heat water in a idli cooker / pressure cooker / steamer base on medium heat.
* Grease the idli plates and fill the moulds with the batter. Place the idli stand in the steamer and close the lid. Don't use the pressure valve if using pressure cooker.
* On low medium flame, steam for about 20 - 25 minutes or until when the surface of the idlis don't stick when touched with moist fingers. Turn off the stove and let sit for about 10 minutes.
* Run a sharp spoon around the edges of idlis and remove the idlis.
* Serve them warm for breakfast along with coconut chutney and/or sambhar.

Wednesday, May 5, 2021

A - Z Idli Series ~ I for Idli (Idli Rice Version)

So far in the series,
Today is the turn for the basic version of idli which happens to be the standard for all the idli variations out there and cherished by South Indians. For the uninitiated, idli is an iconic South Indian breakfast dish which are soft and fluffy steamed cakes. They are prepared using a fermented batter of rice and skinned black gram. This traditional dish is considered to be one of the healthiest breakfasts from the region, easily digestible and fit enough to be prescribed for the ill and convalescing. The dish needs an advanced preparation as the ingredients need to be soaked, ground and then the batter needs to be fermented before steaming it in special moulds. Idlis taste bland on their own. However drizzle some melted ghee over them and dig in with delicious accompaniments like a chutney, usually a coconut based one, a lentil dish called sambhar and spicy lentil powders, thus making it a filling and enjoyable meal for any time of the day. They are obviously gluten free and vegan if you skip the ghee.

My idli turn out super fluffy and soft. To be honest, I grew up watching idli being made around me on a regular basis and I don't fret about the idli preparation. I know however it is a daunting task for those who are not well versed with the process. I tried to explain the process in as much detail as possible here for anyone who needs some tips and the post has turned out to be a lengthy one. Idli making involves four steps - soaking the ingredients, grinding, fermenting and steaming the idlis. Grinding the batter to the correct consistency and it's proper fermentation are the important factors which decides the fate of the idlis. Idli making is an easy task with the modern conveniences we have in the kitchen compared to the olden days when the women had to manually grind the batter in stone grinders and steam on wood / kerosene stoves.
Usually if one lives in a warmer climate like India, soaking the ingredients in the afternoon and grinding it in the evening works fine, if planning for next day's breakfast. My husband's hometown is like a hot oven during summers and so, my mother in law would grind the batter around 9 at night so that the fermented batter would not go sour by morning breakfast time. I live in a cold climate and so my routine in recent years has been to soak the ingredients as soon as I wake up. I grind the ingredients around 11 am and leave the batter in oven with the light on. There are instances where my batter took around 24 hours or more to ferment, during the peak winter time.

Ingredients used in idli preparation:
Idli preparation needs two basic ingredients, skinned black gram / urad dal and rice. Skinned black gram, either whole or split can be used. (My grand mother used to use the whole black gram to make dosas and idlis but it is a pain to sit and rinse off the skins off the soaked beans.) 

Idli rice that is used in the recipe is the short, fat parboiled rice that also goes by the name Salem rice. In lieu of idli rice, idli rava aka cream of rice can be used. In that case soak separately black gram and idli rava. Some use fenugreek seeds / methi and flattened rice / poha as well in the recipe.
 
The black gram and rice proportions used also vary from home to home. The rice used varies from 2 to 4 times the quantity of black gram used. I go with 1:2 ratio whereas my mother uses 1:3 ratio. In Andhra and Karnataka, dosa and idli batters are different but I have noticed that some use the same batter for the both the dishes. 
Step 1 - Soaking the ingredients:
Soaking period is about 4 hours but two minutes are needed to rinse and soak the ingredients. Some soak the ingredients individually but I don't see any merits and soak them together which works fine for me. Rinse them twice thoroughly with water and soak them in enough water so that the water level is higher through out the soaking period. (About 3 hours is enough if using idli rava instead of idli rice and the ingredients are soaked individually in that case.)

Step 2 - Grinding the ingredients:
The ingredients are ground to a smooth batter either in a wet grinder or an Indian style mixer / blender. I have a wet grinder but I prefer grinding in my Oster 14 speed blender which works good for me. (The grinder takes more time than the blender and I hate cleaning the grinder.) I haven't watched the time but the amount of ingredients I mentioned in the recipe can be ground in one batch, which takes around 10 minutes. Don't grind the batter too thick or runny. Too thick batter will not ferment and thin batter will yield flat and not well cooked idlis. Salt can be added while grinding if living in a cold climate and in warmer climates, add salt before steaming the idlis. If using idli rava, grind black gram first, squeeze out the water from the idli rava (that has been soaking in water) and add the rava to the batter and run the blender for a couple of minutes to blend.

Step 3 - Fermenting the batter:
This is the important part of the idli preparation. The ground batter needs to be covered and placed in a warm place to ferment. The time of fermentation depends upon the local weather. It may take around 8 to 10 hours to double that time. Place it in an oven with the light on (without turning the oven on) if living in a cold climate. The yogurt setting in an instant pot works too. The final fermented batter would increase in volume, be airy and have a slightly sour smell to it. If the batter turns out thin for some reason, use it to make dibba rotte instead of idlis. 

Step 4 - Steaming the idlis:
If living in a warm place, salt can be added to the batter at this point. Gently stir the fermented batter a couple of times to uniformly aerate the batter and ladle the batter into greased moulds. If you don't own a idli stand, they can be steamed in small steel cups / glasses. Or even in a steel plate with high edges in a similar fashion to dhokla and cut them into wedges. The idlis can be steamed in a idli cooker, pressure cooker or a steamer. Don't use the safety valve if using a pressure cooker. Steam the idlis on low medium setting and it takes around 20 - 25 minutes on my gas stove to steam them. Moisten your fingers with water and check the top of idli to check whether they are done. They will not stick if done. If the idli top sticks to your moist fingers, then it needs to be steamed further.
Storing the batter and idlis:
I never refrigerate the idli batter but my mother recommends the refrigerated batter to be used within three days. She adds salt only to the portion she is going to use to make idlis and refrigerates the rest of the batter. She leaves the batter on the counter for a while before using it the next time. The refrigerated batter can be used to make again idlis, dibba rotte or ponganalu.
 
I instead usually make a big batch of idlis and freeze as many idlis as I need. (This works if you don't have power cuts in your area.) I cool down the idli immediately after preparation and freeze them to use later. They need to be just warmed in a microwave, covered until hot to enjoy them when needed. 

Ingredients: (Yield - 20 - 22 idlis)
1/2 cup skinned black gram / urad dal
1 cup idli rice
1 & 3/4 tsp. salt or to taste
1 & 1/4 cup water
Ghee to grease the idli moulds and drizzle over idlis while serving

Directions:
* Rinse idli rice, and skinned black gram together and drain. Soak them together in water, in a wide bowl for about 4 - 5 hours and drain the water used to soak completely.
* Grind them together adding salt and water just enough to grind them into a smooth and thick batter. (The salt can be added just before making idlis if living in a warm climate. I add it while grinding since I live in a cold climate and the batter takes longer to ferment.)
* Transfer the batter to a container large enough to hold the fermented batter. (The batter raises while fermenting and so plan accordingly and use a big container.) Cover the container and allow it to ferment overnight (if the batter was ground in the evening) or for about 10 - 12 hours in a warm place. If living in a cold climate, leaving the batter in an oven with the lights on (without turning on the oven) helps. Or use yogurt setting in an instant pot.
* The fermented batter looks like below - thicker than when grounded, airy, and slightly sour smelling.
 
* Heat about 2 cups of water in a idli cooker base or a idli cooker or a steamer on medium heat. 
* Grease the idli moulds with ghee / oil. 
* Gently stir the batter a couple of times with a ladle. 
* Ladle the batter into the idli  moulds carefully without spilling.
* Place the idli stand in the prepared cooker / steamer and close the lid. Don't use the valve for the lid if using a pressure cooker.
* Steam the idlis on low heat setting for about 20 - 25 minutes or until done. (The idlis should not stick when touched with moist fingers.) Check the water level in the steamer base and add extra if needed.
* Wait for about 10 minutes and then remove the idlis by running a spoon around the edges.
* Drizzle melted ghee over the idlis and serve them with a chutney, sambhar and/or spicy podi. Mine were served with roasted gram chutney, sambhar and nalla karam podi.
* Refrigerate the left over idlis and use in a day or two. Or they can be cooled down immediately after preparation and frozen to use later. Nuke them in a microwave, covered and enjoy hot, piping idlis when needed. 

Monday, April 19, 2021

A - Z Idli Series ~ F for Foxtail Millet Idli

Today's idli are made of foxtail millet, a millet that has been grown in India since ages. The millet is rich in fiber, calcium and has a low glycemic index making it an ideal choice for diabetics. These idlis are made only with foxtail millet and skinned black gram, thus  making it a healthy and nutritious breakfast choice for anyone. I sometimes replace a portion of millet with rice but rice free version is obviously healthier. These idlis when served with chutney and/or sambhar make a filling and delicious breakfast / brunch. Obviously, these are gluten-free and vegan if  idli moulds are greased with oil.   
Ingredients: (Yield - 18 - 20 idlis)
1 cup foxtail millet
1/2 cup skinned black gram / urad dal
1/2 tsp. fenugreek seeds
Salt to taste
Water to grind the batter

Directions:
* Rinse foxtail millet, black gram and fenugreek seeds and drain. Soak them together in water, in a bowl for about 4 - 5 hours and drain the water used to soak completely.
* Grind them together adding salt and water just enough to grind them into a smooth and thick batter .
* Transfer the batter to a container and cover it. Allow it to ferment overnight (if the batter was ground in the evening) or for about 10 - 12 hours in a warm place or in an oven with the lights on if living in a cold climate until it ferments.
* Heat about 2 cups of water in a idli cooker base or a idli cooker or a steamer on medium heat. 
* Add Eno's fruit salt to the batter if the fermented batter doesn't raise much. Add 1/2 tsp. fruit salt over the batter and sprinkle a little over it and quickly stir the batter to combine.
* Grease the idli moulds with ghee / oil and spoon the batter into idli plates.
* Place the idli stand in the prepared cooker / steamer and close the lid. Don't use the valve for the lid if using a pressure cooker.
* Steam the idlis on low heat setting for about 20 - 25 minutes or until done. (The idlis should not stick when touched with moist fingers.)
* Wait for about 10 minutes and then demold the idlis by running a spoon around the edges.
* Serve them warm with a chutney / sambhar. 
* Leftovers can be refrigerated.

Sunday, April 18, 2021

A - Z Idli Series ~ E for Elaneer Idli

I was fixated on a recipe from Karnataka for today's 'E' post until I came across Mallika Badrinath's elaneer idli recipe, in a millet version. Inspired by the idea, I used coconut water in my regular idli recipe here but one can replace rice with any millet to make them more healthier. These idlis are gluten free and vegan if idli moulds are greased with oil. Coconut water and the white flesh from a young coconut are used to grind the idli batter instead of water in this case. It makes a difference in the final outcome and one cannot miss how the idlis turn out light, airy and spongy. 

Elaneer means tender coconut water in Tamil and Kannada and hence the name for the idli. Use a young coconut if accessible and add all the pulp / soft white flesh from it while grinding the batter. I had to manage with canned coconut water which was super sweet and contained about a spoon of tiny coconut pieces but not much pulp. The quantity of coconut water mentioned below in the recipe needs to be adjusted if using the soft flesh as well. The coconut flavor is not much noticeable in idlis if using only coconut water (and no white flesh) to grind the batter though the idlis  come out soft and spongy.

Ingredients: 
1 cup idli rice
1/2 cup skinned black gram / urad dal
1 young coconut / Coconut water with soft coconut flesh as needed 
(I used about 1 and 3/4 cups coconut water with no flesh. With coconut flesh, may be less liquid is needed.)
Salt as needed

Directions:
* Rinse idli rice and black gram and drain. Soak them together in water, in a bowl for about 4 - 5 hours and drain the water used to soak completely.
* Add soaked idli rice, black gram, salt, and coconut flesh to a grinder / blender. Next add coconut water as needed and grind them into a smooth and thick batter with pouring consistency. (I used my Oster 16 speed blender to grind them.)
* Transfer the batter to a container and cover it. Allow it to ferment overnight (if the batter was ground in the evening) or as needed in a warm place or in an oven with the lights on.
* Heat about 2 cups of water in a idli cooker base or a idli cooker or a steamer on medium heat. Grease the idli moulds with ghee / oil and spoon the batter into idli plates.
* Place the idli stand in the prepared cooker / steamer and close the lid. Don't use the valve for the lid if using a pressure cooker.
* Steam the idli on low heat setting for about 20 - 25 minutes or until done. (The idlis should not stick when touched with moist fingers.)
* Wait for about 10 minutes and then demold the idlis by running a spoon around the edges.
* Serve them warm with  chutney / sambhar.