HOME        |        ABOUT        |        COPYRIGHT        |        CONTACT        |         RECIPE INDEX        |         INDIAN THAALIS        |         MILLET RECIPES        |        EVENTS' ROUNDUP        

Showing posts with label South Indian. Show all posts

Wednesday, January 19, 2022

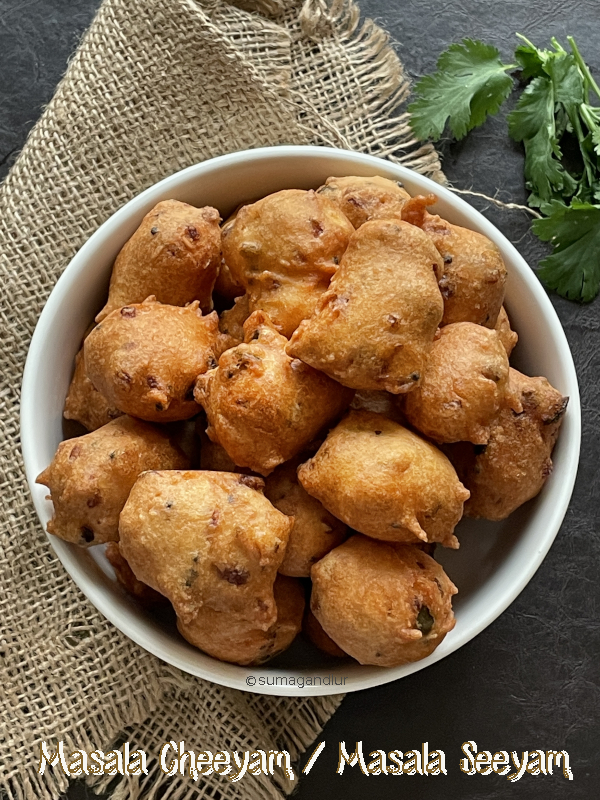
'A - Z' Tamil Nadu Recipe Series ~ C for Chettinad Masala Cheeyam / Masala Seeyam

Southern India is predominantly a rice growing region and the various local cuisines reflect the fact. I did not realize until now that the recipes I planned for this week were all rice based. Akkaravadisal is a sweet rice pudding usually served as an offering to god while brinji is a rice and vegetable based spicy one pot meal. Today's post cheeyam or seeyam is also rice based and is a popular snack from Chettinad cuisine.
 
Chettinad cuisine is perhaps the most well known one among the various regional cuisines of Tamil Nadu, though surprisingly Chettinad / Chettinadu region relatively forms a smaller portion of the state in a geographical sense. It is located mainly in the Sivaganga district and some portion of Pudukottai district. Chettinad is the home of a prosperous banking and business community called Natukottai Chettiars / Nagarathars and in fact, Chettinadu literally means 'Land of Chettiars'.

The Chettiars are known to be traders of salt and spices which is reflected in their cuisine where dishes are made with freshly ground spices. They also use a lot of dried meats and salted vegetables owing to the dry environment of the region. Most of the dishes are either eaten with rice or rice based. The cuisine boasts of both vegetarian and non vegetarian dishes.
Some of the dishes I have previously tried from Chettinad region are

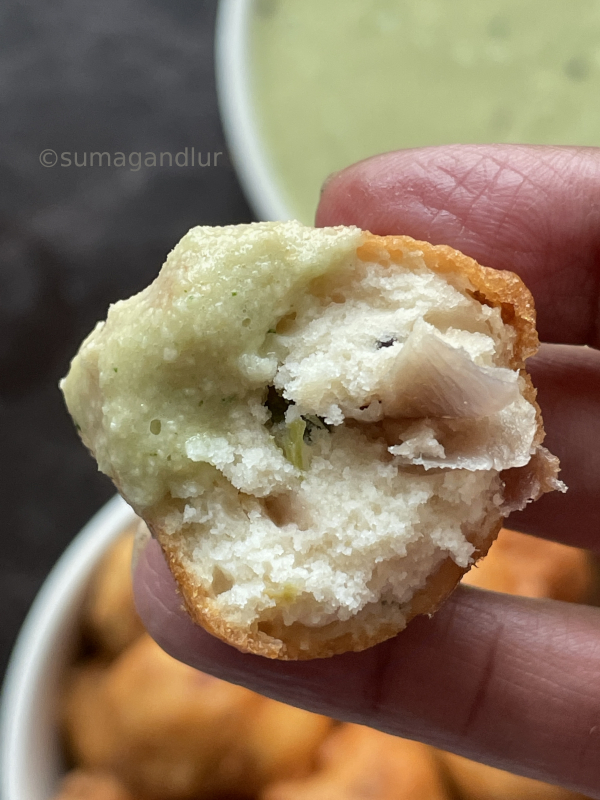
Today's masala cheeyam / masala seeyam also come from Chettinad region as I mentioned above. They are a popular snack from the region, made with a ground batter of rice and skinned black gram. This is a spicy version while there is also a sweet version of seeyam. These delicious fritters make a great evening snack and I read somewhere that people who are fasting also prepare this as an evening meal. 

This spicy version needs advance planning as the rice and black gram needs to be soaked for 2 - 3 hours. Grind the batter fluffy and fine like one does idli batter. Remember not to make it runny. Onions and green chilis are sautéed and added to the batter which add flavor to these fritters though I think the step of sautéing onions can be skipped. Adding raw onions to the batter is not  going to make that of a big difference as they are going to be deep fried anyway.
Ingredients:
1/2 cup rice
1/2 cup skinned black gram / urad dal
Salt to taste
Oil to deep fry 
Ingredients for sautéing:
1 tbsp. oil
1/2 tsp. mustard seeds
1 small sprig of curry leaves, finely minced
1 or 2 green chilies, finely minced
1 medium sized onion, finely minced
2 tbsp. fresh, shredded coconut

Directions:
1. Rinse and soak rice and skinned black gram in water for at least two hours. Drain the water completely after the soaking period.
2. Grind them together into a thick, fluffy batter adding water in small increments. Do not make the batter runny. (Using a grinder would help to use small quantity of water to while grinding. If the batter turns runny, adding a small quantity of rice flour would help but adding too much would turn the cheeyam harder.)
3. Meanwhile, heat a tbsp. oil in a pan and add mustard seeds. When they start to sputter add, green chili and curry leaves. Stir them for few seconds and add onions and salt enough for the onions.
4. Sauté until onion turns translucent and add the coconut. Stir once and turn off the stove.
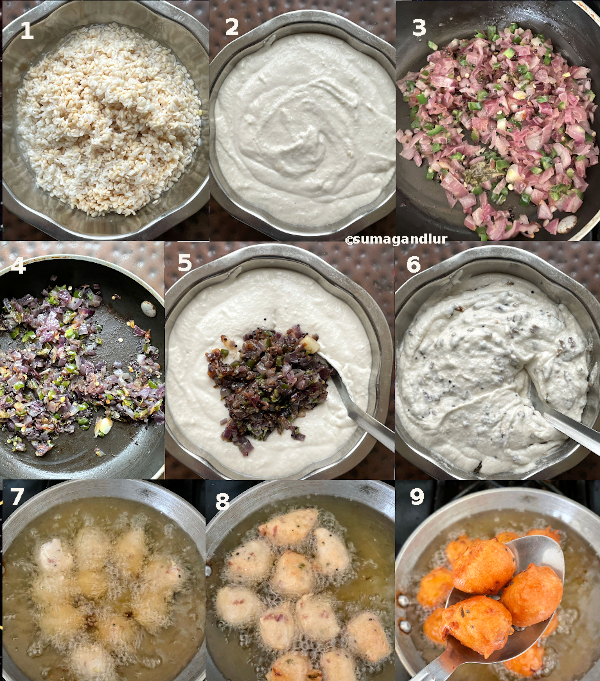
5 & 6. Add the sautéed onions and salt to the batter. (Keep in mind that onions contain salt too). Mix the batter well with a spoon and keep aside.
7. Heat oil for deep frying in a frying pan on medium heat. Drop a pinch of batter to the oil. If it swims to the surface, the oil is ready for frying. If not, heat the oil a little more. Dip your fingers / hand into the batter and shape a small ball. Gently drop into the oil. Repeat the step and drop as many balls as the pan can hold, without overcrowding. (There is no need to fret over the shapes. They don't to be exactly round.)
8. First they sink and soon float to the surface. Keep gently flipping them with a perforated spoon. Lower the heat to low - medium setting and fry until they turn golden brown throughout.
9. Remove them when done and transfer them onto a plate laden with paper towels to absorb the extra grease.
10. Reheat the oil if needed and repeat the steps with the remaining batter.
11. Serve them warm and enjoy with a spicy chutney or some ketchup.

This is going to be my contribution to this week's Blogging marathon, with the theme 'A -Z Series'. Check the page link to see what other marathoners are cooking.


Saturday, October 24, 2020

A - Z Karnataka Recipe Series ~ V for Vangi Bhath

Vangi bhath is a delicious eggplant rice preparation that originated in Karnataka. It is one of the popular vegetarian rice preparations in the state along with bisibele bhath, kayi sasive anna, puliyogare which are common festive dishes among the Brahmin community. All the four recipes have been already posted in my blog and check here for the links to those, if interested. I have posted a vangibhath version earlier which is frequently prepared and enjoyed at my home. In that version, eggplant and potato slices are fried which makes the dish extra special. Today's version is Karnataka style which is prepared slightly differently than that version.  
A second vangi bhath in the series was not part of my original plan. My camera needs some fixing and I have not been able to use it for the past few weeks. I had prepared this bhath for some reason a few weeks ago which came handy now and ended up being my 'V' dish instead of a Konkani dish I had planned earlier. 

As the name suggests, eggplants are the star of this dish and a good quality vangi bhath powder makes a difference in how the final dish turns out. MTR brand one is good if one has never tried the homemade version. The spice powder can be made in advance and it stays fresh for months even if not refrigerated. I usually make a big batch and use it to make quick rice preparations. The other combination of vegetables used in Karnataka to make rice dishes using vangi bhath powder are 

1. Fenugreek greens, potato and peas in menthya bhath
2. capsicum, potato and peas in capsicum bhath
3. Carrot, beans, potato, peas in tarkari bhath


Ingredients for the vangibhath powder:
1 tbsp. split chickpeas / chana dal
1 tbsp.  skinned black gram / urad dal
1/2 to 1 tbsp. coriander seeds  
2 cloves
2 one inch cinnamon pieces
2 tbsp. grated dry coconut
3 dried spicy variety red chillies 
3 Byadagi chillies for color

Vangi bhath powder preparation:
* Dry toast the split chickpeas and black gram until they start to turn reddish. Then add the remaining ingredients and sauté until the coriander seeds turn a shade darker.
* Remove from heat and cool the ingredients. Grind them to a fine powder. Store it in a bottle with a tight fitting lid if not using immediately.


Ingredients for vangi bhath:
1 cup sona masuri rice
3 - 4 tbsp. oil
2 tbsp. cashews
1 tsp. split chickpeas / chana dal
1 tsp. mustard seeds
1 sprig of curry leaves
2 pinches of asafoetida powder
1/8 tsp. turmeric powder
6 baby eggplants, stalks removed and sliced thin lengthwise
1/4 tsp. jaggery powder or as needed
2 tbsp. tamarind water (not thick puree) *
3 tbsp. vangi bhath powder or as needed (recipe above)
Salt to taste
*  Soak a small ball of tamarind in water and squeeze the tamarind. Use the thin tamarind water and not the thick puree. If using thick puree, use less and as needed.

Directions for vangi bhath:
* Rinse and cook rice adding water as needed in a pressure cooker or rice cooker and keep it aside. Let it cool a bit. (I add about 1 and 3/4 cups of water to cook rice.)
* Heat oil in a kadai or a big non stick pot. Add the cashews and toast them till they turn golden brown. Remove them with a slotted spoon and keep aside if you want them to be crunchy. Add split chick peas and mustard seeds to the same oil and sauté until the split chickpeas start turning reddish. Then add curry leaves, asafoetida, turmeric and eggplant slices.
* Cover and cook until eggplants are done, not turning them mushy. (My eggplants took around eight minutes to cook.) 

* Add jaggery, tamarind water, vangi bhath powder as needed and salt to the pan and cook for 3 - 4 minutes.
* Then add the cooked rice and mix gently without mashing the eggplant pieces until all the rice is coated well with the spicy mixture
* Taste and adjust the seasonings if needed. Garnish with the toasted cashews and serve warm.

Friday, October 11, 2019

Stuffed Idlis / Sandwich idli


I cooked and clicked three dishes in advance for this week's  'Stuffed dishes' theme only to toss them away and cook something else again this week. That's what I do somehow when I plan ahead and so I blissfully keep procrastinating most of the time. 😉 These stuffed idlis are replacing the momos I prepared earlier under stuffed dumpling category.

My husband recently watched a television cook show where the chef used the ubiquitous and the popular Indian potato curry as stuffing in some unusual dishes. He suggested to try them out only to get a negative response from me. Later I was mentioning the incident to my mother who also started wondering who in the world enjoys those dishes. Then the topic moved to these stuffed idlis and I felt the inclination to try these for the first time though I have seen other stuffed idli versions before.

I had prepared potato curry a couple of days ago and coincidentally I happened to have some idli batter on hand as well. And these idlis happened on a whim during our lunch time though lunch was already on the table. See how crazy we bloggers sound? 😀 I was not even thinking about blogging these this week but still took some pictures in case. 

The potato curry used for stuffing needs to be a dry preparation and the recipe can be found here. I have used idli batter made with idli rice and skinned black gram aka urad dal but any idli batter of one's choice can be used here. The idli moulds are filled with the batter up to half, a small portion of curry is placed at the center and batter is poured over it to cover and then steamed, resulting in a idli, stuffed with spicy potato curry giving the bland idlis a delicious touch. This can make a mess free snack / lunch box item for little ones without the need of any side dishes. If serving adults, keep the curry on a spicier side, spicier than one usually prefers to balance the blandness of idlis. Otherwise the taste of the idlis would be mediocre. Also serve it along with some coconut chutney or sambhar to make it more enjoyable. 

Ingredients:
Fermented idli batter
Potato curry
Ghee / Oil to grease idli plates

Directions:
* Heat water in a steamer or a idli cooker or a cooker base. 
* Grease the idli moulds. Pour batter into a mould, filling only up to half of it. Take a big lemon sized portion of curry and gently pat into a disc shape. Place it at the center of the mould and pour extra batter over it, enough to fill the mould. (More curry can be stuffed than shown in the picture.)

* Repeat the steps with the remaining batter and the curry.
* Place the idli stand in the steamer, cover the lid and cook on low flame until done. If using cooker, don't put on the whistle. Add extra water to the steamer if water evaporates in the middle of steaming, taking care not to pour over the cooking idlis. One way to figure out if the idlis are done is to touch the idlis with moist fingers. If they don't stick then idlis are done. If they are sticking then they need more steaming. (I usually steam for about 20 minutes on low flame while making idlis.)
* Turn off the stove and let them sit for about 5 - 10 minutes before removing them from moulds.
* Enjoy the stuffed idlis with chutney and/or sambhar.

bmlogo
This post is an entry for Blogging Marathon #105 under 'Stuffed Dishes - Dumplings' theme. Check what other marathoners are cooking, clicking at the link.

Comments

Friday, September 6, 2019

Elaneer Payasam

So far in the series,
Malaadu / Hurigadale Unde
Dry Gulab Jamun
Coconut Burfi / Kobbari Mithai
Almond Halwa / Badam Halwa

I didn't plan to include a payasam / kheer recipe in this Sweets' series until I tasted elaneer payasam. To be honest, I wanted to try this just because it is a coconut based one but after tasting this, I feel like this is the most delicious payasam I ever tasted, hands down. Even my husband who doesn't like coconut had a sip and said it tasted really good. The payasam basically makes use of coconut in all forms - the water and the coconut meat of a tender coconut and milk obtained from grated coconut aka coconut milk. 
Coconut water is a healthy and nutritious drink that is keeping people hydrated for ages in India during the hot, summer days. No wonder, the western stores are now filling the aisle shelves with the coconut products in colorful, artificial packages. The street vendors selling coconut water on the roadsides / bus stops are a common sight in towns across India. A vendor bores a hole at the top of the coconut using a machete and pops in a straw through it, making it easier to drink the clear coconut water. The sellers also break the shell of the tender, green coconut into two halves if requested, to eat the tender coconut pulp inside. This coconut water is not the same as the white colored coconut milk that is prepared by grinding the grated coconut from a mature, brown shelled coconut. Taste-wise, the coconut water maybe either mildly sweet or even bland which I don't think anyone prefers to sip on. The coconut milk is high calorie one while the coconut water has fewer calories and is a wholesome beverage that comes in a natural package. It is more economical and healthier than modern day milk shakes / ice creams. 
 
The payasam is made in two versions, one requires no cooking and the other one involves cooking like this version. This seems to be a popular sweet dish in some regions of Tamil Nadu and I even read somewhere that it appears in all Chettinad wedding feasts. I basically adapted the recipe from the web sources and made this kheer. In case, tender coconut meat is not available then grind some coconut along with coconut water for some thickness. Also, some extra coconut meat may be added to the kheer at the end, if preferred. The coconut flavor obviously is prominent in this kheer and no other flavorings are needed. The common garnish of ghee toasted raisins and cashews (generally used in a payasam) are also not added in this kheer, I think. However I added and also recommend some minced nuts to add color and contrast. I liked the crunchy nut bits while sipping this superb tasting payasam. 

Ingredients: 
1 and 1/2 cups full-fat milk
2 tbsp. condensed milk
1 tbsp. sugar
1/2 cup thick coconut milk

Ingredients to blend:
3/4 to 1 cup coconut water
1/2 cup tender coconut meat (or as much quantity as in 1 tender coconut)

Directions:
* Heat milk in a non stick pan or a thick bottomed pot. When it comes to a rolling boil, add condensed milk and sugar.
* Lower the heat and simmer the milk until it slightly thickens, stirring frequently. There is no need to reduce the milk quantity to half. Turn off the stove and let the mixture cool.
* Meanwhile, puree coconut water and tender coconut meat in a blender. Add this and the coconut milk to the cold milk mixture from the above step. Mix well.
* Chill the kheer before serving.

Tuesday, June 4, 2019

Endu Kobbari Podi / Spicy Coconut Powder


We make a kobbari podi aka coconut powder in Andhra using fresh coconut that is usually eaten with rice and ghee. The traditional method of preparation involves a lot of stirring and in turn, loads of patience. The fresh coconut is grated (or even frozen shredded coconut can be substituted) and toasted on low flame until it is uniformly browned. The coconut is then let cool and ground with the basic spices - salt, red chillies and cumin. The powder stays fresh for months, tastes awesome and is worth the time. Today's version is slightly different and uses the dried coconut instead which makes the podi making process much simpler but tastes equally delicious.
Ingredients:
2 tbsp. split chickpeas / chana dal 
2 tbsp. skinned black gram / urad dal 
8 to 10 spicy dried red chillies or as needed
1 tsp. cumin seeds
1 cup grated dry coconut
Salt to taste
Optional ingredients:
1 tsp. coriander seeds. 
A pinch of fenugreek seeds 

Directions:
* Toast split chickpeas, urad dal and red chillies together on  medium flame, constantly stirring. When the dals start to turn reddish / brown, add cumin seeds and the ingredients mentioned as optional, if using. Toast for a minute or until the coriander starts to change a shade of color. Turn off the stove and let the ingredients cool completely.
* Grind the toasted ingredients along with grated dry coconut and salt finely. 
* Store in a container with a tight lid. The powder remains fresh for months with or without refrigeration.

bmlogo
This post is an entry for Blogging Marathon #101 under 'Condiments' theme.

Comments

Monday, June 3, 2019

Horse Gram - Flax Seeds Idli Podi

I had bought a bag of horse gram for the first time recently to try ulava biryani for the pulao / biryani based April mega marathon. I could not try it unfortunately but have started to use the bean in various other ways. This spicy idli podi from here is one of those recipes and it is a great condiment to go with several south Indian breakfast dishes like idli, upma, dosa or even can be eaten with rice and a dollop of ghee.

Ingredients:
1 tbsp. oil
A pinch of asafoetida
1/4 cup horse gram
1/4 cup split yellow chickpeas /  chana dal 
1/4 cup split, skinned black gram / urad dal
2 tbsp. flax seeds
Dried red chillies (I used 5 spicy and 5 byadgai variety chillies.)
2 sprigs of curry leaves
2 garlic cloves (optional)
Sat to taste

Directions:
1. Heat oil in a small pan and add asafoetida. Turn off the stove and keep it aside.
2. Add horse gram, split chickpeas, black gram, flax seeds, red chillies to a pan and toast on low flame until the dals start to change color uniformly. Add curry leaves at the end and toast for few seconds. Turn off the stove and let them cool completely. 
3. Grind the ingredients from step 2, garlic and salt together finely.
4. Add the oil from step 1 and blend to combine.
5. Transfer the mixture to a jar and use as needed. The mixture need not be refrigerated and stays fresh for at least a couple of months.

Note:
The step 1 can be skipped and the ingredients in step 2 can be toasted in oil and asafoetida can be added at the end of toasting. I don't do it that way since my American blender cannot grind the dry ingredients well if oil is added. I prefer to add the oil at the end and pulse enough to blend.

bmlogo
This post is an entry for Blogging Marathon #101 under 'Condiments' theme.

Comments

Sunday, January 10, 2016

Theepi Pongali / Sweet Pongal

 
When I recently complied recipe index, I realized that many simple, common Indian festive dishes have not been posted on my blog yet though this is my 10th year of blogging. The main reason being that I usually don't cook festival dishes in advance for blog's sake since I have to cook them anyway on the festival day. However 'clicking' those dishes during festivals would be the last thing on my mind because of the hectic schedule. I picked the theme of the festival dishes this week to change that as Sankranti / Pongal is around the corner. 
Sweet and savory pongals, the south Indian style thick and creamy rice puddings take the center stage on a Makara Sankranti day in majority of the south Indian households. And they also happen to be the popular 'prasadams' distributed to devotees in temples across the region and 'naivedyam' offered to God at homes. Today's version is the one commonly prepared in our home using sugar and coconut and a favorite of mine.
 
Ingredients:
1/2 cup rice *
2 tbsp. moong dal
1 & 1/4 cup water
1 cup full fat milk
1/4 cup fresh, grated coconut
1/4 tsp. cardamom powder
5 - 6 tbsp. sugar (adjust according to taste)
1 tbsp. ghee
1 tbsp. raisins
1 tbsp. cashew nuts
A pinch of camphor powder (optional)

* Use any south Indian style white rice. I prefer to use extra long grain rice since it can be cooked to a softer / mushy consistency. Do not use Basmati rice.
 
Method:
* Wash rice and moong dal in two exchanges of water and drain. Add water to rice and dal and pressure cook until rice is almost cooked mushy.
If cooking in a sauce pan, try to go with a non stick one if you have one. Add rice, dal and a cup of water and bring it to a boil. Turn down the heat to lowest setting and cook. Keep an eye while the rice is cooking and keep adding water intermittently as needed and keep stirring. Soaking the rice in water for at least a couple of hours prior to cooking will cut down the cooking time. More quantity of water is needed if cooking in a sauce pan.
* Heat ghee in a pan and toast the cashews and raisins until they turn golden and plump respectively. Transfer them to a small bowl. Add the pressure cooked rice - dal mixture to the pan and mash it slightly using the back of a ladle. Then add milk, coconut and sugar to the pan and cook until almost the milk is absorbed. Add the ground cardamom, edible camphor if using and the toasted cashews - raisins to the cooked pongal and stir to combine. Turn off the stove and serve the pongal warm.  

This goes to Blogging marathon #60 under the theme 'Festival of the Month'. Check the link to see what other marathoners are cooking.


Comments