HOME        |        ABOUT        |        COPYRIGHT        |        CONTACT        |         RECIPE INDEX        |         INDIAN THAALIS        |         MILLET RECIPES        |        EVENTS' ROUNDUP        

Showing posts with label Stuffed Dishes. Show all posts

Saturday, October 12, 2019

Bandh Samosa / Bun Samosa

I had prepared this dish to be a part of the regional snacks for the 'Indian Sweets and Snacks' themed September marathon but held onto it once I saw this month's blogging marathon theme of 'stuffed dishes'. This bun samosa seems to be a signature street food dish of  Kasauli, a hilly town in the north Indian state of Himachal Pradesh. I came across this recipe when my husband was browsing through a YouTube video featuring street food from the region and the snack seemed to be right in our alley. We love samosa chaat and this bun is a part of that chaat wrapped in a toasted bun. What can go wrong with that, right? And so I got some buns and samosas from the store immediately and tried these delicious samosa buns. 

The shopkeeper in the video was selling these jamun buns as well to our surprise. He mentioned in the video that decades ago, a south Indian customer requested him to make that bun after giving him the directions for the recipe. He has been selling jamun buns ever since and the other shoppers have also caught on and now jamun bun has become a hot commodity along with bun samosas. My brother in law's family lived in Kasauli during 80's for a considerable amount of time and so we even wondered for a moment whether my brother in law was that customer by any chance since we haven't heard jamun buns outside of my husband's hometown. 😀

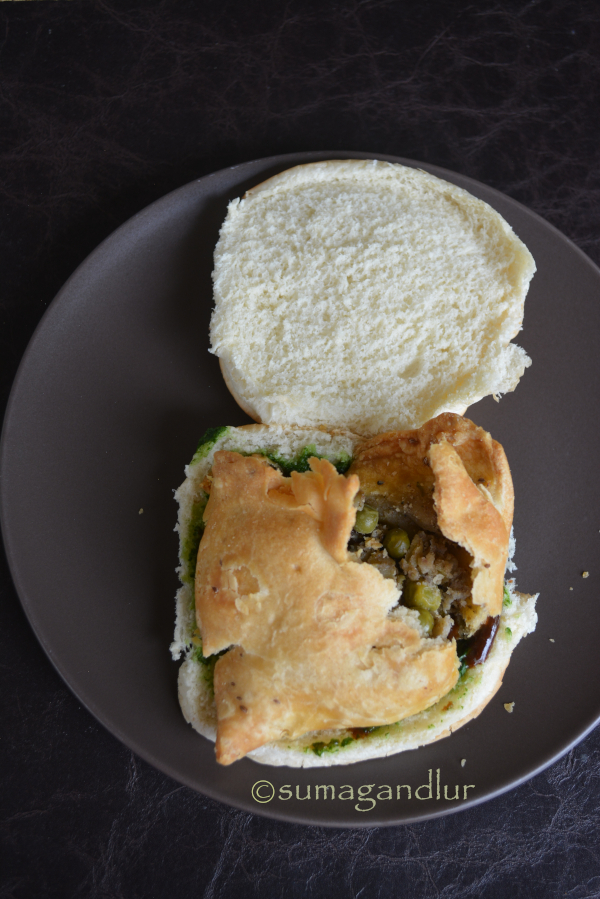
These mess free buns make a lip smacking snack or a mini meal on it's own. If one loves samosa chaat as we do, then this bun is for you. In this bun preparation, samosa, chole and the green and sweet chutneys all go inside a bun and then the bun is toasted using a generous amount of butter. For the uninitiated, samosas are a deep fried pastry with a spicy potato and pea filling while chole is the spicy chickpea curry where as the chutneys are the standard flavor boosters in most of the chaat items, a major portion of the Indian street food. Bun samosa is therefore also called as bundh samosa as the stuffing is encased inside the bun. The word 'bundh / bandh' means closed in Hindi. I used store bought buns, samosa and sweet chutney which makes the preparation relatively quicker and easier than starting from scratch.

Ingredients:
4 burger style buns 
Green chutney as needed
Sweet chutney as needed
4 samosas
About 1 cup chole masala
2 tbsp. butter
* I opened the burger bun for pictures sake but the buns can be cut open only slightly and the samosa and curry can be stuffed as in a pocket. Spread green and sweet chutneys liberally on one side of the bun.
* Slightly mash a samosa and place it over the chutney side.

* Pour over a ladeful (about 1/4 cup or as needed) of chole curry. I made it slightly thicker but the consistency of the curry can be like the regular one.
* Cover it with the other side of the bun.
* Heat a griddle and melt a little butter over it. Place the bun over the griddle and toast until golden brown on both sides. Repeat the stuffing and toasting parts with the remaining buns. Serve them immediately.

bmlogo
This post is an entry for Blogging Marathon #105 under 'Stuffed Dishes - Buns' theme. Check what other marathoners are cooking, clicking at the link.

Comments

Friday, October 11, 2019

Stuffed Idlis / Sandwich idli


I cooked and clicked three dishes in advance for this week's  'Stuffed dishes' theme only to toss them away and cook something else again this week. That's what I do somehow when I plan ahead and so I blissfully keep procrastinating most of the time. 😉 These stuffed idlis are replacing the momos I prepared earlier under stuffed dumpling category.

My husband recently watched a television cook show where the chef used the ubiquitous and the popular Indian potato curry as stuffing in some unusual dishes. He suggested to try them out only to get a negative response from me. Later I was mentioning the incident to my mother who also started wondering who in the world enjoys those dishes. Then the topic moved to these stuffed idlis and I felt the inclination to try these for the first time though I have seen other stuffed idli versions before.

I had prepared potato curry a couple of days ago and coincidentally I happened to have some idli batter on hand as well. And these idlis happened on a whim during our lunch time though lunch was already on the table. See how crazy we bloggers sound? 😀 I was not even thinking about blogging these this week but still took some pictures in case. 

The potato curry used for stuffing needs to be a dry preparation and the recipe can be found here. I have used idli batter made with idli rice and skinned black gram aka urad dal but any idli batter of one's choice can be used here. The idli moulds are filled with the batter up to half, a small portion of curry is placed at the center and batter is poured over it to cover and then steamed, resulting in a idli, stuffed with spicy potato curry giving the bland idlis a delicious touch. This can make a mess free snack / lunch box item for little ones without the need of any side dishes. If serving adults, keep the curry on a spicier side, spicier than one usually prefers to balance the blandness of idlis. Otherwise the taste of the idlis would be mediocre. Also serve it along with some coconut chutney or sambhar to make it more enjoyable. 

Ingredients:
Fermented idli batter
Potato curry
Ghee / Oil to grease idli plates

Directions:
* Heat water in a steamer or a idli cooker or a cooker base. 
* Grease the idli moulds. Pour batter into a mould, filling only up to half of it. Take a big lemon sized portion of curry and gently pat into a disc shape. Place it at the center of the mould and pour extra batter over it, enough to fill the mould. (More curry can be stuffed than shown in the picture.)

* Repeat the steps with the remaining batter and the curry.
* Place the idli stand in the steamer, cover the lid and cook on low flame until done. If using cooker, don't put on the whistle. Add extra water to the steamer if water evaporates in the middle of steaming, taking care not to pour over the cooking idlis. One way to figure out if the idlis are done is to touch the idlis with moist fingers. If they don't stick then idlis are done. If they are sticking then they need more steaming. (I usually steam for about 20 minutes on low flame while making idlis.)
* Turn off the stove and let them sit for about 5 - 10 minutes before removing them from moulds.
* Enjoy the stuffed idlis with chutney and/or sambhar.

bmlogo
This post is an entry for Blogging Marathon #105 under 'Stuffed Dishes - Dumplings' theme. Check what other marathoners are cooking, clicking at the link.

Comments

Thursday, October 10, 2019

Senagapindi Gutti Vankaya Koora / Eggplants Stuffed With Chickpea Flour

Stuffed vegetable preparations are relished across India and some vegetables like eggplants, bitter gourds and capsicum are the preferred choices when it comes to these kind of dishes. Today's version is for eggplant lovers. Stuffed eggplant preparations are called gutti vankaya koora in the states of Andhra and Telangana. A gutti literally means a bouquet, vankaya being eggplant and koora is curry / subzi in Telugu language. The 'tti' sound in the word gutti is pronounced as 'thi' as in 'thick' with a stress. The 'vanka' in vankaya rhymes with lanka as in Sri Lanka. Gutti vankaya koora comes both in dry and gravy versions. A typical dry version is prepared in the way I have given below but there are several stuffing choices one can choose from, making this curry a versatile one. 

Also some versions use up all the stuffing mixture to stuff into eggplants with no extra powder left unlike my version. In that case, the eggplants may need a little sprinkling of salt at the end. I added about a tsp. of super spicy chilli powder in the recipe which is perfect for people like my husband who eat very spicy food. People who prefer it to be less spicy need to adjust the quantity as needed. The extra stuffing mixture added to the curry at the final stages makes the curry delicious and keeps it on a spicier side.

My mother's kitchen is a onion - garlic free zone and so, she prepares dry gutti vankaya versions or simple eggplant curries throwing in curry leaves and coconut, the typical south Indian way. Today's version used to be a common preparation in my both grand mothers' kitchens and still is a regular one in my mother's and aunt's places. It is by far the simplest preparation I have seen when it comes to preparing the stuffing - no toasting, no grinding and no cooking involved. You just mix chickpea flour / senagapindi, salt and chili powder and use it as a stuffing. My mother follows her mother and uses an iron kadai / wok to prepare curries like these and so at the final stages, the left over stuffing mixture is fried to the point where it looks like it got accidentally burnt. My mother was telling me that she prepares it so since she grew up enjoying the curry made that way by her mother. The powder looks  black though it doesn't taste like burnt powder. We used to relish that powder alone with some hot rice and ghee when we were kids. My paternal grand mother used to fry it only until it turned reddish like I did. Apart from what color the remaining stuffing mixture is fried to, the recipe is same in both my mother and father's side of the families. Even little kids who cannot eat the stuffed eggplants can enjoy the fried stuffing mixture alone with rice and ghee.

Ingredients:
4 small sized eggplants
2 Tbsp. oil 
Ingredients for stuffing:
1/4 cup chickpea flour / senagapindi
Salt to taste
1/2 to 3/4 tsp. spicy variety chili powder (or to taste)
1 tbsp. oil (optional)

Method:
* 
Sieve chickpea flour into a bowl and add the remaining stuffing ingredients. Mix well to combine.
* Wash eggplants and wipe them dry. I haven't removed the stalks here but they can be cut off if preferred. Keeping the base (the stalk side) intact, make two cuts in each eggplant vertically from the opposite side, making a + shape. In case the stalks are removed, make the  '+' cut from that side. Fill them with the chickpea flour mixture as shown. You can fill as much as the eggplants can hold without spilling. If the filling gets spilled over the surface of the eggplant, wipe it clean.

* Heat a pan and add oil. Drop the eggplants carefully. Rotate each eggplant in the oil holding the stalk so that they are coated well with oil.
* Lower the flame, cover and let it cook until all the eggplants are done. Keep rotating the eggplants in between for uniform cooking. By this time, the eggplants loose their color and are tender to touch. Sprinkle a little salt over eggplants only if needed.

* When they are done, transfer the eggplants onto a plate. Add the remaining stuffing mixture and cook on low medium flame. The little oil present in the pan would be enough to fry the mixture and in case, one can add a tsp. extra if preferred. This powder when fried should be on a dry side. 

* Keep stirring until it starts to change the color, about 5 minutes or so. 

* Add the eggplants back to the pan and gently mix.

* Remove and serve one or two eggplants along with the chickpea flour mixture in each plate, with warm rice and ghee.

bmlogo
This post is an entry for Blogging Marathon #105 under 'Stuffed Dishes - Vegetables' theme. Check what other marathoners are cooking, clicking at the link.

Comment

Sunday, May 5, 2019

Stuffed Dates

Stuffed dates are bite sized appetizers that are quick and easy to prepare and look quite attractive. They can be easily customized according to one's tastes and make a great snack that is not on the sweeter side. The filling can be made sweeter by whipping the cream cheese with a small amount of sugar or honey. I have used salted pistachios though almonds, walnuts, pecan or any other nuts can be substituted. Similarly any variety of cream cheese or mascarpone can be used.

Ingredients:
Pitted dates (I used deglet noor variety.)
Cream cheese
Chopped, salted pistachios or any other nut

Directions:
* Open up the pitted dates without slicing them into two, to create pockets. 
* Fill them with cream cheese.
* Sprinkle chopped nuts over the cheese.
bmlogo
This post is an entry for Blogging Marathon #100 under 'Stuffed Dishes' theme.

Comments

Friday, April 5, 2019

A - Z Indian Biryani / Pulao / Khichdi Series ~ E for Ek Toap Na Dal Bhaat

Here is a one pot khichdi from the Gujarati kitchens. It is wholesome, nutritious and a filling meal as a khichdi should be but is somewhat a special one. It is easy and quick to prepare this as well. This is one of the dishes I cooked early on but I started to have second thoughts because I have another recipe in the line which involves stuffing and I was not impressed with the images I captured. It was a cloudy day in the middle of Midwest winter and there was not even a single image that looked crisp. I cooked another khichdi last week, in case I didn't want to go with it. However I changed my mind again today and decided to go with this Gujarati meal, I found on Tarla Dalal's website. 

Calling it a one pot rice - lentil khichdi would be misleading since it is not your everyday khichdi where you dump spices, rice, lentil and vegetables in one pot and cook. Vegetables used here are not chopped but stuffed and eggplants are an interesting addition too, considering that it is not commonly used in a khichdi preparation. The addition of vegetables, stuffed with a coconut - cilantro base is the highlight of this khichdi and it definitely elevates the simple khichdi to an entertaining meal. The onions I used were tiny and kind of disintegrated into the khichdi and so, it is hard to notice them in the images. 

This dal bhaat can be cooked under 30 minutes, if soaking toor dal is not involved. I have noticed that the same toor dal without any prior soaking can be cooked in 3 whistles in some cookers and some take longer even if they are newly bought cookers. If you own a cooker which can cook dal in 3 whistles, go ahead with the recipe without soaking dal. If not, soak dal for 1 to 2 hours before so that rice and dal gets cooked at the same time. Otherwise, the rice would be a mush and the dal may not be cooked enough. The stuffing can be changed to a personal favorite one as well instead of using the one mentioned in the recipe. I changed the stuffing slightly while cooking though I am posting the same one mentioned in the original recipe.

Ingredients: (Yield - 4 servings)
1 cup rice
1/3 cup pigeon peas / toor dal
2 1/2 cups water (I used 1.5 + 2/3 cup, It is perfect if you prefer a dry version khichdi like shown in the image.)
2 tbsp. ghee
1 tsp. cumin seeds
a pinch of asafoetida
1/8 tsp. turmeric powder
Salt to taste
1/4 cup frozen peas
4 baby potatoes
4 small variety brinjals / eggplants 
4 to 6 baby onions 

Ingredients for stuffing:
1 tbsp. coriander powder
1 tbsp. cumin powder
1 tbsp. sugar (I didn't use.)
1.5 tbsp. red chili powder
A pinch of asafoetida
Salt to taste
3/4 cup fresh coconut, grated
1/3 cup finely minced cilantro / coriander leaves

Directions:
* If the variety of toor dal being used is not going to pressure cook in 3 whistles or cook at the same time as rice, wash and soak the dal in water for 1 or 2 hours and drain the water. There is no need to soak the rice but wash and drain.
* Combine all ingredients mentioned under stuffing in a small bowl and mix well. 
* Peel the potatoes and onions. Make criss-cross slits on onions, potatoes and brinjals, taking care not to separate the 4 segments. (Keep the stalk of the brinjals intact and cut along the opposite end. Cut a + mark, not cutting all the way through.)
* Stuff the onions, potatoes and brinjals evenly with the stuffing prepared in the above step. Keep them aside.
* Heat ghee in a small (3 liter) pressure cooker and add cumin seeds. When they start to brown add asafoetida, turmeric powder, drained rice and toor dal. Saute them for about a minute, on medium flame. 
* Add green peas, salt and water and stir well. Next add the stuffed vegetables and gently stir the mixture once. Pressure cook on high flame for 3 whistles.
* When the valve pressure is gone, remove the lid.
* If preferred, add another tbsp. of ghee at this point and gently mix.
* Serve it with some plain yogurt / butter milk. 

So far in my Biryani / Pulao / Khichdi series,
A for Ambur Biryani
B for Basanti Pulao / Misthi Pulao
C for Corn - Fenugreek Greens Pulao
D for Donne Biryani


BMLogo
Check out the Blogging Marathon page for the other Blogging Marathoners doing BM#99.

Tuesday, April 26, 2016

A - Z Andhra Recipes ~ V for Vankaaya Kothimira Karam Koora


The first dish I cooked for this marathon has been for the alphabet 'V' but however that dish is not going to be featured today. I had prepared a traditional sweet dish called vennappalu in advance, planning to blog today. In fact, I cooked three varieties of appalu, five different times planning for my 'G', 'R' and 'V' alphabets and somehow other regional dishes took precedence like in today's case and none of those got published this month.

'V' stands for an important vegetable in Andhra cuisine which happens to be 'vankaya', the eggplants or brinjals. Along with the other local vegetables like dosakaya (yellow cucumber), gongura (sorrel greens), chukkakoora (sour greens native to the state), vankaya has a significant place in the native cooking. An eggplant preparation makes it appearance even on wedding menus in Andhra region, especially in brahmin households. Vankaya koora with koora podi (eggplant curry with spicy curry powder) was a common preparation during weddings in olden days. My A-Z Andhra recipe list would have been incomplete without including this most cherished vegetable among the locals. Several versions of pachadi (chutney), koora (curry) and pulusu / pappu (lentil based stews) are prepared using eggplants and many of them are posted on my blog. Today's post features a dry stuffed preparation of eggplants, using a spicy and flavorful cilantro based stuffing. This is a traditional dish and the recipe was shared to me years ago, by my husband's nieces.
 
Pantry ingredients that start with 'V' in Telugu language: 
Vaamu - Ajwain , Carom seeds 
Vadiyalu - Sundried crisps made with rice flour / tapioca pearls / lentils and such
Verusenaga pappu - Peanuts

Produce:
Vankaya - Eggplant / Brinjal
Velaga pandu - Wood apple
Vellulli - Garlic
Vellulli paaya - Garlic pod

Some 'V' dishes:
Vadalu / Garelu - Deep fried fritters
Vada pappu - Soaked moong dal made for RamaNavami
Vampoosa / Vampodi Kaaralu - Deep fried snack
Velaga pandu pachadi - wood apple chutney 
Vellulli karam - Instant garlic pickle
Venna - Butter 
Venna undalu & Vennappalu - Traditional sweet dishes
(And also Curries, Chutney & Dal made with eggplants)
 
Ingredients (2 servings)4 small eggplants (violet or green colored)
2 cups loosely packed cilantro leaves
1 inch piece of ginger
2 green chilies or as needed
1 to 2 tbsp. oil

Method:
* Wash cilantro leaves and pat dry. Grind cilantro leaves, ginger, green chillies and salt together to a paste, adding no water. This is used as stuffing.
* Wash eggplants, wipe them dry and chop off the stalks.
* Keeping the base intact, cut the eggplants twice vertically making a + shape. Fill eggplants with the above stuffing. You can fill as much as the eggplants can hold without spilling. If the filling gets spilled over the surface of the eggplant, wipe it clean.

* Heat oil in a pan and add the stuffed eggplants to it. Tilt the pan carefully so that the eggplants are coated well with the oil. Sprinkle a little salt over the eggplants.
* Cook covered on low flame, turning intermittently until browned on all sides and the eggplants are soft to touch. 
* Remove and serve warm with warm rice and ghee, if serving as a part of Andhra meal. 

So far on my 'A - Z' Andhra Cuisine,
A for Alasanda Vada
B for Bellam Garelu
C for Chiyali
D for Dondakaaya Kaarapu Kaaya
E for Endu Kobbari Podi
F for Fine Biscuits 
G for Gongura - Mamidikaya Pappu
H for Halwa Holigalu
I for Idli Karam Podi
J for Janthikalu
K for Kobbari Koora

Check out the Blogging Marathon page for the other Blogging Marathoners doing BM# 63.


Tuesday, April 5, 2016

A - Z Andhra Recipes ~ D for Dondakaaya Karapu Kaaya / Gutti Dondakaaya


Stuffed vegetables are prepared commonly all over India, with variations and Andhra cuisine is no exception. Eggplants / brinjal, bitter gourd and tindora / ivy gourd are the commonly used vegetables in the state, when it comes to stuffed preparations. They are usually called gutti koora or kaaram pettina koora or karapu kaaya. In fact,  gutti vankaya, a stuffed preparation of eggplants filled with delicious and flavorful spice and bean powder is one of the popular dishes from the state. For today's recipe, I chose to go with a stuffed preparation using ivy gourd or dondakaaya as it is called in Telugu. The process appears a little tedious though it is not that difficult to prepare it and the yummy curry proves that it is worth the efforts and time involved. This goes as a side dish for rice when served as a part of south Indian meal.

The alphabet 'D' doesn't give as many options as it's preceding alphabets when it comes to recipes starting with that letter in Telugu. There are basically two vegetables in Telugu language that start with that letter. Dondakaaya, the ivy gourd / tindora and the dosakaya, the plump, yellow cucumbers that are slightly sour. As is the norm, those vegetables are used to prepare chutney / pickle, curries and dals. 'D' also stands for draksha (grapes), danimma (pomegranate) and dabbakaaya / dabba pandu (a citrus variety, that can be loosely translated as a pummelo) among the fruits, only the latter being used in a rice preparation. There are spices dalchini chekka (cinnamon) and dhaniyalu (coriander seeds) which don't yield any recipes.
Among the dishes, there is dappalam which happens to be a signature Andhra dish, where a medley of vegetables are cooked in a sweet and sour gravy. The letter 'D' also represents dibba rotte, a dense pancake prepared with rice - black gram batter and again unique to the region. And daddhojanam aka yogurt rice that is common to all southern parts of India. 
 
My mother uses either koora podi or senaga pindi (chickpea flour) for stuffing while my mother in law used to use the pappula podi, (ground roasted chickpeas) which is found commonly in Rayalaseema kitchens. There are various fillings that can be used to stuff in the vegetables depending upon one's preference. For today's recipe, I have used a spicy, chickpea flour filling. My mother roasts the filling mixture at the end, until it is dark golden brown in color or it resembles almost like a burnt mixture though she doesn't let it burn. It has a unique, flavorful taste and that powder can alone be eaten mixed with rice and ghee. I have failed so far to achieve that effect and have given up the idea. I instead roast the remaining filling mixture separately in another pan adding a tsp. of oil until golden brown while the stuffed gourds are cooking separately. I add the fried filling mixture to the cooked gourds at the final stage.   

Ingredients:
25 ivy gourds / tindora / dondakaaya
1 cup besan / chickpea flour / senaga pindi
1.5 tsp. chili powder or as per taste
Salt to taste
2 to 3 tbsp. oil

Method:
* Sieve the chickpea flour into a bowl. Add salt and chili powder to the bowl and mix well. Chickpea flour can be toasted as well before stuffing though the step is optional.
* If possible pick lengthy gourds if you are planning to stuff since more filling can go inside the vegetable that way. Wash the gourds and wipe them dry. Trim the edges slightly and cut them marking  a + slit and go almost to the ends with keeping one end intact. Don't use the gourds that have ripened and appear red inside.
* Stuff the gourds with the prepared filling. Keep the remaining filling aside since it is going to be used later in the recipe.
* Heat 2 tbsp. oil in a wide non stick pan and place the stuffed gourds without crowding. Cook on low flame, covered. Keep turning in between and cook until they are cooked and roasted golden brown through out.
* Transfer the roasted gourds onto a plate and to the same pan add the remaining filling mixture and add a tsp or two of oil if needed. Roast until the raw smell is gone or until it turns a dark golden brown color.
* Add back the roasted gourd pieces to the pan and mix once. Serve hot with steamed rice and ghee.

So far on A - Z Andhra Cuisine,
A for Alasanda Vada
B for Bellam Garelu
C for Chiyali


Check out the Blogging Marathon page for the other Blogging Marathoners doing BM# 63


Friday, December 11, 2015

Spicy Stuffed Bitter Gourd / Bharwan Karela

Vegetables that we use in our home falls under three categories from my perspective - the ones which I absolutely love, the ones which I utterly abhor and which coincidentally happen to be my husband's favorite ones and the ones I don't care about but still can manage to eat without any complaints if only cooked in certain ways. The root vegetables fall in the former category to my husband's dismay who keeps commenting that I must have been a bunny in my previous birth. Now the bitter gourd falls under the third category and I am not a fan of it obviously because of it's bitterness. However the irony is that I love podi koora and these yummy crisps made with bitter gourd, which do not contain any sweeteners to mask it's bitterness. Today's recipe is one based on bitter gourd too and loved absolutely by my husband who happens to be a fan of the vegetable. I have never tasted it though I prepare it but going by his input, this is a yummy one for bitter gourd lovers.

Ingredients: (Yield 2 servings)
2 bitter gourds
1 onion, finely chopped
2-3 tbsp. oil
1 tsp. cumin seeds
A pinch of asafoetida powder
2 tbsp. chickpea flour / besan
2 tsp. coriander powder
1 tsp. cumin powder
1/2 tsp. garam masala
1 tsp. amchur powder / dry mango powder
1/2 tsp. red chili powder
1/8 tsp. turmeric powder
Salt to taste

 Method:
* Wash and scrape the ridges of bitter gourd skin and keep the scrapings aside. Make a slit in the bitter gourds lengthwise, keeping the ends intact. Scoop out the seeds and the pith carefully without opening the gourds. Add scrapes and gourds to a bowl and sprinkle salt over them. Keep them aside for at least 30 minutes.
* Wash the gourds and scrapes once again and squeeze out all the water. 
* Heat a tbsp. oil in a small pan and add the chopped onion. Fry until it turns golden brown.
* In the mean time, prepare the stuffing for the gourds. Heat a tbsp. of oil in another small pan and add cumin seeds. When the seeds sizzle and turn a shade darker, add asafoetida and the bitter gourd scrapings. Fry for about 5 minutes on low flame. Then add chick pea flour and fry for a couple of minutes. Then add coriander powder, cumin powder, garam masala, amchur powder, chili powder and turmeric powder to the pan and fry for another minute. Turn off the stove and let the stuffing cool a bit.
* Stuff the gourds with the above stuffing and tie them tightly with thread so that gourds do not open up while cooking. Keep the remaining stuffing aside.
* Heat a tbsp. oil in a pan and add the stuffed gourds. Cook on low flame, until the gourds are cooked well and turn brown all around.
* Add the remaining stuffing, fried onions and salt to the cooked gourd pan and stir to combine.
* Serve warm with hot steamed rice.


This goes to Blogging marathon #59 under the theme 'Stuffed Dishes'. Check the link to see what other marathoners are cooking.

Comments