HOME        |        ABOUT        |        COPYRIGHT        |        CONTACT        |         RECIPE INDEX        |         INDIAN THAALIS        |         MILLET RECIPES        |        EVENTS' ROUNDUP        

Showing posts with label Vegan Recipes. Show all posts

Saturday, June 26, 2021

Barnyard Millet Dosa / Oodhala Dosa

Barnyard millet is a healthy ingredient that would prove beneficial to include in one's diet. This pseudo cereal which has a low glycemic index is gluten-free, low in calories, and a good source of iron and fiber. It is easy to incorporate it in Indian cuisine even if one is not used to it and it can replace rice in many of the dishes. This is a popular ingredient during fasting in certain regions of India as cereal grains are not allowed during the period. 
This is one of my favorite millets to substitute in south Indian style breakfast dishes as it can replace rice easily. Today's barnyard dosa are a healthy twist to the traditional dosa recipe which is prepared with a fermented batter of rice and black gram. This is one of those millet recipes one can try if one is skeptical towards millets or new to millet cooking. These dosas are similar to traditional version, texture and tastewise and none would be the wiser. These dosas can be served for breakfast / dinner along with coconut chutney and sambhar for a wholesome meal. 
Ingredients: (Yield - 12 dosa)
1 cup sanwa / barnyard millet
1/4 cup urad dal / skinned black gram 
1 tbsp. chana dal / split chickpeas / 
2 tbsp. poha / flattened rice
1/2 tsp. methi /fenugreek seeds 
1 tsp. salt
About 1/2 cup water to grind
Oil to make dosas
Directions:
* Add millet, skinned black gram, split chickpeas, flattened rice, fenugreek seeds and rinse twice with water and drain.
* Soak them in water for 3 - 4 hours. Drain the water used to soak before grinding. 
* Add the soaked ingredients and salt to a blender / grinder and grind finely adding water as required to form a thick, pourable consistency batter.
* Transfer the batter to a container, cover and let it ferment in a warm place overnight or for more time if living in a cold place.
* Heat a griddle and pour a ladleful batter at the center and spread it thinly with the back of the ladle. (I made medium sized, thick ones but the dosas are made thinner and griddle sized.) Drizzle oil around the edges and cook until the surface appears dry. 
* Flip the dosa and cook on the other side as well for few seconds.
* Remove it with a spatula and repeat the dosa making process.
* Serve them warm with chutney of your choice.
This post is an entry for Blogging Marathon and check the link to find out what other marathoners are cooking.

Thursday, June 24, 2021

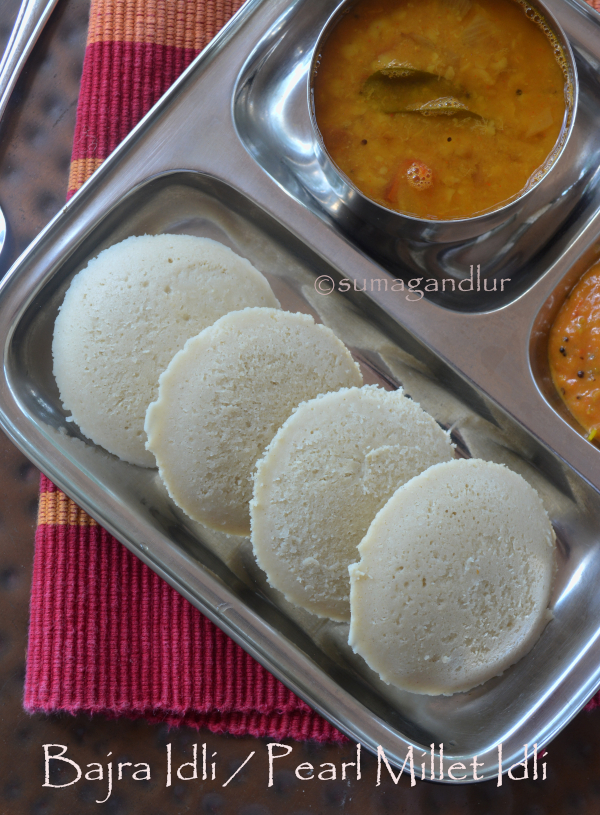
A - Z Idli Series ~ B for Bajra Flour Idlis

These healthy idlis are made using ground pearl millet or bajre ka atta / bajra flour. Bajra / pearl millet / sajja, a whole grain has been grown from ancient times in Indian sub-continent and Africa and used in cooking, both in grain and ground forms. Bajra has been a poor man's staple food in many regions of India and only recently, bajra and other millets have been gaining popularity among the urban class for their nutritional value. 

Pearl millet is a gluten-free grain, nutritious, rich in protein, iron, and fiber making it a great alternative over rice and wheat. It is also a complex carbohydrate, which takes longer to digest thus help managing blood sugar spikes after meals, making it suitable for diabetics. These idlis are obviously gluten-free, vegan and makes a wholesome and filling meal, when served with a lentil side dish like a sambhar.
Flat breads and porridges / khichdis are the most common preparations in India using this grain. However many south Indian breakfast dishes can be given a healthy twist by incorporating millets into recipes. I have replaced a portion of rice with pearl millet / bajra flour in my idli recipe to make them healthier. I have also tried a version, replacing rice with bajra rava / coarsely ground pearl millet. I have not completely replaced the rice in both the cases since I am not sure the flour alone would lend structure to the idlis. These idlis are not very different texture or tastewise from the standard version and can be easily incorporated into one's diet.

Ingredients: (Yield - 27 idlis)
1/2 cup bajra flour / pearl millet flour
1/2 cup idli rice
1/2 cup  urad dal / skinned black gram
1 tbsp. poha / flattened rice 
1/4 tsp. methi / fenugreek seeds
Salt to taste
Water to grind (I used slightly less than 1.5 cups of water.)
Directions:
* Rinse and soak idli rice, skinned black gram, flattened rice and fenugreek seeds in water for about 3 - 4 hours and drain the water. Let the water level be at least an inch above the level of the ingredients during the entire soaking period.
* Grind the soaked ingredients along with pearl millet flour / bajra flour adding salt and water as needed to form a thick, smooth batter. The final batter should not be runny. (I used less than 1.5 cup water to grind the ingredients.)
* Transfer the batter to a container and cover it. Allow the batter to rest in a warm place overnight. The batter may take anywhere between 8 to 16 hours to ferment depending upon the local weather. 
* Stir the fermented batter and fill the greased idli plates. 
* Heat water in a steamer / idli cooker / pressure cooker on medium flame. Place the idli stand in it and cover the lid. There is no need to put the pressure valve on if using the pressure cooker to steam idlis.
* Cook on low medium flame until idlis are done, about 20 minutes. (To check whether idlis are done, touch the surface of the idlis with wet fingers. If they are not sticky then that means idlis are cooked perfectly. If they are sticky, cook for some more time.)

* Turn off the stove and wait for at least 5 minutes and carefully remove the idli stand. Run a spoon around the edges of idli and remove them.
* Serve with a spicy chutney and / or sambhar. Our idlis were served with tomato chutney and sambhar.

Note:
The batter may not raise as much as the regular idli batter. Especially for those living in cold climates, if the batter smells sour and has not raised even after enough fermentation, add a little Eno fruit salt / baking soda to the batter and make idlis. (I haven't tried it but it will definitely be helpful.)

Sunday, April 18, 2021

A - Z Idli Series ~ E for Elaneer Idli

I was fixated on a recipe from Karnataka for today's 'E' post until I came across Mallika Badrinath's elaneer idli recipe, in a millet version. Inspired by the idea, I used coconut water in my regular idli recipe here but one can replace rice with any millet to make them more healthier. These idlis are gluten free and vegan if idli moulds are greased with oil. Coconut water and the white flesh from a young coconut are used to grind the idli batter instead of water in this case. It makes a difference in the final outcome and one cannot miss how the idlis turn out light, airy and spongy. 

Elaneer means tender coconut water in Tamil and Kannada and hence the name for the idli. Use a young coconut if accessible and add all the pulp / soft white flesh from it while grinding the batter. I had to manage with canned coconut water which was super sweet and contained about a spoon of tiny coconut pieces but not much pulp. The quantity of coconut water mentioned below in the recipe needs to be adjusted if using the soft flesh as well. The coconut flavor is not much noticeable in idlis if using only coconut water (and no white flesh) to grind the batter though the idlis  come out soft and spongy.

Ingredients: 
1 cup idli rice
1/2 cup skinned black gram / urad dal
1 young coconut / Coconut water with soft coconut flesh as needed 
(I used about 1 and 3/4 cups coconut water with no flesh. With coconut flesh, may be less liquid is needed.)
Salt as needed

Directions:
* Rinse idli rice and black gram and drain. Soak them together in water, in a bowl for about 4 - 5 hours and drain the water used to soak completely.
* Add soaked idli rice, black gram, salt, and coconut flesh to a grinder / blender. Next add coconut water as needed and grind them into a smooth and thick batter with pouring consistency. (I used my Oster 16 speed blender to grind them.)
* Transfer the batter to a container and cover it. Allow it to ferment overnight (if the batter was ground in the evening) or as needed in a warm place or in an oven with the lights on.
* Heat about 2 cups of water in a idli cooker base or a idli cooker or a steamer on medium heat. Grease the idli moulds with ghee / oil and spoon the batter into idli plates.
* Place the idli stand in the prepared cooker / steamer and close the lid. Don't use the valve for the lid if using a pressure cooker.
* Steam the idli on low heat setting for about 20 - 25 minutes or until done. (The idlis should not stick when touched with moist fingers.)
* Wait for about 10 minutes and then demold the idlis by running a spoon around the edges.
* Serve them warm with  chutney / sambhar.

Monday, February 4, 2019

Spicy Bajra Biscuits / Spicy Millet Flour Cookies (Gluten Free, Vegan Baking)

Theme: Paleo / Vegan / Gluten-Free Recipes

Vaishali posted bajra biscuits some weeks ago and I had to try them for two reasons. We are on the millet wagon for quite sometime now and so needless to say that I keep looking for new ways to include millet in our daily diet. Any interesting recipe that catches my attention gets cooked immediately in my kitchen. The second reason being my husband who enjoys spicier biscuits / cookies to go along with his coffee / tea. 

I made them along the lines of a khara biscuit, on a spicier side to suit his taste buds. Thanks to Vaishali, we enjoyed these healthy and flavorful biscuits. These millet flour based biscuits are gluten free, vegan (free of eggs and dairy) and in a nutshell, guilt free. The flavors can be customized according to one's preferences. If looking for spicier cookies, my chickpea flour cookies and khara biscuits may interest you.
Ingredients: 
1 cup millet flour / bajra flour
1 tsp. ginger - green chilli paste
2 pinches of asafoetida
Salt to taste (I used a little over 3/4 tsp. salt.)
1 tbsp. finely minced curry leaves 
1 tbsp. cilantro
2 tbsp. oil
1/4 cup warm water

Directions:
* Grease or line a baking sheet. Also grease two plastic sheets on one side each. Or cut open a ziplock bag on sides so that you would end up with a large rectangle sheet and grease on one side and keep it aside.
* Preheat the oven to 300 deg F / 150 deg C.
* Combine all the ingredients except oil and water in a mixing bowl. In case you can not paste the ginger and chillies, just run them in a food processor along with the flour. Add oil and rub into the mixture. Next add water in small increments and mix until a dough is formed. Add a tsp. or two extra water if needed.
* Divide the mixture into two portions. Place one of the dough balls between two greased plastic sheets. (Or on one side of the greased ziploc sheet and fold the other end over it). Roll the dough into 1/8 inch thick circle.

* Cut the dough into desired shapes using cookie cutters and prick them all over with a fork. 
* Place the cut biscuits on the prepared baking sheet and bake them until golden brown and crisp. (Vaishali recommended about 15 minutes of baking. My biscuits were 1/4 inch thick ones and so I had to bake for about 25 minutes flipping them in between since they were not browning. I left them in the oven few extra minutes after the oven was turned off. I went with checking the crispiness rather than the color for these biscuits to see if they were done. 
* Cool and save them in an airtight container. Serve them with coffee or tea.

Notes:
* The biscuits pictured here are 1/4 inch thick ones. 1/8 inch thickness gives crispy biscuits while 1/4 inch thick ones gives flaky and crumbly kind ones. We liked both but I would recommend 1/8 inch thick ones if not finishing them immediately. 1/4 inch thick ones kind of lost some of the crispiness the next day. 
* I used a 1.5 inch size diamond shaped cookie cutter and got around 30 biscuits of 1/4 inch thickness. One can make them into thin, big circles.

bmlogo

Comments

Sunday, February 3, 2019

Quinoa - Avocado Pasta

Theme: Paleo / Vegan / Gluten-Free Recipes

This quinoa pasta in avocado sauce hardly takes ten minutes to prepare and is quite a flavor packed one. The avocado sauce here is somewhat prepared on the lines of a pesto sauce along with avocado, which lends creaminess to the sauce. The quinoa pasta by itself is gluten free and vegan and the 'no cook' avocado sauce fits the paleo bill as well. Sprinkle some cheese over the pasta if not vegan to make it more tastier.

Ingredients:
2 cups quinoa pasta
2 ripe avocados -peeled, halved and seeded
2 handfuls of basil and/or cilantro leaves (I used cilantro.)
2 garlic cloves
A handful of almonds (optional)
3 - 4 tbsp. olive oil (or as needed)
Lemon juice to taste
Salt and ground black pepper to taste
(1/4 cup parmesan cheese if not vegan)

Directions:
* Cook quinoa pasta according to package directions. Save some of the pasta liquid and drain.
* While the pasta is cooking, add avocado, cilantro, garlic, olive oil and lemon juice to a blender / food processor and blend well until the desired consistency is reached (chunky or creamy). If you have hard time processing the ingredients, add a little pasta water to facilitate easy grinding.
* Toss the pasta and the avocado sauce together. Season with salt and black pepper and serve immediately. (Sprinkle some cheese over the pasta if not vegan.)

bmlogo 

Comments

Saturday, January 26, 2019

Shaak Wali Dal

I had cooked other dishes for this week but somehow ended up posting regional dals prepared with moong. Today's comforting and simple flavored dal called 'Shaak wali dal' comes from Gujarat. A lentil dish where you can sneak in all those 'not so favorite' kind of veggies and no fussy eater would figure out. And so this 'mixed vegetables' based dal is especially for those picky eaters or when one needs to finish off those last bits and odds from the refrigerator. Here dal and vegetables are cooked together and mashed to invisible bits to mask any vegetables used and tempered with ghee and spices. Any vegetable other than bitter gourd for the obvious reasons can be used. Onion, potato, tomato, carrots, peas, cauliflower, pumpkin, chayote, bottle gourd, zucchini are some of the vegetables that can go into this dal. Greens / Beets would be a nutritional addition if you don't mind the green/ red looking dal.  I used potato, carrot, peas and tomato and made it on a thicker side by not adding any extra water other than needed for pressure cooking. Also I added more toor dal than moong in my dal.

Recipe source: Here
Ingredients:
1/2 cup moong dal / skinned and split green gram
1/4 cup toor dal / split pigeon peas
3 cups of diced vegetables 
1/2 tsp. turmeric powder
1 tsp. cumin powder
1 tsp. coriander powder
1 tsp. chili powder
Salt to taste
For tempering:
2 tsp. ghee / oil
1 tsp. cumin seeds
2 red chillies
a Pinch of asafoetida
1 sprig of curry leaves
Lemon wedges to serve

Directions:
* Wash and rinse the dals in two exchanges of water. Pressure cook dals adding vegetables, turmeric powder and 1.5 cups of water for 4 whistles.
(Soak dals for about 30 minutes in case not using a pressure cooker for any reason. Cook dals and vegetables together in a sauce pan on medium flame adding water as needed until the dals are cooked well. Keep stirring in between.)
* When the valve pressure is gone, mash the dal and vegetables well with the back of a ladle or potato masher or a churner, until the mixture becomes homogeneous. Add the spices and 1/2 cup (or more) of water and bring it to a boil.
* Heat ghee / oil in a small pan and add cumin seeds and red chillies. When the red chillies start to brown add curry leaves and asafoetida. Turn off the stove and add the tempering over the dal and give it a stir. (Garlic can be used as well for tempering.)
* Garnish with chopped coriander leaves if preferred.
* Serve with rice or rotis, with lemon wedges on the side. 

This goes to Blogging Marathon under 'Bookmarked Recipes' Theme.

bmlogo 


Comments

Friday, January 25, 2019

Moongdal - Green Mango Rasam / Pesarapappu - Mamidikaya Chaaru

Chaaru / Rasam / Saaru whatever the regional name maybe, happens to be a staple dish in south Indian cooking and is a thin, spicy lentil broth served with rice. It is served in many homes for every lunch / dinner and considered a comfort dish by many. It aids in digestion and is light enough to serve even to the sick. The classic and the most common rasam uses the pigeon peas - tomato combo. Or lemon juice in lieu of tomato. There are different variations nowadays in the rasam preparations and I happened to see this one on a television cooking program. Rasam powder aka the spice powder used to prepare rasam is a pantry staple in south Indian homes and if you have rasam powder (either homemade or store bought - I would recommend MTR brand) handy, the preparation becomes a simple and easy one.

I prepare rasam / chaaru on a regular basis in my home though I don't have the basic rasam recipe posted here on my blog so far. I am quite good at rasam preparation while not being so in  photographing it. I admit it without any embarrassment that my 'rasam' photographs usually don't do justice to the dish itself.  I see many bloggers beautifully capturing rasam in their images. In my case, all the good stuff sinks to the bottom including the tempering and clear liquid topped with drops of grease remains to be captured and I usually give up. I wasn't happy with today's image too but the green mango rasam is so flavorful that I could not let go without posting it.

Ingredients:
1/4 cup moong dal / skinned, split green gram
1/8 tsp. ground turmeric
3/4 tsp. salt or as needed
1 and 1/2 cups water
1 tbsp. finely minced cilantro
Ingredients to toast and grind:
1/4 tsp. pepper corns
1/2 tsp cumin seeds
1.5 tsp. coriander seeds
or
1 tsp. homemade or store bought rasam powder
Ingredients for tempering:
1 tsp. ghee / oil
1/2 tsp. mustard seeds
1/2 tsp. cumin seeds
2 dried red chillies, broken into bits
2 green chillies, sliced lengthwise
6 - 8 curry leaves
A pinch of asafoetida powder
1/4 cup grated green mango 

Directions:
* Wash and rinse the moong dal in two exchanges of water and drain. Pressure cook moong dal adding 1/2 cup of water and ground turmeric for 3 whistles. (At this stage, one can also add mango pieces along with dal and cook instead of grating and frying later). When the valve pressure is gone, finely mash the dal and mangoes (if used) with the back of a ladle and keep aside.
* Meanwhile, toast pepper corns, cumin and coriander seeds without burning them. Let cool and grind fine. (Skip the step if you have rasam powder.)
* Heat oil / ghee in a pan / pot and add mustard seeds and cumin seeds. When mustard seeds starts to splutter add red chillies, green chillies and curry leaves and saute for a few seconds. Next add asafoetida powder and grated mango (in case if you haven't pressure cooked green mango in the first step.). Fry for few minutes on low flame until the mango appears cooked. Then add pureed moong dal, salt, ground spices (or rasam powder), minced cilantro and about 1.5 cups of water (or as needed to get the desired consistency.) Taste and adjust the seasonings if needed. Bring the mixture to a boil and turn off the stove.
* Serve piping hot rasam with rice and dollop of ghee or as a part of a south Indian meal.

Notes:
* I usually don't use green or red chillies in a rasam recipe since the red chillies and black pepper used in my rasam powder lend enough spicy kick. However I used MTR rasam powder while preparing this rasam and recommend the usage of red chillies and mildly spiced green chillies unless if the rasam powder being used is very spicy by itself. The sourness from the green mango cuts down the spicy level. 
* The mango can be cut into pieces and cooked (and then mashed) along with moong dal if desired instead of grating and frying later.
* Basically I use the same ingredients to prepare my own rasam powder but not in the same ratio. The recipe link to my rasam powder is given below.

Other Rasam recipes posted here.
Carrot Rasam
Drumstick Rasam
Pineapple Rasam
Rasam Powder / Charu podi

This goes to Blogging Marathon under 'Bookmarked Recipes' Theme.

bmlogo  

Comments

Thursday, October 18, 2018

Cracked Pearl Millet Upma / Sajja Nooka Upma (Gluten - Free and Vegan Recipe)

The words 'easy' and 'quick' just pop into one's mind when talking about a upma preparation though it is not as simple as a toast or oats' preparation. However it is one of those when one is picking from a south Indian breakfast selection to cook from. A well made upma tastes pretty good too and so no surprise, it appears even on a south Indian wedding breakfast menu. Generally speaking, a traditional version upma is made from semolina most of the times. Followed by vermicelli / cracked wheat versions in popularity which are more healthier. People nowadays are getting more creative and proving that many grains can be used to prepare upma either in their broken / cracked forms or as whole. 

My mother makes an excellent upma and the taste remains the same each time she makes it. I therefore grew up enjoying upma and still to this day, love it irrespective of the form it is served in. I had recently brought a small bag of broken pearl millet / bajre ka daliya from India and obviously, upma was my first choice to experiment it with. Of course, replacing semolina with millet in the upma makes it more healthier, nutritious, and gluten free. A upma is a vegan friendly dish as it is if one is not tempted to drizzle some ghee over it. Mixed vegetables like chopped carrots, beans, potatoes and peas can go into the dish to make it more wholesome. We enjoyed it with roasted gram chutney.

Ingredients: (Yield 2 servings)
1 tbsp. oil
1/2 tsp. mustard seeds
1/2 tsp. cumin seeds
1/2 tsp. split roasted chickpeas / chana dal
1/2 tsp. split, skinned blackgram / urad dal
Few curry leaves
1/8 tsp. turmeric powder
2 green chillies, stalks removed and sliced finely
1 onion, peeled and finely chopped
1 tomato, washed and diced
1 cup water
1/2 cup broken pearl millet
3/4 tsp. salt

Directions:
* Heat oil in a small pressure cooker directly, Add mustard, cumin, split roasted chcikpeas and blackgram. When the dals start to turn reddish and the mustard seeds start to pop, add curry leaves and green chillies. Saute for few seconds and add onion. Cook until it turns tanslucent and add toamto. Cook until it turns mushy and add water, turmeric, and salt. 
* Let the water come to a rolling boil and then lower the heat. Add broken pearl millet in a slow stream and stir gently to mix, avoiding any lumps forming. 
* Close the lid with the pressure valve on. Pressure cook for 2 or 3 whistles and turn off the stove.
* Remove the lid when the valve pressure is gone and mix well well with a serving spoon to break up any lumps formed. Serve hot with chutney / sambhar. 

Note:
1. If one doesn't prefer to cook the upma directly in a cooker, all the steps before the millet cooking can be done in a pan and transferred to a container that fits into a cooker and then can be pressure cooked that way.
2. If cooking in a pan on stove top, this upma requires more water than the quantity mentioned in the recipe. 
3. Don't serve upma without any accompaniments. It tastes well with either peanut / coconut / roasted gram chutney / a sambhar because of it's texture.

Comments