skip to main |
skip to sidebar
Theme: Paleo / Vegan / Gluten-Free Recipes
Vaishali posted bajra biscuits some weeks ago and I had to try them for two reasons. We are on the millet wagon for quite sometime now and so needless to say that I keep looking for new ways to include millet in our daily diet. Any interesting recipe that catches my attention gets cooked immediately in my kitchen. The second reason being my husband who enjoys spicier biscuits / cookies to go along with his coffee / tea.
I made them along the lines of a khara biscuit, on a spicier side to suit his taste buds. Thanks to Vaishali, we enjoyed these healthy and flavorful biscuits. These millet flour based biscuits are gluten free, vegan (free of eggs and dairy) and in a nutshell, guilt free. The flavors can be customized according to one's preferences. If looking for spicier cookies, my chickpea flour cookies and khara biscuits may interest you.
Ingredients:
1 cup millet flour / bajra flour
1 tsp. ginger - green chilli paste
2 pinches of asafoetida
Salt to taste (I used a little over 3/4 tsp. salt.)
1 tbsp. finely minced curry leaves
1 tbsp. cilantro
2 tbsp. oil
1/4 cup warm water
Directions:
* Grease or line a baking sheet. Also grease two plastic sheets on one side each. Or cut open a ziplock bag on sides so that you would end up with a large rectangle sheet and grease on one side and keep it aside.
* Preheat the oven to 300 deg F / 150 deg C.
* Combine all the ingredients except oil and water in a mixing bowl. In case you can not paste the ginger and chillies, just run them in a food processor along with the flour. Add oil and rub into the mixture. Next add water in small increments and mix until a dough is formed. Add a tsp. or two extra water if needed.
* Divide the mixture into two portions. Place one of the dough balls between two greased plastic sheets. (Or on one side of the greased ziploc sheet and fold the other end over it). Roll the dough into 1/8 inch thick circle.
 * Cut the dough into desired shapes using cookie cutters and prick them all over with a fork.
* Place the cut biscuits on the prepared baking sheet and bake them until golden brown and crisp. (Vaishali recommended about 15 minutes of baking. My biscuits were 1/4 inch thick ones and so I had to bake for about 25 minutes flipping them in between since they were not browning. I left them in the oven few extra minutes after the oven was turned off. I went with checking the crispiness rather than the color for these biscuits to see if they were done.
* Cool and save them in an airtight container. Serve them with coffee or tea.
* Cut the dough into desired shapes using cookie cutters and prick them all over with a fork.
* Place the cut biscuits on the prepared baking sheet and bake them until golden brown and crisp. (Vaishali recommended about 15 minutes of baking. My biscuits were 1/4 inch thick ones and so I had to bake for about 25 minutes flipping them in between since they were not browning. I left them in the oven few extra minutes after the oven was turned off. I went with checking the crispiness rather than the color for these biscuits to see if they were done.
* Cool and save them in an airtight container. Serve them with coffee or tea.
 Notes:
* The biscuits pictured here are 1/4 inch thick ones. 1/8 inch thickness gives crispy biscuits while 1/4 inch thick ones gives flaky and crumbly kind ones. We liked both but I would recommend 1/8 inch thick ones if not finishing them immediately. 1/4 inch thick ones kind of lost some of the crispiness the next day.
* I used a 1.5 inch size diamond shaped cookie cutter and got around 30 biscuits of 1/4 inch thickness. One can make them into thin, big circles.
Notes:
* The biscuits pictured here are 1/4 inch thick ones. 1/8 inch thickness gives crispy biscuits while 1/4 inch thick ones gives flaky and crumbly kind ones. We liked both but I would recommend 1/8 inch thick ones if not finishing them immediately. 1/4 inch thick ones kind of lost some of the crispiness the next day.
* I used a 1.5 inch size diamond shaped cookie cutter and got around 30 biscuits of 1/4 inch thickness. One can make them into thin, big circles.
 Comments
I had come across these Moroccan cookies at New York Times online edition which in turn were adapted from"Dorie's Cookies" by Dorie Greenspan. These cookies are made with a combination of semolina flour and almond flour and I made them eggless. In case if you don't have almond flour, it can be made at home by grinding the almonds with the skin on if you wish or after drying the blanched and skinned almonds. Semolina flour adds a sandy texture to cookies while the almond flour adds richness. These are a version of crinkle cookies if not for the thumb impression. These cookies though look plain are delicious with a hint of citrus flavor and a lingering aroma of orange blossom water.
 I halved the original recipe and gave the measurements below. However I quartered the ingredients from the original recipe for my cookies. (I guess it is not confusing. That means I further halved the ingredients from the below recipe.) I baked them on a lined, large cookie sheet for 16 minutes and got around 16 cookies.
Ingredients: (Yield around 30 cookies)
1 tbsp. flax meal + 3 tbsp. water
3/4 cup + 3 tbsp. semolina flour
1 cup almond flour
3/4 tsp. baking powder
1/8 tsp. salt
1/4 cup + 2 tbsp. granulated sugar
Zest from a lemon
2 tbsp. any flavorless oil (I used canola oil.)
1 tsp. pure vanilla extract
1 tsp. orange blossom water (optional)
Confectioner's sugar for dredging
 Method:
* Combine the flax-meal and water in a small bowl and keep aside for five minutes.
* Position the racks to divide the oven into thirds. Preheat the oven to 350 deg F and line two baking sheets with parchment paper.
* Whisk together semolina, almond flour, baking powder and salt in a mixing bowl.
* Add sugar to the bowl of a stand mixer fit with a paddle attachment or to a bowl in which one use a hand mixer. Grate the lemon zest over sugar and rub them together until sugar is moist. Add flax egg and beat on medium speed for about 3 minutes. Next add oil and continue beating for another 3 minutes. Beat in vanilla and orange blossom water if using. Turn off the mixer. Add half of the dry ingredients and mix them in on low speed. Then add the rest of the dry ingredients and mix only until dry ingredients disappear into the dough, which will be thick.
* Grease your palms and roll out about a tbsp. sized dough between your palms to a ball and coat in confectioners' sugar. Repeat the process with the remaining dough. If your hands get sticky in between rolling the dough balls, wash and grease your palms again and start rolling.
* Place balls 2 inches apart on the prepared baking sheets. Push down the center of each cookie with thumb, pressing firmly enough to make an indentation and causing the edges to crack.
* Bake until cookies are lightly colored, about 14 to 16 minutes, rotating pans top to bottom and front to back after 8 minutes. They will be golden at the bottom, puffed and cracked and just firm to the touch. Carefully lift the cookies off sheets and onto racks.
* Store them in a covered container.
Method:
* Combine the flax-meal and water in a small bowl and keep aside for five minutes.
* Position the racks to divide the oven into thirds. Preheat the oven to 350 deg F and line two baking sheets with parchment paper.
* Whisk together semolina, almond flour, baking powder and salt in a mixing bowl.
* Add sugar to the bowl of a stand mixer fit with a paddle attachment or to a bowl in which one use a hand mixer. Grate the lemon zest over sugar and rub them together until sugar is moist. Add flax egg and beat on medium speed for about 3 minutes. Next add oil and continue beating for another 3 minutes. Beat in vanilla and orange blossom water if using. Turn off the mixer. Add half of the dry ingredients and mix them in on low speed. Then add the rest of the dry ingredients and mix only until dry ingredients disappear into the dough, which will be thick.
* Grease your palms and roll out about a tbsp. sized dough between your palms to a ball and coat in confectioners' sugar. Repeat the process with the remaining dough. If your hands get sticky in between rolling the dough balls, wash and grease your palms again and start rolling.
* Place balls 2 inches apart on the prepared baking sheets. Push down the center of each cookie with thumb, pressing firmly enough to make an indentation and causing the edges to crack.
* Bake until cookies are lightly colored, about 14 to 16 minutes, rotating pans top to bottom and front to back after 8 minutes. They will be golden at the bottom, puffed and cracked and just firm to the touch. Carefully lift the cookies off sheets and onto racks.
* Store them in a covered container.
 This goes to Blogging Marathon under 'Recipes from Southern Hemisphere' Theme.
Comments
This goes to Blogging Marathon under 'Recipes from Southern Hemisphere' Theme.
Comments
Time for some tidbits. Do you know what high tea and low tea are? Good for you if you are acquainted with the terms. If clueless about those words, join the club. I didn't know what they were either until last week and my guesses in fact, would have been quite the opposite to their real meaning. What started as a simple online search this week for elevenses menu turned into somewhat like I was going through a copy of 'English tea traditions for Dummies', (if such a book exists). 😵
One can easily misinterpret the terms 'low and high' teas, associating them with the social class. The 'afternoon tea' of the aristocrat ladies where one needs to mind their dress code and etiquette was called 'low tea' because they would sit in low armchairs in a sitting room while enjoying their tea and cakes set at low level tables. Low tea, a light snack was intended to tide someone over until dinner and usually used to be a ladies 'get together' or a social event. Think of scones, tea sandwiches, pastries, and cakes when talking about low tea. Here, a meal of tea, scones and cream is called a 'cream tea' and it is the simplest form of afternoon tea. If more sweets are added along with tea, scones and cream, then one would have a 'light tea'. If savory stuff is also included in the menu, then it becomes elaborate and constitutes a 'full tea'.
Ironically, 'high tea' originated among the lower classes of the society and it is the meal served at the end of a working day. During 1800's as I mentioned in this post, dinner was a midday meal and the working class did not have the luxury of a lunch break. They instead had tea/meal right after their work with a hearty meal like cold cuts, cheeses and meat pies. This evening meal was served at at a high table - a proper dinner table and hence the name.
 If I am not wrong, a formal afternoon tea time meal is a almost a thing of the past in most of the English households owing to the modern day busy lives. Unless if it is a special occasion or one is visiting classy hotels / tea rooms of England to partake in the afternoon tea which provides the tourists an opportunity to experience the age old English custom along with the locals who drop in to enjoy a relaxed afternoon with a nice cuppa with treats.
Now from those afternoon tea sessions to mid morning breaks. Elevenses, a colloquial English expression that started in the mid 18th century in Britain means a light refreshment taken at about eleven in the morning. I guess the timing had and has been flexible and the food served must have been highly variable. It is obvious that people who eat an early or no breakfast crave for some light refreshment during mid mornings irrespective of their time period in history or their location on the map. The coffee or tea breaks of the modern world is a proof that the institution of elevenses still exists everywhere though maybe not on an elaborate scale or with the same frequency as during the previous centuries. And for that matter not even under the same name, depending upon where you live.
 I am one of those who eats an early breakfast which is usually on the lighter side and feel the hunger pangs mid morning. Today's orange bread is perfect for such situations. A small cup of milk and a slice of this bread would suffice until lunch break. Bread served with butter and small cakes were a usual feature of elevenses and so, I made a quick bread which was kind of cross between the two though the yeast breads were the norm during the 18th century. The other elevenses posts this week are ginger biscuits and classic scones.
 This bread which is on the sweeter side turned predominantly orange flavored one since I upped the liquid ratio in the recipe. The original recipe uses cranberries but I opted for the dried, sweetened ones since no one at home is a fan of tart cranberries. The bread tasted delicious, slightly warmed and slathered with butter. Walnuts add slight crunch while the sweetened, dried cranberries lend a sweet - tart touch. I made two mini loaves and the small slices do the portion control and are great for snacking. I guess the sugar quantity can be reduced if not looking for a sweet bread.
 Ingredients:
1 flax egg or any substitute for one large egg
2 cups all purpose flour
1 cup sugar
1.5 tsp. baking powder
1 tsp. baking soda
1/2 tsp. salt
1 or 2 tsp. grated orange zest
2 tbsp. melted butter
2 tbsp. hot water
1/2 cup orange juice *
1 cup fresh / frozen cranberries (I used dried and sweetened ones.)
1 cup coarsely chopped walnuts
Ingredients:
1 flax egg or any substitute for one large egg
2 cups all purpose flour
1 cup sugar
1.5 tsp. baking powder
1 tsp. baking soda
1/2 tsp. salt
1 or 2 tsp. grated orange zest
2 tbsp. melted butter
2 tbsp. hot water
1/2 cup orange juice *
1 cup fresh / frozen cranberries (I used dried and sweetened ones.)
1 cup coarsely chopped walnuts
* I had to use extra juice since the batter was not coming together. I used over 1/4 cup. Start with 1/2 cup mentioned in the recipe and go on adding in small increments until bread batter is formed. The final batter should not be of neither a dough consistency nor a runny batter.
 Directions:
* Preheat the oven to 325 deg F / 165 deg C.
* Combine 1 tbsp. flaxmeal and 3 tbsp. warm water in a small bowl and keep aside for about 5 minutes.
* Combine all the dry ingredients in a bowl.
* Combine flax egg, orange zest, melted butter, hot water and juice in another bowl and beat to combine. Add to flour mixture, stirring just until combined. Gently fold in berries and nuts.
* Transfer the batter to a greased 9x5 inch loaf pan and bake until a toothpick inserted at the center comes out clean, about 60 minutes. This can also be baked in 4 mini loaf pans but the baking time would be less.
* Cool for about 10 minutes before transferring to a wire rack to cool completely.
* I served the slices warm slathered with butter generously.
Directions:
* Preheat the oven to 325 deg F / 165 deg C.
* Combine 1 tbsp. flaxmeal and 3 tbsp. warm water in a small bowl and keep aside for about 5 minutes.
* Combine all the dry ingredients in a bowl.
* Combine flax egg, orange zest, melted butter, hot water and juice in another bowl and beat to combine. Add to flour mixture, stirring just until combined. Gently fold in berries and nuts.
* Transfer the batter to a greased 9x5 inch loaf pan and bake until a toothpick inserted at the center comes out clean, about 60 minutes. This can also be baked in 4 mini loaf pans but the baking time would be less.
* Cool for about 10 minutes before transferring to a wire rack to cool completely.
* I served the slices warm slathered with butter generously.
This goes to Blogging Marathon under 'Elevenses' Theme.
Comments
Chinese started drinking tea way before the English caught the fancy. However the afternoon tea which started during 18th century is considered an quintessential English tradition though it is relatively new and started centuries later. The English just didn't drink their cuppa during evenings. Instead the ladies made it into a tradition, a fashionable social event which demanded dress code and etiquette. The afternoon tea which was served in drawing rooms between 4 and 5 pm was a small meal, not a drink. It included an array of snacks which in guise were calorie inducing and mouthwatering treats like rich teacakes (which are not cakes by the way), dainty sandwiches like cucumber ones, small sweet pastries, freshly baked scones served with cream and jam and so on. However the ladies were expected not to eat their heartful, which otherwise would have been impropriety.
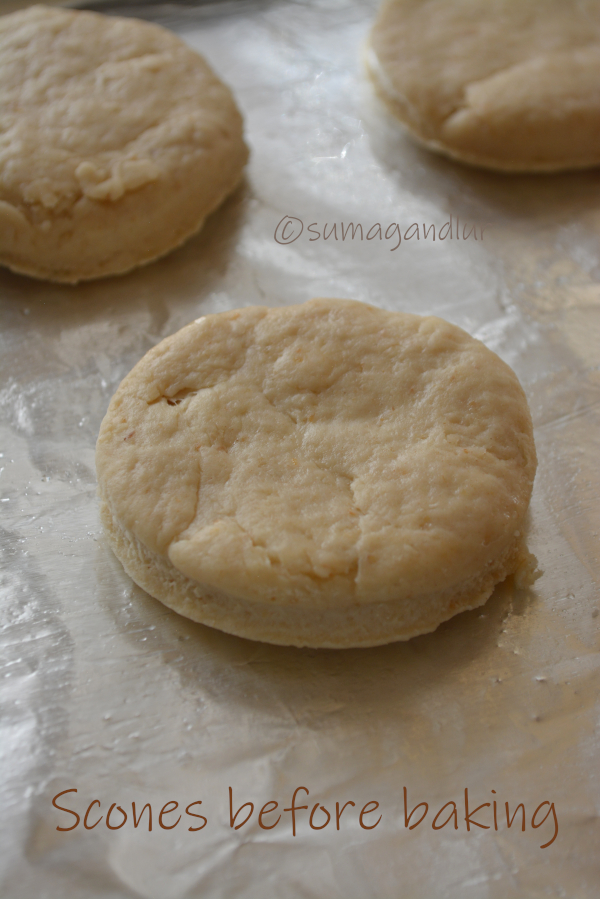
Elevenses on the other hand was a simple affair compared to the evening tea and was a simple refreshment served at around 11 in the morning. It would include tea served with a snack or two which were less savory. Muffins (the English kind and not the American ones), simple bread and butter, biscuits or scones and so on were mostly served. Scones was the common theme of both the tea times, I noticed while looking for elevenses recipes. Tea and freshly baked scones served with cream and jam is known as cream tea. I wanted to try a classic version English scone for quite some time now but the American counterpart always wins when the time to bake them comes. This time, I decided to stick with the English version for my Blogging Marathon - Elevenses theme and tried these classic scones that I had bookmarked from Newyork Times.
These traditional scones are barely sweet since they are eaten with sweet jams and clotted cream. I made them today and served them with strawberry spread to accompany our evening tea and chocolate milk. We noticed that more jam is needed compared to what we spread on our toasts. They were lighter, and flakier than American versions as the recipe suggested.
Ingredients:
1 tbsp. flaxmeal for flax egg
2 cups cake flour + extra as needed
1/2 tsp. salt
2 tsp. baking powder
3 tbsp. sugar (divided)
5 tbsp. cold butter, cut into pieces (or grated)
1/2 to 3/4 cup heavy cream + extra for brushing (Milk can be substituted.)
 The original recipe suggests to bake at 450 deg F but the reviewers of the original recipe suggested to lower the temperature and I baked them at 425 deg F. If you don't have cake flour on hand, combine 1/4 cup cornstarch and 1 and 3/4 cups all purpose flour and use instead. If eating eggs, skip the flax egg and substitute with an egg. Heavy cream can be substituted with milk. Start with 1/4 cup cream or milk and go on adding in small increments until dough can be formed. I had to use about 1/2 cup + 1 tbsp. milk and the dough was easy to work with. The original recipe mentions that the dough should be sticky but not messy. Add 1/2 cup of currants or raisins if preferred. I think they will add a little sweet punch to these barely sweet scones.
 Directions:
* For flax egg, combine 1 tbsp. flaxmeal and 3 tbsp. warm water in a small bowl and keep aside for about 5 minutes.
* Preheat the oven to 425 deg F.
* Add flour, salt, baking powder, and 2 tbsp. sugar to a food processor and pulse to combine. Next add butter and pulse until the mixture resembles cornmeal.
or
Mix the dry ingredients in a bowl and grate the butter which was frozen beforehand, directly into the bowl.
* Add egg and enough cream to form a slightly sticky dough. If the mixture appears too sticky, add a little flour. The final dough should be a little sticky to hands.
* Turn the dough onto a slightly floured surface and knead the dough once or twice. Then press it into a 3/4 inch thick circle and cut it into 2 inch rounds with a biscuit cutter or glass. Gently reshape the leftover dough and cut again until all the dough is used. Put the rounds on an ungreased baking sheet. (I lined the baking sheet with aluminium foil. I made 3 inch rounds of 1/2 inch thickness and got 8 scones.)
Or
Pat the dough into a circle of 3/4 inch thickness directly on a greased or lined baking sheet and cut into 8 wedges with a sharp knife.
Directions:
* For flax egg, combine 1 tbsp. flaxmeal and 3 tbsp. warm water in a small bowl and keep aside for about 5 minutes.
* Preheat the oven to 425 deg F.
* Add flour, salt, baking powder, and 2 tbsp. sugar to a food processor and pulse to combine. Next add butter and pulse until the mixture resembles cornmeal.
or
Mix the dry ingredients in a bowl and grate the butter which was frozen beforehand, directly into the bowl.
* Add egg and enough cream to form a slightly sticky dough. If the mixture appears too sticky, add a little flour. The final dough should be a little sticky to hands.
* Turn the dough onto a slightly floured surface and knead the dough once or twice. Then press it into a 3/4 inch thick circle and cut it into 2 inch rounds with a biscuit cutter or glass. Gently reshape the leftover dough and cut again until all the dough is used. Put the rounds on an ungreased baking sheet. (I lined the baking sheet with aluminium foil. I made 3 inch rounds of 1/2 inch thickness and got 8 scones.)
Or
Pat the dough into a circle of 3/4 inch thickness directly on a greased or lined baking sheet and cut into 8 wedges with a sharp knife.
 * Brush the top of each scone with bit of cream and sprinkle with the remaining sugar.
* Bake for about 9 to 11 minutes or until the scones are golden brown.
* Brush the top of each scone with bit of cream and sprinkle with the remaining sugar.
* Bake for about 9 to 11 minutes or until the scones are golden brown.
 * Serve the scones warm with jam, mascarpone, clotted cream, or creme fraiche.
Comments
* Serve the scones warm with jam, mascarpone, clotted cream, or creme fraiche.
Comments
Wishing all my readers a happy, healthy and prosperous new year. May all your wishes come true this year and hope you get to create a collage of wonderful memories with your near and dear ones.
I have read enough novels set in the Victorian period to know a thing or two about the popular tea tradition and tea rooms of Britain. However I always associated it with the afternoon tea sessions. A ritual which doubled as a light meal and was meant to ward off the hunger pangs between the lunch and dinner periods. A Duchess named Anna Maria, a lifelong friend of queen Victoria is credited with the creation of the afternoon tea ritual, during mid 1840s.
There were only two meals served prior to 18th century - a breakfast and a dinner, the main meal of the day that happened around two or three in the afternoon. Somewhere during the 18th century, dinner was slowly moved to somewhere between six to eight in the evening. During this period, a very light midday meal called 'luncheon' started to get served in wealthy homes, to fill the gap between breakfast and these new fashionably late dinners. However these luncheons were lighter and the long afternoons with no refreshments kept everyone feeling hungry. Anna found that a light meal of tea (usually Darjeeling) and cakes or sandwiches was perfect to beat the hunger pangs before dinner and soon started inviting her friends to join her during the teatime. This post-lunch tea ritual became such a hit that the practice spread in aristocratic circles.
 Now, there is another little teatime tradition called 'elevenses' which also happens to be my theme of blogging marathon this week. Elevenses is a short break taken for light refreshments at eleven in the morning, a couple of hours before the midday meal. This is like a second breakfast that comes between a proper breakfast and before lunch. It was not as formal or fancy as the afternoon tea but light snacks which are usually sweet were served with a tea.
 I read somewhere that not the fancy kind but simple ones like these ginger biscuits were a norm for the elevenses. I found the perfect recipe here to suit my purpose and tried it. I was baking a small portion and so, rather than running to grocery store, I substituted with the things I had in my kitchen. Golden syrup was replaced by honey and maple syrup combo, margarine by butter and self rising flour by a combo of all purpose flour, salt and baking powder. Also I baked them a couple of minutes more and left them in the oven for a few minutes. The extra time in the oven makes them perfect 'dunkers' for tea or coffee.
I was taking care of hundred other things while baking this and kind of messed up with my liquid measurement and so, I might have added more flour than needed. I am guessing that's why my cookies were thicker and did not spread as thinner as the original one. However they taste really good in spite of all the substitutions. As I mentioned above, I made them a little on the harder side to use them to dunk in tea / coffee.
I read somewhere that not the fancy kind but simple ones like these ginger biscuits were a norm for the elevenses. I found the perfect recipe here to suit my purpose and tried it. I was baking a small portion and so, rather than running to grocery store, I substituted with the things I had in my kitchen. Golden syrup was replaced by honey and maple syrup combo, margarine by butter and self rising flour by a combo of all purpose flour, salt and baking powder. Also I baked them a couple of minutes more and left them in the oven for a few minutes. The extra time in the oven makes them perfect 'dunkers' for tea or coffee.
I was taking care of hundred other things while baking this and kind of messed up with my liquid measurement and so, I might have added more flour than needed. I am guessing that's why my cookies were thicker and did not spread as thinner as the original one. However they taste really good in spite of all the substitutions. As I mentioned above, I made them a little on the harder side to use them to dunk in tea / coffee.
Ingredients: (Yield about 30 - 32)
110 g / 4 oz margarine
110 g / 4 oz caster sugar
110 g / 4 oz golden syrup
225 g / 8 oz self rising flour
2 tsp. ground ginger
 Directions:
* Preheat the oven to 180 c / 350 deg F. Grease a baking sheet.
* Melt the margarine, sugar and golden syrup in a pan over medium heat. Remove the pan from heat as soon as the contents are melted and allow it cool slightly. Add the flour and ginger and mix to form a dough.
* Once the dough is cool enough to handle, roll the dough into about 30 small balls with floured hands. Place the balls onto the prepared baking sheet with space in between to allow them to expand while baking. Mark the top of each ball with a fork.
* Bake them until the biscuits are golden brown, about 10 minutes. (Mine were not done at 10 minutes. However remember that they harden a little, while cooling.)
* Remove from the oven, let them cool down a bit and transfer onto a wire rack to cool completely. Store in an air tight container.
Directions:
* Preheat the oven to 180 c / 350 deg F. Grease a baking sheet.
* Melt the margarine, sugar and golden syrup in a pan over medium heat. Remove the pan from heat as soon as the contents are melted and allow it cool slightly. Add the flour and ginger and mix to form a dough.
* Once the dough is cool enough to handle, roll the dough into about 30 small balls with floured hands. Place the balls onto the prepared baking sheet with space in between to allow them to expand while baking. Mark the top of each ball with a fork.
* Bake them until the biscuits are golden brown, about 10 minutes. (Mine were not done at 10 minutes. However remember that they harden a little, while cooling.)
* Remove from the oven, let them cool down a bit and transfer onto a wire rack to cool completely. Store in an air tight container.
Comments
My son did not get to enjoy the things I baked this month as he wasn't home until Christmas' weekend. He loves cinnamon flavored bakes and I tried this one, especially for him. At first I thought of baking a cinnamon raisin bread or cinnamon buns which my daughter also loves but didn't have the patience to wait for the yeast batters to rise. Instead I tried a quick bread version which was done in less than the time needed for a yeast based batter to rise. I am calling this a cinnamon bread though it was supposed to be a cinnamon swirl bread. The original recipe was meant for a standard loaf pan and there were two prominent cinnamon swirls in each slice. In the recipe, 1/3rd of the bread batter is poured into the pan and a layer of cinnamon sugar is sprinkled evenly. Again the layers are repeated twice. The final bread looks gorgeous when cut open, showing those lovely cinnamon swirls. Take a look at the bread.
 I scaled down the recipe not realizing that I may not be able to get those swirls, the reason I tried this recipe in the first place. I had quartered the recipe to fit a mini loaf pan and it was hard to sprinkle two layers of ground cinnamon sugar between the batter layers. After the first layers of batter and cinnamon, I poured the second layer of batter and could not spread the thick batter. I had to pour all the batter instead and sprinkle the cinnamon sugar over it. The cinnamon layer in between was also not enough, I realized when I took a look at the images and tasted it. Don't skimp on the cinnamon for it's pronounced flavor in the bread; lesson learnt. My son wondered why I baked only a mini loaf of this lovely bread. This quick bread is delicious with a perfect crumb. I will bake a big loaf soon and update the pictures.
 Ingredients:
1 flax egg
1 tbsp. ground cinnamon
1 and 1/3 cups sugar (divided)
1/4 cup butter, softened
2 cups all purpose flour
1 tsp. baking powder
1/2 tsp. baking soda
1/2 tsp. salt
1 cup buttermilk
Ingredients:
1 flax egg
1 tbsp. ground cinnamon
1 and 1/3 cups sugar (divided)
1/4 cup butter, softened
2 cups all purpose flour
1 tsp. baking powder
1/2 tsp. baking soda
1/2 tsp. salt
1 cup buttermilk
 Directions:
* Combine 1 tbsp. flax-meal and 3 tbsp. warm water in a bowl and keep it aside for about five minutes. In case buttermilk is not available, add 1 tbsp. cider vinegar to a cup of room temperature milk and keep it aside.
* Preheat oven to 350 deg F / 180 deg C. Grease a 8 by 4 inch loaf pan. Combine cinnamon and 1/3 cup sugar in a small bowl.
* Beat butter, 1 cup sugar and flax egg until blended. Combine flour, baking powder, baking soda and salt. Add these dry ingredients to the butter mixture alternately with buttermilk.
* Pour a third of the batter into the greased pan. Sprinkle 1/3 of the cinnamon sugar evenly over the batter. Repeat layers twice.
* Place the pan in the preheated oven and bake until a toothpick inserted at the center comes out clean, about 45 - 50 minutes. Let it cool for about 10 to 15 minutes before removing from the pan to a wire rack to cool completely. Slice and serve when it cools down.
Directions:
* Combine 1 tbsp. flax-meal and 3 tbsp. warm water in a bowl and keep it aside for about five minutes. In case buttermilk is not available, add 1 tbsp. cider vinegar to a cup of room temperature milk and keep it aside.
* Preheat oven to 350 deg F / 180 deg C. Grease a 8 by 4 inch loaf pan. Combine cinnamon and 1/3 cup sugar in a small bowl.
* Beat butter, 1 cup sugar and flax egg until blended. Combine flour, baking powder, baking soda and salt. Add these dry ingredients to the butter mixture alternately with buttermilk.
* Pour a third of the batter into the greased pan. Sprinkle 1/3 of the cinnamon sugar evenly over the batter. Repeat layers twice.
* Place the pan in the preheated oven and bake until a toothpick inserted at the center comes out clean, about 45 - 50 minutes. Let it cool for about 10 to 15 minutes before removing from the pan to a wire rack to cool completely. Slice and serve when it cools down.
 This cinnamon bread is going to be my last post of this year and also my last entry for the Bakeathon event.

Comments
I remembered that I have a hoard of cooking magazines stowed away when almost I am on my last leg of this bakeathon journey. I used to subscribe them until a year ago and they could have been a great resource for recipes this month, I realized late. Better late than never. These blondies come from Martha Stewart's Living magazine; published a few years ago. These were supposedly created to improvise the buttery flavored blondies with the addition of sweet, floral taste of honey. Any flavored honey can be used in the recipe and in lieu of it, even maple syrup works as I have learnt. Bittersweet chocolate takes the place of traditional semisweet chips here, to add an interesting factor. 1/2 cup of any toasted and chopped nuts can be stirred in along with the chocolate.
 Ingredients:
1/2 cup / 1 stick unsalted butter + extra for pan
1 and 1/4 cup all purpose flour + extra for pan
1/3 cup honey
3/4 cup packed light brown sugar
1 flax egg
2 tsp. pure vanilla extract
1 tsp. coarse salt
4 oz. bittersweet chocolate, cut into chunks
Ingredients:
1/2 cup / 1 stick unsalted butter + extra for pan
1 and 1/4 cup all purpose flour + extra for pan
1/3 cup honey
3/4 cup packed light brown sugar
1 flax egg
2 tsp. pure vanilla extract
1 tsp. coarse salt
4 oz. bittersweet chocolate, cut into chunks
 Directions:
* Combine 1 tbsp. ground flaxmeal with 3 tbsp. water in a bowl and keep aside for about 5 minutes.
* Melt butter and honey in a sauce pan and stir in brown sugar. Let it dissolve and turn off the stove. Transfer the mixture to the flax egg bowl. Add vanilla, flour and salt as well. Stir until just combined and let the mixture cool for about 30 minutes. Stir in chocolate chunks.
* Ten minutes before the cooling period ends, preheat the oven to 350 deg F. Butter an 8 inch square baking pan. Line with parchment, leaving an overhang on two sides. Then butter the parchment and flour pan, tapping out excess.
(I used an 7x5x1.5 inch glass baking dish for half the recipe and did not line it with a parchment. I just greased and floured the pan.)
* Pour batter into the prepared pan and and spread batter evenly with a greased knife if needed.
* Bake until browned on edges and set, about 28 minutes.
* Remove the pan and let cool completely on a wire rack. Lift blondies out of pan using the overhang, if parchment was used. Remove parchment and cut into squares. I cut blondies into squares directly in my glass pan after cooling.
Directions:
* Combine 1 tbsp. ground flaxmeal with 3 tbsp. water in a bowl and keep aside for about 5 minutes.
* Melt butter and honey in a sauce pan and stir in brown sugar. Let it dissolve and turn off the stove. Transfer the mixture to the flax egg bowl. Add vanilla, flour and salt as well. Stir until just combined and let the mixture cool for about 30 minutes. Stir in chocolate chunks.
* Ten minutes before the cooling period ends, preheat the oven to 350 deg F. Butter an 8 inch square baking pan. Line with parchment, leaving an overhang on two sides. Then butter the parchment and flour pan, tapping out excess.
(I used an 7x5x1.5 inch glass baking dish for half the recipe and did not line it with a parchment. I just greased and floured the pan.)
* Pour batter into the prepared pan and and spread batter evenly with a greased knife if needed.
* Bake until browned on edges and set, about 28 minutes.
* Remove the pan and let cool completely on a wire rack. Lift blondies out of pan using the overhang, if parchment was used. Remove parchment and cut into squares. I cut blondies into squares directly in my glass pan after cooling.
 This cake goes to Bakeathon and Blogging Marathon #95 under the theme 'Bookmarked recipes' events.
 Comments
 A 15 year old teenager from Chicago named Renny Powell submitted a blueberry coffee cake in 1954 to the Pillsbury $100,000 Recipe and Baking Contest, which happens to be the precursor to today's Pillsbury Bake - Off contest, The girl scored second place in the youth division for her creation, which she called boy bait. She found that the teenage boys found it irresistible and so decided to attribute this blueberry coffee cake, a special adjective. I found the name not so odd after I tasted it since one can bait anyone they wish with this tempting cake or one need not be a teenager to be lured in. 😋 I am the proof since I truly detest eating blueberries as such but I have baked and enjoyed this cake many times over the years though I never got around to sit and post it until today. These images are at least a couple of years old.
 Cook's Country magazine tweaked the original recipe 'to improve it' as they say. They swapped the shortening and granulated sugar used in the original recipe with butter and a combination of granulated and brown sugars. And they topped the cake with a light, sweet sugar - cinnamon topping instead of streusel. I replaced half the butter with oil and used only half the quantity of the sugar mentioned. I don't like overtly sweet stuff and so the 1/2 cup sugar in the cake plus the sugar topping was enough for me. I swapped the 3 eggs in the recipe with plain yogurt. I used a springform pan to bake this. Still, the final coffee cake is a tender and sweet one with a 'melt in mouth' kind texture. This 'easy to make' rich cake is an addictive one and one would add it to their repertoire if they try this berry packed cake once.
Ingredients:
2 cups + 1 tsp. all purpose flour (divided)
1 tbsp. baking powder
1 tsp. salt
1/2 cup butter + 1/2 cup oil (or use 1 cup butter / 2 sticks butter instead.)
3/4 cup sugar *
1 tsp. vanilla
1 cup yogurt
3/4 cup milk
1/2 cup blue berries (fresh or frozen)**
For topping:
1/2 cup blueberries (fresh / frozen) **
1/4 cup granulated sugar
1/2 tsp. ground cinnamon
Cook's Country magazine tweaked the original recipe 'to improve it' as they say. They swapped the shortening and granulated sugar used in the original recipe with butter and a combination of granulated and brown sugars. And they topped the cake with a light, sweet sugar - cinnamon topping instead of streusel. I replaced half the butter with oil and used only half the quantity of the sugar mentioned. I don't like overtly sweet stuff and so the 1/2 cup sugar in the cake plus the sugar topping was enough for me. I swapped the 3 eggs in the recipe with plain yogurt. I used a springform pan to bake this. Still, the final coffee cake is a tender and sweet one with a 'melt in mouth' kind texture. This 'easy to make' rich cake is an addictive one and one would add it to their repertoire if they try this berry packed cake once.
Ingredients:
2 cups + 1 tsp. all purpose flour (divided)
1 tbsp. baking powder
1 tsp. salt
1/2 cup butter + 1/2 cup oil (or use 1 cup butter / 2 sticks butter instead.)
3/4 cup sugar *
1 tsp. vanilla
1 cup yogurt
3/4 cup milk
1/2 cup blue berries (fresh or frozen)**
For topping:
1/2 cup blueberries (fresh / frozen) **
1/4 cup granulated sugar
1/2 tsp. ground cinnamon
* The original recipe uses 1 cup sugar. I used only 1/2 cup and I think 3/4 cup makes it sweet enough.
** Don't thaw if using frozen blueberries.
 Directions:
* Preheat the oven to 350 deg F. Grease a 9 x 13 inch baking pan or a square pan.
* Combine 2 cups flour, baking powder and salt in a mixing bowl and set aside.
* Beat the butter and sugar until light and fluffy, about 2 minutes.
Next add oil, 1/2 cup yogurt and vanilla and beat to mix. Next fold in 1/3 of the flour mixture, half of milk, another 1/3 of the flour mixture, the rest of the milk, then the remaining flour and finally the remaining yogurt, mixing well after each addition.
* Toss the blueberries with a tsp. of flour. Fold 1/2 cup blueberries gently into the batter. If using frozen berries directly add them to the batter without thawing.
* Pour the batter into the prepared pan and scatter the remaining berries over the top of the batter. Combine 1/4 cup sugar and cinnamon and sprinkle over the top evenly.
* Bake until a tooth pick inserted at the center comes out clean, about 45 - 50 minutes.
* Let it cool completely before slicing.
Directions:
* Preheat the oven to 350 deg F. Grease a 9 x 13 inch baking pan or a square pan.
* Combine 2 cups flour, baking powder and salt in a mixing bowl and set aside.
* Beat the butter and sugar until light and fluffy, about 2 minutes.
Next add oil, 1/2 cup yogurt and vanilla and beat to mix. Next fold in 1/3 of the flour mixture, half of milk, another 1/3 of the flour mixture, the rest of the milk, then the remaining flour and finally the remaining yogurt, mixing well after each addition.
* Toss the blueberries with a tsp. of flour. Fold 1/2 cup blueberries gently into the batter. If using frozen berries directly add them to the batter without thawing.
* Pour the batter into the prepared pan and scatter the remaining berries over the top of the batter. Combine 1/4 cup sugar and cinnamon and sprinkle over the top evenly.
* Bake until a tooth pick inserted at the center comes out clean, about 45 - 50 minutes.
* Let it cool completely before slicing.
It goes to Bakeathon and Blogging Marathon #95 under the theme 'cake recipes' events.
Comments
There have been bookmarked recipes over the years that I have tried and loved so much that they have become a permanent part of my repertoire. This savory semolina loaf which is dubbed as upma loaf in my home is one such recipe that I have been making for nearly a decade now. It is my go to bread when I am packing snacks for our road trips. It is like upma served as slices and can be a great 'to go' snack for savory food lovers without all the mess or need of cutlery.
Fine or regular variety semolina can be used here without toasting. Today I used roasted variety which was closer to the one called in India as bansi rava. Other finely chopped vegetables like green beans and capsicum can be added as well. I omitted onions in this particular loaf and accidentally switched the quantities of water and yogurt. The bread with the yogurt quantity mentioned below usually yields me more porous bread.
Ingredients:
1 cup semolina
1 cup yogurt
1/4 cup water (or more)
1 tsp. salt
2 pinches of ground turmeric
2 tbsp. chopped cilantro
1 tsp. baking soda
Sesame seeds (optional)
For seasoning:
2 tbsp. oil
1/2 tsp. mustard seeds
1/2 tsp. cumin seeds
1/2 tsp. grated ginger
1 finely chopped spicy green chillie
Few curry leaves, finely chopped
1 small onion, finely chopped (optional)
1 grated carrot
A handful of green peas
 Directions:
* Preheat the oven to 375 deg F. Grease a mini loaf pan.
* Combine the semolina, yogurt, water, salt, turmeric and cilantro in a mixing bowl and keep it aside.
* Heat oil in a pan and add mustard and cumin seeds. When they start to pop and sizzle add grated ginger, chilies, curry leaves and vegetables. Cook for a couple of minutes, stirring frequently. Turn off the stove. Pour this seasoning mixture into the semolina bowl and mix well to combine. Add extra water if the batter appears too thick.
* Finally add in the baking soda and pour the batter into the prepared pan. Sprinkle white sesame seeds evenly over the top of the batter.
* Place in the oven and bake until a toothpick inserted at the center comes out clean, about 35 to 40 minutes.
* Remove from the oven and let cool a bit before slicing.
Directions:
* Preheat the oven to 375 deg F. Grease a mini loaf pan.
* Combine the semolina, yogurt, water, salt, turmeric and cilantro in a mixing bowl and keep it aside.
* Heat oil in a pan and add mustard and cumin seeds. When they start to pop and sizzle add grated ginger, chilies, curry leaves and vegetables. Cook for a couple of minutes, stirring frequently. Turn off the stove. Pour this seasoning mixture into the semolina bowl and mix well to combine. Add extra water if the batter appears too thick.
* Finally add in the baking soda and pour the batter into the prepared pan. Sprinkle white sesame seeds evenly over the top of the batter.
* Place in the oven and bake until a toothpick inserted at the center comes out clean, about 35 to 40 minutes.
* Remove from the oven and let cool a bit before slicing.
 It goes to Bakeathon event.
Comments
It goes to Bakeathon event.
Comments