HOME        |        ABOUT        |        COPYRIGHT        |        CONTACT        |         RECIPE INDEX        |         INDIAN THAALIS        |         MILLET RECIPES        |        EVENTS' ROUNDUP        

Showing posts with label Bajra Flour. Show all posts

Thursday, June 24, 2021

A - Z Idli Series ~ B for Bajra Flour Idlis

These healthy idlis are made using ground pearl millet or bajre ka atta / bajra flour. Bajra / pearl millet / sajja, a whole grain has been grown from ancient times in Indian sub-continent and Africa and used in cooking, both in grain and ground forms. Bajra has been a poor man's staple food in many regions of India and only recently, bajra and other millets have been gaining popularity among the urban class for their nutritional value. 

Pearl millet is a gluten-free grain, nutritious, rich in protein, iron, and fiber making it a great alternative over rice and wheat. It is also a complex carbohydrate, which takes longer to digest thus help managing blood sugar spikes after meals, making it suitable for diabetics. These idlis are obviously gluten-free, vegan and makes a wholesome and filling meal, when served with a lentil side dish like a sambhar.
Flat breads and porridges / khichdis are the most common preparations in India using this grain. However many south Indian breakfast dishes can be given a healthy twist by incorporating millets into recipes. I have replaced a portion of rice with pearl millet / bajra flour in my idli recipe to make them healthier. I have also tried a version, replacing rice with bajra rava / coarsely ground pearl millet. I have not completely replaced the rice in both the cases since I am not sure the flour alone would lend structure to the idlis. These idlis are not very different texture or tastewise from the standard version and can be easily incorporated into one's diet.

Ingredients: (Yield - 27 idlis)
1/2 cup bajra flour / pearl millet flour
1/2 cup idli rice
1/2 cup  urad dal / skinned black gram
1 tbsp. poha / flattened rice 
1/4 tsp. methi / fenugreek seeds
Salt to taste
Water to grind (I used slightly less than 1.5 cups of water.)
Directions:
* Rinse and soak idli rice, skinned black gram, flattened rice and fenugreek seeds in water for about 3 - 4 hours and drain the water. Let the water level be at least an inch above the level of the ingredients during the entire soaking period.
* Grind the soaked ingredients along with pearl millet flour / bajra flour adding salt and water as needed to form a thick, smooth batter. The final batter should not be runny. (I used less than 1.5 cup water to grind the ingredients.)
* Transfer the batter to a container and cover it. Allow the batter to rest in a warm place overnight. The batter may take anywhere between 8 to 16 hours to ferment depending upon the local weather. 
* Stir the fermented batter and fill the greased idli plates. 
* Heat water in a steamer / idli cooker / pressure cooker on medium flame. Place the idli stand in it and cover the lid. There is no need to put the pressure valve on if using the pressure cooker to steam idlis.
* Cook on low medium flame until idlis are done, about 20 minutes. (To check whether idlis are done, touch the surface of the idlis with wet fingers. If they are not sticky then that means idlis are cooked perfectly. If they are sticky, cook for some more time.)

* Turn off the stove and wait for at least 5 minutes and carefully remove the idli stand. Run a spoon around the edges of idli and remove them.
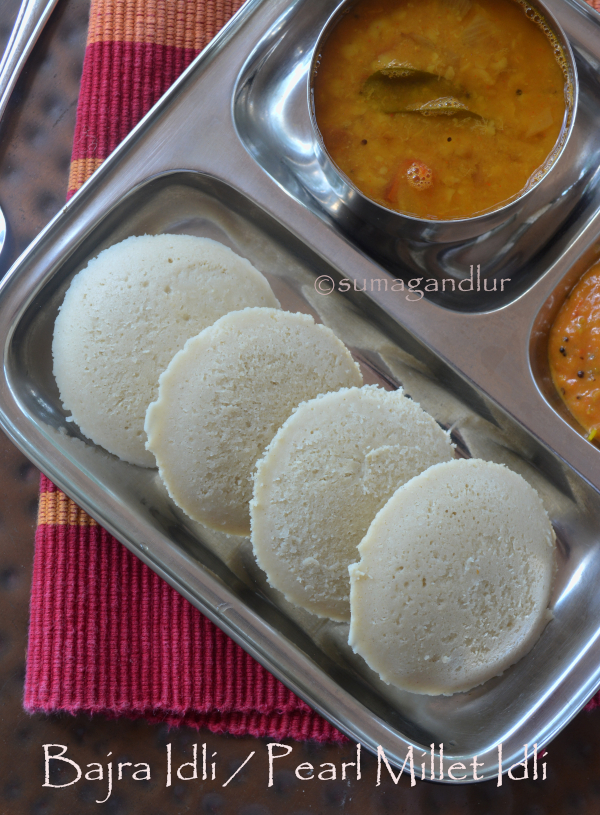
* Serve with a spicy chutney and / or sambhar. Our idlis were served with tomato chutney and sambhar.

Note:
The batter may not raise as much as the regular idli batter. Especially for those living in cold climates, if the batter smells sour and has not raised even after enough fermentation, add a little Eno fruit salt / baking soda to the batter and make idlis. (I haven't tried it but it will definitely be helpful.)

Monday, September 9, 2019

Damni Dhokla

So far in the series,
Malaadu / Hurigadale Unde
Dry Gulab Jamun
Coconut Burfi / Kobbari Mithai
Almond Halwa / Badam Halwa
Elaneer Payasam
Godhuma Sojjappalu

It's time for snacks after last week's overdose of sweets.This is the second week of mega marathon where six savory snacks' recipes from one particular state need to be posted. I chose to go with Gujarat, simply because it is the land of farsaans but decided to stick with some light snacks. The first one in the series is 'Damni dhokla', that can be loosely translated as a savory steamed cake made with fermented rice, millet and lentil batter. These dhoklas seem to come from the southern part of Gujarat and is not a well known one in the other regions.

'Dhokla' is the most popular snack from Gujarat, even outside the region. There is khaman dhokla - an instant version which is the most common, yellow hued one made with chickpea flour, khatta dhokla / white dhokla made with rice and split black gram, idra - prepared using idli batter, vateli dal na khaman using batter made with Bengal gram / chana dal. And of course there are other new versions like corn dhokla, semolina dhokla,  poha dhokla, sandwich dhokla and so on. Dhokla can be a breakfast, tea time snack or even pass as a light meal.

Other dhokla recipes posted here.
Corn dhokla
Khaman
Live dhokla
Microwave dhokla
Nylon khaman dhokla sandwich
Poha dhokla
Sandwich dhokla
White dhokla

This damni dhokla has been on my 'to do' list ever since I saw it on Tarla Dalal's site and this seemed to be a right time to try it. Damni dhoklas are traditionally made in cones, fashioned using almond or banana leaves which would impart their aroma to dhoklas and I was particularly attracted to the cone shaped individual dhokla pieces. I have seen my paternal grandmother using almond leaves from her backyard tree stitching plates to eat in but I wasn't sure that I could make leak proof leaf cones even if I could procure them. And so, I chose to make them in individual cups though they could be made in a regular dhokla pan or any deep rimmed plate. 

This dhokla is not an instant version but needs some advance preparation. The dals and rice are washed, dried and coarsely grind to use in the recipe. The mix can be prepared in large quantities by sending the ingredients to a flour mill or a store bought mix can be used instead. I chose to soak and coarsely ground the ingredients into a batter. The batter needs to ferment before usage and the fermenting time may depend on weather, ranging anywhere between from 4 hours to overnight. The black chickpeas are soaked overnight, cooked and added to the batter as well. Methia keri sambhaar, the traditional Gujarat pickle masala is also an interesting addition to the batter. I prepared a small quantity of that masala at home. However in lieu of it, masala from any pickle jar should work fine too or can be left out from the recipe. The sweet - spicy flavors are subtle in this dhokla and they went well with a sweet chutney. These dhoklas do not need any tempering or garnishing but I did them anyway.

Ingredients for dhoklas:
2 tbsp. chanadal (split Bengal gram)
2 tbsp. toor dal (pigeon peas)
2 tbsp. urad dal (split black gram)
2 tbsp. yellow moong dal (split yellow gram)
1/2 cup parboiled rice (I used idli rice.)
1/4 cup millet flour (bajra flour)
1/4 cup sour yogurt
1 tbsp. methi keri sambhar / methia no masala
1/4 to 1/2 tsp. chili powder
2 tbsp. grated jaggery
Salt to taste
2 tbsp. soaked and boiled brown chickpeas (kala chana)
1 tsp. Eno's fruit salt
6 - 8 banana leaves, cut into squares if using

Ingredients for tempering: 
2 tsp. oil
1/2 tsp. mustard seeds
1/2 tsp. white sesame seeds
Few curry leaves

Ingredients for garnishing:
Minced cilantro
shredded fresh coconut
Methi masala

Directions:
* Rinse the dals and rice thoroughly, drain and spear on a clean cloth to dry. Coarsely grind the mixture in a blender and keep aside. Add sour yogurt and about 1/4 cup water and mix well to make a thick batter. 
Or 
Rinse and soak rice and dals in water for about 4 hours. Drain and grind the mixture coarsely adding yogurt and 1/4 cup water. (My batter became runny with this much quantity of liquid and I added some millet flour to thicken it. I wasn't sure whether more liquid is needed to mix the dry ingredients compared to the ground batter or the batter was supposed to be loose. In case if you don't want to use millet flour for some reason, add water only if and as needed. The batter should not be runny as pancake batter.)
* Allow it ferment for about 4 - 6 hours. The batter didn't rise as idli / dosa batters would. (I had to ferment overnight.)
* Add methia keri sambhaar, jaggery, chili powder and salt and mix well. I added some turmeric powder and boiled chickpeas at this point.

* Heat the steamer / cooker base with water to steam. Add fruit salt and 2 tsp. water over the batter, just before steaming.

* Mix gently when the bubbles form and keep aside.
* Grease a dhokla plate or cups if using.  If using leaves, roll each leaf into a cone and secure the edges with a tooth pick. Add some boiled chickpeas in each cone and pour batter over them. 
* Pour the batter and steam until a tooth pick inserted at the center comes out clean.
* Meanwhile, heat oil for tempering and add mustard seeds, sesame seeds and curry leaves. When mustard seeds start to pop, turn off the heat. Pour them over steamed dhokla evenly.
* Garnish with coconut, cilantro and a pinch of methi keri masala on each piece just before serving. 
* Serve them hot. I served them with sweet chutney.


Check out the Blogging Marathon page for the other Blogging Marathoners doing BM#104.
You are invited to the Inlinkz link party!
Click here to enter

Comments

Monday, February 4, 2019

Spicy Bajra Biscuits / Spicy Millet Flour Cookies (Gluten Free, Vegan Baking)

Theme: Paleo / Vegan / Gluten-Free Recipes

Vaishali posted bajra biscuits some weeks ago and I had to try them for two reasons. We are on the millet wagon for quite sometime now and so needless to say that I keep looking for new ways to include millet in our daily diet. Any interesting recipe that catches my attention gets cooked immediately in my kitchen. The second reason being my husband who enjoys spicier biscuits / cookies to go along with his coffee / tea. 

I made them along the lines of a khara biscuit, on a spicier side to suit his taste buds. Thanks to Vaishali, we enjoyed these healthy and flavorful biscuits. These millet flour based biscuits are gluten free, vegan (free of eggs and dairy) and in a nutshell, guilt free. The flavors can be customized according to one's preferences. If looking for spicier cookies, my chickpea flour cookies and khara biscuits may interest you.
Ingredients: 
1 cup millet flour / bajra flour
1 tsp. ginger - green chilli paste
2 pinches of asafoetida
Salt to taste (I used a little over 3/4 tsp. salt.)
1 tbsp. finely minced curry leaves 
1 tbsp. cilantro
2 tbsp. oil
1/4 cup warm water

Directions:
* Grease or line a baking sheet. Also grease two plastic sheets on one side each. Or cut open a ziplock bag on sides so that you would end up with a large rectangle sheet and grease on one side and keep it aside.
* Preheat the oven to 300 deg F / 150 deg C.
* Combine all the ingredients except oil and water in a mixing bowl. In case you can not paste the ginger and chillies, just run them in a food processor along with the flour. Add oil and rub into the mixture. Next add water in small increments and mix until a dough is formed. Add a tsp. or two extra water if needed.
* Divide the mixture into two portions. Place one of the dough balls between two greased plastic sheets. (Or on one side of the greased ziploc sheet and fold the other end over it). Roll the dough into 1/8 inch thick circle.

* Cut the dough into desired shapes using cookie cutters and prick them all over with a fork. 
* Place the cut biscuits on the prepared baking sheet and bake them until golden brown and crisp. (Vaishali recommended about 15 minutes of baking. My biscuits were 1/4 inch thick ones and so I had to bake for about 25 minutes flipping them in between since they were not browning. I left them in the oven few extra minutes after the oven was turned off. I went with checking the crispiness rather than the color for these biscuits to see if they were done. 
* Cool and save them in an airtight container. Serve them with coffee or tea.

Notes:
* The biscuits pictured here are 1/4 inch thick ones. 1/8 inch thickness gives crispy biscuits while 1/4 inch thick ones gives flaky and crumbly kind ones. We liked both but I would recommend 1/8 inch thick ones if not finishing them immediately. 1/4 inch thick ones kind of lost some of the crispiness the next day. 
* I used a 1.5 inch size diamond shaped cookie cutter and got around 30 biscuits of 1/4 inch thickness. One can make them into thin, big circles.

bmlogo

Comments