HOME        |        ABOUT        |        COPYRIGHT        |        CONTACT        |         RECIPE INDEX        |         INDIAN THAALIS        |         MILLET RECIPES        |        EVENTS' ROUNDUP        

Showing posts with label South Indian Main Dishes. Show all posts

Wednesday, March 11, 2020

A - Z Karnataka Recipe Series ~ H For Hitakida Bele Huli


So far in my A - Z Karnataka Series
A - Akki Halbai
B - Biscuit Roti
C - Congress Kadalekayi
D - Davanagere Benne Dose
E - Ellu Pajji
F - Field Beans / Avarekalu Payasa
G - Girmit

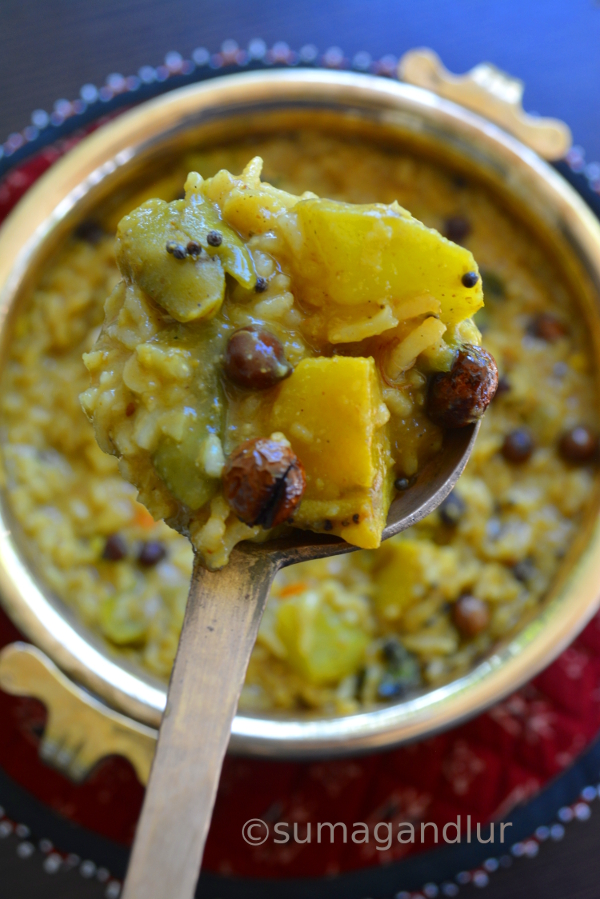
H for hitakida bele hili or saaru. Hitakida bele huli / saaru is one of the classic dishes of Karnataka cuisine and any series on Karnataka food would be incomplete without it. Avarekalu or fresh hyacinth beans is a winter crop and an integral part of Karnataka cuisine. These beans' based dishes dominate the meal menus especially in Bangalore - Mysore region households during the season.   

Thanks to my sister in law who comes from a Kannadiga family, my 'H' recipe was ready even before I thought about doing this Karnataka food series. She had prepared a couple of dishes from the state during our last India trip, which had those star ingredients that I couldn't have sourced locally. I could present this popular and delicious dish only because of her. This huli was cooked and clicked in her kitchen and is her mother's recipe. 

'Hitakida bele' literally means skinned beans. The term huli / saaru usually refer to the gravy based bean / lentil / dal dishes. As the name of the dish indicates, hitakida bele / skinned fresh field beans are the star of the dish and lentils of any kind are not used in this preparation. The beans are first sauteed lightly in ghee to get rid of their smell and then cooked with a spicy paste made with toasted and ground ingredients like coconut, chilles, coriander and Bengal gram. This paste forms the base and gives the thickness to this yummy and flavorful gravy. This recipe has only a simple seasoning of mustard seeds, not even curry leaves or asafoetida. 

Ingredients for grinding:
2 tsp. oil
1 tbsp. Bengal gram / chana dal / kadale bele
1 tsp. rice / akki
1/2 tsp. poppy seeds / gasagase
1/2 tbsp. coriander seeds / dhaniya
4 dried red chillies or adjust as needed
1/4 cup or a little more grated dry coconut
Other ingredients:
2 tsp. ghee
1 cup hitakida avarekalu / skinned fresh field beans / hyacinth beans
Salt to taste
1 tsp. oil
1/2 tsp. mustard seeds

Directions:
* Heat oil in a small and add Bengal gram and rice. When the Bengal gram starts to change color, add coriander seeds, poppy seeds, chillies and coconut. Saute until coriander starts to change color. Turn off the stove and let the ingredients cool. Grind the ingredients in a blender adding water as needed. (We had prepared more dal and so the paste quantity was more as well.)

* Add ghee to the same pan and add the beans. Saute them for a minute or so. Add water as needed and cook until they turn tender. (It will not take much time for the beans to cook but the beans should not turn mushy. Below is the picture of hitakida bele.)

* Add the ground paste and salt to the pan. Add water to the required consistency and bring the mixture to a boil. Lower the heat and cook for about 5 to 6 minutes and turn off the stove.
* Heat a tsp. of oil and add mustard seeds. When they start to splutter, remove and add it to the cooked beans mixture and stir well.

* Serve warm with rice.   

Notes:
1. The quantity of coriander seeds can be altered according to one's taste preference. It can be increased to about a tbsp. in the recipe but the flavor of the final dish would be stronger.
2. A combination of spicy and Byadagi chilli varieties can be used for color.
3. Onion and tomato can be sauteed and added while grinding the other ingredients.
4. Some versions use tamarind and jaggery in the recipe. 
 

Friday, January 25, 2019

Moongdal - Green Mango Rasam / Pesarapappu - Mamidikaya Chaaru

Chaaru / Rasam / Saaru whatever the regional name maybe, happens to be a staple dish in south Indian cooking and is a thin, spicy lentil broth served with rice. It is served in many homes for every lunch / dinner and considered a comfort dish by many. It aids in digestion and is light enough to serve even to the sick. The classic and the most common rasam uses the pigeon peas - tomato combo. Or lemon juice in lieu of tomato. There are different variations nowadays in the rasam preparations and I happened to see this one on a television cooking program. Rasam powder aka the spice powder used to prepare rasam is a pantry staple in south Indian homes and if you have rasam powder (either homemade or store bought - I would recommend MTR brand) handy, the preparation becomes a simple and easy one.

I prepare rasam / chaaru on a regular basis in my home though I don't have the basic rasam recipe posted here on my blog so far. I am quite good at rasam preparation while not being so in  photographing it. I admit it without any embarrassment that my 'rasam' photographs usually don't do justice to the dish itself.  I see many bloggers beautifully capturing rasam in their images. In my case, all the good stuff sinks to the bottom including the tempering and clear liquid topped with drops of grease remains to be captured and I usually give up. I wasn't happy with today's image too but the green mango rasam is so flavorful that I could not let go without posting it.

Ingredients:
1/4 cup moong dal / skinned, split green gram
1/8 tsp. ground turmeric
3/4 tsp. salt or as needed
1 and 1/2 cups water
1 tbsp. finely minced cilantro
Ingredients to toast and grind:
1/4 tsp. pepper corns
1/2 tsp cumin seeds
1.5 tsp. coriander seeds
or
1 tsp. homemade or store bought rasam powder
Ingredients for tempering:
1 tsp. ghee / oil
1/2 tsp. mustard seeds
1/2 tsp. cumin seeds
2 dried red chillies, broken into bits
2 green chillies, sliced lengthwise
6 - 8 curry leaves
A pinch of asafoetida powder
1/4 cup grated green mango 

Directions:
* Wash and rinse the moong dal in two exchanges of water and drain. Pressure cook moong dal adding 1/2 cup of water and ground turmeric for 3 whistles. (At this stage, one can also add mango pieces along with dal and cook instead of grating and frying later). When the valve pressure is gone, finely mash the dal and mangoes (if used) with the back of a ladle and keep aside.
* Meanwhile, toast pepper corns, cumin and coriander seeds without burning them. Let cool and grind fine. (Skip the step if you have rasam powder.)
* Heat oil / ghee in a pan / pot and add mustard seeds and cumin seeds. When mustard seeds starts to splutter add red chillies, green chillies and curry leaves and saute for a few seconds. Next add asafoetida powder and grated mango (in case if you haven't pressure cooked green mango in the first step.). Fry for few minutes on low flame until the mango appears cooked. Then add pureed moong dal, salt, ground spices (or rasam powder), minced cilantro and about 1.5 cups of water (or as needed to get the desired consistency.) Taste and adjust the seasonings if needed. Bring the mixture to a boil and turn off the stove.
* Serve piping hot rasam with rice and dollop of ghee or as a part of a south Indian meal.

Notes:
* I usually don't use green or red chillies in a rasam recipe since the red chillies and black pepper used in my rasam powder lend enough spicy kick. However I used MTR rasam powder while preparing this rasam and recommend the usage of red chillies and mildly spiced green chillies unless if the rasam powder being used is very spicy by itself. The sourness from the green mango cuts down the spicy level. 
* The mango can be cut into pieces and cooked (and then mashed) along with moong dal if desired instead of grating and frying later.
* Basically I use the same ingredients to prepare my own rasam powder but not in the same ratio. The recipe link to my rasam powder is given below.

Other Rasam recipes posted here.
Carrot Rasam
Drumstick Rasam
Pineapple Rasam
Rasam Powder / Charu podi

This goes to Blogging Marathon under 'Bookmarked Recipes' Theme.

bmlogo  

Comments

Monday, December 12, 2016

Lemon Rice / Nimmakaaya Pulihora / Nimbekaayi Chitranna

This lemon rice was a part of the south Indian festival thaali I posted last month. My mother used to prepare lemon rice only once or twice in a year on a festival day and so, even the simple lemon rice was a special one to us while growing up. Later on, I entered a family where lemon rice was 'The designated festival rice' and the younger generation's immediate option whenever there was leftover rice. My husband still thinks that the lemon rice and potato curry are the ultimate combo on a festive day. No wonder considering that the lemon rice is one of the popular rice dishes from south India and is a quick one to prepare.

The preparation of lemon rice is quite a simple one and it is the most fuss-free dish compared to the other traditional rice options out there. The sour and spicy flavors are well balanced in the dish where as the addition of curry leaves and asafoetida make the rice flavorful. Peanuts and dals add a nice crunch and a welcome texture to the dish. It takes about five minutes to prepare the lemon rice if the rice is handy and so, it is a suitable dish both for festive occasions or impromptu/lazy meals. I always held myself back from posting a recipe for lemon rice considering that it is a basic recipe, from a south Indian perspective. However my Gujarati neighbors who ate my lemon rice a few years ago always keep praising it and ask for the tips to master it. This recipe is for those who are not familiar with the rice preparation and novices.

Ingredients: (4 servings)
1 cup rice (I used sona masuri.)
1 - 2 tbsp. oil
2 tbsp. peanuts
1 tbsp. chana dal / split chickpeas
1 tsp. urad dal /skinned and split black lentil
1 tsp. mustard seeds
3 chopped green chillies or 5 - 6 dried red chillies, broken into pieces *
1 stalk of curry leaves
1/8 tsp. turmeric powder
a few pinches of asafoetida powder
Salt to taste
3 to 4 tbsp. lemon / lime juice (Adjust depending upon the sourness of the lemon juice.)
Minced cilantro to garnish (optional)
* A combo of both green and red chillies can be used too. The number of chillies in the recipe can be adjusted according to one's preferred spice levels.

Method:
* Wash the rice in two exchanges of water and drain completely. Pressure cook the rice adding 1 & 3/4 cups of water. (Add 2 cups of water if using a rice cooker.) When the rice is done, spread it on a wide plate and fluff the rice. Or let the rice sit for a while before using.
* Once the rice is ready, heat oil in a pan / kadai. Add peanuts, chana dal, urad dal and mustard seeds. When mustard seeds start to sizzle and pop and the dals start to turn reddish, add chillies and saute for few seconds. Next add curry leaves, turmeric and asafoetida. Stir once and turn off the stove.
* Add rice, salt and lemon / lime juice and mix well. Taste the rice and adjust the salt or the lemon juice if needed. 
* Let the rice sit for at least 15 - 30 minutes for the flavors to develop. 
* It can be served on it's own or serve some papad / chips along with it.

Notes:
1. Salt and lemon flavors tone down a bit after the resting period and so add those ingredients accordingly or taste the rice again after 30 minutes and adjust the quantities. 
2. In case if the lemon rice turns out too salty / too sour just add some more rice and mix well to combine.
3. Bottled lemon juice can be substituted for the fresh juice.

Comments

Thursday, September 15, 2016

M for Mamidikaaya - Kobbari Pulihora / Green Mango - Coconut Rice


In spite of the heat and the inconvenience of power cuts, there are people like my mother who look forward to Indian summers which promise to bring an abundant supply of mangoes and jasmine flowers in the markets. Mango is an enticing fruit to many across the sub continent and both green and ripened ones are in high demand and supply for the few months they are available. The ripened mangoes are eaten as it is or used to whip up some delicious drinks and desserts while the green ones go into the preparation of variety of pickles/instant chutneys, stews or into a simple yet delicious rice dish like the one that is featured here today. 

A green mango pulihora is the main attraction of a Ugadi menu at my mother's place since it is the time when the green mangoes start appearing around the block each season. I have just followed my mother's recipe here, throwing in some fresh shredded coconut which adds a delicious flavor layer to the already tasty dish. If you are a coconut lover and tried this one, you would never probably going to skip the addition of coconut in this dish. There is a mango rice version where coconut and spices are ground and sauteed but I prefer to just add the plain coconut. This one makes a quick and easy to prepare rice dish for beginners that is fit to serve as a lunch box item or as a part of a festive meal.
Ingredients: (3 to 4 servings)
3 cups cooked rice *
3 to 4 tsp. oil
A handful of peanuts
1 tsp. split chickpeas / chana dal
1 tsp. black gram / urad dal
1 tsp. mustard seeds
2 dried red chillies, broken into bits
2 green chillies, sliced lengthwise / chopped fine
1 sprig of curry leaves
1/8 tsp. turmeric powder
2 pinches of asafoetida powder
Salt o taste
1 cup peeled and grated green mango
1/2 cup grated, fresh / frozen coconut (Thaw before if using frozen coconut.)
* Use south Indian style medium grain rice like sona masuri

Method:
* Spread the cooked rice on a wide plate, breaking any rice lumps if present with a spatula. Keep it aside for few minutes to cool.
* Heat oil in a wide pan and add peanuts, red chillies, split chick peas, black gram and mustard seeds in that order. When the peanuts turn golden brown, add green chillies, curry leaves and saute for few seconds.
* Next add turmeric, asafoetida, grated mango, coconut and salt. Saute for 3 to 4 minutes and then add the cooked rice. Mix well, breaking any rice lumps if present. Turn off the stove and serve the rice warm with fried papad or wadis or chips.

Recipes so far in A - Z Rice Dishes,
A for Achaari Chole Pulao
B for Bhuna Khichuri
C for Chintapandu Pulihora
D for Dindigul Thalapakatti Veg Biryani
E for Ellorai / Ellotharai  
F for Fodnicha Bhaat 
G for Gongura Pulihora 
H for Hare Moong ki Chaaswaali Khichdi 
I for Iyengar Style Kadambam 
J for Jodhpuri Vegetable Pulao 
K for Kaju - Karivepaku Annam 
L for Lilva Khichdi

Check out the Blogging Marathon page for the other Blogging Marathoners doing BM# 68.
An InLinkz Link-up

Saturday, September 10, 2016

A - Z Rice Dishes ~ I for Iyengar Style Kadambam

Today, it's time for kadambam, a traditional rice dish that literally tastes divine. Kadambam, in Tamil can be referred to as a medley of similar things though a strand/garland made with a mixture of aromatic flowers is commonly referred to as so. Here in culinary terms, a kadambam is a medley of rice, lentils and vegetables cooked with flavorful spices, steamed lentil balls and fried sun-dried berries. According to the source recipe, this dish happens to be a specialty of Iyengar community and this is a famous prasadam served in Perumal temples across the state. Though on-set, this kadambam sounds similar to sambhar saadam or kadhamba saadam, it is not the case. A kadambam dish makes use of country vegetables like ash gourd, pumpkin, plantain, flat beans and others. Onion, garlic, cilantro, whole spices like cinnamon & cloves, non-local vegetables like carrot, beans, potatoes are all avoided in this recipe. 

The recipe has a long list of ingredients and comes across as a tedious one though apart from the paruppu urundai preparation which takes a little extra time, the dish is not that difficult to put together. The fried sun dried berries, sundakkai add a nice crunch to the dish and paruppu urundai are an interesting addition..
Source: Here
Ingredients to grind:
1 tsp. oil
3 tbsp. coriander seeds
2 tsp. split chick peas / Bengal gram
2 tsp. black gram / urad dal
1/4 tsp. fenugreek seeds / methi seeds
1/2 tsp. peppercorns
2 dried red chiilies
2 tbsp. grated coconut
1/8 tsp. asafoetida powder
Ingredients for paruppu urundai:
1/2 cup toor dal / lentils
2 dried red chillies
Salt to taste
2 tbsp. oil 
Ingredients for kadambam:
1 tbsp. dry sundakkai
1 cup rice
1/2 cup toor dal
3 cups mixed vegetables cut into big pieces (vegetables like ash gourd, broad beans, cluster beans, pumpkin and plantain)
1 tbsp. black garbanzo beans / kala chana
A lemon sized ball of tamarind
1/8 tsp. turmeric powder
1 tbsp. + 1 tsp. sesame oil
Salt to taste
Ingredients for tempering:
1 tsp. ghee
2 dry red chillies
1/4 tsp. mustard seeds
A sprig of curry leaves

Prep work: 
* Soak black garbanzo beans overnight.
* Soak tamarind in water for about 30 minutes. Extract pulp from the tamarind. 
* Heat a tsp. oil and toast all the ingredients except coconut under the list 'to grind' until light brown. Add coconut next and fry until it changes color. Let cool and grind finely.

Method:
* For paruppu urundai, soak lentils and red chilies in water for an hour. Drain the water and grind to a coarse paste adding salt. Heat oil, add this paste and saute well until the color changes. Shape into big marble sized balls and steam cook until done. Keep them aside.
* Heat a tsp. of ghee and fry sundakkais until dark brown.
* Wash rice and toor dal thoroughly with water and drain. Pressure cook rice, toor dal and black garbanzo adding 3 cups of water. When the valve pressure is gone, remove the lid, mash the cooked mixture well and keep aside.
* Meanwhile, cook vegetables adding about a cup water, a tbsp. of oil and turmeric in a pan, until almost done. Next add tamarind and cook until the raw smell of tamarind leaves. Now add the cooked rice and lentils mixture, paruppu urundai, sundakkais, ground spice powder and salt to the pan. Mix well with a ladle thoroughly so that there are not any lumps. Add any extra water if needed to reach the desired consistency and cook for about another five minutes, stirring frequently.
* Heat a tsp. ghee for tempering in a small pan. Add mustard seeds, red chillies and curry leaves. When the mustard seeds start to splutter, turn off the stove and add this tempering to the above rice, kadambam.
* Finally add a tsp.of raw sesame oil to the kadambam and mix well.
* Serve with papad / wadis.

Recipes so far in A - Z Rice Dishes,
A for Achaari Chole Pulao
B for Bhuna Khichuri
C for Chintapandu Pulihora
D for Dindigul Thalapakatti Veg Biryani
E for Ellorai / Ellotharai  
F for Fodnicha Bhaat 
G for Gongura Pulihora 
H for Hare Moong ki Chaaswaali Khichdi

Check out the Blogging Marathon page for the other Blogging Marathoners doing BM# 68.

Thursday, September 8, 2016

A - Z Rice Dishes ~ G for Gongura Pulihora / Spicy & Tangy Sorrel Rice


There are traditional recipes that are carried through generations in families and there are spin-offs with little twists given to the older ones by creative minds. Today's dish gongura pulihora falls in the latter category. Chintapandu pulihora (tamarind rice), nimmakaaya pulihora (lemon rice), mamidi kaaya pulihora (green mango rice) and dabbakaaya pulihora (I guess the English name for the citrus fruit used in the preparation is pomelo) used to be the most commonly prepared pulihoras in Andhra. I have been noticing a wide variety of pulihoras these days on TV cook shows, that were unheard of until a few years back. That's how I ended up hearing about gongura pulihora a while ago though I didn't give a second thought about it until later when it started doing the rounds on several blogs. 

I happened to see this particular gongura pulihora recipe on Pavani's blog a few years ago and have tried it several times over the period though I did not get to post it until now. The pulihora is really delicious and makes a quick alternative to the tamarind rice. My recipe is on the spicier side and Pavani's would be perfect for those who do not prefer very spicy rice.
Ingredients to grind:
2 cups chopped gongura / sorrel leaves
2 tbsp. tamarind puree (I added 3 tbsp.)
3 red chillies

Ingredients for pulihora:
3.5 cups cooked rice (preferably sona masuri style medium grained rice)
2 to 3 tbsp. oil
2 tbsp. peanuts
1 tsp. split chick peas / chana dal
1 tsp. black gram / urad dal
1 tsp. mustard seeds
2 red chilies
1 green chili
Few curry leaves
A few pinches of asafoetida powder
1/8 tsp. turmeric powder
Salt to taste

Method: 
* Cook rice such that each granule stands apart. Don't cook the rice mushy. Spread it on a wide plate.
* Grind the ingredients under 'to grind' smoothly, adding few tsp. of water if needed.
 
* Heat oil in a wide pan or a kadai. Add peanuts, dals and mustard seeds. Fry until dals turn light brownish and add the chillies, asafoetida, turmeric and curry leaves. 
 
 * Now add the ground paste and salt to the pan and stir.
 
* Cook the mixture on low flame until the raw smell of gongura leaves, about 4 -5 minutes. 
 
* Turn off the stove and transfer this mixture to the rice plate or transfer the rice to the pan. Mix gently to combine. 

Recipes so far in A - Z Rice Dishes,
A for Achaari Chole Pulao
B for Bhuna Khichuri
C for Chintapandu Pulihora
D for Dindigul Thalapakatti Veg Biryani
E for Ellorai / Ellotharai  
F for Fodnicha Bhaat


Check out the Blogging Marathon page for the other Blogging Marathoners doing BM# 68.


Saturday, September 3, 2016

Rice Dishes ~ C for Chintapandu Pulihora / Andhra Style Tamarind Rice


It's time for the alphabet 'C' and time for the most traditional dish of my A - Z Rice series. I didn't have to think twice for the letter 'C' since this 'chintapandu pulihora' post has been long due on my blog. Chintapandu pulihora aka the tamarind rice has a significant place in Andhra cooking or south Indian cooking for that matter. Whether you call it pulihora / puliyogare / puliyodarai depending upon which part of south India you are from, this classic dish steals the limelight among the traditional rice recipes. It appears on every menu associated with auspicious occasions and festive meals. It is one of the preferred and common neivedyams (food offering to Gods) offered at hindu temples and distributed as prasadam (the neivedyam distributed among devotees). It is also one of the commonly carried items for picnics and long distance travels since it doesn't get spoiled for at least a couple of days even without refrigeration.

The word 'puliohora' literally means a sour dish, the word 'puli' coming from 'pulupu' which means sour in Telugu. The traditional version of pulihoras are made using tamarind / lemon or mango though some just refer to the tamarind rice as pulihora. The version I am posting today is a pretty common one in Andhra brahmin households though there are versions with the addition of powdered sesame seeds / mustard seeds.
 
My maternal grandmother used to make a superb pulihora and till date I haven't eaten a version that at least came closer to hers, in terms of taste and flavors. Neither my mother nor my aunts have been able to replicate her pulihora taste though they are all considered wonderful cooks and make good pulihoras. My version is usually good, better than the most of the versions sold across the temples in U.S., according to my family. I have learnt from experience that though a pulihora recipe is simple and straight forward, balancing the flavors is the most important aspect in the preparation of tamarind rice and a few trials go in mastering the recipe. It is hard to exactly give the right measurements since tamarind / chillies / jaggery from one batch to another do not taste the same and for the same reason, I held back all these years from posting a recipe. These measurements made a very good pulihora with the kind of tamarind and the very spicy variety chillies I used. And so use your discretion and the below recipe can be used as a guideline. Taste the gojju / pulihora if needed during preparation. The gojju can be prepared in advance and stored for weeks. It is convenient to have it handy when preparing a quick or impromptu meal.

Ingredients for 8 - 10 servings:
5 to 6 cups cooked rice *
1 cup tamarind puree 

3 to 4 tbsp. oil 
3 dried red chilies
1/2 cup peanuts
2 tbsp. chanadal / split chickpeas
1 tbsp. urad dal / black gram
1 tsp. mustard seeds
3 to 4 green chilies, slit lengthwise (I used medium sized, Serrnao peppers)
1 - 2 sprig of curry leaves
1/2 tsp. turmeric powder
1/8 tsp. asafoetida powder
2 tbsp. powdered jaggery (or adjust as needed)
2 tsp. salt approximately or as per taste


* - A medium grained south Indian variety white rice such as sona masuri
 
Method:
* Heat oil in a kadai or preferably a non stick pan. Add red chillies, peanuts, split chick peas, black gram and mustard seeds in that order. Stir and when peanuts appear golden brown, add green chillies and saute for few seconds.
* Next add curry leaves, turmeric powder and asafoetida powder. Stir for few seconds and pour the tamarind puree into the pan.
* Cook the mixture until it thickens, with intermittent stirring. Stay near the stove at the final stages since the mixture may stick to the pan and burn, especially when not using a non stick pan. Add salt and jaggery and stir until they combine. Turn off the stove and let the mixture cool.
 

* This paste can be used immediately at this point or can be stored for later use. The mixture stays good even if left outside on a counter for few days but to be on a safer side, let it be refrigerated.
* Meanwhile, spread the rice on a wide plate. (My mother sprinkles turmeric powder on the rice and pours the cooked paste over it, instead of adding turmeric in the seasoning.) Add the cooked paste to the rice and mix well. Let it sit for few minutes for the flavors to develop. Taste and add if any extra salt is needed. Extra rice can be added if the pulihora seems spicy.
(Cook extra rice in case. You may start with 3/4th quantity of the rice and about 3/4th of the paste to begin with so that you can taste and adjust the quantities of rice and tamarind paste to suit your tastes.)
* Serve with some papad, potato chips or wadi / vadiyalu.
 

Recipes so far in A - Z Rice Dishes,
A for Achaari Chole Pulao
B for Bhuna Khichuri
Check out the Blogging Marathon page for the other Blogging Marathoners doing BM# 68.

Tuesday, November 17, 2015

Karivepaku Annam / Curry Leaves Rice


This is a spicy rice dish that I had tried a few years back after seeing on a food blog and has been a regular in my home since, though I cannot recall the source now. The recipe is based on curry leaves and so, the rice is obviously a flavor filled one. It doesn't taste like curry leaves powder mixed with rice though both recipes use almost the same ingredients. The spice powder can be prepared ahead for a quick and yummy lunch box idea or for a lazy meal. And don't be fooled by the long list of the ingredients in the recipe. This is indeed a simple and quick dish and most of the ingredients are either ground or go into tadka /seasoning.

Ingredients:
2 cups cooked rice (I used sona masuri rice.)
Salt to taste

Ingredients to toast:  
2 tbsp. urad dal / black gram
1 tbsp. chanadal / split chickpeas
4 to 5 dried red chillies
1 tsp. tamarind
1 cup tightly packed curry leaves  
A pinch of methi seeds / fenugreek seeds
1/2 tsp. black peppercorns

Ingredients for seasoning:
2 tbsp. oil
1 tsp. mustard seeds
1 tsp. urad dal / black gram
1 tsp. chanadal / split chickpeas
A generous pinch of asafoetida
2 tbsp. cashews
1/8 tsp. turmeric powder

 
Method:
* Wash the curry leaves and pat them dry.
* Heat a pan and dry toast chana dal, urad dal, red chillies and tamarind. When the dals start to turn reddish, add peppercorns, fenugreek seeds and curry leaves. Toast them for another minute.
* Transfer them onto a plate and let cool. Grind the toasted ingredients into a coarse powder.
* Heat oil in a pan and add mustard seeds, chana dal and urad dal. When the dals almost start to turn reddish add the cashews and toast them as well to golden brown. Add asafoetida and turmeric to the pan and turn off the stove. 
* Now add the rice, spice powder and salt and mix well. Serve warm.
(If less spice level is preferred, start with adding half of the spice powder. Taste and adjust the quantity of spice powder as needed.)
  
This goes to Blogging marathon #58 under the theme 'Rice Dishes'. Check the link to see what other marathoners are cooking.

Comments

Tuesday, November 10, 2015

Aratikaaya Vepudu / Plantain Fry


I wish everyone who are celebrating Diwali, a happy, safe and fun filled one. 

Coming to this week's recipes for BM, it is going to be dry sautes that can be served with rice and/or rotis. I did not have to go looking for recipes elsewhere for this theme as I prepare vegetable dishes on a daily basis, just like the rest of the Indians do. All I had to do was pick those dishes that I haven't posted on my blog yet. The first one is going to be this crispy and yummy fry made with plantain, an absolute favorite of my family. Generally I stay away from frying vegetables but as usual there is one exception for which I keep gladly breaking the rule. And that happens to be this plantain fry, that everyone at home loves to indulge in. This is a regular fare in my mother's kitchen and in fact a commonly served dish for new mothers in our families since plantain is believed to generate heat in the body.

Ingredients: (Yield 4 servings)
2 large sized plantains
2 tbsp. oil
Salt to taste
Red chili powder to taste 
Method:
* Trim the edges and peel the plantains. Quarter each plantain lengthwise and cut crosswise into 1/4 inch thick pieces.
 
* Heat oil in a kadai or a wide non-stick pan and add the plantain pieces. Fry on medium flame, intermittently stirring / tossing the pan until they turn crisp and golden brown uniformly. 
If the plantain pieces are scorching or sticking to the bottom of the pan, then gently scrape with the spatula and lower the heat. Add extra oil if needed. The fried plantain should have an inviting crunchiness and not the rock hard texture.
* Turn off the stove and then add salt and chili powder to the fried plantain. Toss the pan to coat the plantain pieces with the spices uniformly. (One is going to end up with a coughing fit if the stove is not turned off before adding the chili powder.)
* Serve immediately with hot, steamed rice. They taste good and crisp off the pan. They go soft after a while and doesn't taste that good.
 
This goes to Blogging marathon #58 under the theme 'Dry Sautees'. Check the link to see what other marathoners are cooking.

Comments

Sunday, October 18, 2015

Goruchikkudu Kaaya - Senagapappu Koora


This is one of those typical curries that gets prepared regularly in my mother's kitchen and mine or for that matter in any south Indian kitchen. This simple and homely dish goes well with some hot steamed rice or rotis. The cluster beans in the recipe can be replaced by other vegetables like cabbage, beans, beetroot, snake gourd or bottle gourd.
 
Ingredients:
2 cups chopped goruchikkudu kayalu / cluster beans / guvar beans
3 - 4 tbsp. chanadal (Soaked in water for a couple of hours)
1/2 cup shredded, fresh coconut
Salt to taste
For tadka:
1 tbsp. oil
1 tsp. split chickpeas / chana dal
1 tsp. split black gram / urad dal
1 tsp. mustard seeds
1 tsp. cumin seeds
Few curry leaves
2 green chilies, finely chopped 
2 dried red chilies, broken into bits
1/8 tsp. turmeric powder
 
Method:
* Trim the ends and string the beans, if necessary and chop them fine. Pressure cook the beans adding a little water for 2 whistles or until cooked.
* Heat oil in a kadai or a sauté pan and add mustard seeds, chana dal, urad dal, cumin seeds and curry leaves.
* When the dals turn reddish, add the chilies and sauté for about 30 seconds. (If cluster beans are not pressure cooked in the earlier step, they can be added now and cooked on low flame directly in the sauté pan, covered.)
* Next add the cooked cluster beans, soaked chana dal, coconut, turmeric powder and salt. Stir them well and cook on low heat for about 5 minutes.
* Serve it warm along with rice / rotis.
 
This goes to blogging marathon #57 under the theme 'Side Dishes' and check here to find out what other marathoners are cooking today.

Comments