HOME        |        ABOUT        |        COPYRIGHT        |        CONTACT        |         RECIPE INDEX        |         INDIAN THAALIS        |         MILLET RECIPES        |        EVENTS' ROUNDUP        

Showing posts with label Tamarind. Show all posts

Wednesday, April 10, 2019

I for lyengar Puliyogare / Iyengar Puliyodharai

I am posting recipes this month, along with a blogging group, with a theme of 'Biryanis, Pulaos and Khichdis'. Though the main focus is on those mentioned categories, there was an option of throwing in some south Indian style rice dishes as well. The only conditions were that the dish would be a grain based one and would feature a series of either Indian or international variations. Though traditionally the themed dishes are mostly made with rice, it was decided that other healthy grains could be used as substitutes. Easy enough but my brain conveniently chose to ignore the 'grain' part though I was seeing it over and over again in the email chain discussions that were going on between the bloggers during the preparation time. I ignored the 'Iyengar puliyogare' that was on my final list and went ahead with 'Idiyappam biryani' instead, patting myself on the back for not inserting a south Indian dish to the 'Biryani / Pulao / Khichdi' series. I forgot that only grain / grits is allowed but not flour or batter.

I realized just last night while scheduling the post that it wasn't a grain based one. Valli, the BM group creator and coordinator, as usual was gracious enough to give me a green signal to go ahead with the dish since it was late for me to cook another dish but I wasn't happy with my error. However I wasn't sure either whether I would be able to click even if I cooked a dish today because of the bad weather. I even frantically looked through my drafts folders to find two rice recipes that could fit today's "I' theme by attaching a prefix of 'Instant', which I didn't want to do. However I took a chance and cooked puliyogare today and to my delight, was even able to take decent pictures in the poor light. And so here is Iyengar style puliyogare or puliyodharai for my 'I' post. 

Iyengars, a Tamil brahmin sect whether they live in Tamilnadu or Karnataka have become synonymous for their traditional recipes and bakeries through out the southern parts of India. This 'puliyodarai' as called in Tamilnadu or 'puliyogare' as called in Kannada is one such culinary delight from them. This is also called kovil puliyodarai aka temple puliyodarai alluding to the fact that it is commonly served as prasdam' (food served to devotees), in temples across south India. Any south Indian would agree that puliyodharis, sweet and savory pongals or for that matter anything that served in temples taste special. Divine touch, perhaps.

When cooked by experts, a simple tamarind rice transforms into an exceptional and hearty meal, infused with a fine balance of flavors. Tamarind rice is a classic rice preparation, popular throughout the southern parts of India and reserved even for festive and wedding meals. A spicy paste of tamarind puree is cooked along with seasonings and tempering which is called pulikachal or gojju and then mixed with rice in any tamarind rice preparation. However there are subtle variations between a standard tamarind rice and this Iyengar version. A ground mixture of lentils and spices is added to the Iyengar version which sets it apart from the standard version and makes it more delicious. One of my mother's neighbors of 3 decades or over are Iyengars from Hassan and I remember my mother learning this style of puliyogare from the mother in law of the family, who happens to be a gem of a lady. One of my sisters-in-law cooked one day this in our home using ground sesame seeds and sambhar powder. I loved it so much that I had noted down the proportions. I usually refer to it while preparing tamarind rice to have an approximate idea on the proportions of the ingredients being used. It comes out good each time. 

Puliyogare stays fresh for two days even without refrigeration when made with freshly cooked rice and completely cooled before packing. That's why it is one of the popular picnic or travel foods in southern India. The cooked tamarind paste aka gojju can be prepared in advance as well and stored for few months. Just take care to add enough salt while cooking, cool it down completely and store it in an airtight, non-metallic container, preferably a glass jar. Refrigerate it for longer shelf life though it can be left outside if consuming within weeks. The gojju comes handy to fix quick meals where you all need is some cooked rice or even some leftover rice to mix it with. 


Ingredients for spice powder: (Yield 1/2 cup)
1.5 tbsp. split chickpeas / chanadal
1 tbsp. split, skinned black gram / urad dal
1.5 tbsp. coriander seeds
4 byadagi chillies or mild ones
3 spicy variety like Guntur red chilies
A pinch of fenugreek seeds
1 tsp. white sesame seeds

Ingredients for tamarind paste and tamarind rice:
8 cups of cooked rice 
100 gm / 3.5 oz / about 1/2 cup tamarind
5 tbsp. sesame oil (Substitute with peanut / canola oil.)
1/4 cup peanuts
1 tsp. mustard seeds
1 tsp. split chickpeas / chana dal 
1 tsp. skinned blackgram / urad dal (optional)
2 dried red chillies, each broken into 2 or 3 pieces
1 tsp. black sesame seeds
2 sprigs of curry leaves 
2 pinches of asafoetida powder
1/4 tsp. turmeric powder 
About 2 tsp. salt (I added a little more but adjust as needed.)
1/4 cup spice powder
1/4 tsp. mild red chili powder (Optional. I used about 1/2 tsp.)
2 Tbsp. jaggery powder or as needed (I added 5 stevia packets.)

Notes:
1. Some add peppercorns in the spice powder but I don't. If using black pepper, skip chili powder from the recipe.
2. Adding sesame seeds in the tempering is optional but you usually see them in Karnataka style tamarind rices.
3. Skip or reduce chili powder if you prefer mildly spicy food. Then the other seasonings may need slight adjustments as well. if you don't prefer adding chili powder but prefer heat, increase the quantity of red chilies in tempering.
4. For quick fix, add a tsp. of ground white sesame seeds and 1 to 2 heaped tbsp. of homemade sambhar powder instead of spice powder.
5. The spice powder can be used to prepare the tamarind paste recipe two times. There will be therefore some leftover powder. Store it in an airtight container. Or halve the spice powder recipe if using it for one time tamarind rice preparation.
6. The tempering of peanuts and dals can be added later (if preferred) instead of adding first while preparing the tamarind paste, which keeps the tempering crunchy. 

Directions:
* Pressure cook south Indian style rice like sona masuri. When the valve pressure is gone, let it sit for few minutes. Remove the cooker lid and spread the rice in a wide plate / pot and keep it aside to cool. 
* Usually here in US, I get 7 oz / 200 gm slabs of tamarind. I used half of it which came to about 1/2 cup.

* Place tamarind in a microwave safe bowl and pour enough water to cover the tamarind and cook for 4 to 5 minutes. Or soak it in enough water until it softens.

 * Add split chickpeas / chana dal, blackgram / urad dal and red chillies to a pan. Toast until the dals start to change color. Add coriander seeds, fenugreek seeds and sesame seeds and toast until coriander seeds start to brown. Turn off the stove.

* Let them cool and grind finely in a small blender / spice grinder. 
* Remove the seeds from cooked tamarind and run through a blender if preferred. (I don't usually don't do it.) Run the mixture through a sieve and collect the puree. 

* Add a few tbsp. of water if needed, to extract the puree. Don't add too much water, We need about a cup of thick puree for this recipe not watery one. Refrigerate any extra puree or throw away the residue of strings and pith if no more puree can be extracted.

* Heat oil in a pan on medium flame, preferably a non-stick one to prevent the mixture from sticking to the bottom of the pan and to avoid constant stirring. Add peanuts, mustard seeds, split chickpeas / chana dal, split black gram / urad dal, and red chilies to the hot oil. Keep stirring and when the dals start to change color to light brown, add sesame seeds, curry leaves, turmeric and asafoetida and stir for about 10 seconds.

* Add the tamarind puree, cover and cook for about 10 minutes, stirring intermittently. Keep an eye on the cooking tamarind paste, especially if not using a non stick pan.

* Next add salt, chili powder, spice powder and jaggery / sweetener and mix well. Cover and cook the mixture, stirring intermittently. The mixture splutters everywhere while cooking and so, be sure to cover the pan. After a couple of minutes, taste the paste while cooking and adjust the seasonings if needed. Continue to cook until the mixture thickens, about 10 minutes more. 

* By the time the tamarind paste would be thicker leaving the oil separate. Don't worry about the quantity of oil. It is perfect when mixed with rice.
 * Add the cooked tamarind gojju / paste to the rice in the pan.
* Mix gently to combine the rice well so that each grain is coated evenly with the gojju. Taste and see whether salt is sufficient. If not, add salt as needed. If the puliyogare is too spicy, add some extra plain rice and mix well.


BMLogo
Check out the Blogging Marathon page for the other Blogging Marathoners doing BM#99.

Comments

Saturday, September 3, 2016

Rice Dishes ~ C for Chintapandu Pulihora / Andhra Style Tamarind Rice


It's time for the alphabet 'C' and time for the most traditional dish of my A - Z Rice series. I didn't have to think twice for the letter 'C' since this 'chintapandu pulihora' post has been long due on my blog. Chintapandu pulihora aka the tamarind rice has a significant place in Andhra cooking or south Indian cooking for that matter. Whether you call it pulihora / puliyogare / puliyodarai depending upon which part of south India you are from, this classic dish steals the limelight among the traditional rice recipes. It appears on every menu associated with auspicious occasions and festive meals. It is one of the preferred and common neivedyams (food offering to Gods) offered at hindu temples and distributed as prasadam (the neivedyam distributed among devotees). It is also one of the commonly carried items for picnics and long distance travels since it doesn't get spoiled for at least a couple of days even without refrigeration.

The word 'puliohora' literally means a sour dish, the word 'puli' coming from 'pulupu' which means sour in Telugu. The traditional version of pulihoras are made using tamarind / lemon or mango though some just refer to the tamarind rice as pulihora. The version I am posting today is a pretty common one in Andhra brahmin households though there are versions with the addition of powdered sesame seeds / mustard seeds.
 
My maternal grandmother used to make a superb pulihora and till date I haven't eaten a version that at least came closer to hers, in terms of taste and flavors. Neither my mother nor my aunts have been able to replicate her pulihora taste though they are all considered wonderful cooks and make good pulihoras. My version is usually good, better than the most of the versions sold across the temples in U.S., according to my family. I have learnt from experience that though a pulihora recipe is simple and straight forward, balancing the flavors is the most important aspect in the preparation of tamarind rice and a few trials go in mastering the recipe. It is hard to exactly give the right measurements since tamarind / chillies / jaggery from one batch to another do not taste the same and for the same reason, I held back all these years from posting a recipe. These measurements made a very good pulihora with the kind of tamarind and the very spicy variety chillies I used. And so use your discretion and the below recipe can be used as a guideline. Taste the gojju / pulihora if needed during preparation. The gojju can be prepared in advance and stored for weeks. It is convenient to have it handy when preparing a quick or impromptu meal.

Ingredients for 8 - 10 servings:
5 to 6 cups cooked rice *
1 cup tamarind puree 

3 to 4 tbsp. oil 
3 dried red chilies
1/2 cup peanuts
2 tbsp. chanadal / split chickpeas
1 tbsp. urad dal / black gram
1 tsp. mustard seeds
3 to 4 green chilies, slit lengthwise (I used medium sized, Serrnao peppers)
1 - 2 sprig of curry leaves
1/2 tsp. turmeric powder
1/8 tsp. asafoetida powder
2 tbsp. powdered jaggery (or adjust as needed)
2 tsp. salt approximately or as per taste


* - A medium grained south Indian variety white rice such as sona masuri
 
Method:
* Heat oil in a kadai or preferably a non stick pan. Add red chillies, peanuts, split chick peas, black gram and mustard seeds in that order. Stir and when peanuts appear golden brown, add green chillies and saute for few seconds.
* Next add curry leaves, turmeric powder and asafoetida powder. Stir for few seconds and pour the tamarind puree into the pan.
* Cook the mixture until it thickens, with intermittent stirring. Stay near the stove at the final stages since the mixture may stick to the pan and burn, especially when not using a non stick pan. Add salt and jaggery and stir until they combine. Turn off the stove and let the mixture cool.
 

* This paste can be used immediately at this point or can be stored for later use. The mixture stays good even if left outside on a counter for few days but to be on a safer side, let it be refrigerated.
* Meanwhile, spread the rice on a wide plate. (My mother sprinkles turmeric powder on the rice and pours the cooked paste over it, instead of adding turmeric in the seasoning.) Add the cooked paste to the rice and mix well. Let it sit for few minutes for the flavors to develop. Taste and add if any extra salt is needed. Extra rice can be added if the pulihora seems spicy.
(Cook extra rice in case. You may start with 3/4th quantity of the rice and about 3/4th of the paste to begin with so that you can taste and adjust the quantities of rice and tamarind paste to suit your tastes.)
* Serve with some papad, potato chips or wadi / vadiyalu.
 

Recipes so far in A - Z Rice Dishes,
A for Achaari Chole Pulao
B for Bhuna Khichuri
Check out the Blogging Marathon page for the other Blogging Marathoners doing BM# 68.

Wednesday, April 27, 2016

A - Z Andhra Recipes ~ W for Wadiyala Pulusu


My father was complaining about the summer heat in Bangalore last week, over a phone call. It seems that they had almost hit the mark of 40 deg C (around 104 deg F), a sort of record in the recorded meteorological history of the city. Those who live in Indian cities / towns where they experience summer season all through out the year, in varying degrees may wonder what we are grumbling about. However for the local Bangaloreans, it is nothing short of a catastrophe. The city was oncecknown for it's greenery and serene, cool climate but over the years, it gradually is tipping towards the opposite side. 

Keeping the heat woes aside, there are also some great things to look forward in the summer. It is the season when the plump and luscious mangoes and fragrant jasmine flowers show up in the markets. And it is also the time for mothers / grandmothers to start making jar loads of variety of pickles and start stocking up on year load supplies of vadiyalu, appadalu, orugulu and such sun-dried stuff. Coming up to the latter stuff, vadiyalu aka sun dried crisps are made through out India during summer months and go by regional names. Appadalu or papad are made generally using black bean and are paper thin circles. Where as orugulu (in Telugu language) are sun-dried vegetables or peels. Vadiyalu which go by regional names like wadi, sandige or vadam are sundried crisps made using legumes / rice flour / tapioca pearls / beaten rice flakes / popped rice grains and such. 
I chose to go with 'wadiyalu / vadiyalu' as the star ingredient for today's recipe. Mostly we tend to use the latter spelling when talking about these summer bounty. However 'va' and 'wa' are similar sounding in Indian context and logically speaking there is no rule that vadiyalu has to be spelt in that particular way since it is not an English word. Besides, they are called 'wadi' in several Indian languages and so, I chose to go with the word 'Wadiyalu' for today's post. And did I forget to mention why this maneuvering around the spelling? There are no ingredients or recipes in Telugu language that start with the alphabet 'W'. And a pulusu / stew prepared using wadiyalu is going to be my 'W' dish today, under the A to Z Andhra vegetarian recipe series I am doing this month.

Wadiyalu / Vadiyalu are meant to perk up any meal while some are served as a side dish for rice. Minapappu wadiyalu (Black gram / urad dal wadi) / Gummadi wadiyalu (Black gram - ash gourd ones) fall under the latter category and we eat them with rice. They are also used to make curries and stews like today's post. I have been making my own supply of vadiyalu for over a decade now and I usually have a very big box full of variety of wadiyalu / sundried chips in stock through out the year. I have been to India during the past two summers and couldn't prepare wadiyalu then. However I am looking forward for a successful summer this year, in terms of wadi making.
 
The spicy minapappu wadiyalu aka black gram ones are my most favorite ones and the fried wadis are used in making this pulusu aka spicy, sweet and tangy stew. I had only a handful of minappau wadiyalu left in my stock and so I used pesarapappu ones (moong - methi wadis) instead. If using the black gram ones, they are added to the stew just before serving since they get soggy once dropped in the stew. Here is a version of that pulusu I already posted but it is prepared using lentils. However if using moong dal ones, they are cooked along with stew since they are harder and retain their structure even after cooking. This pulusu is flavorful and comes handy when one runs out of vegetables. Besides, it takes around 10 minutes from start to finish and a simple one to prepare. However attaining a right balance of the flavors is the key. It was hard to capture the dish since wadiyalu and all the seasoning including the curry leaves kept sinking into the pulusu as it doesn't provide a thick base for the stuff to stand on. There are about 30 pieces of wadiyalu in that stew and each wadiyam that can be seen in the image is stacked on about another 3 or 4 wadiyalu. :))

Here are links for some of the dishes I mentioned above.
Minapappu vadiyalu / Black gram Wadi
Pesarapappu vadiyalu / Mungori
Sundried Potato Chips
Orugulu
Vadiyala pulusu with lentils

Ingredients: (3 servings) 
Wadiyalu / Vadiyalu *
Oil for frying + 2 tsp. oil
1 tsp. mustard seeds
1 tsp. cumin seeds
A pinch of asafoetida
Few curry leaves
1/8 tsp. turmeric powder
About 1/4 cup thick tamarind water **
2 tbsp. chickpea flour / rice flour (I used besan / chickpea flour / senaga pindi.)
1/4 tsp. chili powder (or accordingly)
Salt to taste
1 - 2 tsp. sugar / jaggery powder

* 1 cup minapappu / black gram / urad dal wadiyalu or 1/2 cup  moong / pesara pappu wadiyalu
** Soak about a big lemon sized tamarind in water until it softens or nuke the tamarind and water in a microwave for 3 minutes. Squeeze the pulp and extract thick juice.


Method:
* Heat oil and fry the wadiyalu until they turn a few shades darker. They fry very quickly and so, close attention needs to be paid not to burn them. Scoop them out using a slotted spoon and drain on paper towels.
* Add rice flour / chickpea flour and a few tbsp. of water to a small cup and make a smooth paste. (I added 2 tbsp. of toasted chickpea flour instead.) Rice flour or chickpea flour acts as the thickening agent here since lentils are not used in the recipe.
* Heat 2 tsp. oil in a sauté pan and add mustard seeds and cumin seeds. When mustard seeds start to pop, add curry leaves, asafoetida and turmeric. 
* Next add tamarind juice, jaggery powder, chili powder, salt, rice flour paste / chickpea flour and about 1&1/2 cups of water to the pan. If using moong dal wadiyalu, add them to the pan as well at this point. The quantity of chili powder used depends upon the spiciness of the wadiyalu being used. Mine were very spicy and so a little chili powder was used. 
* Mix everything with a ladle and check the consistency. It should be of pourable consistency like sambhar and if needed, add extra water. Bring the mixture to a boil. Taste and adjust the seasonings, if needed. There must be a balance between the dominant flavors of the dish. Highlighting any one flavor ruins the dish.
* Turn down the stove and simmer for a couple of minutes more.
* If using minappapu wadiyalu / black gram wadi, add them to the stew just before eating so that the crunchiness of wadiyalu is retained.
* Serve with rice and ghee. 

So far on my 'A - Z' Andhra Cuisine,
A for Alasanda Vada
B for Bellam Garelu
C for Chiyali
D for Dondakaaya Kaarapu Kaaya
E for Endu Kobbari Podi
F for Fine Biscuits 
G for Gongura - Mamidikaya Pappu
H for Halwa Holigalu
I for Idli Karam Podi
J for Janthikalu
K for Kobbari Koora
L for Lauzu
M for Matikkaaya Kaaram Koora
N for Nimmakaaya Kaaram
O for Ottotti
P for Perugu Vadalu  
Q for Qubani ka Meetha 
R for Ragi Sangati
S for Satyanarayana Vrata Prasadam
T for Theepi Dibba Rotte
U for Usirikaaya Pulihora 
V for Vankaya Kothimira Karam Koora


Check out the Blogging Marathon page for the other Blogging Marathoners doing BM# 63.


Saturday, December 17, 2011

Back to Basics ~ How to Make Tamarind Puree in a Jiffy


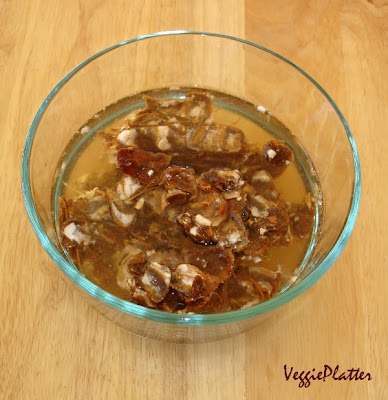
Tamarind is a pantry staple in Indian homes and like many other cultures of the world, the mature pods of this fruit are prized in Indian cuisine for their characteristic sweet-sourness. It happens to be one of the souring agents extensively used there, the others being lemon juice, kokum and amchur. It is a mandatory item, especially in south Indian cooking whose daily fare like sambhar, rasam (the lentil stews which are their main protein source) or the special rice dish "Pulihora / Puliyogare" depend on it. And so preparing  tamarind puree / thick tamarind juice from tamarind pods is such a mundane thing in Indian kitchens that I never thought of dedicating a post towards it. :) When I am doing "Preps & "Preserves" duing this week of BM#11, I however thought of recording this simple process for those who are not familiar with Indian cuisine or new to tamarind. It is a lot easier, cheaper and moreover fresher than the store bought tamarind concentrate. Somehow I think the store bought stuff turns our dishes darker and tasteless.
I grew up in a time and region in India where huge tamarind trees on either side of the roads was norm. We like many households used to buy tamarind in bulk (atleast a few kilograms) and store. I remember my mother used to avoid buying the dark colored tamarind since it lent a dark color to our pulusu / sambhars.


Now here, I have no control over the quality or color and have to shell out $2 + tax for a small block of tamarind like the one pictured above and the worst part is that it is not as much sour as I wish it to be. No wonder, I am mad each time I see and buy those tamarind blocks here. In India though the tamarind is found in free form, here the Indian grocers sell the tamarind in those compressed blocks. In USA, tamarind can be brought at Indian grocery shops or Asian / Hispanic aisles of supermarkets.
The Indian store kind tamarind is usually with fibrous membrane and seeds still present but with no shell. It therefore is easier to make the tamarind puree in a jiffy.


The tamarind needs to be soaked in water to soften the pulp for easy extraction of the puree. Removing the membranes and seeds is optional since they are discarded at the end anyway. However you wish to seperate them before soaking it in water, feel free to do so. Usually tamarind puree is prepared in Indian kitchens on a daily basis or whenever needed since usage of fresh ingredients is asserted in Indian cooking.
Usually about a lemon sized ball of tamarind is soaked in water until it softens. Add enough water so that all the tamarind is below the water surface. What I do usually is wash the tamarind, add water to it and nuke the bowl in a microwave for 2 - 3 minutes. I throw away the water used, add fresh water and rinse away the bits of shells any present.


 Let there be some water in the bowl. Now take handful of softened tamarind pulp and keep rubbing and squeezing to separate it from the membranes and the seeds. Usually Indians use only their right hands for this job. Yes that is my right hand and I learnt that day that it is not easy to take a picture with your left hand. 


As you keep rubbbing the tamarind pulp between your fingers or in your fist, the purée will seep through your fingers while the veins, seeds and membranes stay in your hand. (Usually I have the tamarind in on my four fingers and squeeze it with my thumb as in the picture.) You can just keep that veins and all that unwanted stuff aside and continue to repeat the process with the remaining pulp. Some also run the soft pulp through a sieve to filter out the puree.
You can add a little water if needed to the stuff you kept aside earlier and squeeze again to get as much puree as possible. The idea is to extract as much puree as possible. Discard the membranes, seeds and the veins.


Note:
1. The consistency of the puree depends upon the dish you are using it in. A little watery ones is fine for the sambhars / rasams while thick puree is needed for pulihora or tamarind chutneys.
2. This can be refrigerated for about 2 - 3 days and has to be dscarded after it.

Check here to know what my fellow marathoners have come up with.

Comments

Tuesday, February 15, 2011

Blogging Marathon Day 7 ~ Papdi Chaat / Papri Chaat


I have never continuously posted for a week in my four years of blogging. I go by my own slow pace and usually post around 1-3 dishes per week depending upon my moods and what I cook. There were times when I didn't post for months either because of a valid reason or due to sheer lethargy. This was indeed a mini marathon for me. Apart from a couple of recipes that were in my drafts, I cooked the rest this week during the marathon. I prefer, prepare and post simple and quick food most of the time and this marathon was no exception.
I started this blog to record our family recipes four years ago and mostly know the Indian food bloggers who had been already blogging (and sadly some who no longer are blogging) by then and those who started around the same time as me. Now there are a myriad number of talented bloggers out there that it is hard to keep track of everyone. The "Blogs I follow" list on the sidebar of my blog needs an update real badly. Thanks to Srivalli, this marathon gave me a small opportunity to connect with a few such bloggers and hopefully our relation continues in the future. :)
Now moving on to the last post of this blogging marathon, I am left with the street food theme and I am going with papdi chaat. Chaats are a family favorite and even the little finicky one at home loves it because she gets to choose the toppings of her liking. She enjoyed it with a sense of pride yesterday for being able to create her own chaat and of course, it was a onion-green chutney free version.
Like the rest of the chaat family, papdi chat is also full of flavorful layers and as the name suggests, papdi / papri is the main ingredient.
Most of the chaats have a common theme when it comes to the ingredients. The green chutney, the sweet date chutney, sev, cooked garbanzo beans, chopped onion, tomato & cilantro, yogurt are the very basic and common ingredients found in most of the chaats. If you have them ready, assume that the significant part of the job is done. The chutneys can be done ahead and refrigerated. Garbanzo beans can be cooked in a large quantity and stored in a freezer in small portions for later use. Similarly sevs, papdis can be prepared in advance and stored in airtight containers. And if you don't find time to do everything from scratch, there is always the option to buy at stores. Chutneys, sev, papdis are available at Indian grocers and canned chickpeas/yogurt box serve the purpose.
If you go by the store option, then all you have to do in this particular recipe is boiling potato cubes in a microwave, chopping the veggies, assembling the ingredients and enjoying a bowlful of flavorful chat.

What you need for this chat:
Papris / Papdis (See the recipe below.)
Sev (Recipe found here.)
Green chutney
Sweet chutney
Boiled potato cubes
Cooked garbanzo beans
Sweetened / Plain yogurt
Finely minced onion, tomato and cilantro
Chat masala for garnish (optional)


Note: I had not noted down the quantities for the chutneys and so will post the recipes next time.

Papdi / Papri Recipe:
Ingredients: (Makes about 3 dozen)
2 cups all purpose flour / maida
Salt to taste
4 tsp hot oil
Oil to fry the papdis


1. Combine the first three ingredients in a mixing bowl. Add enough water to form firm dough. If not using immediately, cover the dough.
2. Pinch off a lime sized portion and shape it into a ball. Roll it out thinly like you do for rotis, dusting with flour if necessary. Prick the rolled out dough with a fork randomly to avoid papris puffing up while frying. I rolled out a big roti and cut out small circles of about 1&1/2 inches diameter.
3. Heat enough oil for deep frying in a kadai / deep pan. When the oil is hot enough, let the stove setting be at low. Drop the dough circles into oil and fry them till they turn light golden brown on both sides. Drain them on absorbent paper towels.
4. Cool and store them in an air tight container.


Assembling the papdi chaat:
Though the chaat is conveniently eaten in a bowl, I have arranged them on a tray just to have a better look at the various layers of flavors that go into this. Also I have added the toppings in smaller quantities for photographic purposes. Be generous while serving. :))
Take a wide and deep serving bowl / plate. Place 4-5 papdis, layer each papdi with boiled potato cubes and boiled chickpeas. Next go the chutneys. Sprinkle chopped onion and tomato. Spoon sweetened yogurt. Finally finish off with sev and coriander leaves. Garnish with some chat masala if you prefer. Repeat the layers if you wish. :)


The recipes I posted in this blogging marathon under "Special Choice" theme are
1. Sweet recipe - Oats - Coconut Laddu
2. Book marked recipe - Kalkandu Sadam
3. Rice recipe - Menthya Rice
4. Kid friendly dish - The all American Mac n Cheese
5. Starters - Guilt FreeTomato Soup
6. Regional Special: Dosavakaaya 

I am sending this over to Srivalli's Kid's Delight - Street Food event.

Wednesday, May 19, 2010

Onion Gojju / Erragadda Pachipulusu


Today's recipe is a tangy, sweet stew sans beans from my grandmother's kitchen. Though the name says pachi pulusu (which means raw stew literally), there is nothing raw about it. Sauteed onions are cooked in a tangy - sweet - spicy sauce and it goes well with rice / rotis / dosas. A recipe my mother / I rely on when the refrigerator is empty or when something needs to be cooked real quickly.

Ingredients for 4 servings:
2 onions
1/4 cup tamarind pulp/juice (The quantity depends on how much sour the tamarind is and how thick the extracted tamarind pulp is.)
2 Tbsp jaggery powder
2 tsp salt or as needed
1/8 tsp turmeric powder
A pinch of asafoetida powder
1/2 tsp chili powder or as needed
2 cups water
2 Tbsp rice flour
For tadka: 1 tsp chanadal, 1 tsp mustard seeds, 1 -2 green chilies - slit lengthwise, few curry leaves

The cooking part:
1. Heat oil in a sauté pan and add the mustard seeds and chanadal. When the chanadal starts to turn reddish and the mustard seeds start to pop, add the green chilies and curry leaves. Sauté for a few seconds and then add turmeric powder and the onion.
2. Fry the onions on low - medium flame till they turn translucent. 
3. Meanwhile, add a few Tbsp of water to the rice flour and make a paste and keep it aside.
4. Then add the tamarind juice, jaggery powder, chili powder, salt,  asafoetida powder, rice flour paste and about 2 cups of water to the sautéed onion. Mix everything and bring the mixture to a boil. Taste and adjust the seasonings, if needed. There must be a balance between the dominant flavors of the dish. Highlighting any one flavor ruins the dish.
5. Turn down the stove and simmer for a couple of minutes more.

This goes to
Niloufer's Twenty - 20 Event.
Sunita's Think Spice - Tamarind hosted by PJ this month.

Post a comment

Wednesday, July 18, 2007

Pandu Mirapakaya Pachchadi - Fresh Red Chillie Pickle

No Indian palate is accustomed to bland food. We need chillies to pep up any savory dish. Be it in the form of chillies-fresh/ripe or the chillie powder which go into our daily fare of curries / dals / pickles, it needs to be just there. Recently, our own chillie, 'Bhut Jolokia' has been honored as the hottest chillie on earth by Guinness Book of World Records. For the JFI event, Nandita of Saffrontrail has aptly chosen chillies - the ingredient without which our Indian cooking would be at loss.

I instantly knew what I was going to prepare when JFI - chillies was announced. Being an andhrite, pickle of course. Spicy pickles are an integral part of Andhra cuisine. Instead of being sidelined, they are given prominence as a part of the main meal, which is rice centered. Especially in Telugu Brahmin house holds, a traditional meal always start with rice being eaten with pickles / chutneys (pachchadi) with generous sprinkling of ghee. Rice is eaten with pickles (pachchadi), cooked and spiced vegetable / curry (koora), spicy Dal (pappu / pulusu), rasam (charu), yogurt (perugu) - always in this order. A menu on a festive ocassion may include more curries, rice dishes (like pulihora), other sweet and savory dishes.

It is therefore a common practice to prepare and store pickles for year long usage. Avakaya, Maagaya, Mukka pachchadi (pickles made with mango), Gongura, Chintakaya (made with raw tamarind) are to name a few. Among the long list of Andhra pickles, here is one, Pandu Mirapakaya Pachchadi / Pandu Mirapakaya Karam. As the name suggests, the main ingredient that goes into this pickle are fresh red chillies, the chillies which are allowed to ripen before picking.

Making this pickle is an easier task compared to the other ones. You don't need any elaborate preparations to make this. You can have this in a jiffy just by grinding the required ingredients. Take care to use dry utensils and ingredients for pickle's long shelf life. This pickle stays fresh for at least six months with the kind of fresh red chillies available in Andhra. If you are substituting with other varieties, it is better to refrigerate.

Note: The closest substitute for fresh red chillies I could find in my grocery shop were chicara. The quantities of other ingredients may slightly vary depending upon the chillies you choose. The following ingredients give you a cup of pickle. You can increase/decrease the quantities in same proportions for more / less quantity of the pickle. Also the ingredients should be ground into a coarser paste for an authentic version. I could not do it because of my blender. Don't be skeptical to try this because of the color and the chillies used. The fresh red chillies are mild compared to the green ones. If you want to try this, I would recommend you to go ahead without any hesitation. If you try it, I am sure that you are going to love it..

Ingredients:
Fresh red chillies - 10
Tamarind - A small lime size (Hint: if you make a ball out of tamarind, it should fit into a Tbsp size spoon)
Salt - 1 tsp
Oil - 2 tsp
Mustard seeds - 1/2 tsp
Asafoetida - little (around a 1/8 tsp)

How to make the pickle:
Wash the red chillies and let them air dry or wipe them dry. Chillies should have no trace of moisture. Remove the stalks.
Mean while, heat oil in a small pan and add mustard seeds and asafoetida. When mustard seeds start to pop, turn off the stove. Let the mustard seeds cool.
Take care that the mixer / blender which you are going to use is completely dry. Grind the chillies, tamarind and salt into a coarse paste WITHOUT water.
Add the mustard seeds - asafoetida mixture to it. Stir well and store it in a glass / ceramic jar.
Always use a DRY spoon when handling the pickle.
Traditionally, this is eaten with rice & ghee. It also can be served as a side dish / dip.

'Pandu Mirapakaya Pachchadi' - My entry to JFI - Chillies hosted by saffron trail's Nandita. Indira of Mahanandi is the person behind JFI.

Post a Comment

Tuesday, July 3, 2007

Tomato Pickle, The Simpler Way

My parents and husband come from different parts of the same state. I therefore have a couple (sometimes more) of versions/recipes to follow, when I am planning to prepare a dish. Sometimes, the same dish has different names too. Tomato pachchadi / ooragaya is also prepared differently in our families. My mom has a version of tomato nilva pachchadi which can be stored year long without any refrigeration. My mom's version uses sun dried tomatoes. I cannot afford that much of sunshine in Chicago and so, I went by my SIL's directions and prepared this tomato pachchadi which can also stay fresh for at least six months, if refrigerated. That is another thing whether you will have any thing left to refrigerate, once you taste it. Two cups of pachchadi was gone in less than a week at my place and we don't live in a hostel. And yes, the number of adults in our home is only two. The preparation is simpler compared to my mom's version. Though, it is going to take around an hour to prepare this, there is no need to show your love and attention through out the process. Plan to prepare this pachchadi, when you are cooking a meal in the kitchen. Just stir the mixture once in a while to avoid it sticking to the bottom of the pan. You can cook the mixture with occasional stirring on low -medium flame, for most of the part (80% of the cooking). The final stages need to be cooked on low flame with almost constant stirring. The final product should look like the one in the picture (almost as thick as homemade puliyogare gojju). It goes well with rice and a tsp of ghee or as a side dish with any Indian breakfasts.

Ingredients: Chopped tomatoes - 5 cups Thick tamarind extract - 1 cup Chili powder - 1/2 cup Salt - Accordingly Turmeric powder - 1/2 tsp Asafoetida - 1/4 tsp Oil - 8 Tbsp Mustard seeds - 1 tsp And a deep bottomed, non stick pan Wash the tomatoes thoroughly and chop them in to medium sized pieces. Heat a tbsp of oil in a pan and add tomatoes to it. Fry on medium flame for about five minutes. Remove them from heat. Let them cool a little bit and puree them in a blender. Again add remaining oil, tomato puree,tamarind, turmeric powder, asafoetida to the pan and keep cooking on medium flame. Since the mixture tends to splatter, cover the pan with the lid. You can cook on medium flame and keep stirring once in a while in the initial stages of cooking. Later turn down the heat to avoid the mixture sticking to the bottom of the pan. Cook till the mixture reaches almost solid stage as in the picture. Then add chili powder and salt and let it simmer for about five minutes. Heat a tsp of oil in a small pan and add mustard seeds. When mustard seeds start to pop, remove and add it to the tomato chutney. Let it cool and store it in a glass jar and refrigerate it.
Other related post:

Saturday, January 27, 2007

Ginger - Tamarind Chutney / Allam - Chintapandu Pachchadi

My mom uses ginger rarely in her kitchen and preparation of Ginger - Tamarind chutney is one of those occassions. My parents are from Coastal Andhra and tamarind chutney is quite popular in that region. There, you sure are going to find a jar of ginger - tamarind chutney in most of the kitchens , any day, any time. This comes under 'Must haves' in my mom's kitchen. She never runs out of this chutney.
As usual, this can be eaten with rice as all other Indian chutneys. If this would have been my sister's blog, she would have recommended this chutney with dosas and upmas. She would eat dosas only, with this chutney, even if you tempt her with hundred other side dishes. This comes in real handy when you have no time to prepare chutneys or during those power cuts which have become so frequent in India.

Ingredients:
Tamarind - 100 g / 3.5 oz
One inch square ginger - 2 pieces
Powdered jaggery - 1/4 cup
Red chillies - 20
Salt - 3/4 tsp
Urad dal (Black gram) - 2 tbsp
Mustard seeds - 1 tsp
Methi (Fenugreek) seeds - A few ( half of 1/4 tsp)
Asafoetida (Hing) - Little (half of 1/4 tsp)
Oil - 1 tbsp


In USA, tamarind (Indian brands) is usually sold in a 200 grams / 7 oz size bar. I have used half of it to make this chutney. Soak this in enough water for an hour or until it softens. Alternatively, you can place this in microwave for 2 minutes to quicken the process. When it is soaked, tamarind would become soft enough to squeeze. Extract a cup of thick tamarind pulp from it and keep aside.
Peel the ginger. I used the same quantity of ginger shown in the picture.
Meanwhile, heat oil in a small pan and add uraddal and mustard seeds. When urad dal starts to turn a little brown, add methi seeds, hing and redchillies. When urad dal and methiseeds turn red, switch off the stove. Let it cool. Grind this cooled mixture with ginger, tamarind pulp, jaggery and salt in a blender to a coarser mixture. Remove the chutney from the blender and store it in a glass / ceramic bowl.
It usually stays fresh even for a month, refrigerated.

This recipe is going to be a part of my contribution to the JFI - Ginger event.

Post a Comment

Friday, January 26, 2007

Allam Gojju / Ginger Gojju

For Rosie's JFI - Ginger event, I am planning to go overboard a little (assuming not overwhelming Rosie) and presenting a GINGER THALI. All Indians know what a thali is. It is an Indian meal, served on a big plate. Different dishes are served in small cups arranged in it. My Ginger Thali is a simple meal with food items (mainly South Indian) prepared with ginger. Don't assume that all dishes are gingery. You would not even notice that all the items have ginger unless someone tells you. Even if you have slight inclination towards ginger and Indian food, then these dishes are right for you. In South India, appetizers and desserts are not served unless it is a festive occasion. So, I am skipping those. I am sure my friends would come up with them in plenty. I already see Asha's mouth watering Rissoles.

I am going to post ginger recipes from Ginger Thali for a couple of days. Today, I am coming up with the recipe for 'Allam Gojju' which you can eat with rice, pongal, rotis etc. (Ginger is called allam in Telugu, my native language).

The spicy, sweet and the sour gojjus are a speciality of Karnataka, a southern state of India where I grew up. Gojju is usually prepared with a vegetable in a gravy. To a gojju, jaggery imparts the sweetness, the tamarind gives the sourness and spices of course give that kick associated with Indian food. A powder is usually used to thicken the gravy. Here I have used roasted chick pea (Dalia) - coconut powder. Every family sure will have their own favorite when it comes to the powders added to thicken the gravy. (If you don’t have any ingredients used to make this gravy thickening powder, you simply can add a tablespoon of rice flour. Before adding to the gravy, just take care to mix rice flour well with a little quantity of cold water without forming any lumps and then add it to the other ingredients in the wok).

Here in this recipe, ginger has been used in place of the vegetable. I learnt this recipe from my MIL who in turn got this recipe from a cook at her nephew’s wedding. She cooks this primarily to go with pongali / pongal. It is good to go with rice, rotis and other Indian breakfast stuff. It takes hardly 10 minutes to prepare if you have all the ingredients ready. I have no words to describe this dish which has all the flavors infused in it. It is simply delicious. Try it once and this would be on your regular menu.


Ingredients:
Ginger grated and chopped into fine pieces – 2 Tbsp
Tamarind – A small lemon size
Jaggery, Powdered – 2 Tbsp
Chillie powder – 1 & ¼ tsp
Salt – 1 & ½ tsp
Water – 1 & ½ cups
Oil – 1 or 2 Tbsp
Cumin Seeds (Jeera) – 1 tsp
Mustard seeds – 1 tsp
Chana dal – 1 tsp
Asafoetida(Hing) – ¼ tsp
Turmeric Powder - ¼ tsp
Curry leaves – A few
For gravy thickening powder:
Roasted chickpeas /Dalia (Pappulu , Kadale pappu) - 2 Tbsp
Dry coconut grated – 1
Tbsp


Preparation:
Soak tamarind in water for half an hour. Alternatively, you can put the tamarind & water bowl in a microwave for 2 minutes to fasten the process of soaking. Squeeze two tablespoons of thick tamarind pulp from it.
Grind dalia and coconut into a fine powder.
Heat oil in a wok or a pan. When the oil is hot, add ginger and fry for 30 seconds. Then add chanadal and when both ginger and chanadal start getting brown, add cumin seeds, mustard seeds, hing, curry leaves and turmeric. When mustard seeds start to splutter, add tamarind pulp, jaggery, chillie powder, salt, dalia-coconut powder and water. When it starts to boil, lower the heat and leave it for a couple of minutes. Then, switch off the stove and allam gojju is ready to serve.

Post a Comment