HOME        |        ABOUT        |        COPYRIGHT        |        CONTACT        |         RECIPE INDEX        |         INDIAN THAALIS        |         MILLET RECIPES        |        EVENTS' ROUNDUP        

Showing posts with label Corn Flour. Show all posts

Sunday, October 26, 2014

Vegetable Tikkis


Here are some guilt-free and filling tikkis made with mixed vegetables for BM #45 under the theme 'Healthy Tea Time Snacks". I made them spicy and they were a tasty treat to our evening beverage.

Ingredients: (For about 18 mini tikkis)
2 potatoes - peeled, cooked and mashed
1 cup finely chopped, mixed vegetables - cooked, drained and coarsely mashed (I used green beans, carrot and peas.)
Salt to taste
Dried red chili powder to taste
1/2 tsp amchur powder
3 - 4 tbsp. corn flour
Semolina to coat the patties (optional)
Oil to shallow fry (I used canola oil.)

Method:
* Add the mashed vegetables, salt, chili powder, amchur and corn flour to a mixing bowl. Combine all the ingredients to form a firm mixture (that can be shaped into patties.)

* Pinch about a small lime sized portion of the dough and slightly flatten it into a disc. Gently roll the disc in semolina so that is coated on all sides with semolina. This semolina coating step is optional but it adds a nice crunch to the patties. (I coated half of the patties with semolina. Both coated and plain versions tasted yummy.)
* Repeat the steps with the remaining mixture and keep them aside. 
* Heat a griddle or a non stick pan and spray it with oil. Place the patties on the griddle without over crowding and spray with oil one more time if necessary.
* Fry them on medium flame until they turn golden brown on both sides.
* Serve them immediately with ketchup or green chutney.
Check what other marathoners are cooking during BM #45.

Comments

Tuesday, September 30, 2014

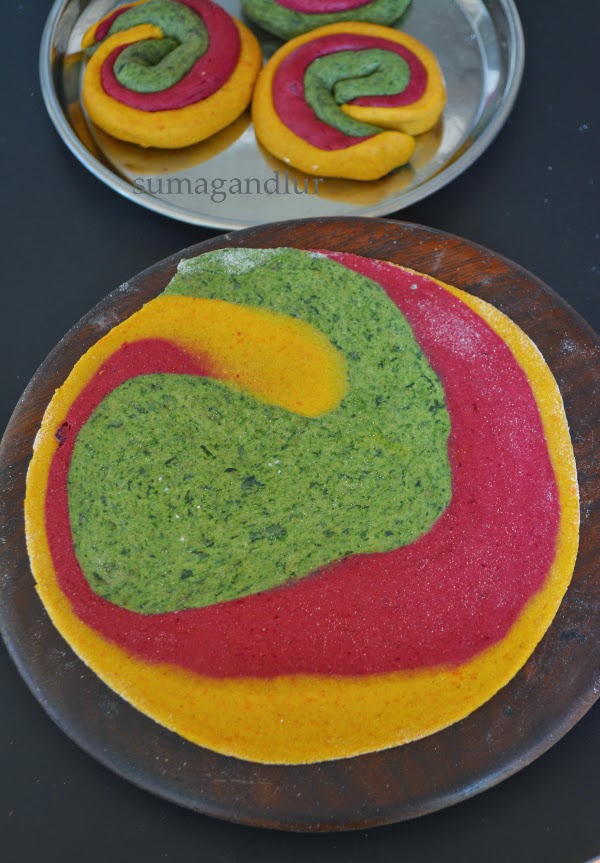
Tri colored Multi Grain Flour Roti

 
I am pretty sure that mothers with school age kids across the globe constantly face the 'lunch box' conundrum. In an ideal world or in a food commercial, a mother lovingly packs a substantial, healthy meal for the kids and they return home with empty boxes and happy faces. In reality, the scenario would be quite the opposite. The kids sometimes come home with untouched boxes and sour faces, giving lame excuses. 'The most favorite food in the world' keeps on changing for every few days. The conundrum turns nightmarish especially when the kids are picky eaters and moms have to wreck their heads for creativity. 

Probably all mothers agree with me when I say that packing a nutritious meal that appeals to kids' senses can get quite challenging sometimes. I have been packing my kids' lunch boxes for more than a decade now but it is still hard to please my younger one sometimes. These rotis are for kids like her who do not prefer carrying a side dish along with rotis or refuse to touch stuffed parathas. These colorful rotis are prepared with multi grain flour and vegetable puree to make them more nutritious and healthy. You can of course pack a side dish / yogurt / ketchup for kids if they prefer or add spices directly to the dough so that little ones can just roll them and eat. Three different kinds of vegetable based doughs are prepared. A small portion of each one is rolled into a log and then coiled tight to form a disc. It is rolled into a thin circle and toasted like regular rotis. These patterned colorful rotis are visually very much appealing to little ones and may not even realize that they are eating vegetables with the surprise thrown at them. Of course one need not go with my choice of vegetables and substitute them with their favorite vegetables. 

Ingredients: (Yield about 7 large rotis or about a dozen small rotis)
3 cups multi grain flour (See the notes below)
Salt to taste
Chili powder to taste
1/2 tsp. coriander powder
1/2 tsp cumin powder
1/2 tsp garam masala  
1/2 cup peeled and chopped carrot cubes
1/2 cup peeled and cubed beetroot
1/2 cup spinach puree
Milk / yogurt / water to grind the vegetables
Canola / vegetable oil 
Extra wheat flour for dusting
(The quantities of spices can be changed or omitted according to one's choice).

Method:
* Combine the flour, salt and spices if using in a mixing bowl. Divide the mixture into three parts.
*  Add carrots to a blender and grind finely using as little liquid as possible. (I use milk / yogurt for grinding, to make the rotis more nutritious and keep them softer.)
* Similarly grind beetroot pieces separately and keep it aside.
* Blanch the spinach if using fresh leaves or thaw in the microwave for 4 -5 minutes if using frozen spinach. Grind it into a fine puree and keep it aside. If you don't prefer the strong flavor of ground spinach, just wash and chop the spinach leaves finely.
* To one part of the flour add carrot puree and about 1 tbsp of oil. Combine to form a firm, pliable dough. (If the dough appears to be sticky, add some extra flour and if the dough is too dry then add some extra liquid.)
* To the second part of the dough, add beetroot puree and a tbsp. of oil. Again form a firm dough and keep it aside.
* To the third part of the flour add the spinach puree / finely chopped spinach and a tbsp. of oil and prepare the dough.

* Keep the dough balls covered for minimum 30 minutes. I left it on my counter-top for about an hour. 
* Pinch small lime sized balls from each colored dough.
* If you want to make small sized rotis, you can make still smaller sized balls. Roll each ball into a log of about 6 inches long and 1/2 inch wide. 
* Bring the logs together and twist them together to form a disc.
* Flatten the disc lightly with your fingers and gently roll it into a thin circle, dusting intermittently with flour if necessary.
* Transfer the rolled out disc onto a hot griddle. Flip after about 30 seconds and pour 1/2 tsp of oil around the edges and 1/2 tsp on the surface. Gently press down with a flat spatula and cook until golden spots appear on both sides. Remove the cooked roti and transfer onto a plate.
* Repeat the steps of rolling and frying with the remaining dough. Work with one portion at a time and keep the rest of the dough covered. Keep covered the toasted rotis in a towel or in a covered box or a hot pack box.
* Serve with a side dish if serving adults. For kids, ketchup / a small box of yogurt can be packed.

Notes:
1. Multi grain atta can be store bought or home made. For home made versions, try to keep the ratio of wheat to the other grains combined 5:1 or 4:1. If you are lucky enough to have a local flour mill, you can grind wheat kernels along with ragi, oats, barley, soya beans, maize and chana dal and store the flour in an airtight container. 
After learning what is present in the store bought flour, I instead started to combine the flours I have at home just like this dosa flour. For today's version, I combined 2 & 1/2 cups of atta / wheat flour, 2 tbsp. each of besan / garbanzo flour, corn flour, finely ground oats, and 1 tbsp. each of ragi flour and soy flour.
2. If planning to make the rotis for lunch boxes, this dough can be prepared the previous night itself. Cover and store it in the refrigerator until ready to use in the morning. Just before making the rotis, thaw the dough in the microwave. Place the dough covered in the microwave and heat for about 30 to 60 seconds depending upon the quantity of dough you have. and then proceed with the recipe as usual.
3. Other vegetables can be substituted. 

This is my contribution to Indusladies Recipe book with the theme "Kids Lunch Box".

Recipe Contest Logo

Comments    

Thursday, September 25, 2014

V for Venezuela ~ Cachapas

 
Event: BM #44, Around the world (A - Z Series)  
Choice of Country: The Bolivarian Republic of Venezuela
Capital City: Caracas
Official Language: Spanish 


I am moving to Venezuela today for the "Around the World in 30 days", an alphabetical based global culinary tour. It is a South American nation situated on the northern side of the continent and it's cuisine is influenced by it's indigenous people and the European ancestry. The cuisine is varied and greatly reflects the climatic contrasts and the diversity in culture among it's people. Food staples include corn, plantain, yams, rice, beans and meat. 

During my recipe hunt for this marathon, I realized that plantains, yuca and corn are an integral part of Latino cooking. And so I made it a point to cook three dishes based on these ingredients which were simple and kid-friendly - Yuca fries, patacones and these cachapas. Like baleadas, these pancakes were a super-hit with my  
daughter.
 

Cachapas are fresh corn pancakes topped with cheese and they are a popular street food in Venezuela. These traditional pancakes are made using fresh corn dough or wrapped in dry corn leaves and boiled. They are served at breakfast or as an appetizer at homes. The most common and simple variety is made by grinding fresh corn into a thick batter. These thick, lumpy pancakes are traditionally eaten with a soft cheese from Venezuela called Queso de Mano and occasionally with fried pork. Mozzarella or feta cheese can be substituted in absence of Queso de Mano. Cachapas may also include different kinds of cheese, cream or jam.
(Source:Wiki)

Ingredients: (makes 4)
2 cups corn kernels (I used frozen)
Salt to taste
3 tbsp masa harina (I substituted it with corn flour.)
Oil to make cachapas
1 cup Venezuelan cheese / shredded mozzarella cheese

Method:
* Grind corn kernels and salt to a thick, coarse paste in a food processor. Add masa harina / corn flour and pulse to incorporate.
* Heat a nonstick pan and pour a ladleful of batter. Don't spread but just using the back of the ladle, shape into a circle.
* Add 1/2 tsp of oil around the edges, cover and cook until golden brown spots appear on the bottom side. 
* Uncover the pan and carefully flip the cachapas without breaking.
* Cover and cook again until it turns golden brown on the other side too.
* Top with about 1/4 cup of cheese and cover until the cheese has melted.
 * Repeat the process with the remaining batter and serve immediately.
 
Comments

Tuesday, August 12, 2014

Live Dhokla

Now here is another variety of dhokla that are supposedly becoming a popular street food in Gujarat and believe it or not, they are called live dhokla. The title itself caught my attention when I saw them on a TV cook show. If I recall correctly, the chef was mentioning that these dhokla are called so because they are prepared live in front of the customers and are served fresh and warm unlike the traditional dhokla and are quite becoming a rage.
My local "Patel Brother's" grocery shop sells freshly made dhokla, samosas, dabeli and similar stuff on weekends and they would be gone like hotcakes in under an hour or so. My husband is a great patron of that store and so I can understand the popularity considering that they are served warm. 
The recipe is quite simple though a bit of pre-planning is required since the batter needs to be fermented. And don't worry, there is no grinding involved here. All you need is a bowl, a spoon and a couple of minutes. The recipe uses flours and so the batter can be whipped up in a jiffy, right before you go to sleep. Unlike the traditional ones, these are thinly made and are smeared with oil as soon as they are steamed. There is no mustard - sesame seed seasoning or garnishing with cilantro or coconut. These dhokla are soft, spongy and are slightly on the tangy side. These thin dhokla bites are a great evening snack / breakfast item when paired with green chutney posted below and a sweet chutney.
 Ingredients:
1/2 cup handvo flour
1/2 cup semolina
1/2 cup corn flour
1/8 tsp turmeric powder
1/2 cup slightly sour yogurt
1/2 tsp + 1/2 tsp baking soda 
Water as needed (I added about 3/4 cup.)
Salt to taste
A pinch of asafoetida powder
1 finely chopped green chili
1/2 tsp red chili powder
2 tsp oil

Note:
Store-bought or homemade handvo flour can be used. If preparing at home, use rice and a mixture of dals in the ratio 1:1 and grind them coarsely. You can use basically any variety of skinned dal than can be found in an Indian kitchen. For example: Urad dal (skinned black gram), chana dal (split chick peas), toor dal (lentils), moong dal, masoor dal and/or any other dal. I prepared it using rice, urad dal, chana dal and toor dal.

Procedure:
* Mix the flours and turmeric powder in a bowl. (If you don't have turmeric powder, you can leave it out but the dhokla would end up white.)
* Combine yogurt and 1/2 tsp baking soda in another small bowl and whisk. Add this to the above flour mixture and mix well with a spoon. 
* Next add water as needed and mix to make a thick batter (thicker than dosa batter). I had to add about 3/4 up water.
* Cover and let the batter sit to ferment overnight or for about 7 - 8 hours or lesser time if you live in a hot climate. (I prepared my batter around 10.30 pm and prepared dhokla in the morning.)
 * In the morning / just before steaming the dhokla, grease a thali (stainless steel plate with high edges) or a circular cake tin of about 6- 7 inches in diameter. Keep your steamer / pressure cooker ready for steaming by pouring water in the base and turning on the heat.  * Add salt, asafoetida and green chili to the fermented batter and mix well with a ladle.
* Add 1/2 tsp baking soda to 2 - 3 tbsp. of hot water and stir it with a spoon and add it to the batter. Stir the batter vigorously using a ladle in clockwise motion for few seconds. You would notice the effervescence and the batter turns frothy. 
(If you are going to use one thali to steam at a time, my advice would be to work with the fermented batter in batches to retain the action of baking soda. Use half of the fermented batter and add 1/4 tsp baking soda as explained in this step, pour into the container and steam. When ready to steam the next batch of dhokla, use the remaining half of the batter and again add the hot water and 1/4 tsp baking soda. )
* Similar to sandwich dhokla, these are also kept thin and so pour about a cup of batter (about 1/2 cm thickness) into the greased thali / circular container you are going use to steam dhokla. Gently shake the thali / container to ensure that batter is spread evenly. (I used two 8 inch containers and poured the batter at about 1/2 cm thickness and steamed them in my pressure cooker.)
* Sprinkle about 1/4 tsp red chili powder over it. Place it in the steamer / pressure cooker and cover it. Remember to not use a whistle on if using a pressure cooker.
* Steam on medium flame for about 15 - 20 minutes or until a knife / toothpick inserted at the center comes out clean. Another way of checking is, removing the lid and trying to touch the surface of the dhokla with wet hands. The surface wouldn't be sticky when done. However be careful with the latter method. This needs experience and caution as there is the risk of burning hand with the hot steam if attention is not paid. I follow this method but follow it at your own risk. :)
* Allow it to rest for a couple of minutes and brush it with about a tsp of oil over the surface using a flat surfaced wooden spatula. Cut into squares using the same spatula or a knife.

These dhokla were served with a green chutney in the show. It is quite simple to prepare. Just bend together finely the following ingredients.

Ingredients for chutney:
1/4 cup daliya / roasted, split chick peas
3 -4  tbsp. cilantro
1 - 2 green chillies
1/4 tsp cumin seeds
A pinch of asafoetida powder
A pinch of turmeric powder
Salt to taste  
1 tsp lemon juice
4 tbsp. yogurt

This is my entry for BM #43 under the theme "dhoklas".
Check here to know what other marathoners are cooking.

Comments