HOME        |        ABOUT        |        COPYRIGHT        |        CONTACT        |         RECIPE INDEX        |         INDIAN THAALIS        |         MILLET RECIPES        |        EVENTS' ROUNDUP        

Showing posts with label Evening Snacks. Show all posts

Tuesday, November 24, 2015

Thapala Chekkalu / Sarva Pindi

Andhra's thapala chekklau are equivalent to Karnataka's version rice flour rottis and also go by the name sarva pindi in Telangana region. Thapala refers to 'thappela', the round bottomed vessels, mostly the brass ones once associated to traditional Indian kitchens. A thappela and not a griddle was the original choice to make these rice flour based flat breads and hence the name. We grew up eating rottis for breakfast on a regular basis and so I am quite familiar with the dish but what caught my attention when I saw this recipe on a cook show was the interesting add-ons to the basic version besides adding a healthy dose of chickpea flour. This version did not use onions or coconut but still was very delicious with peanuts adding a nice texture and flavor.

Ingredients:
1 cup rice flour
1/2 cup chickpea flour / besan
1 tsp ginger paste
1 tsp. green chilli paste / 2 chopped green chillies or chili powder as needed
Salt to taste
2 tbsp. finely minced curry leaves
1 tsp. cumin seeds
1 tbsp. sesame seeds
1/4 cup toasted and skinned peanuts, slightly crushed
1/4 cup soaked chana dal / split chickpeas *
2 tbsp. hot oil
Luke warm water as needed. (I added about 1/2 cup + 2 tbsp. water.)
Oil to make thapala chekkalu (I used canola oil.)
* Soak chana dal in enough water for 1 -2 hours or until they soften.

Method:
* Combine all the ingredients in a mixing bowl except water and the oil mentioned at the end, using your fingers. Add luke warm water as needed to form a firm dough.
* Divide the dough into four portions and roll each one into a ball. Work with one dough portion at a time and keep the rest covered.
* Pour a tsp. of oil in the center of a griddle / skillet and place the dough ball at the center of the griddle. Pat it using fingers till a thin, flat circle is formed. (It doesn't need to be super thin like tortillas.)  Thapala chekkalu can me made as big as the griddle size or smaller ones. Poke some holes randomly using index finger if you wish or just leave it out.
 
* Pour a tsp oil around the edges of the dough circle and over it. Cover with a lid and turn on the stove. Let it cook on a low - medium flame and flip it using a wide spatula when golden brown spots develop on the bottom side and the upper side doesn't look raw. It may take around 5 to 6 minutes. 
* Add half a tsp of oil around the edges again if needed. Cover it again and cook for about 3 to 4 minutes or until the other side turns light brown too. Turn off the stove and remove the cooked chekka
* Repeat the above steps with the remaining dough portions, making sure that the griddle is cool each time before it is used. Wash the griddle with cold water after each use to quicken the cooling process or use 2 griddles to cook simultaneously.

This goes to Blogging marathon #58 under the theme 'Bookmarked Dishes'. Check the link to see what other marathoners are cooking.

Comments

Sunday, October 25, 2015

Peanut Dahivada Chaat


This yummy chaat comes from the same Gujarati cook show that I mentioned in my yesterday's post. This recipe caught my attention because of the unusual peanut based fritters and our love for chaats. This peanut dahi vada chaat definitely makes an interesting and lip smacking snack on a lazy evening.

Servings: 4
Ingredients to make vadas:
3/4 cup roasted and skinned peanuts
3/4 cup chana dal / split chickpeas
3 tbsp. besan / chickpea flour
3 - 4 green chillies or as per taste
1 inch ginger piece
Salt to taste
2 tbsp. minced cilantro 
1/2 tsp fruit salt
Oil to fry 
Ingredients to assemble the chaat: 
2 cups yogurt (I used homemade, fatfree yogurt.)
Salt & Sugar to taste
Green chutney
Sweet chutney 
Aloo sev
Chaat masala
Red chili powder
Julienned ginger

Preparing Vada Batter:
* Soak peanuts for about an hour and drain. Grind them fine, adding little water if needed.
* Soak chana dal separately for a couple of hours. Grind coarsely along with chillies and ginger.
* Combine the ground peanuts and chana dal mixture, besan, salt, and 1/2 tsp fruit salt in a bowl and mix well. Rest the mixture for about a minute or so.
 
Frying the Vadas:
* While grinding the above, heat oil in a small sized wok for deep frying the vadas / fritters.
* Make small lime sized balls out of the batter and pat them gently to discs. Slide them carefully into the hot oil. Fit as many as the frying pan can hold without overcrowding.  
* Fry them on low flame until golden through out and cooked through, flipping them intermittently. Drain them on paper towels and let them cool for about 1 minute. They don't absorb much oil and are not greasy to touch. 
* Dunk the fried fritters in a bowl of water for about 10 to 15 sec. Remove them and gently squeeze each fritter between palms to remove the excess water.

Assembling the chaat:
Arrange about 4 fried vadas / fritters in a small bowl. Pour about 1/2 cup yogurt yogurt on vadas  and drizzle green and sweet chutneys as much as preferred. Sprinkle chaat masala and red chili powder over the vadas.Garnish with sev and julienned ginger.

 
This goes to blogging marathon #57 under the theme 'Bookmarked Posts' and check here to find out what other marathoners are cooking today.

Comments

Tuesday, May 19, 2015

Chocolate Chip - Oatmeal Cookies (Version 2)


KAF is my to go website for baking recipes since most of their recipes are foolproof and the user reviews gives me an idea how a recipe is going to turn out and in case if it needs any tweaks or twists. These chocolate chip - oatmeal cookies come from there and are supposedly their recipe of the year for 2015. An apt choice I would say. This recipe yields addictive cookies with the right amount of chewiness and crispiness. My daughter loves chocolate chip cookies and I had bookmarked them earlier for her. I tried a small batch yesterday making it an eggless version and got a big happy thumbs up from her. The only regret I had was that I should have made more cookies as mine were gone in a day. They are just subtly soft at the center and have a crispy exterior if baked for the mentioned time. If one prefers crispy cookies, they must be left in the oven few minutes more after turning off the oven. Cookies can be made bigger or smaller than the size mentioned in the recipe below and the serving size would differ. I used a tbsp. sized scoop and got sixteen, 2.5" sized cookies. 

Ingredients: (Yield 16 cookies)
1.5 tsp. flax meal or a substitute for half an egg
1/4 cup unsalted butter, at room temperature
1/4 cup light brown sugar, packed
2 tbsp. granulated sugar
1 tsp. vanilla extract
1/2 cup all purpose flour
1/4 cup quick-cooking or old-fashioned oats
1/4 tsp. baking powder
1/4 tsp. baking soda
1/8 tsp. salt
3/4 cup semisweet chocolate chips

Method:
* Combine flax meal and 1.5 tbsp. water in a small bowl and set it aside for about 4 -5 minutes.
* Whisk together flour, oats, baking soda, baking powder and salt in a bowl.
* Preheat the oven to 325 deg F. Line a large baking sheet with parchment paper or grease it.
* Beat butter and sugars together until smooth. Next add the flax egg and vanilla and beat well once again. Add the flour mixture into the butter bowl and mix until thoroughly incorporated, scraping the bottom and sides of the bowl. Stir in the chocolate chips.
* Scoop out tbsp. sized portions of dough onto the cooking sheet, leaving about 1.5 to 2 inches between cookies.
* Bake for about 12 - 15 minutes, until they are light golden brown, with slightly darker edges. They continue to bake as they cool on the pan and so it's ok if they look slightly shiny in the middle. Remove the cookies from the oven, and as soon as they're set enough to handle, transfer them to racks to cool.
( If baked for the mentioned time, they wouldn't be crispy when they come out of the oven. When they cool down, they crisp around the edges while remaining softer at the center. I baked them for 15 minutes and turned off the oven. I left half of the cookies in the oven itself for few minutes more and those cookies had turned out perfectly crispy.) 

These cookies are going to be a part of
1. Blogging Marathon #52.
2. Srivalli's 'Kids' Delight' event hosted by Sandhya this month with the theme "Snacking all the Way".

Comments

Monday, May 18, 2015

Aratikaya Bajji / Plantain Bajji ~ Indian style Plantain Fritters

Bajjis are the Indian version spicy vegetable fritters where vegetables are given a chickpea flour paste coating before the deep frying part. They make a great evening snack any given day and the most commonly used vegetables to make bajjis are onion slices, sliced potatoes, eggplants, snake gourd, ridgegourd or plantains. I make bajjis rarely but they used to be a regular fare on a rainy evening or a part of a festive meal in my mother's kitchen. I had made these last week but hardly had a minute to capture them before everyone gobbled them up. I placed them in a random bowl and took about a couple of pictures. I later realized that I forgot to even consider the perfectly round bajjis in the hurry albeit every bajji was yummy. :)

Ingredients:
3/4 cup garbanzo flour / besan
2 tbsp. rice flour
1 tsp. cumin seeds
Salt to taste
Chili powder to taste
1/8 tsp. turmeric powder
2 pinches of asafoetida powder (optional)
1/8 tsp. baking soda
1 small sized plantain (green colored)
Oil to deep fry (I used canola oil.) 

Method:
* Heat the oil in a deep frying pan on medium heat. Don't bring it to the point of smoking hot.
* Sieve garbanzo flour into a mixing bowl. Add all the other ingredients except the plantain and oil to the bowl and mix to combine. Next add water and make a batter of semi-thick consistency. It should be neither thick nor watery but should be able to coat when the plantain slices are dipped in it.
* Peel the plantain and slice thinly. Drop the slices either in a bowl of cold water or in the batter to prevent the slices turning brown.
* Drop a pinch of batter into the oil to test whether the oil is ready for frying. If the batter sizzles and comes to the surface immediately, it's ready to fry. If the batter sinks and doesn't rise, the oil needs some more heating. Dip the plantain slices in the batter so that it is coated well on both sides and drop it into the oil carefully. Repeat this step and drop as many slices as the pan could hold without over crowding.
* Fry until they turn golden brown. Remove them with a spatula and drain on absorbent towels. 
* Repeat the steps with the remaining plantain slices and the batter.
* These bajjis can be served as it is or with chutney on the side.

These bajji are going to be a part of
1. Blogging Marathon #52.
2. Srivalli's 'Kids' Delight' event hosted by Sandhya this month with the theme "Snacking all the Way".

Comments

Sunday, April 12, 2015

Snack Time ~ Baked Mixed Dal Vada / Baked Parippu Vada


It's a rarity that we have an internet outage for no apparent reason and the customer service representative schedules to send the service guy only 24 hours later. However that's what happened with us yesterday and we had no internet connection yesterday for a good part of the day, and up until now today, though we are still unable to believe that it happened here in U.S.. Now for those who are following me on the baking marathon and wondered why there was no post from me yesterday, that should explain my absence. :)
When I planned baking snacks, vada was instantly on the top of my list. Masala vada / Split chickpea fritters are my absolute favorites among the vada category and knowing how much I loved them, my mother used to prepare them on every birthday of mine without being asked. However I think I have fried them twice or thrice in my kitchen in the past 19 years, trying to avoid deep-frying even though I love them to death. And so I took this marathon opportunity to try the baked version. I used a combo of legumes instead of using chana dal alone and made the parippu vada instead.
 
I tried them a couple of times until I got it right. The first time, I thought to brown them uniformly and they ended being a little hard though we finished them anyway. The second time I baked them until only the edges browned and they were perfect. Probably I am never going to deep fry masala vada / parippu vada again as these proved to be a perfect alternative to deep fried version and they were a super hit in my home. They actually remained crispy longer than the fried version and we finished them in a couple of days.

Ingredients (makes about 25)
1 cup mixed dals / legumes*
3 to 4 green chillies or to taste
Salt to taste
A handful of cilantro leaves, finely chopped
1 big onion, finely minced
Oil (I used canola oil.)
*  I used chana dal (split chickpeas), urad dal (split blackgram) and toor dal (lentils) in equal quantities.

Method:
* Wash and soak all dals in water together for about 2 hours or so. Take care that they are immersed in water during the soaking period.
* Transfer the dals to a colander after soaking so that the water gets drained completely.
* Now add the drained dals, salt and green chillies to a mixer / food processor and grind coarsely without adding any water. Add cilantro and pulse few times. Transfer the ground mixture to a bowl and add minced onion to it and mix well. The ground mixture must be on the thicker side.
* Preheat the oven to 400 deg F.
* Line a baking sheet with aluminum foil and spray/brush with oil. 
* Pour about 1/8 tsp oil and gently spread it using your fingers, about 2.5 inches diameter circle. Pinch about a very small lime sized ball and pat it (directly on the spot you just greased) into a thin circle of about 2.5 inches diameter. 
 
* Repeat the steps with the remaining batter. Pat as many vadas as your baking sheet can fit, while spacing them apart.
(I greased each spot with about 1/8 tsp oil before patting the vadas to make sure that they are not going to stick to the foil. The vadas which were not greased underneath got stuck to the foil though I could recover them later.) 
* Place the baking sheet in the oven and bake for about 12 - 15 minutes. Brush the tops with oil one more time, flip and bake for about 10 minutes or until the edges start to brown. 
(Use the time mentioned as a guideline and watch the vadas carefully during the final minutes of baking. Even if they appear yellow colored, they might have turned crisp and so you don't have to even brown the vadas as much as I did. The vadas can be even finger tapped to check whether they have turned crisp.)
* Serve them warm. If there are any leftovers, cool and store them in an airtight container and finish within two days or so.
 

Wednesday, March 25, 2015

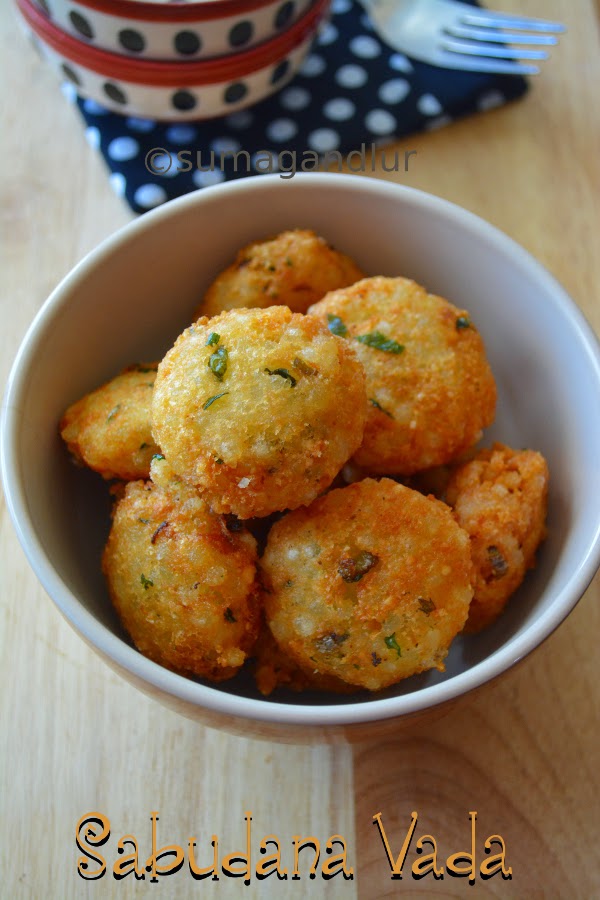
Sabudana Vada / Sago Vada

Honestly speaking, fasting during navratri or the fasting food aka 'vrat ka khana' is an alien concept to me as a south Indian. As a vegetarian, I know that onion and garlic are taboo during religious occasions and rice is not consumed sometimes when fasting. However I had no clue that there is a long list of ingredients that people wouldn't consume during fasting in other parts of the country until I moved to U.S. and saw some of my Indian friends fasting at the drop of a hat in the name of festivals.  
Sabudana or tapioca pearls is one of the ingredients that is allowed during fasting and can be used to prepare yummy, light snacks such as khichdi or vadas. Sabudana vada, a traditional deep fried snack from Maharashtra is also equally popular as a fasting food. They are yummy but the flip side is that they are deep fried and need a bit of pre-planning since sabudana needs soaking. This 'crunchy on the outside and softer inside' vadas make a great snack along with your evening cup of tea.
 
Ingredients:
1 cup sabudana / sago pearls
2 small sized potatoes
1/4 cup peanuts
2 -3 green chillies, finely chopped (adjust the quantity as per preference.)
1 - 2 tbsp. finely minced cilantro
Salt to taste (or rock salt if fasting.)
1 Tbsp. rice flour (optional and if fasting, rice flour can be replaced with buckwheat flour or chestnut flour.)
Oil to fry (I used canola oil. Vegetable / peanut oil can be substituted.)
  
Preparation:
* Soak sabudana in just enough water to cover them for about 2 - 3  hours or overnight depending upon the sabudana variety. Drain in a colander and keep it aside until all the water is completely drained. (check notes.)
* Peel and cook the potatoes in a pressure cooker. Drain completely and then mash finely.
* Roast and skin the peanuts. Grind them coarsely and keep aside.

Method:
* Heat oil in a kadai / frying pan to deep fry the vadas.
* Add soaked and drained sago pearls, mashed potato, peanut powder, green chillies, cilantro, salt and flour if using to a wide bowl. Mix well to combine. 
* Pinch about lemon sized portions from the mixture.
* Gently pat them into patties and gently slide them into hot oil. Fit as many patties as the pan could hold without overcrowding.

* Deep fry them until they turn golden brown and are done.
 Notes:
1. I have used large sabudana pearls here. The soaking time depends upon the quality and the variety of sabudana. I have heard from my mom that the best quality sabudana needs just sprinkling of water to make the pearls soften but the variety I usually get here requires overnight soaking. Some soften in lesser time than the other and so check accordingly. When you press a soaked sago pearl between your finger tips, it should be moist and spongy.)
2. I usually deep fry keeping the flame at somewhere between low and medium. Vadas cooked at high temperature would brown faster leaving the insides uncooked while a low cooking temperature would make vadas greasier.
3. During fasting months, amaranth flour / buckwheat flour or water chestnut flour can be substituted for rice flour and rock salt can be used in place of regular salt.
4. For a healthier version, they can be shallow fried in a appe pan.
5. Minced ginger, 1 tsp of sugar or lemon juice can also be added to the recipe.

This goes to Blogging Marathon #50, under the theme of "One ingredient - Three different dishes", Sabudana / Sago / Tapioca pearls being my chosen ingredient. Check out the link to find out what other marathoners are cooking.

Comments

Sunday, January 25, 2015

Aloo - Chana Chaat

 
The next one in the 'Chaat' series is going to be this lip-smacking aloo chana chaat that can be a wholesome meal on it's own. This can be turned into an oil-free dish if you skip the garnishing of sev and puri / papdi. Some planning is ready if you are planning to make this dish from scratch since this chaat's star ingredient is cooked garbanzo beans. In case if you have some cooked beans handy or a can of garbanzo beans lying in your pantry then it can be prepared quickly. The below recipe can just be used as a reference point. One can omit or add ingredients as per their choice. And of course the seasonings and chutneys that go into the dish depends upon one's taste buds and so use them accordingly. 

Ingredients:
1.5 to 2 cups cooked garbanzo beans / Kabuli chana
1 potato / aloo
1 tomato (optional)
1 onion (preferably red onion.)
Salt to taste
1/4 tsp chaat masala
Black salt to taste (optional)
1 tsp lemon juice
Green chutney to taste
Sweet chutney to taste
4 to 6 crushed papdi / poories
2 to 3 tbsp. minced cilantro to garnish
Fine sev to garnish

Preparation:
1. Soak chana / garbanzo beans overnight and boil until tender. Drain and keep it aside. (Indians usually cook the beans in a pressure cooker to quicken the process.) Drain and rinse the beans thoroughly if using canned beans.
2. I peel the potato, cut into small cubes and cook it in the microwave adding a little water. It takes around 5 - 7 minutes to cook potato in the microwave depending upon it's strength. One can cook the potato in a pressure cooker or in a sauce pan on stove top too. Just cook until fork tender.
3. Finely chop onion. Usually red onion is used for chaats as that is the commonly available onion variety in India. However white onion can be used if you don't have red ones handy.  
4. Finely chop tomato and keep it aside. Mince cilantro finely.
5. If you are preparing chutneys, papdi/pooris and sev at home then keep them ready before assembling the chaat. Store-bought sev, papdi / pooris and chutneys can be lifesavers during time crunches. I used the store bought sev, sweet chutney and ready to fry pooris for this recipe. I haven't posted the green chutney recipe yet. I grind cilantro leaves, mint leaves, green chillies, salt and lemon juice.
 
Click the links below if you are looking for these recipes.
Date-Tamarind chutney 
Papdi 
Sev

Assembling the Chaat:
* Combine garbanzo beans, potato, onion, tomato, salt, chaat masala, black salt if using and lemon juice in a mixing bowl.
* Add green chutney and sweet chutney as per taste and mix gently.
* Divide the mixture in individual serving bowls.
* Garnish each bowl with crushed papdis / pooris, minced cilantro and sev. Add some more sweet chutney and green chutney if desired.
* This can be served as a starter at parties, an evening snack or as dinner.

This goes to BM #48, under "Chaats" theme. Check here to see what my fellow marathoners are cooking during Blogging Marath on #48.

Comments

Sunday, January 11, 2015

Podi Idli


It is snowing outside my window as I am writing this post. In fact, we woke up to a temperature of about negative 30 deg C, the day I made these idlis. The weather we have right now is not the kind that is conducive for idli and dosa batter fermentation. The subzero temperatures and wind chills are not however stopping me from trying out these south Indian signature dishes in my kitchen. A warm oven and longer hours of fermentation (than usual) are yielding me somewhat "close to perfect" kind of batters in this harsh climate. And so I am here with a 'idli' based evening snack for this week's blogging marathon with the theme of Indian Tiffin dishes.

Usually I prepare a large batch of idlis and freeze them to use later during time constraints, either as a breakfast or to prepare an evening snack. Recently I had some leftover mini idlis and used them to prepare this podi idli. Podi idli is a dish inspired from Tamilian kitchens and uses leftover idlis and milagai podi to create a quick and yummy snack. It tastes altogether different from it's base dish 'idli' and hence provides a variety to taste buds for those who are tired of eating idlis.

Ingredients:
Button Idlis / Mini Idlis (About 25)
1 tbsp oil
1/2 tsp mustard seeds
1/2 tsp cumin seeds
1 onion, finely chopped
2 tbsp. Idli milagai podi
Salt to taste
Minced cilantro to garnish

Method:
* Heat oil and add mustard and cumin seeds. When mustard seeds start to crackle, add onion and fry them until translucent.
* Add the mini idlis, salt, milagai powder and chili powder if using and mix well until all the idlis are coated well with the powder.
* Turn off the stove, garnish with cilantro and serve immediately.

Notes:
* I used this idli milagai podi, that also had some grated dry coconut added to it.
* Regular sized idlis can be substituted instead of mini ones. Cube them and use as needed.
* To make the dish wholesome, vegetables can be added in this recipe. After onions are fried, add finely chopped vegetables and saute them.
* Add about 1/2 tsp chili powder if you want the dish to be more spicier or reduce the quantity of milagai powder if serving kids.

This 'podi idli' is going to be a part of this week's BM theme of  'Tiffin / Nasta'. Check here to see what my fellow marathoners are cooking during Blogging Marathon #48.


Comments

Thursday, December 4, 2014

Mangalore Buns

Event: BM #47
Theme: One State - Different Cuisines
My Choice: Karnataka - Mangalorean Cuisine 
Course: Snack

From Kodagu, we are moving towards the neighboring district of Dakshina Kannada to taste one of the popular cuisines of Karnataka. Mangalorean cuisine to be precise. 'Dakshina Kannada' was formerly known as South Canara and Mangalore is the headquarters of this coastal district. Udupi district was carved out of 'Dakshina Kannada' a few years ago. And so basically, Mangalorean cuisine consists of 'Udupi' cuisine and cuisines of 'Mangalorean' communities for an easy reference. However Mangalorean cuisine collectively reflects the cuisine of 'Tulunadu' region. (Tulunadu consists of the above mentioned Dakshina Kannada and Udupi districts of Karnataka and the northern parts of Kasargod district in Kerala.) I think it is quite confusing enough for the uninitiated.
Udupi cuisine has gone global and this vegetarian cuisine needs no introduction. The famed 'masala dose' has it's origin in Udupi. The cuisine takes it name from the temple town of Udupi, situated on the southwestern coast of India. It has it's origin in the Astha mathas of Udupi founded by Sri Madhvacharya.Whereas Mangalore / Mangalooru is an important port city situated between Arabian sea and the Western Ghats.
One of my close friends happens to be from Udupi and my parents' neighbors for 25 years had been Mangaloreans. I therefore have a fair idea about their food. Though Wikipedia says that Mangaloreans eat spicy food, I beg to differ. They prepare mildly spicy food and coconut is a must in their cooking. They use a variety of red chillies which gives a beautiful orange-red hue to sambhar but is very mildly spicy. Jackfruit, breadfruit, bamboo shoots, yellow cucumber, malabar spinach, colocasia leaves are commonly used. Rice is a staple food and fish is widely used in the non-vegetarian cooking because of the proximity to the coast.

I chose to go with Mangalore buns for today's post. They are unique to the Mangalore-Udupi region and are not served anywhere else outside, in the state. The 'bun' in the title is quite misleading, considering the fact that these are not baked. In fact these golden brown beauties are deep fried. I guess they are called so because of their soft, chewy texture. Though these buns are also referred to as banana pooris, they have no relation with pooris whatsoever. The texture is close to a bun and they are mildy sweet. These yummy buns can be served plain with a cup of coffee or with some coconut chutney if you prefer.
 Do you see now why they are called buns?

Ingredients: (Yield about 9 buns)
1 & 1/2 cups all purpose flour + extra for dusting 
1 big sized banana
2 - 3 tbsp. sugar
1/4 tsp. baking soda
1/2 tsp. salt
2 tbsp. yogurt 
1 tbsp. ghee
Oil to fry

Method:
* Peel and mash the banana finely making sure that there are no lumps. Add sugar, mix well and keep it aside.
* Combine flour, salt and baking soda in a mixing bowl. Next add banana mixture, yogurt and ghee and knead it into a firm dough. If the dough is sticky to touch, add a few tbsp. of flour to make it firm. Usually water is not needed to prepare this dough. However if the dough is too hard, wet your hands and try to fix the dough or add water in tsp. increments and work with the dough.
* Cover and rest the dough for 4 - 8 hours depending upon your convenience.
* When ready to fry the buns, heat about 2 cups of oil in a small kadai or a frying pan. Drop a small pinch of the dough into the pan. If it floats immediately to the surface then the oil is ready to fry. If the dough does not rise to the surface then heat the oil for a couple of minutes more and fry.
* Divide the dough into 9 portions and roll them into balls and keep them covered. 
* Work with one ball at each time and roll it into about 4 cm. circle. Roll it a little thicker than pooris and dust with floor if needed.
* Set the heat of the stove somewhere between low and medium. Slowly slide the rolled disc into the hot oil and fry for few seconds. Gently press the disc with the back of the spatula so that it puffs up nicely. Flip it and fry for few more seconds and remove with a slotted spoon and drain on absorbent towels.
* Repeat the procedure with the remaining dough.
* Serve warm with coconut chutney or plain.
* They can be stored up to a couple of days.

Notes:
* The authentic version uses plain flour. For a healthy alternative, half or full quantity of the flour can be substituted with atta / whole wheat flour. However substituting flour with wheat flour would not retain the puffiness of the buns longer.
* Use overripe bananas to make these buns.
* 1/2 tsp of cumin seeds can be added too while preparing the dough but I usually skip it.
* These buns are subtly sweet and so add sugar accordingly.
* Usually these buns puff up nicely while frying. However if they don't, no need to panic since that would alter only the looks and not the flavor / taste of the buns.

Check what other marathoners are cooking during this marathon.

Comments 

Sunday, October 26, 2014

Vegetable Tikkis


Here are some guilt-free and filling tikkis made with mixed vegetables for BM #45 under the theme 'Healthy Tea Time Snacks". I made them spicy and they were a tasty treat to our evening beverage.

Ingredients: (For about 18 mini tikkis)
2 potatoes - peeled, cooked and mashed
1 cup finely chopped, mixed vegetables - cooked, drained and coarsely mashed (I used green beans, carrot and peas.)
Salt to taste
Dried red chili powder to taste
1/2 tsp amchur powder
3 - 4 tbsp. corn flour
Semolina to coat the patties (optional)
Oil to shallow fry (I used canola oil.)

Method:
* Add the mashed vegetables, salt, chili powder, amchur and corn flour to a mixing bowl. Combine all the ingredients to form a firm mixture (that can be shaped into patties.)

* Pinch about a small lime sized portion of the dough and slightly flatten it into a disc. Gently roll the disc in semolina so that is coated on all sides with semolina. This semolina coating step is optional but it adds a nice crunch to the patties. (I coated half of the patties with semolina. Both coated and plain versions tasted yummy.)
* Repeat the steps with the remaining mixture and keep them aside. 
* Heat a griddle or a non stick pan and spray it with oil. Place the patties on the griddle without over crowding and spray with oil one more time if necessary.
* Fry them on medium flame until they turn golden brown on both sides.
* Serve them immediately with ketchup or green chutney.
Check what other marathoners are cooking during BM #45.

Comments

Saturday, October 25, 2014

Roti Sandwich Bites

Thanks to Harini and her friend, these roti bites have become a favorite tea time snack at my household. I usually freeze the extra rotis I make and this recipe has come handy in the recent times to convert them into a quick, guilt-free and chatpata snack during evenings. This also works when you are not in a mood to cook a side dish for rotis.
I used some left over green pea rotis when I first tried these. I had added the green pea stuffing directly to wheat flour to make rotis. I only added salt and some chili powder to chickpea flour paste as these rotis were spicy on their own. 

Ingredients:
4 rotis (Tortillas can be substituted.)
3/4 to 1 cup chickpea flour 
Salt to taste
Chili powder to taste
1 small carrot, grated

Other Optional ingredients that can be used:
Onion powder
Garlic powder
Chaat masala
Mint / Kasuri Methi
Carom Seeds / Cumin Seeds


Method:
* Combine chickpea flour, salt and the spices that are going to be used in a mixing bowl. Next add water and mix with a spatula to make a thick, spreadable paste. Finally add the grated carrots and mix.
* Heat a griddle / non stick shallow pan and spray it with about a  tsp of oil.
* Spread the chickpea flour paste thinly on one side of the roti and place the paste side down on the hot griddle. 
* Turn the stove to medium flame and let it cook and turn golden brown. In the mean time, apply the paste on the topside of the roti.
* When the bottom side of the roti is cooked, lift the roti with a flat spatula and spray again the griddle with a little amount of oil. Now flip the roti and cook until the other side is cooked as well.
* Repeat the steps with the remaining rotis. Cut into wedges and serve warm with ketchup / sauce. 

Check what other marathoners are cooking during BM #45

Comments