HOME        |        ABOUT        |        COPYRIGHT        |        CONTACT        |         RECIPE INDEX        |         INDIAN THAALIS        |         MILLET RECIPES        |        EVENTS' ROUNDUP        

Showing posts with label Millet. Show all posts

Monday, September 28, 2020

Idli Platter ~ Proso Millet Idli

Idli is a popular breakfast dish from the southern parts of India, that is prepared by steaming a fermented batter of rice and black gram. They are steamed in special moulds called an idli stand which holds about two dozen idlis, the ones typically used in a household setting. Whereas the moulds used in restaurants are naturally bigger in size to hold more idlis, to cater their customers. The fact that they are steamed and use no fat in the preparation makes them an healthy breakfast choice for everyone including toddlers, the ailing or convalescing. The idlis are bland by themselves are usually served with a chutney and/or a soupy lentil gravy called sambhar.
The standard version idlis use rice and black gram that need soaking, grinding and fermenting before steaming which means that they need advance planning. There are versions with other grains substituted for rice which basically follow the same method. There are a second set of idlis where the ingredients are mixed and soaked for a short amount of time and steamed which make them instant versions. I have a few varieties of idlis in my platter today which fall under these two categories. I chose to go with about ten varieties though there are plenty of other variations. Most of the idlis in my idli platter are from Karnataka and the accompaniments I have are those side dishes popularly served in Bangalore restaurants - chutney, sambhar and saagu. Check my breakfasts page for more idli ideas.

I have the following in my idli platter.
Idli - Standard version prepared using idli rice and black gram.
Semolina idli / Rave idli (Recipe here)
Cucumber idli / Southekayi idli
Field beans Idli / Avarekayi Idli
Pumpkin idli / Kumbalakayi idli (Recipe here.)
Horse gram idli / Kulitha idli 
Flattened rice idli / Avalakki idli
Pearl millet idli / Bajra idli / Sajje idli
Proso millet idli / Baragina idli
Finger Millet idli / Ragi idli
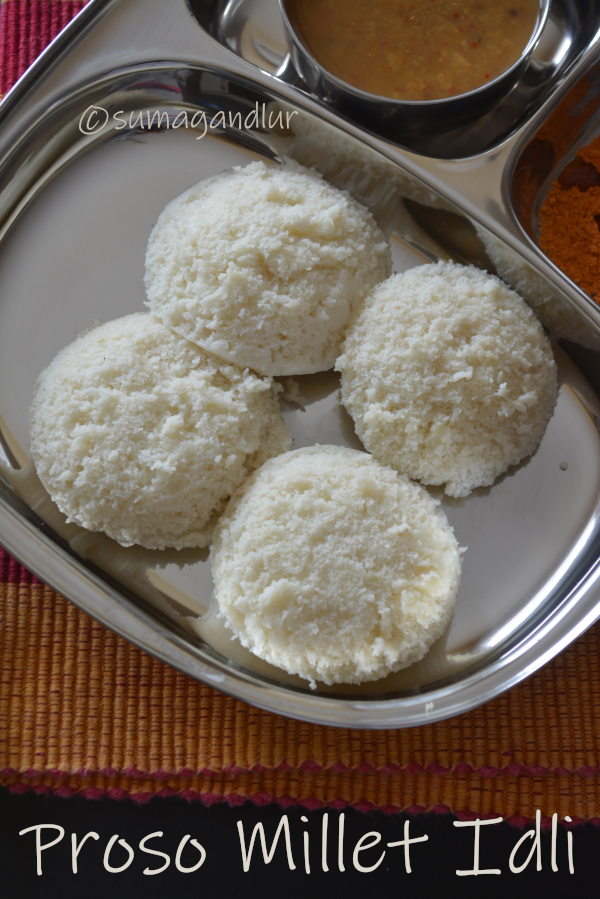
I am posting the the proso millet idli recipe for today. I replace a portion of idli rice with either millets or millet flours in my regular idli recipe to make them healthier and nutritious. I haven't liked those idlis that much which are made adding no rice. We enjoy the version I am posting today and as far as I have noticed, the millets do not change the taste of idli at these proportions. They make a healthy and delicious breakfast or lunch along with some chutney and/or sambhar. My husband loves idli and so, I usually make a big batch of idlis and freeze them so that I don't need to make them every other day. The idlis can be refrigerated or frozen given that there are no power cuts in the area you live. If freezing, cool the idli immediately after they are demolded and put them in the freezer.  When ready to eat, heat them in the microwave, covered and you will have fresh, piping hot idlis.
Ingredients:
1/2 cup proso millet
1/2 cup idli rice
1/2 cup black gram / urad dal
Salt to taste

Directions:
* Rinse and soak the ingredients in water for about 3 to 4 hours.
* Grind them together to a thick batter adding as much as water needed. Add salt as well if living in a cold climate. 
* Transfer the batter to a container big enough (to allow the batter rise), cover and leave it aside to ferment. The fermentation may take anywhere between 8 to 14 hours depending upon the local climate. Make sure to place the batter in a warm place if living in cold climate.
* The fermented batter should look like the one below, light and frothy slightly smelling sour. Add salt if it was not added while grinding and gently mix to combine.
* Add water up to 2 inches in a steamer / idli cooker / pressure cooker base and heat it.
* Grease the idli plates and spoon the batter into moulds. Place the filled idli stand into the cooker and close the lid. Do not use the pressure valve on the lid if using a pressure cooker,.
* Steam the idlis on low heat until done, about 20 minutes or until the surface of the idli doesn't stick if touched with wet fingers. Turn off the stove.
* Let it sit for about 10 minutes and then remove the lid. Run a sharp spoon along the edges to demould the idlis.
* Serve them warm with chutney / sambhar. 
* These can be refrigerated or frozen as well.

Friday, September 25, 2020

Thalipeeth ~ Maharashtrian Multigrain Flour Flatbreads


Thalipeeth are instant flatbreads made with multigrain flour and spices combined. These savory flatbreads are a famous breakfast from the state of Maharashtra and are also made in northern parts of Karnataka. Thalipeeth are in fact similar to Karnataka rottis which are made using one particular flour instead of using a mix. This flatbread can be eaten for any meal of the day and one can attach all the positive tags to it - healthy, filling, nutritious, wholesome, tasty and guilt-free. They can be even made gluten free by leaving out the whole wheat flour from the recipe and replacing it with any other flour. They don't need any side dishes to go with but they can be served with Maharasthrian spicy condiment thecha, any spicy pickle, butter or yogurt.

Maharashtrians keep a 'bhajani' mix handy to make thalipeeth which is a combination of flours that are individually toasted and stored for later use. The combination of flours used in a bhajani varies from kitchen to kitchen and any combination of four to five flours lying in an Indian pantry would work in a thalipeeth recipe. Finger-millet flour, ground oats, urad dal flour are some of the other options one can include in a thalipeeth. There are other versions, sabudana thaipeeth and rajgira thalipeeth which meet the dietary restrictions of a 'vrat' / fasting food. I had included thalipeeth in my breakfast platter from western India. I did not toast any of the flours here as the mix was meant to be used immediately. 

Ingredients:
1/2 cup sorghum flour (jowar ka atta)
1/2 cup pearl millet flour (bajre ka atta)
1/2 cup rice flour (chawal ka atta)
1/4 cup chickpea flour (besan)
1/4 cup wheat flour (gehun ka atta)
1 tbsp. white sesame seeds
1 tsp. carom seeds / ajwain
Salt to taste
1 tsp. chili powder
1 tsp. cumin powder
1 tsp. coriander powder
1/4 tsp. turmeric powder
1/2 cup finely minced onions
1/4 cup minced coriander leaves
1 tsp. finely minced green chillies
1 tsp. grated ginger
2 tsp. oil + extra oil for toasting

Directions:
* Combine all the dry ingredients in a mixing bowl. Add onion, coriander leaves, green chillies and ginger to the bowl. 
* Combine all the ingredients once more. 
* Add water in parts and knead into a soft dough. Add oil at the end and knead again to combine.
* (I made the thalipeeth as I make our rottis, directly patting over the pan.) Pour 1 tsp. of oil at the center of a shallow pan / tawa and place a small portion (bigger than an orange) of the dough over it, Pat it into a thin circle and make 3 or 4 holes or a hole at the center. Pour 1/4 tsp. oil around the edges and at the holes. 
Or
The dough can be patted on a wet cloth / parchment paper into a circle and transferred to a hot, greased pan / tawa.
* Place the pan on the stove, cover it with a lid and cook on medium flame. Cook it until bottom side turns golden brown with brown spots all over and flip. Continue to cook until the other side browns as well. Remove it with a spatula.
 
* Using two pans simultaneously while making thalippeth saves time. If patting the dough directly on a pan as I did, then either wait until the pan cools down or wash it under cold water before making the next thalipeeth.
* Repeat the steps with the remaining dough and make thalipeeth.

 Comments

Thursday, September 24, 2020

Bajra Aloo Roti

Bajra aka pearl millet, a healthy and gluten free grain has been grown in India for centuries. The grain is packed with nutrients, rich in fiber thus aiding in digestion and has a low glycemic index making it ideal for diabetics. However over the time, the grain somehow had been relegated to the status of rustic and rural food excepting a few states in India. Fortunately the millets are again slowly gaining popularity among the urban communities as well for their health benefits. Bajra is widely consumed in the Indian states of Gujarat, Rajasthan, Haryana, and Maharashtra. I originally made these bajra aloo rotis for the state of Haryana but later realized that these are made in Rajasthan and Gujarat as well with variations.
These rotis are a variation to the regular bajra rotis aka pearl millet flatbreads made across the western parts of India, where bajra is widely consumed. Potato and spices are additional ingredients in this flatbread where the roti is made patting between palms and are slightly thicker than what I have made here. These are basically rustic and everyday kind breads where one doesn't need any fancy side dishes. Some butter, pickle or even plain yogurt would make an excellent accompaniment to these tasty rotis. I served them with pitla, a chickpea flour based side dish from Maharashtra which is called Bombayi chutney in Andhra.
I started slowly incorporating various millet flours into out diet a few years ago and now they have become pantry staples. I started my exploration by using them in thicker Karntaka style rottis. I make somewhat decent rotis now using bajra / pearl millet and jowar / sorghum flours though I need to yet master them. It took a lot of trial and errors since no one at back home use these flours though I learnt recently that my paternal grand mother used to cook millets regularly in place of rice when my father was a kid. One can easily incorporate various millet flours in everyday breakfast dishes like idli, dosa and rotis by starting with replacing a portion of rice / wheat flour by a millet. Similarly millets can replace rice in main dishes. One of the important things to remember regarding bajra flour is not to overstock it as the flour tends to get bitter if it sits for longer periods without getting used.
Experts and people with gluten issues can leave out the wheat flour from the recipe and make rotis, by patting them between palms or on a plastic sheet or a wet cloth and transferring them to the griddle.  However I prefer the version with an addition of wheat flour to it, which makes it comparatively easier to roll the rotis. 

Ingredients: (Yield - 10 rotis)
3/4 cup pearl millet / bajra flour
3/4 cup whole wheat flour + extra for dusting
1/2 tsp. dry mango / amchur powder
Salt to taste
3 to 4 spicy green chillies or to taste, grated 
1 inch piece of ginger, peeled and grated
1 potato, peeled and boiled (I had about 3/4 cup mashed.)
About 1/2 cup warm water to knead
Oil to make rotis

Directions:
*
Mash the potato well and keep aside. Don't throw away the water used to cook the potatoes and use instead in preparing the dough. Warm it if the water has come to room temperature.
* Combine flours, salt, dry mango powder in a mixing bowl. Next add the remaining ingredients except the water and oil. Mix the ingredients well using fingers. 
* Add warm water as needed to form a slightly firm dough and allow it to rest for 30 minutes to an hour. If the dough appears sticky, add some extra wheat flour and knead.

* Knead the dough once. Divide the dough into 10 portions and roll each one into a smooth ball and pat them into discs. Place them in the bowl and keep them covered while working on each ball at a time.
* Flour the disc generously and roll into a thin circle of about 5 to 6 inches in diameter. If rolling appears difficult, roll them between two sheets of plastic or parchment paper which makes it easier to roll.

* Heat a tawa / shallow pan / skillet. Pat away any excess dough from the rolled circle and place it at the center of the griddle.
* When small bubble start to form, flip and cook for about 20 to 30 seconds. 
* Add 1/4 to 1/2 tsp. oil around the edges and smear the back side of the spoon over the surface of the roti. Cook flipping once or twice in between, pressing the spatula all over the surface of the roti until brown spots appear on both sides.
* Repeat the steps of rolling and toasting the rotis with the remaining dough.

Friday, June 12, 2020

A - Z Karnataka Recipe Series ~ O for Oodhalina Bisibele Bhath


So far in my 'A - Z' Karnataka recipe series,
A - Akki Halbai
B - Biscuit Roti
C - Congress Kadalekayi
D - Davanagere Benne Dose
E - Ellu Pajji
F - Field Beans / Avarekalu Payasa
G - Girmit
H - Hitakida Avarekalu Huli
I - Iyengar Bakery Style Masala Toast
J - Jolada Vade
K - Kumbalakayi Idli
L - Limbe Hannina Gojju
M - Mysore Pak
N - Nuchinunde

'O' dishes / culinary terms in Kannada:
There are some traditional and popular recipe choices for the alphabet 'O' from Karnataka cuisine like obbattu, obbattu saaru, oralu chitranna, ottu shavige and open dose. 'O' also stands for 'oota' and 'outhana' which means a meal and a feast respectively. Anything dried is called 'ona' and the tempering / tadka is called oggarane in Kannada.

I opted to go with oodhalu which is barnyard millet in Kannada for today's post in spite of the 'O' choices I had. My A - Z Karnataka Recipe series appeared incomplete with out the inclusion of bisisbele bhath in it. I have already posted the standard version on my blog and I therefore decided to prepare it with oodhalu. Bisibele bhath is a rice - lentil dish in Karnataka cuisine that is both traditional and popular. The rice- lentil- vegetable mixture is leisurely cooked in a pot on stove top and then freshly ground spices are added which lend the characteristic, special flavor to the bhath. 

The words 'Bisi-Bele-Bhath' literally translate the essence of the dish in a nutshell. Bisi literally means hot in Kannada, temperature wise. The syllable 'bi' is pronounced as in the word 'Bin' while 'si' as in the word 'Sin'. Bhath is a term generally used for rice dishes. Now coming to the middle part of the name. Though not phonetically correct, somehow the accepted spelling is 'bele'. Now the syllable 'be' is pronounced as 'bay'. 'Le' is pronounced as 'lay'. (Actually English language doesn't have the la sound used here. You kind of roll out your tongue and say it). Here, the la used is the one that comes after the Indian alphabet 'ha'. Now bele refers to the lentils used in the dish. Bisibelebhath so literally means hot rice - lentil mixture.

Bisibele bhath is a nutritious and filling one pot dish that is delicious as it is but substituting millet for rice makes it more healthier. Don't let the long list of ingredients intimidate you. It doesn't take much time to cook this dish if pressure cooker is used and you have the spice powder handy. I always keep homemade spice powder handy and in fact I cook this dish when I am looking for a quick one pot meal. Store bought spice powder can be used in a cinch though home made spice powder tastes superior. Use equal quantity of spicy and byadai chillies in the spice powder ingredients. The latter add the hue to the powder. I have run out of byadagi variety chillies this time and that's why my bhath is lighter in color. Bisibele bhath is served as a special or festive meal at homes / functions and also as a breakfast / lunch option at restaurants. If you are looking for other variations, check these posts.

Bisibelebhath
Brown Rice Bisibelehulianna
Cracked Wheat Bisibele Huli
Oats - Masoor Dal Bisi Bele Huli
Poha Bisibelehuli
Quinoa Bisibelehuli

Ingredients: (Yield - 6 generous servings) 
3/4 cup barnyard millet / oodhalu
1/2 cup pigeon peas / yellow lentils / toordal
About 2 cups chopped vegetables (I used 2 small carrots, 2 small potatoes, 1 big sized tomato,  25 -30 green beans)
1/8 tsp. turmeric powder 
1 tbsp. tamarind puree 
Salt to taste 
Ingredients for bisibele bhath masala powder: 
1.5 tbsp. split chickpeas / chanadal 
1.5 tbsp skinned black gram / uradadal 
1 tbsp. coriander seeds
2 one inch cinnamon pieces 
4 pieces of moggu 
4 spicy red dried chillies
2 - 3 tbsp. grated dried coconut 
Ingredients for tadka: 
2 tbsp. ghee 
1 tsp mustard seeds
2 tbsp. cashews
A sprig of curry leaves

Directions:
* Wash millet and lentils thoroughly and drain the water. Add them along with vegetables, turmeric powder and about 2 cups of water to a pressure cooker directly and cook till they are done. Alternatively, they can be cooked in a sturdy pot. It needs intermittent stirring and the water needs to be added accordingly.
Meanwhile add split chickpeas and skinned black gram to a sauté pan and dry roast them on medium heat. Add the remaining ingredients mentioned under 'the masala powder' list when they start to change their color. Toast until the coriander seeds start to turn a few shades darker and the split chickpeas and black gram had turned reddish. Turn off the heat and let cool the toasted ingredients. Once cool, grind them into a fine powder.
* When the valve pressure is gone, remove the cooker lid. Add the prepared bisibele bhath powder, salt, tamarind to the cooked millet- lentil mixture and mix well. Add water as neededto adjust the consistency (about 1 cup). Let the mixture come to a boil and then simmer the mixture for about 5 minutes.
* Meanwhile, heat ghee in a small sauté pan. Add the tadka ingredients and toast till the cashews turn golden brown. Remove from heat and add the tadka to the cooked bisibele huli and mix well.
* Serve with papads, chips or kara boondi.

Sunday, May 17, 2020

A - Z Karnataka Recipe Series ~ J for Jolada Vade / Jowar Vadi

So far in my A - Z Karnataka Series
A - Akki Halbai
B - Biscuit Roti
C - Congress Kadalekayi
D - Davanagere Benne Dose
E - Ellu Pajji
F - Field Beans / Avarekalu Payasa
G - Girmit
H - Hitakida Avarekalu Huli
I - Iyengar Bakery Style Masala Toast

Today we are onto the alphabet "J' in my A - Z Karnataka recipe series. This alphabet was a no brainer considering that there are not many ingredients that start with 'J' in Kannada language and jowar aka jola is a staple in the northern parts of the state. I did not even try to explore a 'J' recipe as I had early on decided that I am going to cook something using this millet. 

There are several jowar based recipes in Karnataka cuisine including rotti, mudde and these vade. Jolada rotti aka sorghum flour flat bread is a staple meal in northern Karnataka, and eaten on a daily basis. I would have loved to post the recipe if I had mastered the art of jowar roti making which seriously needs some skill and expertise. These vade or vadi also come from the northern Karnataka region and eaten as a snack though they make a great lunch item too. They are almost spicy on their own and there is no need to toil for a side dish to go with these vadis. They pair well with a simple coconut or peanut chutney.

There are two ways to make these vadi, the following one being the simple one prepared using dry ingredients. The other method involves using freshly ground paste of skinned black gram and other ingredients which needs some advance prep work. These vade or vadi are not like the regular, crispy fritters though they are called so. They look like pooris and are prepared on the similar lines as bedmi poori, a famous breakfast option from the northern parts of India.
Ingredients: (Yield - 25 to 30 vade)
1 cup sorghum flour / jowar flour 
1 cup wheat flour 
2 - 3 tbsp. gram flour / chickpea flour 
2 - 3 tbsp. skinned black gram flour / urad dal flour
1 tsp. salt
1 tsp. red chili powder or to taste
1 tbsp. coriander powder
1/2 tbsp. cumin powder
A handful of cilantro leaves, minced
A sprig of curry leaves, minced
Lukewarm water to prepare the dough 
Oil to fry vade

Directions:
* Combine all ingredients except water and oil in a mixing bowl.
 
* Add luke-warm water in small increments and knead into a stiff and smooth dough. (I used a little less than 1.5 cups). Add 1/4 tsp. oil to the prepared dough and knead once. Cover and let the dough rest for a couple of hours. 

* Knead the dough again for few seconds before making the vadi. Pinch big marble sized portions of dough and shape them to smooth balls. Work with one portion at a time while keeping the rest covered.
* Heat about 1-5 to 2 cups oil in a pan / small kadai on medium flame. There is no need to bring the oil to a smoking point. Pinch a small portion of the dough into the hot oil. If it immediately swims to the surface, then the oil is hot enough to fry. If the dough ball stays at the bottom, then it needs some more heating. 
* Grease a rolling board / work surface or a thick plastic sheet. Pat a dough ball into a thin, 3 - 4 inches circle of uniform thickness with greased fingers. Sprinkle some white sesame seeds on top and press, if preferred. (I used sesame seeds only for first batch as some of the sesame seeds don't stick to the vadi while frying.)

* Gently drop it into the hot oil from the sides. It usually starts puffing up and if it doesn't, gently tap it with the back of the ladle. (Don't worry if it still doesn't puff up. Some may not puff up.)

* Flip it once it puffs up and cook the other side as well. for few seconds. Remove with a slotted spoon and place it on a plate lined with absorbent paper towels.

* Repeat the shaping the dough circles and frying part with the remaining dough.  
* Serve them with coconut or peanut chutney or peanut powder. 


Comments

Sunday, April 12, 2020

Foxtail Millet Instant Puliyogare

Here is another dish to add to 'Millet Recipes' repertoire, if one is interested in millet based Indian diet. I have substituted millet for rice in the instant puliyogare here to give it a healthy touch. Instant puliyogare mix is one of the products from MTR that I love. It yields a south Indian style, quick and tasty tamarind rice when mixed with cooked rice

Ingredients:
1 and 1/2 cup cooked foxtail millet
2 tbsp. oil
1 tbsp. peanuts
1 sprig curry leaves
2 tbsp. instant puliyogare powder (I used MTR brand.)
Directions:
* Let the cooked millet cool a bit before using it in the recipe. 
* Heat oil in a pan (There is no need to bring it to smoking point.) and add peanuts and curry leaves. Toast until peanuts turn golden brown. Then add puliyogare powder to the oil and mix quickly. Turn off the stove. 
* Add the cooked millet and mix gently to combine. Taste and add salt if needed and mix once again. 
* Serve immediately.

Friday, April 10, 2020

Jowar Idli / Jonna Idli / Sorghum Flour Idli

These are traditional idlis with a healthy twist and below is the recipe if looking to incorporate millets into everyday Indian diet. The addition of sorghum flour to the idli batter boosts the nutrition factor while retaining the taste and the soft consistency of the rice version idlis.

Ingredients: (Yield 30 idlis)
3/4 cup sorghum flour / jowar flour 
3/4 cup idli rice
1/2 cup black gram / urad dal
Salt to taste

Directions:
* Rinse and soak idli rice and black gram in water for about 3 hours. Let the water level be at least an inch above the level of the ingredients during the entire soaking period.
* Drain the water used to soak and grind them along with sorghum flour adding salt and water as needed to form a thick, smooth batter. The final batter should not be runny. (I used less than 1.5 cup water to grind the ingredients.)
* Pour the batter into a container big enough to hold the fermented batter and cover it. (The batter level raises during fermentation.) Allow the batter to rest in a warm place overnight. The batter may take anywhere between 8 to 16 hours to ferment depending upon the local weather. The fermented batter looks like below in the images.


* Stir the fermented batter and pour into idli plates. 

* Heat water in a steamer / idli cooker / pressure cooker on medium flame. Place the idli stand in it and cover the lid. There is no need to put the pressure valve on if using the pressure cooker to steam idlis.
* Cook on low medium flame until idlis are done, about 15 - 20 minutes. (To check whether idlis are done, touch the surface of the idlis with wet fingers. If they are not sticky then that means idlis are cooked perfectly. If they are sticky, cook for some more time.)
* Wait for about 5 minutes and carefully remove the idli stand. Run a spoon around the edges of idli and unmould them.
* Serve with a spicy chutney and / or sambhar. 


Friday, January 10, 2020

'Kodo Millet' Paramannam / Arikala Paramannam

After last week's A - Z Karnataka Recipes theme, I am moving onto the theme of festival recipes this week keeping in mind the upcoming Sankranthi festival. Somehow savory and sweet pongal versions and paramannam kind of dishes have become synonymous in the southern parts of India with this harvest festival. However my mother was mentioning recently in one of our chats that she doesn't remember a single Sankranthi festival meal where her mother had prepared a pongali / paramannam. Her mother would prepare ariselu / athirasam or boondi laddu. Of course, ariselu, a traditional sweet dish uses the harvested rice and would have made perfect sense for the season if one didn't mind the extra labor involved in pounding the rice and the deep frying part. My mother has somehow moved the dish to the Diwali category since it is prepared commonly during then in Bangalore area and also times it during our visits to India since it happens to be my husband's favorite sweet dish. 

My mother is also content preparing a sweet pongal dish like this albeit a traditional version using rice on Sankranthis. My version today uses kodo millet which tastes utterly delicious, almost similar to rice and comes handy if avoiding rice. The recipe can be easily doubled and the preparation is quite simple and easy one. If you have any other millet handy like proso, barnyard, foxtail or little millet, they can be substituted for kodo millet here. Even quinoa, cracked wheat can be used. Or stick to rice, the original version. A little dal is always added while making rice based sweet dishes for auspicious occasions since the plain rice versions are made during death anniversaries. The color of the dish depends upon the color of the jaggery being used in the recipe. No need to fret or run to store in case if one doesn't have jaggery on hand. It can be easily replaced by sugar. Actually I enjoy the sugar and the coconut combination in the traditional rice version more. And coming to edible camphor, a tiny pinch is all that matters for that divine taste which resembles the temple prasadms. A tad more would result in an overbearing flavor. Ghee can be used as generously as one would wish. And finally don't skip the coconut if possible since it enhances the flavor of the dish. 

Ingredients:
1/4 cup kodo millet
1 tbsp. split yellow gram / Bengal gram (Moong dal or Chana dal) 
3/4 cup milk
1/4 cup grated fresh coconut
1/2 cup powdered jaggery
1/8 tsp. ground cardamom
A pinch of edible camphor
1 to 2 tbsp. ghee
1 tbsp. raisins
1 tbsp. cashews

Directions:
1. Rinse kodo millet and dal with water and drain. Pressure cook kodo millet and dal adding 1/2 cup milk for 3 whistles. Add a small spoon to the millet container while cooking to prevent milk from boiling over. (It can be cooked directly in a pot as well on medium flame and the liquid quantity may need to be adjusted as needed (usually more). Milk can be replaced with water in this step to avoid the milk from boiling over while cooking. Keep stirring to avoid millet sticking to the bottom of the pan while cooking or use a non stick pot to make the job easier.)  

2. Heat ghee in a small pan and add raisins and cashews. Toast them until cashews turn golden brown and raisins turn plump.
3. Transfer the toasted raisins and cashews with a slotted spoon on to a plate. To the same ghee, add the cooked millet, coconut, jaggery, and cardamom.

4. Mix well and add the remaining milk. Stir well. Cook on medium flame stirring intermittently until the mixture starts to bubble. Simmer on low heat for about 3 - 4 minutes until all the jaggery melts and incorporates into the mixture. Finally add edible camphor if being used and turn off the stove. Add the toasted cashews and raisins as well. Stir well and serve warm. It tastes good even when cold. Leftovers can be refrigerated and warmed before serving.  

Some points to be noted:
1. I directly added jaggery to the millet mixture since it was clean. In case the jaggery appears not clean, melt it separately in a small pan adding small amount of water and filter the solution. There is no need to add too much water since we don't need the paramannam to be very diluted.
2. Sometimes the milk may split when added to jaggery directly and cooked. It has not happened to me but in case if you suspect that to happen and to be on a safer side, the addition of milk can be omitted in step 4. Instead, the milk can be boiled and cooled separately and added to the mixture after turning off the stove.

Thursday, October 17, 2019

Protein laddu


My parents used to subscribe a variety number of magazines while we were growing up. The subscription also extended to some of the kids' classics like chandamama and balamithra in Telugu versions  which were exclusively for me. Remember this was way before the kids started to glue on to television sets and I was content with my books and the neighborhood friends. Probably in guise, my parents were trying to see if I can pick up reading and writing skills in Telugu which eventually I did though I have never lived In Andhra and besides ended up being a bookworm. Meanwhile, my young and energetic mother would try the recipes from those magazines which caught her attention. Nowadays she sticks mostly to tedious, tried and tested traditional kind of snacks / sweets when it comes to festivals which I don't even dare to try. 

Nowadays she has this habit of noting down making my father note down any interesting and easy recipes that she come across on cooking shows or any magazines. It is done, keeping me in my mind as she knows that I like to try new dishes as long as they are easy and quick ones. This laddu recipe was one among the bunch that came from her a while ago. I tried a couple and this laddu was surely a winner in terms of taste and nutrition though they look rustic. They faintly reminded me of sunnundalu which are dear to me. I don't need to go on singing the virtues of these laddus as the ingredients speak for themselves. My daughter who doesn't like sweets in general had liked these and that is surely a winner recipe to me. As far I go, I am unable to stop myself from popping one into my mouth every time I am near the laddu container. 😋 Try these easy, yummy laddus for this Diwali and I promise that you wouldn't be disappointed.

I tried a small portion of the recipe and still got about 16 standard size laddus. The new peanut packet was misplaced and had only a handful in the bottle which filled up to 3/4th of a 1/4 cup measuring cup. I therefore measured my ingredients based on that but interchanging quantities slightly shouldn't affect the final product. If one is confused with the measurements I have provided, just use one measure each of lentils, peanuts and nuts and double the flours' measurements. Use jaggrey and ghee accordingly.  Also I need to mention that the jaggery I used was a sweeter variety and the laddus were sweeter with the amount of jaggery I used. One may need to adjust the jaggery quantity since the amount of jaggery used in the recipe depends upon the sweetness of the jaggery being used and the preferred sweetness of laddus. 

Ingredients: (Yield - 16 laddus)
3 tbsp. moong lentils (yellow moong dal) 
3 tbsp. black lentils (urad dal with husk)  
3 tbsp. peanuts 
3 tbsp. almonds
3 tbsp. cashews (I replaced half with pistachios.)
1/4 cup + 2 tbsp. wheat flour
1/4 cup + 2 tbsp. finger millet flour / ragi flour
1 and 1/4 cup powdered jaggery
4 - 5 tbsp. melted ghee
Directions:
* Toast lentils in a pan individually on low flame until moong starts to turn slightly reddish and the black lentils start to change their color as well. Transfer them onto a plate.
* Next toast almonds and cashews individually. Transfer them to the lentils' plate.  
* Next add peanuts and toast on low flame until done. Let them cool and rub between your palms to remove the skin. Or for a quicker version, toast them in a microwave as I did. It takes around 3 to 4 minutes in a microwave to roast this small quantity but giving one or two intermittent breaks is recommended to avoid them from burning. This step can be avoided if using toasted and skinned peanuts.
* Toast flours individually on low flame until they start to change color slightly. I toasted them without adding any ghee but if preferred, it can be done so. 
* Let all the toasted ingredients come to room temperature.
* First the lentils need to be ground since they take longer than the rest of the ingredients. We like to keep our sunnundalu a tiny bit coarser and so I opted to do the same here as well. They can be ground very fine if one chooses to do so. It depends upon one's preference how the texture of these laddus should be. (I did use my blender for this part and continued the next steps in my food processor.)
* Next finely grind peanuts and the other nuts that are being used. Add the flours at the end and just pulse to combine.
* Finally add the ground jaggery and run the blender / food processor until the mixture is combined well.

* Transfer the mixture to a wide plate and run your hand through the mixture and break any lumps if present.

* Add ghee in increments to the mixture and keep working it into the dough. 

* Mix well so that ghee uniformly coats the mixture. Stop adding ghee when a small portion of the mixture can be easily shaped into a ball without breaking. (Initially about 3 tbsp. of ghee can be added and then the rest in increments and as needed. Mostly 1/4 cup should be enough.) 
* Make lemon sized balls out of the mixture and store in an airtight container. 


Comments