HOME        |        ABOUT        |        COPYRIGHT        |        CONTACT        |         RECIPE INDEX        |         INDIAN THAALIS        |         MILLET RECIPES        |        EVENTS' ROUNDUP        

Showing posts with label Indian Sweets. Show all posts

Monday, July 5, 2021

Sweet Potato Kheer

This post was originally published in 2009 and needed some revamping both in terms of content and images. I had posted a microwave version but I am updating with the stove-top method too. 

Kheer / payasam is a popular and quick to cook dessert from Indian cuisine. It is equivalent to the pudding recipe from the western world sans eggs. Rice, vermicelli, sago/tapioca pearls, and split chickpeas versions are the most common and traditional kheers prepared across India. There are though several other delicious versions and kheers are mostly easy to prepare. The basic preparation of a kheer remains the same. A grain / lentil / vegetable / other ingredient is cooked in milk and sweetened with sugar or jaggery. Dairy milk is most commonly used though other milks like coconut milk, almond milk can be easily substituted in the recipe. Whole milk adds richness to a kheer but replacing it with half and half or a splash of condensed milk makes it festive. Cardamom is the most common flavor used in south India while saffron, kewra essence and rose water are other flavoring agents that go in north Indian style kheers. A garnish of ghee toasted dry fruits and nuts finishes the dish.

I love simple kheers like carrot / chayote / dates that sound special and unusual. I sometimes combine half & half to my kheers for the extra richness. These are some of the kheers that I have already posted on my blog. The first time I prepared this sweet potato kheer was for my guests who had hard time guessing the contents of the kheer and were bowled over by it's taste. I had never heard about sweet potato kheer before that and it was an experiment done on a whim. I use the pink fleshed sweet potato that is common in USA to make this kheer. The color of this chilled kheer is just because of the yam and no saffron was added. It can be cooked with the Indian variety sweet potato too but the sugar quantity in the recipe needs adjustment as it is a more sweeter variety. This is so delicious that it can be served to guests or can be included in festive meals. It can also be cooked during vrat / fasting since sweet potato is allowed during the period.
Ingredients:
2 tbsp. ghee
1/2 cup peeled & shredded sweet potato 
1.5 cups whole milk or as needed (or substitute with half & half for more richer version.) 
3 - 4 tbsp. sugar or to taste
Seeds ground from 2 cardamom pods / 2 pinches of ground cardamom
1 tbsp. cashews and raisins for garnishing (optional)
(For the original microwave version, I had used a tbsp. of ghee and 1.5 tbsp. sugar.)

Stove-top method:
* Heat ghee in a pan and add cashews and raisins. Toast them until raisins turn plump and cashews turn golden brown. Remove them with a slotted spoon and transfer them to a small bowl.
* Add grated sweet potato to the same ghee and sauté for 5 - 6 minutes, stirring continuously. 
* Next add milk to the pan and cook until sweet potato softens. (It doesn't tale much time.)
* Next add sugar and ground cardamom and cook until the sugar melts. Turn off the stove.
* Garnish with toasted cashews and raisins. 
* I usually serve it chilled but it can be served both warm or chilled.

Microwave version:
* Mix the ghee and the shredded sweet potato in a microwave safe bowl and cook it for a couple of minutes in the microwave. Remove and stir the contents once in between. 
* Add 3/4 cup of milk to the bowl and mix well. Put the bowl back in the microwave and cook until the sweet potato is almost done. Check once in between and if the milk has been absorbed by the sweet potato, add some more. (It may take about 3 - 4 minutes.) 
* Add sugar, remaining milk, and cardamom to the bowl. Mix well and put it back in the microwave and cook for a couple of minutes or until the sweet potato is cooked. Garnish with nuts/raisins if using. Stir well before serving. This kheer can be served warm or cold.
 
Note:
1. For diabetic-friendly version, omit the sugar and add a little sweetener to the bowl just before serving.
2. The time to cook the kheer in a microwave may vary depending upon the strength of the microwave. Use your discretion and cook accordingly.

Saturday, June 5, 2021

Sesame Seed - Peanut Laddu

(This was originally published on 12/25/2012.)

From an Indian perspective, the word 'sweets' stand for all culinary things that are obviously sweet and are from the subcontinent. In a traditional sense, none of the baked goods or the western desserts usually fall under the category and they are never a part of a religious feast. 

Laddus, kheer, halwa and burfis make up a significant portion of the myriad varieties of Indian sweets. They entice me the most and so I thought of posting a nutritious and super quick laddu today. These laddus are made with just four ingredients - peanuts, white sesame seeds, dried coconut and jaggery. This is again a 5 minutes recipe if you have toasted and skinned peanuts handy. One minute to toast sesame seeds, under two minutes to blend the mixture and about two minutes to shape the laddus. These are vegan, gluten-free, no bake and a quick fix treat that satiates the sweet tooth.
Peanuts obviously are a good source of protein while sesame seeds are a source of good fats and have a rich iron content. Jaggery is the sweetener used here which is more nutritious than sugar. Adjust the quantity as needed since the sweetness of jaggery varies each time one buys a batch. There is no need of any binding agent to make these laddus. Toasted peanuts and sesame seeds are used here which when ground release oil which help to bind the laddus. Made with healthy ingredients, these protein rich laddus provide a quick boost of energy besides being yummy and easy ones to prepare.

Ingredients: (Make 10 laddus)
1/2 cup roasted, skinned peanuts
1/4 cup white sesame seeds
1/4 cup grated dried coconut /copra
3/4 to 1 cup jaggery powder (depending upon the sweetness of jaggery)

Method:
* Toast sesame seeds on medium flame, continuously stirring until they start to slightly brown and start to sputter. It takes about a minute to toast them. Turn off the stove and transfer them onto a plate. Let them cool.
* Add all ingredients to a food processor / blender and coarsely grind them.

* Transfer the mixture onto a plate. Fist a portion of the mixture and shape it into a ball. Repeat the step of making balls with the remaining mixture. (It took me about 2 minutes for this quantity.)

* Store the laddus in an airtight container. The container can be left over the counter and needs to be refrigerated only if need to be stored longer. 

bmlogo

This post is an entry for Blogging Marathon under the theme 'Protein rich dishes'. Check the link to find out what other marathoners are cooking.

Comments

Friday, December 11, 2020

Meethi Sakrouri / Boondi ki Kheer

This boondi ki kheer was part of the Bihari thaali that I posted back in September. This is supposedly a traditional Mithila sweet and goes by the regional name meethi sakrouri. This kheer contains boondi, the tiny balls of chickpea flour that are deep fried which makes it a special one. Boondi can be prepared from scratch or store bought boondi can be used which makes the kheer preparation quite a simple and easy task. The milk needs to be reduced until it thickens and then cooked further after addition of boondi and sugar. The dish is finished with a generous garnishing of nuts which makes the kheer more inviting.

Ingredients:
4 cups full-fat milk
Sugar / sweetener to taste (I added about 6 Stevia packets.)
Plain boondi as needed 
1/8 tsp. ground cardamom
Coarsely chopped nuts to garnish
Directions:
* Boil milk in a non stick pan or a thick bottomed pan on low heat setting. Continue to cook until the milk quantity reduces to about 3 cups.
* Add sugar and cook further until the sugar is melted completely.
* Next add boondi, cardamom and nuts to the milk. Cook for 4 -5 minutes more and turn off the stove. The boondi soften and slightly plump up by the time.  
* Serve the kheer immediately.

Sunday, May 24, 2020

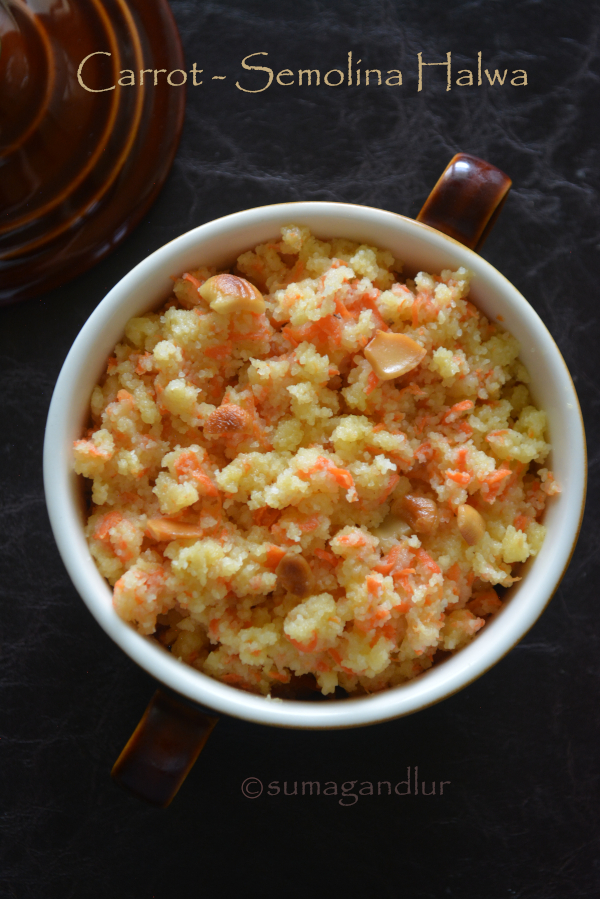
Carrot Semolina Halwa

I am planning to post three sweet dishes from Indian cuisine this week that are made with vegetables. The first one among those is this delicious halwa. Halwa, though associated with Persian cuisine also happens to be a popular sweet dish in India and there are varieties ranging from those made with flours, legumes to fruits and vegetables. Carrot halwa and semolina halwa are two popular ones among the genre and I tried to combine both in today's dish which yielded a yummy fusion. 

Carrots, semolina and sugar are the main ingredients that are needed to make this quick and easy sweet dish. Dairy or non dairy milk can be added or omitted depending upon whether halwa needs to be rich or not. I tried to keep it a less calorie one adding little amount of ghee and milk. It can be made rich adding more ghee and cooking the halwa in milk instead of water.
(Yield 4 servings) Ingredients: 
2 tbsp. ghee
2 tbsp. cashews
1 cup peeled and grated carrot
1/2 cup milk
1 and 1/2 cups water *
2 pinches of ground cardamom
1/2 cup roasted semolina 
3/4 cup to 1 cup sugar

*  Milk can be used instead of water. Or half the quantity of water can be replaced with milk.
Directions:
* Heat ghee in  a pan and add toast cashews until golden brown. Remove them with a slotted spoon onto a plate and add grated carrot to the same ghee. 
* Saute the carrot for a couple of minutes and add milk. Cook on low medium flame until carrot is softened, stirring intermittently. The carrot would have absorbed all the milk, by this time.
* Next add water to the cooked carrot and bring the mixture to a boil. (Half or full quantity of water can be replaced with milk if preferred.) 
* Add ground cardamom to the boiling water and lower the heat. Next add semolina, stirring continuously while doing so and taking care that no lumps are formed. Cover and cook until semolina is done. 
* Next add sugar and cook until the sugar melts. Mix well and cook for a minute more and turn off the stove.
* Add the toasted cashews to the cooked halwa and serve.

Comments

Friday, January 10, 2020

'Kodo Millet' Paramannam / Arikala Paramannam

After last week's A - Z Karnataka Recipes theme, I am moving onto the theme of festival recipes this week keeping in mind the upcoming Sankranthi festival. Somehow savory and sweet pongal versions and paramannam kind of dishes have become synonymous in the southern parts of India with this harvest festival. However my mother was mentioning recently in one of our chats that she doesn't remember a single Sankranthi festival meal where her mother had prepared a pongali / paramannam. Her mother would prepare ariselu / athirasam or boondi laddu. Of course, ariselu, a traditional sweet dish uses the harvested rice and would have made perfect sense for the season if one didn't mind the extra labor involved in pounding the rice and the deep frying part. My mother has somehow moved the dish to the Diwali category since it is prepared commonly during then in Bangalore area and also times it during our visits to India since it happens to be my husband's favorite sweet dish. 

My mother is also content preparing a sweet pongal dish like this albeit a traditional version using rice on Sankranthis. My version today uses kodo millet which tastes utterly delicious, almost similar to rice and comes handy if avoiding rice. The recipe can be easily doubled and the preparation is quite simple and easy one. If you have any other millet handy like proso, barnyard, foxtail or little millet, they can be substituted for kodo millet here. Even quinoa, cracked wheat can be used. Or stick to rice, the original version. A little dal is always added while making rice based sweet dishes for auspicious occasions since the plain rice versions are made during death anniversaries. The color of the dish depends upon the color of the jaggery being used in the recipe. No need to fret or run to store in case if one doesn't have jaggery on hand. It can be easily replaced by sugar. Actually I enjoy the sugar and the coconut combination in the traditional rice version more. And coming to edible camphor, a tiny pinch is all that matters for that divine taste which resembles the temple prasadms. A tad more would result in an overbearing flavor. Ghee can be used as generously as one would wish. And finally don't skip the coconut if possible since it enhances the flavor of the dish. 

Ingredients:
1/4 cup kodo millet
1 tbsp. split yellow gram / Bengal gram (Moong dal or Chana dal) 
3/4 cup milk
1/4 cup grated fresh coconut
1/2 cup powdered jaggery
1/8 tsp. ground cardamom
A pinch of edible camphor
1 to 2 tbsp. ghee
1 tbsp. raisins
1 tbsp. cashews

Directions:
1. Rinse kodo millet and dal with water and drain. Pressure cook kodo millet and dal adding 1/2 cup milk for 3 whistles. Add a small spoon to the millet container while cooking to prevent milk from boiling over. (It can be cooked directly in a pot as well on medium flame and the liquid quantity may need to be adjusted as needed (usually more). Milk can be replaced with water in this step to avoid the milk from boiling over while cooking. Keep stirring to avoid millet sticking to the bottom of the pan while cooking or use a non stick pot to make the job easier.)  

2. Heat ghee in a small pan and add raisins and cashews. Toast them until cashews turn golden brown and raisins turn plump.
3. Transfer the toasted raisins and cashews with a slotted spoon on to a plate. To the same ghee, add the cooked millet, coconut, jaggery, and cardamom.

4. Mix well and add the remaining milk. Stir well. Cook on medium flame stirring intermittently until the mixture starts to bubble. Simmer on low heat for about 3 - 4 minutes until all the jaggery melts and incorporates into the mixture. Finally add edible camphor if being used and turn off the stove. Add the toasted cashews and raisins as well. Stir well and serve warm. It tastes good even when cold. Leftovers can be refrigerated and warmed before serving.  

Some points to be noted:
1. I directly added jaggery to the millet mixture since it was clean. In case the jaggery appears not clean, melt it separately in a small pan adding small amount of water and filter the solution. There is no need to add too much water since we don't need the paramannam to be very diluted.
2. Sometimes the milk may split when added to jaggery directly and cooked. It has not happened to me but in case if you suspect that to happen and to be on a safer side, the addition of milk can be omitted in step 4. Instead, the milk can be boiled and cooled separately and added to the mixture after turning off the stove.

Saturday, September 7, 2019

Godhuma Sojjappalu / Cracked Wheat Halwa Appam

My final post of this week, which featured 'Sweet' series. Next week, I am onto savory snacks from the state of Gujarat. So far in the series,
Malaadu / Hurigadale Unde
Dry Gulab Jamun
Coconut Burfi / Kobbari Mithai
Almond Halwa / Badam Halwa
Elaneer Payasam

Sojjappalu is one of the sweets prepared as a neivedyam on festival days in Andhra Pradesh. The 'sojja' refers to the semolina halwa filling used in the appams. I sometimes prepare these for Varalakshmi Vratham, substituting with other fillings. I made the filling with cracked wheat halwa this time which was equally delicious. I made a small portion but this can be easily doubled. The cracked wheat halwa filling I prepared here is sweet to eat as it is but becomes a mildly sweet filling for appalu. If one prefers appalu on a sweeter side, then increase the sugar quantity and cook until the halwa thickens.
Somehow, I find the preparation of sojjappalu simple compared to the bobbatlu / poli recipe. An outer layer dough is prepared using all purpose flour and a sweet filling of halwa is prepared. The sweet halwa filling is encased in a dough disc, rolled into a palm sized one and are deep fried to golden brown. They are not rolled as thin as a poli and they puff up while getting fried. There is no need to worry in case if they don't puff up. They end up getting flattened once they cool down, just as pooris do. I usually pat them into a thick disc but this time, I rolled them thinner. 

(1 cup = 240 ml)
Ingredients: (Yield - 5 to 6 appalu)
1/2 cup maida / all purpose flour + extra for dusting
A pinch of salt
1 tsp. oil
Oil / ghee to fry appalu

Ingredients for filling:
1/2 cup water
1/2 cup fine cracked wheat
1/2 cup sugar *
1/8 tsp. cardamom powder
1 tsp. ghee
* The filling is sweet to eat as it is but becomes a mildly sweet filling for appalu. If one prefers appalu on a sweet side, then increase the sugar quantity and cook until the halwa thickens.

Directions to prepare the outer covering:
* Combine flour, 1 tsp. oil and salt in a mixing bowl. Add water as needed and form a firm, pliable dough (I added about 2.5 to 3 tbsp. water.) Cover the dough and rest it for about 30 minutes or so.


Directions to prepare the sweet filling:
* Toast the cracked wheat on medium flame for a couple of minutes and keep it aside.

* Bring 1/2 cup water to a rolling boil in a pan. 

* Add the cracked wheat to the hot water and stir well to combine. Lower the heat and cover the pan. Cook the cracked wheat for a couple of minutes.

* Add sugar, ghee and cardamom to the cracked wheat and continue to cook.

* The sugar melts and loosens the mixture. Cover and continue to cook.

* Turn off the stove when the mixture is well cooked and comes together as thick mass. If the mixture appears runny, cook further until the mixture thickens. Leave the mixture to cool.

Directions to prepare appalu:
* Divide the dough into 5/6 equal portions and roll them into smooth balls. Similarly, divide the stuffing into 5/6 equal portions and roll them into balls. Grease your palms with ghee if needed.
 
* Dust the work surface with flour if needed. Roll a dough ball into a thin circle of about 4 inches diameter. Place the stuffing at the center of the circle and bring the edges of the rolled dough together. Roll them into discs. Or grease your fingers if needed and pat into a circle of 1/4 inches thickness.
 
* Heat oil / ghee in a frying pan. Pinch a small portion of the dough and drop into the oil to check the readiness. If the dough sizzles and comes to the surface then the oil is ready to fry. Slide the rolled disc into the hot oil carefully from the side of the pan.

* Fry on low flame, flipping in between until the disc turns golden brown on both sides. Remove with a slotted spoon and drain on a plate covered with an absorbent towel. Repeat the steps with the remaining dough and the filling.
* The appalu puff up while frying but they get flattened once they cool down.

Check out the Blogging Marathon page for the other Blogging Marathoners doing BM#104
You are invited to the Inlinkz link party!
Click here to enter

Comments

Thursday, September 5, 2019

Almond Halwa / Badam Halwa


So far in the series,
Malaadu / Hurigadale Unde
Dry Gulab Jamun
Coconut Burfi / Kobbari Mithai

There was a time when I didn't have to bother about what I was putting into my mouth or worry about calories, which sounds like a bygone era when I put it like that. Almond halwa and burfis seem to belong to that period, considering that I haven't prepared either of them in the past 16 years. Yes, you read that right. I somehow remember the last time I made badam burfi in my kitchen, though I cannot tell you what I cooked for my lunch, a couple of days ago. 

These almond based sweets made a regular appearance in my home during the early years of my cooking and I kinda had become an expert in making almond burfis. That was the first sweet I learned on my own after moving to US without my mother in the picture and it was kind an accomplishment for me who hadn't done cooking in a real sense up until then. Somehow over the years I have stopped preparing them as I mentioned earlier and recently my husband was mentioning about my badam burfi / halwa to the kids who seemed to not remember ever eating those. 
And so I thought of including this badam halwa aka Indian version almond pudding, which is a super delicious treat in this week's sweet series. There is no need for any occasion to enjoy this yummy halwa though it makes a great addition to any festive platter. It is also a common item sold in Indian sweet shops. This is a quite easy, straight forward recipe for even newbie cooks since it tests only one's stirring skills. Blanched almonds are ground to a paste and cooked along with ghee and sugar until it thickens and leaves the sides of the pan, resulting in a literally melt in mouth halwa. All one needs to do is to not to leave the stove unattended and stir the halwa frequently which is not very tedious though it sounds so. Use a non stick pan to cook this and there is no need to stir continuously that much, I feel. 

Prep time: 10 minutes
Cook time: Around 30 minutes
Ingredients:
1 cup almonds 
3/4 cup milk
1 cup sugar
4 tbsp. ghee
1/4 tsp. saffron strands or 2 drops of yellow food color (optional)
1/8 tsp. ground cardamom (optional)

Directions:
1. Soak saffron strands in 1 or 2 tbsp. hot water if using and keep aside.
2. Rinse and add almonds to a microwave safe bowl. Pour enough water to cover almonds.
 3. Microwave the almonds along with water for 3 minutes and carefully remove the bowl. Carefully drain the hot water and rinse them once. Alternatively, the almonds can be soaked overnight or can be immersed in hot water for sometime. This is done to facilitate the peeling of almonds. Or one can always use blanched almonds instead and avoid steps 2 and 3.

4. Peel the skins of almonds one by one. Place an almond between your thumb and the next two fingers. 
* Put a slight pressure on the almond with the thumb and do the upward slide motion. 
* The skin will come off. Repeat the step with the remaining almonds.
* Transfer the almonds to a blender and add milk. Grind them to a fine paste. Add a little extra milk or water if not grinding easily. Transfer the mixture to a pan, preferably a non stick one. One can use a thick bottomed pan as well but the chances are more of the mixture getting stuck to the bottom and it may need constant scraping. 
* Add 2 to 2.5 tbsp. ghee to the ground paste and put the pan on medium flame.
* Cook the mixture for five minutes, stirring frequently and add sugar.
* The mixture becomes loose when sugar is stirred into the paste. If you notice any tiny clumps of almond paste, rub them with the back of a spoon or spatula you are using.

* Keep stirring frequently and continue to cook. Add saffron strands along with the water if using, stir well and keep cooking. Keep scraping the sides of the pan as well while cooking to avoid the almond paste sticking. The below picture is after 15 minutes of stirring / cooking and you notice that it has thickened. It kind of resembles semolina halwa in looks. (I kept changing the heat setting to medium and a little lower than medium on my gas stove while cooking.) 

* Add the remaining ghee at this point and continue to cook. 
*  The mixture starts to leave the sides of the pan and one would even notice the mixture turning porous (holes appear) when stirred as in Mysore pak preparation, though not as much. One can add a little ground cardamom at this point for flavor, if preferred. Keep stirring further and cook until the mixture clumps into a single mass and leaves the sides of the pan. Also the ghee would have completely absorbed by the halwa at this point. (It takes about 10 to 12 minutes after the ghee addition.)
* Turn off the stove. Transfer the halwa to a container or serve it warm. Garnish with chopped almonds before serving, if preferred.
Notes:
1. One can add more ghee in the halwa preparation, if preferred.
2. Blanched almonds can be used instead of soaking and peeling the almonds.


Check out the Blogging Marathon page for the other Blogging Marathoners doing BM#104.You are invited to the Inlinkz link party!

Comments