HOME        |        ABOUT        |        COPYRIGHT        |        CONTACT        |         RECIPE INDEX        |         INDIAN THAALIS        |         MILLET RECIPES        |        EVENTS' ROUNDUP        

Wednesday, February 19, 2014

Whole Wheat Sticky Buns

Usually most of the times, the food magazines I subscribe here have few vegetarian recipes that I really feel like trying. However I don't let it deter my love for the food magazines. I think that even if there are one / two recipes worth trying then I feel like it makes up for the money and time spent over it. These yummy sticky buns is one such recipe worth trying and has become my kids' recent favorite.
Last month's edition of "Martha Stewart's Living" seemed like a jackpot. Unlike the other times, this one was filled with plenty of yummy dessert recipes and I couldn't resist trying some of them. I wanted one of the "rolled and baked" themed dishes to be on the sweet side and my usual cinnamon buns recipe was lost. I remembered seeing these sticky buns in the magazine and tried these instead. And these cinnamon flavored, sweet and gooey buns became an instant hit with my kids. The buns are quite easy to make and doesn't need any expertise to master them. 

Ingredients for dough: (Makes 10 rolls)
1 tbsp. flax meal + 3 tbsp. water (Or any substitute for 1 egg.)
1 & 1/4 cups whole wheat flour (I used roti atta.)
3/4 cup all purpose flour
2 tbsp. toasted wheat germ (I used a tbsp. of flax seed meal + a tbsp. of flour instead.) 
1 & 1/8 tsp active dry yeast
1/2 tsp salt
2 tbsp. packed light brown sugar
1/2 cup warm water

Preparing the dough:
* Whisk flax meal and water in a bowl and keep aside for 3 - 4 minutes.
* Combine flours, wheat germ, yeast, salt, brown sugar, water, butter and the flax meal solution in the bowl of a stand mixer fitted with the dough attachment or a food processor. Mix until dough is smooth and elastic, about 5 minutes.
* Transfer to a lightly greased bowl and cover with a plastic wrap.
* Allow to rise in a warm place until the dough is doubled, about 1 - 2 hours.
 Ingredients for filling / topping:
1 stick / 1/2 cup unsalted butter, softened + plus extra for pan
3/4 cup packed light brown sugar
1/2 tsp ground cinnamon
1/2 tsp salt
1/2 cup pecans, toasted and chopped (I used walnuts instead.)

Preparing the filling:
* Mix butter, brown sugar, cinnamon and salt in a bowl until smooth and fluffy.
* Brush a 9 inch round cake pan with butter. Spread half of the above filling mixture over the bottom of the pan. Sprinkle half of the pecans over it.
 
* Lightly flour the work surface and roll out the dough into a 10x14 inch rectangle.
* Spread the remaining filling over the rolled out rectangle with a spatula, leaving about 1/4 inch around the edges. Sprinkle the remaining nuts.
* Starting at a long edge, roll up the dough like a cylinder and cut crosswise into 10 pieces.
* Place the pieces in the pan with cut-side down. Space them evenly since they are going to rise after the second resting.
* Now cover the pan tightly with a plastic wrap. Allow to rise again in a warm place until they are almost doubled and the buns are touching, about an hour or so.
* Preheat oven to 350 degree F / 175 degree C.
* Bake buns until golden brown and the topping is bubbling, about
25 minutes.
 * Let the buns cool in the baking pan, for about 15 minutes.
* Place a serving plate centered over pan. Hold the plate and pan together and carefully flip over. Lift the pan off and scrape out any remaining topping from the pan onto the buns.
* Serve warm. Refrigerate the left overs and warm them in the microwave for few seconds before serving them.

This is going to be a part of BM # 37 under the theme of "Rolled and Baked Recipes".

Comments

Tuesday, February 18, 2014

Spicy Bread Rolls

During each marathon announcement, Valli keeps on throwing googlies towards us in the form of "conditions" to make the themes more challenging. As one hardly notices the fine print on the products by manufacturers, I pay little attention to the clauses at the first glance. I sit after sending my selected themes to Valli, go through the announcement again and leisurely repent. The same thing happened again with the theme I chose this week. I wanted to try Danish pastries and cigar rolls real bad under the "rolled and baked" theme until I went through the clauses again. My excitement bubble burst after seeing the condition "to be done from scratch". I wasn't going to sit and start from the scratch but went for an easy substitute instead. I had seen sweet and savory roll versions prepared with bread plenty of times before and thought I will go with this instead.
And yes, I do bake bread at home regularly but since this is not about bread making, I will save it for another post. I have used whole wheat bread and spicy potato curry for the filling here. Feel free to use any filling of your choice but keep it on the dry side. These real crisp and yummy rolls can be a great teatime snack. Serve them hot with a spicy / sweet chutney.
Ingredients:
10 - 12 Bread slices
About 1 cup potato curry / any other spicy filling
Melted butter to bush the rolls 
 
Method:
* Take the bread slices and trim off the crusts to make an even shape. 
* Using a rolling pin, roll them thin without breaking.
* Place about a tbsp. of curry on one of the shorter ends. Wet (with water) along the other end of the shorter side.

* Start from the end where filling is, and go on rolling like a cylinder.
* Seal the ends with moistened fingers if needed.
* Repeat the steps with the remaining bread slices. Brush them with melted butter all over and arrange them on a baking sheet.
* While doing the prep work, preheat the oven to 350 degree F. Bake them for 12 - 15 minutes or until they turn crisp. Remember to flip them around a couple of times in between during the baking process.
* For a quicker version, they can be sautéed in a pan too instead of baking.
This is going to be a part of BM # 37 under the theme of "Rolled and Baked Recipes".

Comments 

Monday, February 17, 2014

Soft Pretzel Rolls

Another week of blogging marathon starts from today and I had picked "rolled and baked dishes" for this week, during the theme selection. Honestly speaking, I had a very wrong notion about this particular theme. I thought it was literally using a rolling pin in the baking recipes and even selected my recipes. Just to confirm, I had mailed Srivalli. She must have laughed at my goofiness but the ever understanding lady returned back to me saying that she was looking for the "rolls" and not the ones using "rolling pin".
After knowing about what is expected, I decided on two of the recipes quickly. I was planning on sandwich rolls for the third one and had to do a lot of prep work just to decide which one. I was looking for some eggless soft rolls and definitely not the stone hard nightmares I get on those European international carriers whenever I travel.  
Croissants are something my kids love and I buy regularly and so the first thing that came to mind was these yummy rolls. However, after pondering a while, the amount of butter that goes into them started giving me jitters. I know it sounds lame but when you don't see with your own eyes what went into them, you can just pretend that it is not that bad for you and just buy. :) I gave up on the croissants' idea and started looking for something easily doable stuff. After searching over the internet for hours, I ended up staring at these soft, chewy pretzel rolls found here.
Honestly, I hadn't even heard about these rolls until I saw them at this blog. I know about the pretzels but definitely not the rolls. Usually I don't pay much attention to the bakery section at my local grocery stores, especially the rolls / buns. I buy whole wheat bread, pitas, croissants and sandwich buns without much thinking and so I must have missed these soft rolls so far.
A little wiki search tells me that these are baked specialty in Germany, Austria and Switzerland. They are also called as laugenbrötchen or lye rolls in Germany since they are glazed with lye solution before baking as in the case of pretzels. A baking soda wash will also provide the same effect and that's what has been used in this recipe. These rolls are used in sandwiches but we have enjoyed them with soup and salad. These rolls are on the dark brown side, going by the images in the virtual world but I ended up with a lighter version, I guess. Either I didn't bake them to the point where they attain that color or I could have gone with a little extra baking soda in the recipe. However it doesn't make any difference to the taste or texture of the bread. I halved the original recipe to make 10 rolls.
They taste best, fresh out of the oven. However 1 or 2 days old ones, warmed for a few seconds in a microwave taste just as good. And finally, I would like to mention that it is a very easy recipe that doesn't demand much time / attention from you. If I can do it, you can do it too.

Ingredients: (Yield 10 rolls)
1 & 1/2 tsp. instant yeast (rapid rise yeast)
1 tsp. salt
2 tbsp. oil
1 cup warm milk
3/4 cup warm water
3 & 1/2 to 4 cups all purpose flour (Use flour as needed. I had to use about 4 cups minus 2 tbsp. flour.)

For the soda bath:
6 cups water
1 & 1/2 tsp. sugar
2 tbsp. baking soda

Method:
The dough can be prepared in an electric mixer or a food processor or by hand in a big bowl. I chose to go manually since the daily roti making ritual at home has made me enough skillful to prepare a dough under 5 minutes using just one bowl.
* Stir yeast, salt, oil, milk and water in a mixing bowl. Add initially about 3 cups of the flour to the milk mixture and bring it together working with your right hand. Scrape any dough sticking to the sides of the bowl. Then go on adding extra flour gradually as needed to form a soft dough that is not sticky to touch anymore. Do knead well for about 3- 4 minutes.
* Transfer the dough to a lightly greased bowl, cover with a plastic wrap or a lid. Leave it to rise in a warm place until it doubles in size, about 1 to 2 hours.
* Mine was done in an hour.
 
 * Divide the dough into 10 portions (or more if you want it to be small sized rolls).
 * Shape each portion into a roll. Mel has even posted a tutorial on how to shape the rolls. I followed her method. If interested, check it out.
* Slightly flatten them at the bottom and place them on a lightly greased baking sheet with some space in between. Cover them with a kitchen towel or a plastic wrap. Leave them aside again to rest for 15 - 20 minutes.
 
* Preheat the oven to 425 deg F / 220 deg C.
* In the meanwhile, add water, baking soda and sugar to a large sauce pan and bring it to a boil.
* Before dropping them into water, the recipe suggests to carefully pinch the bottom seam of each the dough ball without deflating it. This helps the dough ball to keep the shape. I skipped this step and just flattened lightly after rolling, just before the 15 - 20 minute resting step.
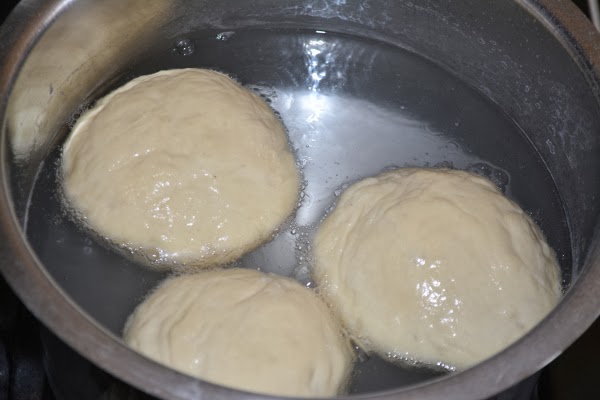
* When the water is boiling, gently drop 3 or 4 dough balls into it. The balls come to the surface immediately. Boil for 30 - 60 seconds on each side. The longer you boil, the chewier your rolls would be. I did for around 35 seconds on each side.
* Gently remove each bun with a slotted spatula and drain. Transfer the boiled dough balls onto a lined baking sheet. Repeat the steps with the remaining dough balls. Don't worry if the dough balls look wrinkly at this stage. 
* Using a sharp knife, slash 2 to 3 , 1/4 inch deep cuts into the top of the unbaked rolls. If you are using coarse salt, you can sprinkle a little on each of the buns at this point. I hate the salt even on the pretzels and chose to leave it out.
* Bake them for about 20 - 22 minutes or until the rolls are deep golden brown.
 
This is going to be a part of BM # 37 under the theme of "Rolled and Baked Recipes".
 

Wednesday, February 12, 2014

Vegan Orange - Chocolate Cupcakes

 
I stumbled upon this recipe when looking for any fruit and chocolate based cupcakes and oh boy, I am glad that I did. This is almost a 5 star recipe, in my opinion. I should however admit that in the middle of baking, my heart sank seeing the sinking tops of the cupcakes. I had zeroed in on this recipe and was in no mood for further recipe hunting. I gave up and thought that I may have to fall back on any standard banana chocolate one. However by the end of baking they rose again, leaving a big happy smile on face. And so if the cupcakes sink in the initial stages of baking following this recipe, I guess there is no need to worry.
The taste and the texture of the cupcakes are fabulous. You can also add a tsp. of orange zest to enhance the orange flavor. The recipe had nuts in them but instead I chose to go with chocolate chips as this was a chocolate based theme. This is basically a cake recipe and suggests to use a 8-inch square or 9-inch round baking pan. I decided to use a muffin pan instead since I was planning to bake cupcakes for the marathon.

Ingredients: (Yield 16 cupcakes)
1/2 cup soy milk at room temperature (or milk for a non vegan version)
2 tbsp. apple cider vinegar
1 & 1/2 cups all purpose flour
1 tsp. baking soda
1/3 cup unsweetened cocoa
1 cup sugar
1/2 cup mixed chopped nuts (optional)
1/2 cup vegetable oil
1/2 cup orange juice
2 tsp. vanilla extract
1/2 cup vegan chocolate chips (or chopped nuts)
 
Method:
* Grease the cake tin / muffin pan you are going to use and keep it aside. Or liners can be used for the muffin pan. 
* Whisk milk and vinegar in a bowl and leave aside for 3 to 4 minutes.
* Preheat oven to 375 deg F / 190 deg C.
* Sift flour, baking soda and cocoa powder into a mixing bowl. Add sugar and mix well.
* Mix orange juice, oil and vanilla and add it to the vinegar mixture. Beat just to combine.
* Add the liquid ingredients to dry and whisk to combine forming a non lumpy batter.
* Bake for 25 - 30 minutes or a tooth pick inserted into the center comes out clean. I halved the original recipe to get 8 cupcakes and mine were done in about 25 minutes.
See how beautiful the texture is.
 
This is going to be a part of BM # 37 under the theme of "Chocolate Based Muffins / Cupcakes".
 

Tuesday, February 11, 2014

Oats - Chocolate Chip Muffins


For one of the "chocolate based cupcakes / muffins" themed entries for the blogging marathon, we have the choice to use either chocolate chips or frosting. I have a great aversion to the latter and so stuck with the chocolate chip option. Besides I already had baked a couple of chocolate cupcakes for this week and was looking forward to try a new muffin recipe throwing chocolate chips in it.
And I had to go no further than my pantry for the inspiration. There was a berry muffin recipe on my oats container. Whenever there is an interesting baking recipe other than the boring basic method of cooking oats, I do take notice and give it a try when I can. This time, I turned the recipe into eggless and added some chocolate chips to it. The recipe yields a dozen muffins but I halved the recipe to get six. They turned out good and I had no complaints with either the taste or the texture. Even my daughter approved them. And people who follow my blog of course would know that she had to because of the choco-chips. :)

Baking Temperature: 400 deg F / 200 deg C
Prep time: 5 minutes
Baking time: 18 - 22 minutes
Yields: 12 muffins

Ingredients:
1 cup quick cooking oats
1 & 1/4 cup all purpose flour
1/2 cup sugar
1 tsp baking powder
1/2 tsp baking soda
1/4 tsp salt
1/2 cup soy milk or any non dairy milk (or milk for a non-vegan version) 
1/2 cup oil (I used canola oil, but melted butter can be substituted if preferred.)
1 tbsp. flax seed meal (or any other egg substitute for 1 egg)
1/2 to 3/4 cup chocolate chips (or blue berries)
Method:
* Combine flax seed meal and 3 tbsp. of water in a small bowl and keep it aside for about 3 to 4 minutes.
* In the mean time, preheat the oven to 400 deg F. Grease the muffin tin or line with paper cups. If using silicone muffin pan, there is no need to prep but I use liners to make it convenient to grab n go.
* Combine all the dry ingredients in a bowl. Next add milk, oil, flax seed meal solution and mix just to combine. Stir in chocolate chips at the end.


* Spoon the batter into muffin cups, up to 3/4ths.
* Bake them for about 18 - 22 minutes or until they turn golden brown. (I did half the batch and mine were done in 19 minutes.)

This is going to be a part of BM # 37 under the theme of "Chocolate Based Muffins / Cupcakes".

Comments

Monday, February 10, 2014

Basic Vegan Chocolate Cupcakes

Chocolate, cheese and olives come under 'I absolutely love" category for my daughter and she rarely refuses them when offered. When I say chocolate, not only the candies and other chocolate based desserts, she even doesn't spare the bitter chocolate chips. On the spur of the moment, I picked chocolate based muffins/ cupcakes theme for this week's marathon keeping her in mind. Later when I started thinking about the recipes and the quantity of cupcakes I may end up with, I started to feel hesitant. Besides, I didn't want to end up with repetitive looking recipes. However after some investment of time online and other sources, I got to try some recipes for the first time in my kitchen that turned out to be absolute hits.
The first recipe inspired from here is a basic vegan version of chocolate cupcakes. It is a fool proof version and yields very yummy, perfectly done cupcakes. Moist and fluffy - the kind anyone would love to have. Going by the reviews, the frosting suggested in the recipe is equally delicious but the lazy me decided to skip it. I halved the original recipe, reduced the sugar quantity and got half a dozen cupcakes.

Ingredients: (Yield 12 cupcakes)
1 cup soymilk (or plain milk for non-vegan version.)
1 tablespoon apple cider vinegar
3/4 cup granulated sugar (Vegan sugar)
1/3 cup canola oil (or softened butter for non-vegan version.)
1 teaspoon vanilla extract
1 cup all-purpose flour
1/3 cup cocoa powder
3/4 teaspoon baking soda
1/2 teaspoon baking powder
1/4 teaspoon salt
Method:
* Sift together flour, cocoa powder, baking soda, baking powder, and salt in a bowl and keep it aside.
* Whisk together milk and vinegar in a large bowl and set aside for 3-4 minutes to curdle.
* Preheat oven to 350°F. Grease the muffin pan or line it with paper or foil liners.
* Add sugar, oil and vanilla extract to the soy milk mixture and beat until foamy. Add the dry ingredients to the wet ingredients and beat till no lumps are left.
* Pour the batter into muffin cups, filling up to 3/4th of them.
 * Bake for about 18 to 20 minutes or until a toothpick inserted into the center comes out clean.
* Transfer to a cooling rack and let cool completely.

This is going to be a part of BM # 37 under the theme of "Chocolate Based Muffins / Cupcakes".
 
Comments

Wednesday, February 5, 2014

Biscotti Bites

I saved the best for last. "Best" according to my daughter. I consider a baking experiment hit when my daughter is ready to finish off the entire batch without sharing it with any one. I consider it a super hit when my daughter keeps asking me for another batch without forgetting about the stuff even after a month or so. This is what happened with these cookies and my daughter absolutely loved them.
I tried them from Martha Stewart Living magazine, which I subscribe regularly. I tried these cookies the day I got that particular edition since the picture of these bites got my attention. I instantly knew that my daughter was going to love these chocolate covered bites. It is like a quick take on the traditionally twice baked crunchy biscotti. The only goof up I did was heaping a tablespoon of batter instead of a teaspoon though my daughter didn't complain. And so instead of bites, I ended up with chunky cookies.
I halved the original recipe and should have got around 50 bites according to the recipe. I did not get that many may be because I used a tablespoon sized dough for each bite. The recipe also had about a tbsp. of grapefruit zest that I omitted.

Ingredients:
1/2 cup + 2 tbsp. all purpose flour
1/2 cup + 2 tbsp. fine cornmeal (I had coarse cornmeal and so substituted it with all purpose flour.)
1/4 tsp baking powder
1/4 tsp coarse salt
1/3 cup unsalted butter, at room temperature
1/2 cup granulated sugar
1 tbsp. flax seed meal + 3 tbsp. water
1/2 to 3/4 cup sweetened shredded coconut
5 oz bittersweet chocolate, chopped
Fine sanding sugar, for sprinkling (I didn't use it.)
Method:
* Combine flax seed meal and water in a small bowl and keep it aside for 4 -5 minutes.
* Mix flour, cornmeal, baking powder and salt in a bowl.
* Beat butter until smooth. Add granulated sugar and beat again until fluffy. Add flax seed mixture and beat again until well combined. Add flour mixture and beat on low speed until just combined. Next beat in coconut and half the chocolate until evenly distributed.
* Line the baking sheets with parchment paper. Drop heaping teaspoonfuls of dough, spaced 1 inch apart, on the sheets. I would recommend slightly flattening them with fingers. Sprinkle sanding sugar if using. Refrigerate for 30 minutes.
* Preheat the oven to 350 deg F / 175 deg C. Place the cookie sheets in the oven. Bake rotating sheets halfway through, until golden, 18 - 20 minutes. Let them cool completely.
* Melt remaining chocolate in a bowl set over a saucepan of simmering water, stirring until chocolate turns smooth. Dip bottoms of cooled cookies in melted chocolate.
* Set them on parchment lined baking sheets and again refrigerate them until chocolate is set.
This is going to be a part of
1. BM # 37 under the theme of "Baked Snacks".
2. Srivalli's "Kids' Delight" event, hosted by PJ this month with the theme "Baked Treats For Kids".
 

Tuesday, February 4, 2014

Caraway Cookies

I make it a point to bake / buy cookies regularly as they tend to disappear quickly at our home. They happen to be one of my daughter's favorite after-school snack items and besides, her dad loves to have some along with his evening coffee. And so, I keep on looking forward to try out new cookie recipes whenever I get a chance. Of course blogging marathon now a days is also serving as an inspiration. :) 
I got to try these caraway cookies today from a cookbook I own. Years ago, I had bought two cookbooks on the spur of the moment. The books combined have more than 200 recipes with beautiful pictures. However I have hardly tried any recipes from them though I go through them regularly. Today, my attention went to one of those books called "Baking" accidentally while cleaning the bookshelf and somehow I thought of trying out one recipe today. I already have recipes ready for this week's marathon but still I wanted to bake one more stuff. :)
These caraway cookies caught my attention because of the presentation, easy preparation and their color, which of course I could not achieve in my cookies. :) Nevertheless, the cookies tasted good with hints of caraway seeds / ajwain flavor. My daughter loves to eat raw cumin seeds and caraway seeds and so I had one more reason to try them. I am mostly used to taste ajwain in spicy dishes and this was a welcome change. If you are not used to the strong caraway seeds' flavor, go with poppy seeds instead.

 Ingredients: (Makes about 60 cookies of 2 inches diameter)
1 tbsp. flax seed meal + 3 tbsp. of water (Or use 1 egg if you consume them.)
2 cups all purpose flour
Pinch of salt
1/3 cup butter, cut into small pieces
1&1/4 cups superfine sugar (I added only a cup and it was enough sweetness.)
1.5 to 2 tbsp. caraway seeds
Milk as needed
Crystal sugar for sprinkling
Method:
* Mix flax seed meal and water in a small cup and leave it aside for about 5 minutes.
* Sift flour and salt into a mixing bowl. Rub in butter with fingertips until the mixture resembles bread crumbs. Stir in the sugar, caraway seeds and the flax seed meal. Bring together to form a dough. At this point, I think it is impossible for the dough to come together without using a liquid. I had to add more than 1/4 cup milk at room temperature. Form a soft dough adding milk little by little.
* Preheat the oven to 325 deg F and grease a cooking sheet.
* Flour your working surface if needed and roll the dough thinly and cut into rounds of about 2 inch diameter. 
* Transfer the dough rounds onto it. Brush them with milk (or beaten egg if using) and sprinkle with a little sugar. (I was baking another batch of cookies, got confused and accidentally sprinkled fine sugar. )
* Bake for about 15 minutes or until the cookies are crisp and lightly golden in color. (I had to bake few extra minutes.)
* Let them cool on a wire rack and store them in airtight container.
This is going to be a part of
1. BM # 37 under the theme of "Baked Snacks".
2. Srivalli's "Kids' Delight" event, hosted by PJ this month with the theme "Baked Treats For Kids".

Comments

Monday, February 3, 2014

Baked Masala Peanuts / Peanut Bhujiya

Masala peanuts / Peanut bhujiya are loved by everyone equally at our home. Even my 12 year old who considers eating as a punishment needs no nudging when it comes to these spicy peanuts. Though she cannot handle spicy food in general, savory stuff like these peanuts are an exception. She keeps drinking water and goes "ooh aah" because of all the heat but wouldn't stop from munching on this addictive stuff. I too love them equally and so my husband needs no reminders to buy packets of these peanuts whenever he goes shopping. :)
Traditionally peanuts are coated with spicy, thick chickpea flour batter and are then deep fried. I have seen my MIL making them at home but I have never been inclined to prepare them until now. I had promised my daughter the other day that I will make some at home to escape a shopping trip in this cold weather. When I decided to make masala peanuts at home, I thought to make a low cal version instead.
Jugalbandi's version was stuck in my head ever since I saw them posting it and I tried it at last today. This is not the real deal but can be a great substitute if you are trying to cut down some calories. Any other nuts can be used in place of peanuts.
My notes:
1. I greatly recommend using roasted peanuts for this recipe. You will end up with crispier masala peanuts that way. Otherwise you will end up with slightly softer peanuts with a crispy outer shell.
2. I found that the baking time mentioned in the original recipe was longer with my oven settings. After 15 minutes of baking on one side, they were almost on the verge of burning. And so, I baked the second batch for only about 12 minutes, I stirred them and turned off my oven. I left them in the oven for few minutes and removed the tray.
3. 1/3 cup of water used in the recipe is perfectly fine but going by the pictures, the batter I ended up with was not that wet as in the original recipe. While arranging them for baking, separating each peanut is tedious but I did it anyway. You can drop the peanuts in clusters, bake them and then break them to get individual pieces.
Ingredients:
1.5 cups of roasted peanuts or any other nuts being used
1.5 cups of besan / chickpea flour
2 tbsp. of rice flour
1 tsp chili powder (Or more if you prefer spicier version)
1 tsp salt
1 tbsp. ajwain / carom seeds, coarsely crushed
1/3 cup water

Method:
* Combine flours, salt, chili powder and ajwain in a mixing bowl.
* Divide the mixture into two portions. Add water to one portion and mix well. Then add the roasted peanuts and mix well so that peanuts are coated well with the besan mixture. Now add the remaining besan mixture and mix well. 
* There was no dry flour left at this point, for my batch. If at all there is too much loose flour left, moisten your hands with water and wet the mixture.
* Preheat the oven to 400 deg F / 200 deg C.
* Break the clusters and arrange the peanuts directly on a baking tray. No need to grease or line the baking sheet.
* Bake for about 10 minutes, stir them and bake for another 10 minutes. They turn golden brown and crispy by the time. (See my notes.)

This is going to be a part of
1. BM # 37 under the theme of "Baked Snacks".
2. Srivalli's "Kids' Delight" event, hosted by PJ this month with the theme "Baked Treats For Kids".

Comments