HOME        |        ABOUT        |        COPYRIGHT        |        CONTACT        |         RECIPE INDEX        |         INDIAN THAALIS        |         MILLET RECIPES        |        EVENTS' ROUNDUP        

Showing posts with label Onion. Show all posts

Tuesday, January 11, 2022

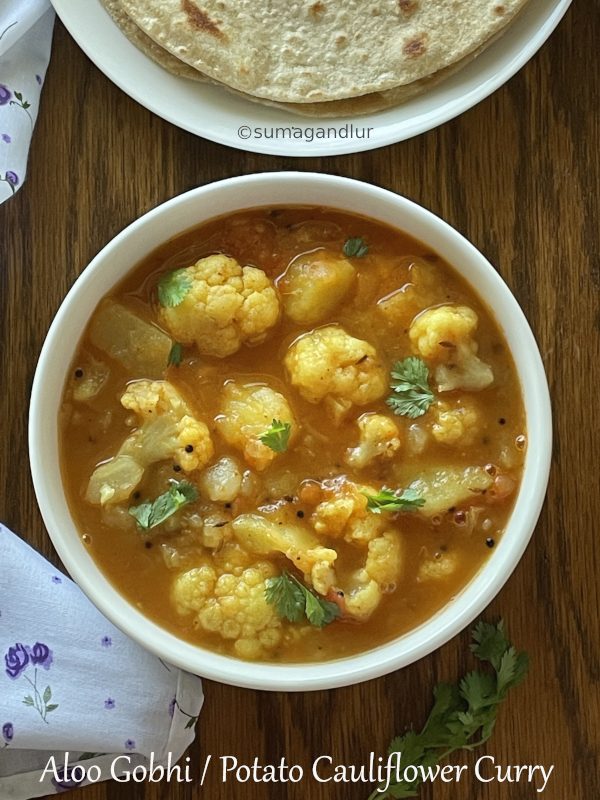
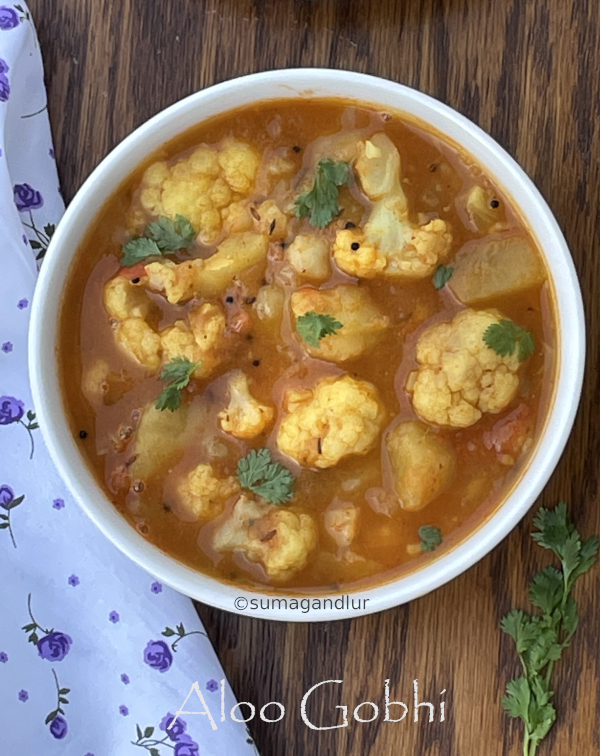
Aloo Gobhi / North Indian Style Potato & Cauliflower Curry
 (Originally published on 2/23/2011)

Aloo gobhi is a delicious, home style vegetable preparation from North India that has become popular through out the Indian subcontinent. In fact, it is so popular that it has made its way into the Indian restaurants everywhere. This is reflected in the fact that it is one of the mandatory side dishes you will find on any Indian restaurant menu in the western hemisphere and an equally ubiquitous one even in our blog world. :) Simple enough in terms of preparation even to a novice cook and palate pleasing, it's no surprise that aloo gobhi is a favorite to many.

There are no hard and fast rules when it comes to aloo gobhi preparation. It can be prepared dry or with some gravy clinging to potato - cauliflower mixture. Onions & / tomatoes can be added or omitted. It can be prepared according to one's taste preference and here is my version of our favorite "aloo gobhi".

Ingredients: (Yield - 4 servings)
1 big sized onion (about 1/2 cup chopped)
2 tomatoes (1 cup chopped)
1 small sized cauliflower (2 cups florets after the leaves and hard parts removed)
3 medium sized potatoes (2 cups peeled & cubed potatoes)
1 tsp grated ginger
1 tbsp. oil
1 tsp cumin seeds
1/8 tsp. turmeric powder
1 tsp. coriander powder
1 tsp. chili powder
1/2 tsp. garam masala
Salt to taste
Minced cilantro to garnish
Directions:
* Heat oil in a kadai / pan and add grated ginger and cumin seeds to it. Add turmeric powder and chopped onions when they slightly brown. Cook them covered until they turn translucent. 
* Next add the tomatoes and cook until they turn slightly mush.
* Add potato cubes and about a cup of water and. Continue to cook until potatoes are 3/4th done. 
* Add the cauliflower florets and salt. Add some more water if needed. When the cauliflower turn almost tender, add chili powder, coriander powder and garam masala to it and mix well. Mash  cooked potatoes cubes slightly without mashing cauliflower. Simmer the curry for a couple of minutes more and turn off the stove. Garnish with cilantro. (I add cauliflower almost at the end as cauliflower gets cooked in about 5 to 6 minutes and softens furthen even after turning off the stove.) 
* Serve the curry warm with some hot roti / phulka and yogurt for a complete meal.

This is going to be my contribution to this week's Blogging marathon, with the theme 'Winter Produce'. Check the page link to see what other marathoners are cooking.


Friday, September 3, 2021

Tomato - Onion chutney

This tomato and onion based chutney makes a tasty side dish to go with south Indian style breakfast dishes like idli, dosa and paniyaram. It also goes great with vegetable based parathas. Use juicy variety tomatoes with some tartness for a flavorful chutney. Use tamarind if the tomatoes are not sour enough or skip it totally if using sour variety tomatoes. Garlic can be added for extra flavor. A reader had requested for this chutney recipe when I paired it with mallige idli and here it is.
Ingredients:
2 tbsp. oil 
1 tbsp. skinned black gram / urad dal
3 dried red chillies or to taste
2 onions, roughly chopped
2 tomatoes, cut into big chunks
A pinch of ground turmeric 
1 tsp. sized tamarind piece *
Salt to taste
Ingredients for seasoning:
1/4 tsp. mustard seeds
1 small sprig of curry leaves

* Adjust the tamarind quantity as needed. Skip it if the tomatoes used are sour.

Directions:
1. Heat oil in a pan and add black garm / urad dal, Stir until the dal turns reddish. Next add red chillies and onion to the pan. Sauté on low flame until they are cooked /  lightly browned.

2.  Next add the chopped tomatoes, turmeric, salt and tamarind to the pan.
3. Cover and continue cooking on low flame until tomatoes turn mushy. 
4. Turn off the stove and let the mixture cool down. Grind the mixture, slightly coarsely if preferred.
5. Heat oil in a small pan and add mustard seeds. Add curry leaves when they start to splutter and turn off the stove. Add this to the ground chutney and mix well.
6. Serve the chutney with Indian style breakfast dishes like idli, dosa or vegetable based parathas. 

This post is an entry for Blogging Marathon and check the link to find out what other marathoners are cooking.

Monday, July 19, 2021

Uthappam Waffles / Dosa Waffles

Dosa waffles or uthappam waffles are those made with leftover, savory dosa batter and these make a filling breakfast or dinner. Dosa batter is needed for this recipe to start with and here is the recipe for dosa batter. These waffles can be made in less than half an hour if you have the batter ready.

Waffles are a fun way to use any leftover dosa batter besides using them to make uthappam, ponganalu, onion dosa and such. Mixed veggies can be added to make the waffles more nutritious. Serve these gluten-free, vegan waffles with coconut or peanut chutney for a delicious breakfast or dinner.
Ingredients: (About 3)
2 cups dosa batter
Salt if needed
1 small red onion, chopped
1 small tomato, chopped 
1 small carrot, peeled and grated 
1 or 2 green chilis, finely chopped
2 tbsp. cilantro, finely minced
Oil to grease the waffle pan
Directions:
1. Left over dosa / idli batter is needed for this recipe. Add salt only if it was not added earlier to the batter. Add few tbsp. of water if the batter appears too thick.
2 & 3. Add chopped vegetables, green chilis, and cilantro to the batter and mix well with a ladle.
4. Preheat the waffle maker and brush the grooves with oil. 
5. Pour the prepared batter into the waffle maker.
6. Cook the waffles according to the instructions in the manual of your waffle maker. 
* Once done, gently remove the cooked waffle from the waffle maker. Use the remaining batter and prepare waffles. 
* Serve them warm with chutney of your choice.
This post is an entry for Blogging Marathon. Check the link to find out what other marathoners are cooking.

Thursday, November 5, 2020

Kaara Chutney / Kara Chutney

Today's recipe is of a classic side dish from the southern state of Tamil Nadu. Kara chutney is a spicy and delicious chutney that is perfect to go with south Indian style breakfast dishes like idli and dosas. It is quite simple to prepare as it involves only sauteing onion and tomato. It can be prepared ahead a day or two so that it can be handy during morning rush hours. 

Ingredients:
1.5 tbsp. oil
1 tbsp. chana dal / Bengal gram
1 tbsp. urad dal / skinned black gram
4 - 5 dried red chillies (I used less spicier byadagi chillies. Use less quantity if using spicier variety.)
3 garlic cloves with skin peeled
1 medium sized onion, chopped (about 1/2 cup)
1 tomato, chopped (about 1/2 cup)
1 tiny ball of tamarind (that would fit into a tsp.)
Salt to taste
Ingredients for tempering / tadka:
1 tsp. oil
1/2 tsp. mustard leaves
6 curry leaves

Directions:
* Heat oil in a pan and add chana dal, urad dal and chillies. When the dals start to turn reddish, remove the chillies and soak them in water. (Or chillies can be soaked in hot water for about 20 minutes ahead and then added along with the onions in the next step.)
* Add garlic and onions to the pan and saute until the onions turn light brownish. 
*  Next add tomatoes, tamarind and salt and cook until the tomatoes turn into a mush.
* Turn off the heat and let the mixture to cool. Grind the mixture finely adding water as needed. (One can make it thinner than the one shown in the pictures.)
* Heat oil in a small pan for tadka and add mustard seeds and curry leaves. When the mustad starts to sputter, turn off the stove and add it to the ground chutney and mix well.
* Serve with dosas / idlis.

Tuesday, November 3, 2020

Peanut - Onion Chutney

Peanut based chutney is one of the common chutneys prepared in south Indian homes besides the coconut chutney and roasted gram chutney. The thick, creamy and richly flavorful chutney goes well with breakfast dishes like idlis, dosa, upma, pongal and such. 

Peanuts that are roasted on low heat until the rawness is gone is used in this chutney. The low heat is the key here. If peanuts are roasted on high flame then only the skins get blackened faster but the peanuts still would taste raw. The chutney doesn't taste good when the peanuts are not roasted well. The roasted peanuts are cooled and then usually skinned by rubbing between the palms, before getting used in the chutney. It is absolutely fine if one wishes to skip this step and use them with the skin intact. Peanuts can be roasted ahead and stored to use later. Or if using store bought skinned peanuts, these steps can be skipped altogether which makes the chutney making a quick and simple task.

Peanut chutney is made in many versions. I usually stick to the basic one that needs just roasted peanuts, green chilies and salt. Many add garlic too to this chutney. Coconut, ginger, cilantro, tamarind can go into this chutney as well. Here is a version that one of my sister-in-law prepares using fried onion. She adds sautéed onion at the end while grinding but I add directly to the chutney. An extras step to the basic version but adds flavor to the chutney. I served dosas with peanut chutney and ginger - tamarind chutney. 
Ingredients:
2 - 3 tsp. oil
1 tsp. mustard seeds
1 tsp. skinned black gram / urad dal
1 tsp. split chickpeas / chana dal
1 sprig of curry leaves
1 onion, finely chopped
1 cup roasted and skinned peanuts
2 green chilies or to taste
Salt to taste
1 cup water

Directions:
* Heat oil in a small pan and add mustard seeds, black gram and split chick peas. Stir once and when mustard seeds start to splutter and split chickpeas start to turn reddish, add curry leaves and onion. Sauté on low flame until onion turns translucent. (Or the sautéing of onions and tadka can be done separately.)
* Grind peanuts, green chilies and salt together adding water, finely or slightly grainy, depending upon one's preference.
* Transfer the ground peanut chutney to a bowl and add the sautéed onion mixture. Mix well and serve as a side dish to south Indian breakfast dishes like dosa, idli, or upma.

Tuesday, August 18, 2020

Saag Aloo / Aloo Palak ~ Potatoes in Spinach Gravy


 (This was originally posted on 6/30/2007.)

Saag Aloo / Aloo Palak is a tasty curry of chunky, diced potatoes in spinach gravy. This nutritious and vegetarian preparation is a Punjab specialty. This spicy and flavorful blend of creamy spinach and potato goes well with Indian rotis / tortillas. I have chosen to use whole potatoes in the dish instead of using diced ones. Also, frozen spinach can be used instead of fresh ones. The preparation is quite a simple one, though the ingredients list is longer.

Ingredients: (6 servings) 
2 tbsp. oil
1 tsp. cumin seeds
1 tsp. grated ginger / ginger paste
1/2 tsp. garlic paste (I didn't use any.)
2 pinches of asafoetida
12 small sized white potatoes / baby potatoes - 12
1 cup chopped cooked spinach 
1 cup chopped onion 
1 cup chopped tomato
1/8 tsp. ground turmeric
1 tsp. coriander powder
1/2 tsp. cumin powder 
1/2 tsp. chili powder or to taste
Salt to taste


Directions:
* Peel the potatoes and cook them in a pressure cooker with sufficient water for one whistle. If not using a cooker, cook them in water until they are fork tender. Keep them aside. Do not throw away the water used to cook the potatoes.
* Heat oil in a pan and add cumin seeds.When cumin seeds start to turn brown, add grated ginger and garlic if using. Saute for few seconds and add asafoetida and turmeric. 
* Add onion next, lower the heat setting and fry the onions till they turn brown. Then add tomatoes and cook until they are mushy. Add chili powder, cumin and coriander powders to the pan and fry for a minute.
* Puree the cooked spinach using water that was used to boil potatoes.
* Add the spinach puree, cooked potatoes and the required amount of salt to the onion - tomato mixture. Add some water if needed. Let the mixture simmer on low flame for about five minutes. Turn off the stove.
* Serve with rotis / pooris / tortillas.


Comments

Monday, August 17, 2020

A Simple Potato Curry


(This was originally posted on 12/21/2006.)
My husband comes from a big family and when we have family gatherings, our number would surpass 50 75. I lived for a short time with my in laws after my wedding and there would be almost 10 people around the food table, any given day. Cooking would be a huge chore, especially when all the siblings and their families visited. To my surprise, whenever the whole family gathered there would be a roti night instead of cooking a simple rice item. My mother in law would get a reprieve from the kitchen tasks and the rest of the women would take turns in making rotis and curries. I remember that we always ended up going for a second packet of flour after finishing a three kilo packet of wheat flour for our roti making. And also Thursday dinners would always be rotis as the elders did not eat rice that night. My sister in law was responsible for the dinner preparation on those days and I, who happened to be a novice cook then used to be her helper.

I am not sure whether my sister in law particularly liked this curry  or hated all the hassle and opted for this simple and delicious version. It did not involve a lot of chopping or toiling in front of the stove. Instead of cutting the vegetables into tiny bits (until our backs started complaining), she would chop them into big chunks and put them together in a wok adding some water and forget them for a while. At the end when they were done, she used to add some salt, chili powder and sambhar powder. Yep, sambhar powder. Anyway it used to be lip smacking and nobody had any complaints. The curry used to be watery but I mash a few potato pieces to make it like a thicker gravy. I cook this curry very rarely nowadays and slightly differently but a lot of nostalgia attached to it and is a easy and fuss-free one for novice cooks.

Ingredients:
1 tbsp. oil

1/2 tsp. mustard seeds
2 onions, sliced or diced  
2 tomatoes, chopped
1/8 tsp. turmeric powder
About 4 cups chopped and boiled potatoes

Salt to taste
Chili powder to taste
2 tbsp. sambhar powder or to taste (I used homemade one.)
1/2 tsp. sugar or to taste
Minced cilantro to garnish
(Imaginative and creative ones over there, you can always add whatever you wish).

Directions:
* Heat oil in a wok / pan on the stove and add mustard seeds. When they start to sizzle and splutter, add onion and cook until it is done. No need to brown. Next add tomatoes and cook until mushy and add turmeric powder. 
* At this point, boiled potatoes can be added if handy or add chopped potatoes and a cup of water. Cover and cook on low medium setting, until potatoes are fork tender. Check in between and add water if needed. 
* Add salt, chili powder, sambhar powder, and sugar to the pan and stir well. Mash some of the potato pieces with the back of the spoon and add extra water if needed. Taste and adjust the seasonings if needed. Let the mixture come to a boil and lower the heat. Simmer for a couple of minutes and turn off the stove.
* Garnish with minced cilantro leaves and serve warm with rotis / bread.

Thursday, March 12, 2020

A - Z Karnataka Recipe Series ~ I for Iyengar Bakery Style Masala Toast


So far in my A - Z Karnataka Series
A - Akki Halbai
B - Biscuit Roti
C - Congress Kadalekayi
D - Davanagere Benne Dose
E - Ellu Pajji
F - Field Beans / Avarekalu Payasa
G - Girmit
H - Hitakida Avarekalu Huli

We move to "I' in the series which was a difficult alphabet to pull off, if I got stuck to picking a dish that started with a 'I' sounding regional name. The only options that I could think of were idlis, which were generically a south Indian breakfast dish or something from an Iyengar Bakery. I chose to go with the latter, which have been an integral part of my life, like millions across in the state. I have always enjoyed and still enjoy their delectable treats and could not miss this opportunity to include one of their dishes in the series. 

It is norm to find an Iyengar bakery in every neighborhood in and around Bangalore and for that matter, in towns around south India whether they are authentically an Iyengar bakery or not. The Iyengar bakeries, not a franchise but is an iconic chain of small food joints sell fresh and delicious baked goods. The first one, 'Bengaluru Brothers Bakery' started in the bustling Chickpet area in Bangalore and after a century and later, Iyengar bakeries dot every community in the city. You are sure to find one near most of the bus stations. People flock around to buy their iconic vegetable puffs, palya buns (curry buns), kobri biscuits (coconut biscuits), khara biscuits (spicy biscuits), dilpasand, bread and so on irrespective of the strong competition from the modern day pizza - burger joints.

This masala toast, an open sandwich with a spicy vegetable curry spread is one of their popular dishes. I wouldn't call my recipe an authentic one as the original recipes are close guarded secrets.The below recipe is an attempt to try their iconic and delicious dish. I have added capsicum and carrot to the curry but even a handful of grated cabbage can be added to the curry. Some add a tbsp. of tomato ketchup or tomato sauce in the curry but I don't think they were a part of the original version. This curry is a simple and easy preparation and can be cooked in advance. It can be refrigerated to use for breakfast in the morning which makes a quick and filling meal. I have used a whole grain bread here instead of the usual white bread. This toast can be served for breakfast or as an afternoon snack or even as a light meal.  

Ingredients:
1 tbsp. oil
1/2 tsp. mustard seeds
1/2 tsp. cumin seeds
1 sprig of curry leaves
1 small green chillies, finely minced
1 onion, chopped finely
1/2 small sized capsicum, finely chopped
1 carrot, peeled and grated
1 tomato, finely chopped
1/8 tsp. ground turmeric
Salt to taste
Chili powder to taste
1/4 tsp. garam masala
1/4 tsp. chaat masala
Finely minced cilantro to garnish
4 Bread slices
Butter for toasting

Directions:
* Heat oil in a pan and add mustard seeds and cumin seeds. When mustard seeds start to splutter add green chillies and onion. Saute and cook until onion almost turns translucent. 
* Next add capsicum, carrot and tomato. Stir well and cook until the vegetables are done.

* Add turmeric, salt, chili powder, garam masala and chaat masala to the pan. Mix well and cook for few seconds. Garnish with cilantro leaves.

* Heat a tawa / griddle. Apply butter on both sides of the bread slices. Toast each slice on medium flame until golden brown and crisp on both sides.
* Spread about 2 tbsp. vegetable filling on one side of each bread slice and serve along with a hot cup of coffee.

Saturday, September 21, 2019

Spicy Corn Chaat

Spicy corn chaat happens to be my final post of the week under 'snacks' theme. This sweet corn based snack can easily keep the hunger pangs at bay during the evening hours. It can be prepared in no time and can be eaten without any guilt. It is light, vegan and gluten free. Feel free to omit sev to make it a zero oil recipe and onions can be omitted too if one doesn't like to pair corn and raw onions. Drizzle some green chutney and sweet chutney to make it more chatpata. Finely chopped green chillies would be also a great addition to make it more spicierThe corn can be lightly sauteed in a small amount of butter if preferred before adding spice powders but personally we don't like that flavor here.
Ingredients: (2 to 3 servings)
2 corn on the cob / 1.5 cups of corn kernels
Salt and/or black salt to taste
Chili powder to taste
Cracked black pepper to taste 
Chaat masala to taste
Lemon juice to taste
1 small red onion, finely minced
1 small tomato, finely chopped
Minced cilantro to garnish
Fine sev to garnish

Directions:
* If using fresh tender corn, transfer them to a microwave safe bowl. Sprinkle some water, cover and steam them in a microwave, for about a minute or as needed. If using frozen corn, they can be boiled alternatively.
* Drain any water used to corn. Add salt, spice powders and lemon juice as needed and mix to combine. Taste and adjust the seasonings if needed. 
* Divide the mixture in 2 or 3 serving bowls. Add onion and tomato pieces to each serving bowl. Garnish with sev and cilantro and serve immediately.

So far in the BM # 104 series of 'Indian Sweets and Snacks', 

First week - Sweets
Malaadu / Hurigadale Unde
Dry Gulab Jamun
Coconut Burfi / Kobbari Mithai
Almond Halwa / Badam Halwa
Elaneer Payasam
Godhuma Sojjappalu

Second week - Snacks from Gujarat
Damni Dhokla
Doodhi Muthia / Lauki Muthia
Dal Pandoli
Methi Khakhra
Pressure Cooker Khandvi

Jhal Muri


Check out the Blogging Marathon page for the other Blogging Marathoners doing BM#104.
You are invited to the Inlinkz link party!
Click here to enter
Comments

Wednesday, June 19, 2019

Dal Mughlai

I had come across this dal a while ago and had bookmarked it to try later. This week seemed like a right occasion to try it when I am posting 'pigeon peas' based dishes. I am not sure about the origins of this dal or whether the dal has any connection with the royal kitchens. And if indeed it is the case, this dal seems like a precursor to modern day 'dal fry' recipe. Surprisingly this dal is not a 'rich' kind where any dairy product is used as in the case of Sultani or Nawabi dals. This is more like a simple and flavorful, every day kind of dal cooked in North Indian homes without all the spice powders. The dal goes well with rotis / rice or plain pulaos.

Ingredients:
3/4 cup pigeon peas / toor dal
1/4 cup split chickpeas / chana dal
1 cup peeled and cubed bottle gourd / lauki
1 cup chopped tomato
1/8 tsp. ground turmeric
2 tbsp. ghee / oil
1 tsp. cumin seeds
1/2 tsp. garlic paste (I didn't use it.)
1 tsp. finely chopped green chillies
1 tsp. grated ginger
3/4 cup, sliced onions
Salt to taste
2 tbsp. minced cilantro to garnish

Directions:
* Clean, wash and soak dals in enough water for a couple of hours and drain.
* Add the drained dals, tomato, bottle gourd pieces, turmeric and about 2 cups of water to a pressure cooker and cook for three whistles. When the valve pressure is gone, remove the lid and mash the dal well with the back of a ladle and keep aside.
* Meanwhile, heat ghee / oil in a pan and add cumin seeds. When they start to brown, add garlic, chillies, ginger and onion. Saute on low flame until the onion turns light brown.
* Add the mashed dals and salt to the pan and cook on medium flame for 3 or 4 minutes and turn off the stove.
* Garnish with cilantro and serve warm. 

bmlogo
This post is an entry for Blogging Marathon #101 under 'Cook 3 Side Dishes with One Ingredient' theme.

Tuesday, June 11, 2019

Shahi Paneer

As the name suggests, shahi paneer is a dish fit for royals. It is a flavorful curry prepared in a rich and creamy base of nuts, onion, yogurt and cream. This mild and delicious paneer gravy curry is quite easy to prepare and makes a perfect party dish. 

Ingredients:
3 tbsp. ghee / oil
1 cup roughly chopped onion
1 inch piece of ginger
1 - 2 garlic cloves (I didn't use any.)
1 tbsp. cashews
1 tbsp. almonds
1 tsp. cumin seeds / caraway seeds
2 cloves
1 cardamom
1 inch cinnamon piece
1/8 tsp. turmeric powder
1/2 tsp. chili powder
Salt to taste
1/2 tsp. garam masala
1/2 cup full fat yogurt
1/2 cup water
A pinch of saffron, crushed
200 gm paneer cubes (more or less about 1 and 1/2 cups of paneer)
2 - 3 tbsp. cream (optional)

Directions:
1. Heat a tbsp. ghee / oil and add onion, ginger and garlic. Fry until the onion is cooked. Let the mixture cool. Blend it to a fine paste along with almonds and cashews, adding a little water.
2. Heat 2 tbsp. ghee / oil in a pan and add cumin seeds, cloves, cardamom and cinnamon. Saute for few seconds, until the spices start to release their aroma.
3. Next add the ground onion - nut paste, turmeric, chili powder garam masala, and salt. Fry for a couple of minutes on low flame.
4. Whisk the yogurt until smooth. Lower the heat and add the whisked yogurt and water. (Add more water if needed. The mixture gets quite thickened after cooking.) Stir and let the mixture simmer until it thickens, about 10 minutes. Taste and adjust the seasonings if needed.
5. Add saffron, paneer cubes and whisked cream if using. Simmer for a couple of minutes more and turn off the stove. 
6. Transfer the mixture to a serving bowl since the curry tends to cook further and gets quite thickened if left in the same pan.
7. Garnish with roughly chopped cilantro leaves and serve with rotis / rice.

Notes:
* 1 or 2 drops of kewra water can be added finally, if preferred.
* Paneer cubes can be lightly fried before adding to the gravy if preferred.
* Vegans can substitute tofu and non dairy yogurt.  
* Tomatoes can be added to the recipe if preferred. Add them after onions are sauteed and cook until mushy.
* The nuts added to the onion paste alone makes the gravy richer. I therefore avoid using ghee and cream in this recipe if cooking for ourselves. However they enhance the flavor of the dish.

bmlogo
This post is an entry for Blogging Marathon #101 under 'Gravy Curries' theme.

Comments

Friday, April 5, 2019

A - Z Indian Biryani / Pulao / Khichdi Series ~ E for Ek Toap Na Dal Bhaat

Here is a one pot khichdi from the Gujarati kitchens. It is wholesome, nutritious and a filling meal as a khichdi should be but is somewhat a special one. It is easy and quick to prepare this as well. This is one of the dishes I cooked early on but I started to have second thoughts because I have another recipe in the line which involves stuffing and I was not impressed with the images I captured. It was a cloudy day in the middle of Midwest winter and there was not even a single image that looked crisp. I cooked another khichdi last week, in case I didn't want to go with it. However I changed my mind again today and decided to go with this Gujarati meal, I found on Tarla Dalal's website. 

Calling it a one pot rice - lentil khichdi would be misleading since it is not your everyday khichdi where you dump spices, rice, lentil and vegetables in one pot and cook. Vegetables used here are not chopped but stuffed and eggplants are an interesting addition too, considering that it is not commonly used in a khichdi preparation. The addition of vegetables, stuffed with a coconut - cilantro base is the highlight of this khichdi and it definitely elevates the simple khichdi to an entertaining meal. The onions I used were tiny and kind of disintegrated into the khichdi and so, it is hard to notice them in the images. 

This dal bhaat can be cooked under 30 minutes, if soaking toor dal is not involved. I have noticed that the same toor dal without any prior soaking can be cooked in 3 whistles in some cookers and some take longer even if they are newly bought cookers. If you own a cooker which can cook dal in 3 whistles, go ahead with the recipe without soaking dal. If not, soak dal for 1 to 2 hours before so that rice and dal gets cooked at the same time. Otherwise, the rice would be a mush and the dal may not be cooked enough. The stuffing can be changed to a personal favorite one as well instead of using the one mentioned in the recipe. I changed the stuffing slightly while cooking though I am posting the same one mentioned in the original recipe.

Ingredients: (Yield - 4 servings)
1 cup rice
1/3 cup pigeon peas / toor dal
2 1/2 cups water (I used 1.5 + 2/3 cup, It is perfect if you prefer a dry version khichdi like shown in the image.)
2 tbsp. ghee
1 tsp. cumin seeds
a pinch of asafoetida
1/8 tsp. turmeric powder
Salt to taste
1/4 cup frozen peas
4 baby potatoes
4 small variety brinjals / eggplants 
4 to 6 baby onions 

Ingredients for stuffing:
1 tbsp. coriander powder
1 tbsp. cumin powder
1 tbsp. sugar (I didn't use.)
1.5 tbsp. red chili powder
A pinch of asafoetida
Salt to taste
3/4 cup fresh coconut, grated
1/3 cup finely minced cilantro / coriander leaves

Directions:
* If the variety of toor dal being used is not going to pressure cook in 3 whistles or cook at the same time as rice, wash and soak the dal in water for 1 or 2 hours and drain the water. There is no need to soak the rice but wash and drain.
* Combine all ingredients mentioned under stuffing in a small bowl and mix well. 
* Peel the potatoes and onions. Make criss-cross slits on onions, potatoes and brinjals, taking care not to separate the 4 segments. (Keep the stalk of the brinjals intact and cut along the opposite end. Cut a + mark, not cutting all the way through.)
* Stuff the onions, potatoes and brinjals evenly with the stuffing prepared in the above step. Keep them aside.
* Heat ghee in a small (3 liter) pressure cooker and add cumin seeds. When they start to brown add asafoetida, turmeric powder, drained rice and toor dal. Saute them for about a minute, on medium flame. 
* Add green peas, salt and water and stir well. Next add the stuffed vegetables and gently stir the mixture once. Pressure cook on high flame for 3 whistles.
* When the valve pressure is gone, remove the lid.
* If preferred, add another tbsp. of ghee at this point and gently mix.
* Serve it with some plain yogurt / butter milk. 

So far in my Biryani / Pulao / Khichdi series,
A for Ambur Biryani
B for Basanti Pulao / Misthi Pulao
C for Corn - Fenugreek Greens Pulao
D for Donne Biryani


BMLogo
Check out the Blogging Marathon page for the other Blogging Marathoners doing BM#99.

Wednesday, April 18, 2018

A - Z Indian Street Foods ~ O for Onion Pakoda

This April has been weird in terms of weather. Besides showers, it has been bringing on and off snowfalls as well including today's one. It is the 6th one of the month for us though the accumulation on the ground is melting by the next day's sun and we didn't have to shovel in the below freezing weather. Days of the month had been more cloudier and I am not sure whether the ground will thaw enough to bring flowers in May.

Blame it on weather or the street food themed marathon of mine, I have been deep frying more and more this month and making my husband happy. 😋 Probably I finished my year quota of deep frying in one month. ðŸ˜• I prepared these crunchy, delicious chickpea flour based onion fritters yesterday and ate all by myself as there was no one home to share them with. They go by the name pakoda, pakora, pakodi depending upon the region you live in India. These fritters are not region specific and enjoyed through out the nation with unequivocal love whether savoring with family on a cold evening with a cup of coffee or tea or hanging out with friends and eating at a street joint. 

They are simple to prepare at home. The pakoda batter must be prepared really thick / tight and fried on low flame. If the batter gets thinner, one would end up with another popular fritter called bhajiya / bajji instead. Mixed vegetables / greens can be mixed as well while preparing batter. If onions are not preferred, they can be replaced with cashews or peanuts as well and these can be stored longer.

Ingredients required:
3/4 cup besan / chickpea flour
2 - 3 tbsp. rice flour
2 onions, thinly sliced lengthwise (about 1 cup)
Chili powder to taste (Chili powder + finely chopped green chilies can be used. I skip chilies when serving kids)
Salt to taste
Few curry leaves, finely minced
2 tbsp. hot oil
Oil for deep frying 

Method:
* Mix all the ingredients except the oil to fry in a bowl. Add a tbsp. or two of water and prepare a firm dough.
* Heat the oil in a kadai or a deep-bottomed pan. When the oil is hot, drop small portions of the batter with your fingers in the hot oil. Turn the heat setting to lowest and fry them until they turn golden brown. Fry as many pakoda as the pan can fit without overcrowding. Remove them with a slotted spoon onto absorbent towels. Repeat the process with the remaining batter.
(Do not fry them until they turn to a dark shade. If the onions turn black, they would turn bitter.)

So far, on this series,
A for Aloo Kabli
B for Bajra Vada
C for Chooda Matar
D for Dahi Batata Puri
E for Elaichi - Kesar Lassi
F for Fulwadi
G for Ghugni Chaat
H for Hare Chane Ki Chaat
I for Indori Garaadu Chaat
J for Jamun Bun
K for Khakra - Chana Bhel 
L for Locho
M for Masala Puri Chaat
N for Nippattu Masala Chaat

BMLogo
Check out the Blogging Marathon page for the other Blogging Marathoners doing BM# 87

Monday, April 16, 2018

A - Z Indian Street Foods ~ M for Masala Puri / Masala Puri Chaat


Today's chaat comes from south Indian state of Karnataka, that has gradually become popular in other states as well. Masala puri or masala puri chaat is a yummy street food where the crushed pooris are served with a spicy, hot peas curry and the usual chaat toppings like onions, tomatoes, cilantro, sev, sweet chutney and a sprinkling of chat masala. It is quite a simple recipe though it doesn’t appear so given the long list of ingredients. If you have store bought pooris, meetha chutney and sev, all you need is to cook peas curry. The peas curry also can be prepared in advance and can be reheated before assembling and serving thus making it a convenient chaat to prepare for family / guests without hassle. Most of the recipes over the web prepare the spice masala from the scratch and I realized that those are the ingredients found in pav bhaji masala. This recipe is therefore adapted from here for it’s simplicity. My husband appreciated this chaat the most among the lot I posted in the series so far. It was so good that I don't think I need another recipe for masala puri chaat. 

List of ingredients for peas masala:
Part 1:
1 cup dried peas, soaked overnight or 7- 8 hours
1 potato, peeled and roughly chopped
1/8 tsp. turmeric powder
Salt to taste
Part 2:
1 tbsp. oil
1 small onion, peeled and chopped
1 green chili, slit lengthwise
1 clove garlic, chopped (I didn't use any.)
1 inch ginger, grated or chopped
1 large tomato, chopped
Kashmiri or any similar red chili powder that is less spicier
1/8 tsp. turmeric powder
2 tsp. pav bhaji masala powder
1 tsp. or to taste aamchur powder / dry mango powder
1/4 tsp. garam masala powder
1/2 tsp. sweetener 
Salt to taste

Ingredients for each serving of chaat:
About 10 flat puri / papdi
Sweet tamarind chutney as needed
2 tbsp. finely minced red onion
2 tbsp. finely minced tomato 
1 tsp. finely minced coriander leaves / cilantro
1 pinch of red chili powder 
2 pinches of chaat masala
Black salt (optional)
Sev (Deep fried, crispy chickpea flour vermicelli)

Preparing peas masala:
* Drain the soaked peas and rinse once with fresh water. Pressure cook peas, potato, salt and turmeric along with 2 cups of water for 3 whistles.
* Mash the vegetables and keep aside. (I pulsed everything in a food processor a couple of times so that I had a coarsely crushed peas - vegetable mixture.)
* Meanwhile, prepare the masala base for the peas curry. Heat oil in a pan or kadai. Add onions, garlic, ginger and chili and saute until onion turns translucent. Next add tomatoes and cook until mushy.
* Cool the onion and tomato mixture and blend to a smooth paste and pour into the same pan. Also add peas and mashed potato.
* Add the remaining spice powders in Part B and salt. (Remember that salt was added while cooking peas as well.) Add water and mix well. The consistency of the curry should be pourable like shown in the images. If the consistency appears thicker, add some more water and cook. Taste and adjust the seasonings if needed. Slowly simmer the mixture for 10 - 12 minutes. 

Serving masala puri:
* Place as many puris as you wish to serve in a serving bowl. 
* Crush them roughly and pour 2 - 3 ladles of green pea curry or as much preferred. 
* Drizzle meetha chutney / dates - tamarind chutney over the curry generously or as preferred.
* Top it with minced onion and tomato as much as preferred. 
* Sprinkle a few pinches of chaat masala, red chili powder and also black salt if needed.
* Top it with a generous dose of sev and minced cilantro. Serve immediately. 
* If using puris, they soak up the liquid and turn soggy quick whereas papdis don't get soggy quicker and may add an extra crunch. 
Notes:
1. White dried peas or green ones can be used.
2. In lieu of puris, flat puris / papdi can be used. 
3. A chopped carrot can be added along with potato and peas while pressure cooking. Or grated carrot can be used as topping too if preferred.
4. The quantities of spice powders mentioned can be used as guide lines and adjust the quantities according to your taste preference or level of tolerance for spices.

So far, on this series,
A for Aloo Kabli
B for Bajra Vada
C for Chooda Matar
D for Dahi Batata Puri
E for Elaichi - Kesar Lassi
F for Fulwadi
G for Ghugni Chaat
H for Hare Chane Ki Chaat
I for Indori Garaadu Chaat
J for Jamun Bun
K for Khakra - Chana Bhel 
L for Locho

BMLogo
Check out the Blogging Marathon page for the other Blogging Marathoners doing BM# 87