HOME        |        ABOUT        |        COPYRIGHT        |        CONTACT        |         RECIPE INDEX        |         INDIAN THAALIS        |         MILLET RECIPES        |        EVENTS' ROUNDUP        

Saturday, July 23, 2011

Magori Palak Ki Kadhi


Second week of blogging marathon # 7 starts from today. I have been participating in Srivalli's marathons for the last six sessions and I am guessing that by now, my regular readers must have become familiar with the concept of blogging marathon. For the uninitiated here we go. Each participant has to pick a theme among several given choices and cook seven different dishes during the week, adhering to the selected theme. Check what my fellow marathoners are cooking today.
I chose to go with "Cooking from Cookbooks" this week and the first recipe is going to be from Vidhu Mittal's "Pure and Simple". It is an Indian vegetarian cookbook that justifies it's title. An excellent one for both novice and experienced cooks with crisp illustrations and simple cooking methods. One of my recent favorite cookbooks, I would say.
The first thing I tried from this cookbook happens to be this magori - palak kadhi. I had prepared a batch of mangodis / mangoris / magoris last summer and was looking for ways to use them. My first trial nimona was a hit and so when I happened to see this kadhi recipe, I immediately gave it a try. The dried moongdal dumplings are cooked in spinach and slightly tangy yogurt base and as expected, it tasted wonderful. It is a great side dish for rotis.


Ingredients:
1/2 cup magoris
1 cup fresh / frozen chopped spinach
1 cup yogurt (sour one is best.)
2 Tbsp gram flour / besan
1/2 tsp turmeric powder
One inch piece of ginger
2 - 3 Green chillies (Serrano peppers)
Salt to taste
1/4 cup of oil to deep fry
For tadka/seasoning 1:
2 tsp of oil / ghee, 1 tsp cumin seeds and a pinch of asafoetida
For tadka / seasoning 2:
2 tsp oil / butter, 1 tsp cumin seeds, 1/2 tsp chili powder and a pinch asofoetida

Method:
* Heat 1/4 cup oil in a small frying pan and deep fry mangoris in medium hot oil until light golden brown. Remove them with a slotted spoon and drain them on absorbent towel. Crush them lightly and keep them aside.
* Grind ginger and chillies to paste adding little water if needed.
* Sieve the gram flour.
* Heat 2 tsp of oil in a small pressure cooker and add cumin seeds and asafoetida. Then add fried and crushed magori, spinach, turmeric powder and a little water to it and cook to 1 whistle.
* Whisk together yogurt, gram flour, ginger - chillie paste along with enough with water to make a pourng consistency.
* When the valve pressure is gone, remove the lid. Add the yogurt mixture, salt and water as needed. Reduce heat and simmer for about 10 minutes. You have to keep stirring constantly until thick and creamy. Don't let the yogurt curdle. Simply whisk the sauce if it happens.
* Heat the other 2 tsp oil and add cumin seeds, chili powder and asafoetida. When cumin seeds start to turn brown, remove the tadka and pour over the kadhi.


Note:
Magoris / Mangodis are prepared by soaking and grinding moong dal. The ground dal is shaped into small dumplings and then dried in hot sun. The dried mangodis are then stored in airtight containers for later use.
Check here for a detailed recipe.

This goes to Sonu's "Flavors of Rajasthan", an event originally started by Nayna.

Friday, July 22, 2011

Eggless, Microwave Cake Under 15 Minutes


I am here today with an easy and quick eggless cake for the final day of this BM#7. I don't recall the recipe source now but this has been in my folder for more than a decade. This cake had caught my attention because it was eggless, quick and the title had a 'spongy' tag. I tried this twice so far and as the recipe claims, it is a pretty quick one that can be prepared in a microwave. The cake would be ready by the time a convection oven gets pre heated. And texture wise, it falls between a cake and bread and is not very moist / spongy as it claims. However, it does not disappoint and a pretty decent one for "under 5 minutes effort" I would say. This is the recipe I have come up with after a few modifications to the original recipe.

Ingredients:
1 cup unbleached, all purpose flour / maida
1 tsp baking powder
1 tsp baking soda
1/2 cup condensed milk
1/3 cup butter / oil
2 big sized bananas (about 1 cup banana puree)
1/2 cup milk

Method:
* Sieve the flour, baking soda and baking powder twice.
* Combine the wet and dry ingredients in a mixing bowl. Mix well to form a batter of pouring consistency.


* Pour the batter into a greased microwave safe bowl. Bake in the microwave on HIGH for about 10 minutes.
* Cool the cake, invert, cut into slices and serve warm.


Note:
1. I use a 1.75 quart / 1.65 litre bowl (that holds about 6 cups) and is a perfect one for this cake.
2. The recipe uses only the sweetness from the condensed milk and does not require extra sugar.
3. Other fruits can be substituted for banana.

Check what my fellow marathoners are cooking. today. And if you have missed any of my "Microwave Cooking" posts during this week of blogging marathon, here is the list.
1. Pear Jam
2. Eggless Brownie Under 2 Minutes 
3. Chocolate Popcorn Trail Mix
4. Danedar Dal
5. Carrot Halwa
6. Vermicelli - Coconut Upma

This is on it's way to "Only Baked" event at Tamalapaku, an event originally started by Pari.

Comments

Thursday, July 21, 2011

Vermicelli - Coconut Upma / Semya - Kobbari Upma ~ Microwave Version


Vermicelli - coconut upma is a regular one in my mother's kitchen as my father won't touch onion and a rarity in my kitchen as M won't touch coconut. J I love this version of upma my mother prepares because it is simple, quick and tastes delicious with the addition of a generous amount of sweet coconut and aromatic cilantro. Just drizzle a spoonful of ghee at the end for a yummy upma that can be served as a breakfast or an evening snack. Today I am posting microwave version of this upma for BM#7. Check what other marathoners are cooking today.
Here is another version of vermicelli upma that I prepare regularly.

Ingredients for 2 - 3 servings:
1 cup vermicelli (I used pre roasted variety.)
1/2 cup fresh / frozen grated coconut
1.5 cup water
1/4 tsp turmeric powder (optional)
1.5 tsp salt (or to taste)
For tadka: 3 - 4 tsp oil / ghee, 1 tsp chana dal, 1 tsp urad dal / skinned black gram, 1 tsp cumin seeds, 1 tsp mustard seeds, 3 green chillies chopped fine (or to taste) and few curry leaves
Minced cilantro for garnish

Method:
* Add oil to a microwave safe bowl, and heat it in the microwave. Next add the dals, mustard and cumin seeds. When dals start turning reddish, add the chillies and curry leaves. Fry them for about 30 seconds or so.
* Next add the water, turmeric powder, salt and the coconut. Bring the water to a rolling boil. It would take around 3 - 4 minutes for this step.
* Next add the vermicelli and mix well. Cover and cook until vermicelli is done, about 8 - 10 minutes. Don't forget to stir in between.
* Garnish with minced cilantro and fresh coconut if desired.

Note:
If not using roasted vermicelli, toast the vermicelli until golden brown.

Wednesday, July 20, 2011

Carrot Halwa / Gajar Ka Halwa ~ Microwave Version


I must say that this "Microwave Cooking" theme of BM#7 has been the easiest one among the lot I tried so far in the various blogging marathons I have participated in. I did not have to plan beforehand this time or make a list of dishes that would fit the theme or anything as such. That is mainly because I am used to microwave cooking and enjoy it. The dishes I have presented so far are a regular fare in my kitchen and the yummy carrot halwa showcased here today happens to be no exception. I usually prefer a microwave to stovetop to cook this halwa since it is quick and easy.
This classic, scrumptious dessert from the Indian subcontinent needs no introduction. The rich, creamy, colorful halwa is so popular among masses that it is an integral part of Indian restaurants' menus worldwide and an iconic dessert of Hindi movies. No wonder considering it's melt in mouth kind texture. A true delectable treat!

Ingredients: (for 4 servings / about 2 cups cooked halwa)
6 medium sized carrots - peeled and grated (I had 4 cups grated carrot.)
2 Tbsp ghee
1 cup full fat milk (I used about 1.5 cup low fat milk today.)
1/4 cup sweetened condensed milk
3 Tbsp sugar or to taste
1/2 tsp cardamom powder
Nuts to garnish


Method:
* Heat the ghee in a microwave safe bowl and add the grated carrot. Sauté for a couple of minutes.
* Then add the milk to carrot and cook stirring occasionally, until the milk evaporates.
* Next add the condensed milk and sugar to the carrot mixture. Continue to cook until the mixtures turns thick, stirring in between. Remove the bowl from microwave, add cardamom powder to the cooked halwa and mix well.
* Garnish with nuts and serve warm.

Notes:
1 Adding khoya / mawa or cream or condensed milk at the final stages enhances the flavor of carrot halwa. I usually go with a low fat version and skip those when I am preparing a small quantity to satisfy my sweet tooth.
2. Avoid adding khoya / khova when halwa is being prepared in microwave. It tends to turn a dark brown shade and the halwa may be not a visually appealing one though the flavor remains unchanged.
3. Increase the quantities of condensed milk and ghee in the above recipe, if a richer halwa is preferred.
4. Follow the above procedure for stove top method too.

Check what the other marathoners are cooking today.

Comments

Tuesday, July 19, 2011

Danedar Dal


My "microwave recipe" for today in blogging marathon #7, happens to be a regional dal adapted from 'Gourmet Indian in minutes' cookbook. Check what the other marathoners are cooking.

What tempted me to try this recipe was the beautiful image associated with it. According to the book, this simple, basic dal is a usual fare at Gujarati homes during the festival of Navratri.  It is supposedly a sweet - sour kind dal and the original recipe uses only a green chillie for about 2 cups of dal. If you prefer those flavors to shine, feel free to add tamarind and jaggery accordingly. I modified the recipe a bit to suit our taste buds so that even my daughter who is not a great fan of sweet stuff enjoys it. She ate it without any complaints and that means this recipe is a keeper for me. So far, this is the first moong dal recipe she ate with out uttering a word. For me it is a basic, comforting sort of dal that can be put together quickly. Especially an opt one when you run out of veggies. And surprisingly, the dal didn't have the typical "moong dal" smell. Don't skip the peanuts; they add a contrasting texture to this filling dal.

Ingredients for 2 - 3 servings:
1/2 cup moong dal (skinned, yellow ones) / pesara pappu
1/4 tsp turmeric powder
2 Tbsp salted peanuts (I used raw ones but toasted ones may be better.)
1 tsp jaggery powder / brown sugar
1-2 Tbsp tamarind puree or to taste
Salt to taste
For tadka: 2 tsp oil, 1 tsp mustard seeds, 1 tsp cumin seeds, 2 green chillies - slit lengthwise, few curry leaves
Cilantro leaves for garnish


Method:
* Soak moong dal in hot water for about 30 minutes. This step is optional but it sure cuts down the cooking time. Throw away the water used to soak and rinse the dal well.
* Add 1.5 cups of water, turmeric powder and the dal to a microwave safe bowl and cook until the dal turns mushy, about 12 - 15 minutes. Remove the bowl.
* Heat oil in another microwave safe bowl and add the tadka ingredients. When they start to splutter, remove the bowl.
* Add the tadka, peanuts, tamarind paste, salt and jaggery powder to the dal bowl and put back in the microwave. Cook for another 2 -3 minutes.
* Garnish with cilantro and serve along with rice / rotis.

This moong dal dish goes to Cook it Healthy - Proteinicious event.

Comments

Monday, July 18, 2011

Chocolate Popcorn Trail Mix


I am here with a trail mix on the third day of blogging marathon #7, with the theme "microwave dishes". It happens to be a yummy mixture of chocolate drizzled popcorn, fiber rich wheat cereal, dried fruits and nuts. This kid snack mix can be put together under 5 minutes like yesterday's dessert. A quick, easy and fiber rich snack to munch on, anytime. I used no butter, no sodium popcorn prepared in my microwave.  I did not use any seasonings since I was planning to drizzle drench the popcorn with chocolate sauce.

How to pop corn in a microwave:
Popping corn in a microwave is quite a simple process. One Tbsp of corn kernels yield about a cup of popcorn. Place about 1/4 cup of corn kernels in a paper bag, fold over the top twice or thrice and put the bag in the microwave. Cook until you stop hearing the popping sound. It takes usually around 70 - 90 seconds for 1/4 cup kernels to pop. Remove the bag and your plain pop corn is ready.


Now let's move on to the chocolate popcorn trail mix. One is only limited by imagination / creativity when it comes to granola / trail mixes. Add whatever you find interesting, appealing and nutritious in your pantry to create your own signature dish. Today, I happened to add wheat squares, almonds, pistachios, walnuts, sultanas and a sweetened, dried berry mix to the popcorn and drizzled it with melted, semi sweet chocolate. 


Ingredients:

2 cups popcorn
2 cups toasted wheat cereal
1 cup any dried fruit
1 oz (Baker's) semi sweet baking chocolate (I doubled the quantity and it is not necessary.)

The 'how' part:
* Microwave chocolate on HIGH in a microwave safe bowl, stirring every 30 seconds until it melts completely.
* Drizzle the melted chocolate over the popcorn, cereal and dry fruits mixture. Gently toss the mixture to evenly coat.
* Spread into single layer on large sheet of wax paper and cool.


Check what my fellow marathoners are cooking today.

Comments

Sunday, July 17, 2011

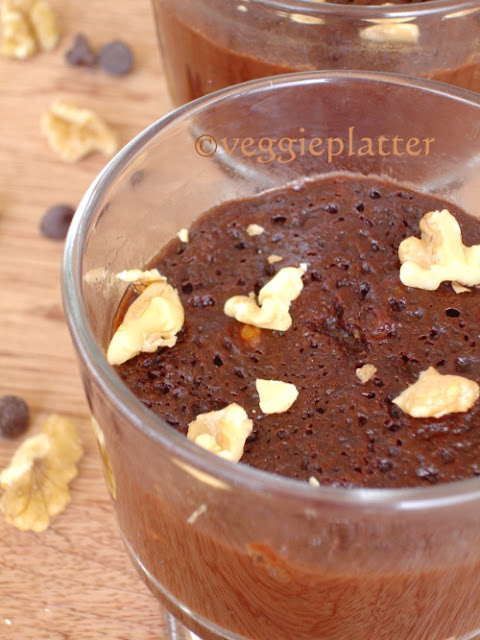
Easy, Eggless Microwave Brownie in Two Minutes


Before proceeding to the recipe, I should mention that this is such a ridiculously easy and quick recipe that even a kid (of course a responsible one) can master it. It is rich, decadent and more over an eggless version. It can be put together under 5 minutes - 2 minutes for preparation and 90 seconds cooking time. What else do we need in a recipe? J
Over the years, I kept noticing this particular recipe in blogosphere under different names. A mug cake / an instant microwave cake / microwave brownie / microwave chocolate cake or what ever it was, the idea of a baked dessert under 2 minutes sounded so preposterous that I had to check it personally. Somehow the time never came until I saw Prathibha's recipe and her tempting images. I did try it at last and the recipe was an instantaneous hit at my home. We liked the 'not overly sweet' flavor of this moist brownie / cake and seems like have developed a kind of addiction to it. The kids would go "Mom, could you please make that MW brownie, it is so easy, right"? What would you do when the kids are asking so politely and you can whip up a dessert under less than 5 minutes? Of course you oblige. Probably I have cooked this for about 40 times so far and each time, it was a success and we have loved it.
My 12 year old opted for this when he had to cook in front of his class because of the ease and simplicity of the recipe. And one should not forget how rich and delicious it tastes.


Ingredients: (1 - 2 servings)
2 Tbsp unsalted butter + a pinch of salt or 2 Tbsp salted butter
2 Tbsp milk
1/2 tsp vanilla essence
4 Tbsp icing sugar (or powdered sugar)
2 Tbsp all purpose flour / maida
2 Tbsp cocoa powder
2 Tbsp chocolate chips / dark chocolate bits
2 Tbsp walnut pieces

Method:
* Melt the butter (and salt if using) in a microwave safe bowl and let cool. Then add milk and vanilla essence to it and whisk well.
* Next add all the dry ingredients to another bowl and mix well.
* Then combine the wet and dry ingredients in another microwave safe bowl and mix well.
* Microwave the mixture for only 90 seconds. The surface would be soft and dry by the time. Let it stand for a couple of minutes and then remove from the microwave and enjoy while it is still warm.
* It can be served with vanilla ice cream or some chocolate sauce or whipped cream for extra decadence. J


My kitchen notes:
1. Measure accurately the ingredients or else you will end up with not such a delicious product.
2. Even cooking for an extra 30 - 60 seconds have resulted in a powdery brownie.
3. The brownie mixture expands while cooking and so, the initial mixture should fill only about 1/2 of your baking utensil.
4. I have baked this in microwave safe bowls and coffee mugs.
5. Also preparing this in large qunatities haven't yielded good results for me.


This is my second day post of blogging marathon #7 with the theme of 'Microwaved based' cooking. Check what the other marathoners are cooking today.
This goes to "Only Baked" event at Tamalapaku, an event originally started by Pari.

Comments

Saturday, July 16, 2011

Pear Jam ~ Microwave Version


Srivalli's two week long blogging marathon # 7 starts today and the theme choices for the participants this time are going to be
1. Crunchy Snacks for Kids
2. Cooking from a cookbook
3. Cooking from the backpack
4. Microwave Cooking
5. Regional Specials
6. Combo Meals
7. No Butter Bakes

That means the participating bloggers have to select a theme from above and cook for a week based on it. For this week's marathon, I chose microwave cooking and so for the next seven days, you are going to see microwave based recipes here. Check what the other marathoners are cooking today. 
On the first day, here is a simple and quick yet yummy pear jam prepared in the microwave. Actually this recipe was in my drafts for over three years now since I wasn't happy with the initial pictures I took and later forgot to update it.  

Preparing jam using bread machine:
Ingredients:
Pears - 2 (1 cup mashed)
Sugar - 1/3 cup
Lemon Juice - 1 Tbsp
Pectin - 1/2 packet (up to 1 oz)

I usually go with D'anjou pears because they are just sweet with out the awful smell. (I dislike Bartlett pears for their smell.) I prepared the jam for the first time in my Zojirushi bread machine following their cooking manual. Now with the bread machine, it is pretty simple. You add all the ingredients to the baking container and it does the job for you. And if you are not satisfied with the bread maker's jam consistency and think that the jam has to be thicker, then put the jam into a microwave safe bowl. Microwave it for 2 -5 minutes depending upon the desired consistency. The jam thickens when cooled / refrigerated and so, it is usually wise to stop micro waving it when you are almost there. After refrigeration, if the jam becomes thicker and is not spreadable, warm the jam in MW for a minute. It should work. Also, you can skip pectin from this recipe all together. It takes longer in bread machine to prepare jam though it is easier. I don't personally prefer wasting that much of power over a cup of jam. Here is the recipe anyway.
Peel the pears and mash them coarsely with a fork or in a blender.  Add all the ingredients to the baking pan and cook selecting the 'jam course' or follow the instructions.


Jam preparation in microwave:
I usually prepare jams in small quantities and prefer using a microwave. Last week, I prepared pear jam in microwave in two batches and this is how I did it.

Method 1:
Ingredients:
1 cup pear
1 tsp lemon juice
1 tsp pectin
6 Tbsp sugar

Peel and coarsely mash the pears with a fork. Add all the ingredients to a microwave safe bowl and cook in the microwave, stirring in between. Stop before you think that you have reached the desired consistency since it thickens after cooling. It usually takes me around 10 - 12 minutes to prepare jam in my microwave with the above quantity. Let cool and refrigerate the jam.


Method 2 :
For the other batch, I decided to puree the fruit and had about 4 cups of pureed pears. I added about 1/2 cup sugar, 1 tsp pectin, 6 cloves and a tsp of lemon juice to it. I microwaved it till the desired consistency was reached. The jam consistency would be softer when the fruit is over ripened and pureed. I personally prefer not to puree the fruit while preparing jams. Cool, discard the cloves and refrigerate the jam prepared.

Note:
Pectin is a type of sugar contained in fruits that jellifies jam (adds thickness). Add pectin as part of the ingredients if a softer jam is not preferred but a thicker version.

Comments

Friday, July 15, 2011

Eggless Moist Chocolate Cake


Before I proceed with the recipe for this moist chocolate cake, I should mention that this one is a no egg, no butter and no fuss recipe. A few food bloggers have earlier tried this cake inspired by this one and had attracted my attention with their captivating images. However, I was put off by the cocoa powder and oil used. I was not happy with the flavor of a cocoa cake I baked earlier and so decided to pass this one. "Palates differ" as one of those Telugu saying goes. I know those ingredients can be easily substituted but just mentioning. Then I got to taste an excellent brownie made with cocoa powder and had to change my opinion.
Later this cake was again personally recommended by a family member. Actually it was me who referred her to the recipe when she was looking for some egg ess, chocolate cakes. She tried it and was all praises about this cake. Hearing it from a sweet-hater (the girl doesn't prefer sweet stuff, lol.), I had to give this a try and that's what I did today.
It gets full marks for the texture and appearance. I loved the glistening, dark brown hue of the cake and the perfect texture. It was soft and moist with the gooey chips appearing in between. However the cake itself is not messy, sticky or gooey. If you skip those chocolate chips, you don't even notice those gooey spots in between. Chocolate / cocoa lovers would like this cake.


Ingredients:
1.5 cups flour
3 Tbsp unsweetened cocoa powder (I used Hershey's brand)
1 tsp baking soda
1/4 tsp salt
1 cup water
1 cup sugar
1/4 cup oil (I used canola oil.)
1 Tbsp white vinegar / lime juice / lemon juice
1 tsp vanilla essence
2 Tbsp chocolate chips (optional)

Method:
* Preheat the oven at 350 deg F / 180 deg C. Grease a cake / loaf pan and keep aside.
* Sieve the flour, baking soda, cocoa powder and salt, 2 - 3 times and keep it aside.
* Add sugar to the water and stir it to get dissolved. Then add the oil, vinegar / lemon juice and vanilla and mix well.
* Now combine the dry and wet ingredients stirring gently, to form a lump free batter. The final batter would be runny as in the below image.


* If using chocolate chips, sprinkle them on the surface or mix it into the batter.


* Pour the batter into the greased cake / loaf pan. Bake for about 35 - 40 minutes or until a tooth pick inserted in the center of the cake comes out clean.
* Place the pan on a cooling rack. Once cool, invert the pan and remove the bread. Slice and serve.


The batter raises while baking and so, choose a pan where the initial batter comes up to only 1/2 of the pan. I baked in a big loaf pan and cut it into slices.


This goes to "Only Baked" event at Tamalapaku, an event originally started by Pari.

Monday, July 11, 2011

Pear Milkshake


For those of you wondering about my absence from the blog world and what happened to me, I am all well and alive. J We had been on a short, rejuvenating vacation over the long weekend and got to meet some family members. I had been busy with the preparation and packing for the vacation, the actual part of it and again the unpacking and cleanup chores after returning back home. And of course the latter part was no fun though we enjoyed each day of our vacation. The little one is already asking whether we can go on another one next weekend. Probably we have to do it one more time next month. J
Summer holidays for the kids have started just last month in our parts of the world and obviously we parents have to devise new methods to beat their boredom. Or else we get bombarded with a routine tag line of a summer vacation 'I am bored'. Luckily 'the daughter' is in summer program giving me some respite for a few hours each day. She seemed to like the concept of the program and tries to follow their routine at home during weekends. And this milkshake, basically a simple recipe was the result of it. Her summer program teacher cooks a snack once a week in front of the students. Usually the kind that can be created easily by even kids (with adult supervision of course.) My daughter has planned to cook with me once a week during the summer break and for our first cooking session, I chose to go with a milkshake for its simplicity. Though the picky eater tasted only a few spoons, she now at least knows what goes into a milkshake and how it is prepared. Mission accomplished. J

We just blended together two peeled pears, 1.5 cups milk and sugar for this quick, refreshing treat. Add extra milk if thinner milkshake is preferred.


Comments