skip to main |
skip to sidebar
Here is a quick and tasty pulao made with juicy, succulent corn and my personal favorite, fenugreek greens aka methi. This pulao can be made with corn alone if preferred or replace the greens in the recipe with other vegetables like potato / capsicum / peas or even soy chunks or paneer. I like the combo of corn and fenugreek where the strong flavor of the latter is balanced by the hint of sweetness from corn kernels.
The recipe again is made to serve two adults. My son is away at college while my daughter won't touch these rice dishes with a barge pole. There was no point in making large servings though the recipe below can be doubled or tripled easily. I used fresh corn to make this pulao. This can be a quick lunch box recipe and if one has cooked basmati rice or leftover rice, this can be prepared in a short time. I cooked rice separately since I did want my corn to retain some bite. I have given both methods of cooking below. This is a kid - friendly recipe and one can add green chillies as needed. The chillies I used here were hot. This can be served with a spicy raita if the pulao is mildly hot. Or it can be made more spicier by adding more chillies and can be served with plain yogurt.
Ingredients: (Yield - 2 servings)
1/2 cup Basmati rice
1 cup or more roughly chopped fenugreek greens / methi
1 cup corn kernels (I used one ear of corn.)
2 tbsp. oil
1 tsp. cumin or caraway seeds (jeera / shahjeera)
2 cardamom pods
2 cloves
2 one inch piece cinnamon
1 bay leaf
1 star anise
2 or more spicy green chillies
1 big onion
1 tsp. ginger - garlic paste or grated ginger - chopped garlic
1.5 tsp. salt
3/4 cup water
Prep work:
1. If using fresh corn, peel off the husks and the silky threads. Use a sharp knife to cut down along the cob, to remove kernels.
2. Thinly slice the onions and green chillies.
3. Wash and roughly chop the fenugreek greens.
This is what I did:
1. Rinse the rice in two or three changes of water and pressure cook for 3 whistles adding 3/4 cup water. (I didn't soak the rice in water before cooking.) Let it sit for few minutes after the valve pressure is gone.
2. Heat oil directly in a pressure cooker or a pan. Add cumin / caraway seeds. When they brown, add cloves, cardamom, cinnamon, bay leaf, star anise and saute for 30 seconds. Add green chillie, onion and salt. Saute until onion is cooked to golden brown. Then add garlic - ginger paste and saute until raw smell disappears.
3. Next add chopped fenugreek greens and corn. Saute the vegetables until the fenugreek greens is cooked well, about 5 to 7 minutes. By the time corn would be done as well with very slight bite to it.
4. Next add the cooked rice and if it is still warm, leave it for few minutes. Gently fluff it with a fork or spoon and mix gently to combine. Let it sit for few minutes for the flavors to mingle.
This is how it is usually done:
1. Rinse and soak the rice in water and keep it aside.
2. Heat oil directly in a pressure cooker or a pan. Add cumin / caraway seeds. When they brown, add cloves, cardamom, cinnamon, bay leaf, star anise and saute for 30 seconds. Add green chillie, onion and salt. Saute until onion is cooked to golden brown. Then add garlic - ginger paste and saute until raw smell disappears.
3. Next add chopped fenugreek greens and corn. Saute the vegetables for a couple of minutes.
4. Drain the rice and add it along with 3/4 cup of water.
5. a) If using pressure cooker, cook for 3 whistles and turn off the stove. When the valve pressure is gone, fluff and serve.
b) If the pulao is being cooked in a pan instead of a cooker, add 1/4 cup more water. Cover and cook on low flame until rice is done, about 18 - 20 minutes. Taste and see whether rice is cooked. If the rice is not cooked yet, sprinkle some water and let it cook for some more time.
c) If you don't want to brown the bottom of the pressure cooker by directly cooking in it, a pan can be used to cook until step 4 and the contents can be transferred to a pressure cooker or a electric rice cooker and finish cooking.
So far in my Biryani / Pulao / Khichdi series,
A for Ambur Biryani
B for Basanti Pulao / Misthi Pulao
 Check out the Blogging Marathon page for the other Blogging Marathoners doing BM#99
My daughter knows about my food blogging and sometimes she just checks the pictures on this blog to know what I am blogging about. Yesterday in a casual conversation she learnt about my participation in blogging marathons and my 'themed' posts. After hearing about this week's theme, she thought that Valli genuinely was looking for ideas and was going to prepare these dishes on her kids' birthdays. I couldn't stop laughing at her naivete but went ahead with her suggestion of a 'chocolate treat' for the party.
 These chocolate-sprinkle covered pretzel sticks are a hit
with my kids and so I thought of sending them over to this virtual
anniversary party. All you need to make these yummy treats are a few
pretzel sticks, a melting variety chocolate and some sprinkles to decorate. One can leave the decorating job to enthusiastic kids as I did. My daughter used nonpareils, chocolate sprinkles and confetti sprinkles to decorate and some of the pretzels were left with just chocolate coating.
Method:
* Cover a baking sheet with foil / wax paper.
* Pour the sprinkles in small shallow cups and keep them handy.
* Melt the chocolate using double boiler method or in a microwave. (I prefer the former method since the chocolate remains melted for longer time compared to the microwave method as I leave the chocolate pan on the hot water pan until I am done.)
* Dip half of the sticks in chocolate and roll them in sprinkles.
* Lay them on the baking sheet and stick it in the refrigerator to dry them quicker.
Notes:
1. Small or jumbo sized pretzel sticks or small sized
pretzels can be used.
2. White or dark chocolate can be used. One oz of baking chocolate covers about 65 - 70
small sized (2.5 inch) pretzel sticks. I used Baker's semi-sweet baking chocolate.
3. Nuts / dessicated coconut can be substituted for sprinkles.
This is going to be my contribution to
1. Blogging Marathon #45
2. Kids' Delight - Potluck Party.
Comments
These chocolate-sprinkle covered pretzel sticks are a hit
with my kids and so I thought of sending them over to this virtual
anniversary party. All you need to make these yummy treats are a few
pretzel sticks, a melting variety chocolate and some sprinkles to decorate. One can leave the decorating job to enthusiastic kids as I did. My daughter used nonpareils, chocolate sprinkles and confetti sprinkles to decorate and some of the pretzels were left with just chocolate coating.
Method:
* Cover a baking sheet with foil / wax paper.
* Pour the sprinkles in small shallow cups and keep them handy.
* Melt the chocolate using double boiler method or in a microwave. (I prefer the former method since the chocolate remains melted for longer time compared to the microwave method as I leave the chocolate pan on the hot water pan until I am done.)
* Dip half of the sticks in chocolate and roll them in sprinkles.
* Lay them on the baking sheet and stick it in the refrigerator to dry them quicker.
Notes:
1. Small or jumbo sized pretzel sticks or small sized
pretzels can be used.
2. White or dark chocolate can be used. One oz of baking chocolate covers about 65 - 70
small sized (2.5 inch) pretzel sticks. I used Baker's semi-sweet baking chocolate.
3. Nuts / dessicated coconut can be substituted for sprinkles.
This is going to be my contribution to
1. Blogging Marathon #45
2. Kids' Delight - Potluck Party.
Comments
 While planning for last month's 'global food' based blogging marathon, I realized that stuffed dates are a popular treat in the Arab world. They can range from a simple stuffing like coconut or sesame seeds to these party worthy cheese filled ones. The sweetened cheese filling here is flavored with cardamom / rose water / orange blossom water, strongly reflecting the Arabic influences. The stuffed dates are then garnished with nuts. These stuffed dates would be an yummy treat for kids and adults alike.
Ingredients:
Soft, pitted Dates
Cream Cheese / Ricotta Cheese / Freshly made Chena
Powdered sugar to taste
Cardamom powder for flavor
Pistachios to decorate
Method:
* Make a small lengthwise incision on one side of each date using a small knife and keep them aside. (If using pitted dates, remove the pits.)
* Combine cheese, sugar and cardamom in a small bowl.
* Fill each date with about 1 tsp (or sufficient) cheese mixture.
* Garnish with sliced pistachios or press a pistachio on each date.
Notes:
1. One tbsp. cheese would fill 3 - 4 dates. Skim cheese can be used.
2. I garnished with some orange zest too and I think that flavor is too overpowering and only a little cardamom would suffice for the flavor. Even rose water / orange blossom water can be substituted for cardamom.
This is going to be my contribution to
1. Blogging Marathon #45
2. Kids' Delight - Potluck Party.
Comments
While planning for last month's 'global food' based blogging marathon, I realized that stuffed dates are a popular treat in the Arab world. They can range from a simple stuffing like coconut or sesame seeds to these party worthy cheese filled ones. The sweetened cheese filling here is flavored with cardamom / rose water / orange blossom water, strongly reflecting the Arabic influences. The stuffed dates are then garnished with nuts. These stuffed dates would be an yummy treat for kids and adults alike.
Ingredients:
Soft, pitted Dates
Cream Cheese / Ricotta Cheese / Freshly made Chena
Powdered sugar to taste
Cardamom powder for flavor
Pistachios to decorate
Method:
* Make a small lengthwise incision on one side of each date using a small knife and keep them aside. (If using pitted dates, remove the pits.)
* Combine cheese, sugar and cardamom in a small bowl.
* Fill each date with about 1 tsp (or sufficient) cheese mixture.
* Garnish with sliced pistachios or press a pistachio on each date.
Notes:
1. One tbsp. cheese would fill 3 - 4 dates. Skim cheese can be used.
2. I garnished with some orange zest too and I think that flavor is too overpowering and only a little cardamom would suffice for the flavor. Even rose water / orange blossom water can be substituted for cardamom.
This is going to be my contribution to
1. Blogging Marathon #45
2. Kids' Delight - Potluck Party.
Comments
Fairy bread is supposedly a hit at kids' parties in Australia and New Zealand and I guess one doesn't have to wonder why. :) Basically the crusts are trimmed off white bread slices and spread with butter or margarine. And next comes the fun part where the buttered slices are sprinkled with nonpareils or 'hundreds and thousands'. And then these appealing bread slices are quartered before serving. In case anyone is wondering what 'hundreds and thousands' are, the colorful sprinkles are called so outside North America.
I knew instantly these are going to be a hit with my teenager. When ever she accompanies me to shop, the first thing on her request list is that I let spend some time in the baking isle. I don't know what the fascination is but she spends time looking at the various frosting and toppings and she picks one small bottle of sprinkles or some thing on the same lines, every time she comes. And so as expected she proved me that this can be enjoyed by kids of all ages.
I substituted honey wheat bread for white bread and chose to keep the crust. These bread slices don't need any toasting before smothering with butter and decorating. They are quick and easy to put together compared to sandwiches. And it would be great project to involve the young ones while making these colorful fairy bread slices for kid-centric parties. I am sure that they would have loads of fun with the nonpareils besides being proud for their contribution to the party.
Bread slices, softened butter and colorful sprinkles are the only ingredients you need to make this kid-friendly treat. Trim off the edges of bread slices or just keep them if you prefer. Spread butter / margarine on one side of the slice and sprinkle the nonpareils, covering the entire surface on the buttered side. Quarter them and serve.
This is going to be my contribution to
1. Blogging Marathon #45
2. Kids' Delight - Potluck Party.
Comments
My younger one turned a teenager this weekend. And officially, I am now a mother of two teenagers, who happen to be the opposite ends of a spectrum in every aspect. The older one cannot throw a tantrum for his dear life while the younger one doesn't know how to stop from throwing one. She gets upset at the drop of a hat and so the situations demand a lot of tactful & patient parenting, cajoling and threatening from my side where she is concerned. And even though she is not little anymore, lunch box is still one mini struggle since the stuff she doesn't prefer comes home untouched under the guise of "being not hungry". I therefore involve her while planning lunches and we decide it beforehand what she gets to carry in her lunch box.
If given a choice, my daughter would survive on a salad and pasta diet. She loves pasta so much that she carries it to school at least 2 - 3 times in any given week. I therefore could not avoid from posting a pasta recipe for the lunchbox themed blogging marathon today. I wanted to try something on Mediterranean lines but it got changed into something else as my daughter was hovering around as it was a holiday here. I went according to her whim and choice of ingredients since it was her lunch and got a thumbs up from my kids.
Ingredients: (2 servings)
1 cup pasta shells of your choice (I used sweetcorn, carrot and squash blend of twisted elbow macaroni.)
1/2 cup cooked / canned garbanzo beans
1 small tomato, chopped
1 small grated carrot
1/4 cup black olives
1/2 cup white cheddar cheese or any other cheese of your preference
2 -3 tbsp milk (optional)
Salt & pepper to taste
1- 2 tbsp minced parsley / cilantro
Method:
* Cook pasta al dente according to the directions on the package and drain.
* Transfer the pasta to the pan and add all the ingredients except the parsley / cilantro. Just heat until the cheese has melted and blended into the mixture.
* Turn off the stove, transfer the pasta into a serving platter and garnish with parsley/cilantro.
This rice dish goes to
1. Blogging marathon #40
2. Srivalli's Kids' delight event, hosted by Jayanthi this month with the theme - Lunch box.
Comments
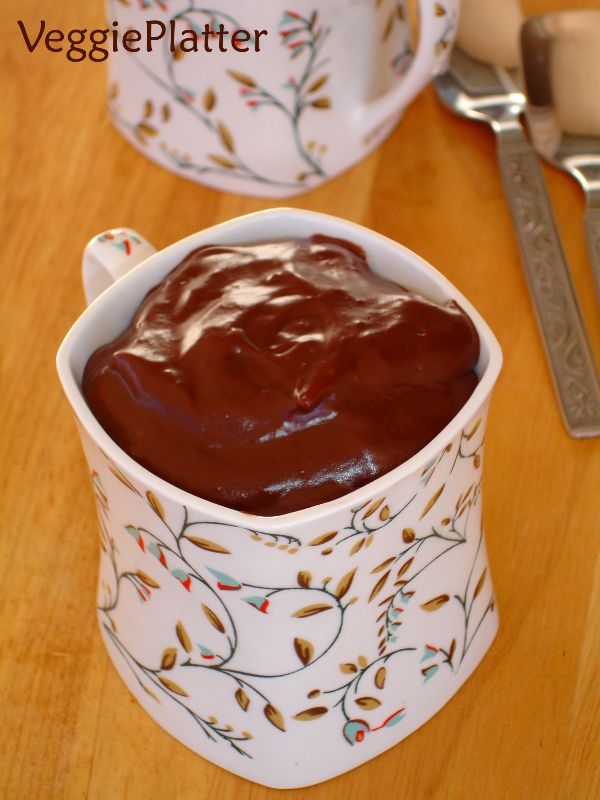
Whenever I ask my 11 year old to make a list for our weekly grocery shopping, the two things instantly that come to her mind are chocolate pudding and macaroni & cheese. They are so appealing to her that she never gets tired of them. If given a choice, she can survive on them alone. Chocolate pudding is her most favorite evening snack and so obviously, none of our grocery shopping goes by without buying cartons of chocolate pudding.
While she enjoys those store bought puddings, I keep worrying looking at the long list of chemicals added in the form of preservatives to the simple pudding. And so I was thinking of trying it at home from a long time now. Recently when I was browsing for condensed milk recipes, I came across this recipe at allrecipes and was impressed by the positive reviews the recipe got. The recipe is very simple even for a novice cook and can be prepared in a jiffy. I consider it a hit as my daughter was happy with this pudding. Try it if you are looking for a quick one to satisfy your sweet tooth.
Ingredients: (4 servings)
1/2 cup sugar
1/3 cup cocoa powder
3 Tbsp cornstarch
2 cups milk (at room temperature or warm)
1 tsp vanilla essence
Method:
* Mix sugar, cocoa and cornstarch in a microwave safe bowl.
* Gradually add milk to the bowl and whisk so that no dry lumps are present.
* Microwave the mixture for 3 minutes on HIGH. Remove and stir the mixture. Again at one minute intervals, cook for about 2 minutes or until shiny and thick.
* Stir in the vanilla and butter.
* If serving cold, place a piece of plastic wrap directly on the surface of the pudding to prevent a skin from forming and chill. (I skipped this step as my daughter likes to eat the pudding at room temperature.)
Note:
* I halved the recipe to get 2 servings and it was done under less than 4 minutes.
This goes to BM#24 under the theme of "Cooking with Appliances". Check here to find out what others are cooking during the marathon.
Comments