HOME        |        ABOUT        |        COPYRIGHT        |        CONTACT        |         RECIPE INDEX        |         INDIAN THAALIS        |         MILLET RECIPES        |        EVENTS' ROUNDUP        

Saturday, January 4, 2014

Aloo Tikki Chole Chaat

I love aloo tikki chole and samosa chaat so much that whenever I cook chole masala at home, I purposely cook extra to enjoy these chaats later. I eat them to my heart's content without any guilt and so when I saw aloo tikki chole in the combo dishes' list during BM #36 announcement, I couldn't give it a miss. :) Even though I prepare them quite often at home, I didn't get a chance to post them so far since I mostly prepare them for our dinners and blogging / photography takes a backseat during dinner preparations. However for BM, here it is.
When preparing tikkis at home, one naturally has control over what goes into it and can add ingredients according to their preference. You can just add chili powder / minced green chillies if you don't like any other spices or go with extra addition of coriander powder, garam masala and chaat masala to the below mentioned ingredients. I personally prefer corn starch over bread crumbs for binding and have used it. Feel free to use bread crumbs if you prefer it. The following recipe gives my preferred version - spicy and slightly tangy tikkis.

Ingredients for tikkis: (Yield about 10 tikkis)
4 medium sized potato (I had more than 2 cups of mashed potatoes)
1/8 tsp turmeric powder
1 tsp chili powder
1 tsp amchur powder
1/2 tsp cumin powder (optional)
Salt to taste
2 tbsp. corn starch
1 - 2 tbsp. minced cilantro
3 - 4 tbsp. oil to shallow fry

Method:
1. Peel and cut the potatoes into big chunks. Cook in a pressure cooker for 2 whistles or on stove top until they are done. If using a microwave, cube the potatoes to quicken the cooking process. Drain the cooked potatoes and let them cool. Mash the drained potatoes well.
2. Combine the mashed potatoes, spice powders, salt, corn starch and cilantro in a bowl. Mix well and divide the mixture into 10 portions. Roll each one into a ball and flatten it a bit to form a patty.
3. Heat 1 - 2 tbsp. oil on preferably a non stick pan on medium flame. When the oil is hot, reduce the heat to medium and place the tikki in the hot oil. Place as many tikkis as the pan can hold without overcrowding.
4. Cook until the bottom side of the cutlet turns golden brown. Flip the cutlets using a spatula and drizzle some more oil around the edges of them. Cook until the other side turns golden brown too. Transfer them onto absorbent towels.
5. Repeat the steps with the remaining mixture.

Aloo tikki chole chaat:

 (This picture is kind of cheater's version since the chaat contains veggie patties.)

Here is aloo tikki chole chaat for you in a nut shell. Spicy potato patties are cooked until golden brown and are topped with spicy chickpea curry, tongue tickling green and sweet chutneys, sharp minced onion, crisp sev and finally yogurt to balance off the flavors. And if one doesn't prefer to stress too much and not prepare everything from scratch, store bought chutneys and sev can be great lifesavers.
Now coming to aloo tikki chole, we need the following -
Aloo tikkis (recipe above)
Chole masala (recipe here)
Dates - Tamarind chutney (recipe here)
Cilantro - Mint chutney
Sev - I have used thin and thick sev. (recipe here)
Minced red onion
Minced cilantro

Yogurt

* Arrange a couple of tikkis on a plate and pour about 2 ladles of chole masala over them. Spoon chutneys over and sprinkle some sev. Garnish with onion and cilantro and round off with a ladle of yogurt.

This is my "Aloo Tikki - Chole Chaat" post under "Combo Dishes" theme for BM#36. Check here to know what other marathoners are cooking. 

Comments

Friday, January 3, 2014

Soya - Veggie Burger


Before proceeding towards the recipe, I would like to wish everyone a happy, peaceful and healthy new year.

When I thought of a sandwich with patty / cutlet,  the first thing that came to mind was a veggie burger and I didn't sit to ponder much about other options as I was fixated on this burger thing. My husband often prepares burgers at home with store bought soya patties and this time I thought to make them at home, of course throwing Indian touch. I didn't have the energy to make the buns also from scratch and so we settled with the ones we picked up from the store.
Now assembling the burgers is no rocket science and one can go with their preferred choice of ingredients to make the sandwich. I have used burger buns, lettuce, onion, tomato, cheddar cheese slice, soya - veggie patty with some mustard and ketchup in my burger sandwich. I am going to give the recipe for the patties below. If you feel that the following ingredients are not properly binding, feel free to add some bread crumbs.

Ingredients:
1 cup soya granules (or soya chunks)
1 potato (peeled and cubed)
1/2 cup finely chopped carrots and beans
1/4 cup toasted and skinned peanuts 
2 - 3 tbsp. minced cilantro
2 green chillies, finely chopped
Salt & chili powder to taste
1 tsp cumin powder
1 tsp lemon juice
1 - 2 Tbsp oil
Oil for shallow frying

Method:
* Soak soya granules / soya chunks in hot water for about 10 minutes and drain. If using soya chunks, cut them into tiny pieces or crumble them after soaking.
* Cook potato, beans and carrot together. Drain, cool and slightly mash them.
* Grind the toasted peanuts coarsely.
* Combine soya, mashed veggies, peanut powder and all the remaining ingredients (except the oil used to fry) in a mixing bowl. Adjust the seasonings / ingredients according to preference to form a stiff, coarse mixture.
* Heat 2 -3 tbsp. oil on a shallow nonstick pan over high heat.
* Pinch out a lemon sized portion of the mixture, shape into a patty / cutlet. 
* When the oil is hot, reduce the heat to medium and place the patty/cutlet in the hot oil. 3 - 4 cutlets can be cooked at a time depending upon the size of the pan.
* Cook until the bottom side of the cutlet turns golden brown. Flip the cutlets using a spatula and drizzle some more oil around the edges of them. Cook until the other side turns golden brown too. Transfer them onto absorbent towels.
* Repeat the steps with the remaining mixture.

Comments

Thursday, December 26, 2013

Corn Vadas / MokkaJonna Vadalu

I had so many corn recipes in mind for the third day of BM that I kept contemplating on what to cook until the last moment. However an occasion at home yesterday called for these super yummy vadas. Your's truly, you know who turned an year older yesterday. :) Back home, it was an unwritten rule that my dear mother had to cook bisibelebhath and masala vadas on my birthdays. Surprisingly, I never craved for sweet dishes on my birthdays though I had / still have a big sweet tooth. Keeping up the tradition, I cooked BBB yesterday and was looking for an alternative to vadas as I had not thought of soaking chanadal.
The first thing that came to mind were these corn vadas, suggested by one of my aunts during my last India visit. She had reiterated that they really taste good and I need to give them a try. Her recipe didn't include besan but I had to add it for binding since my batter was little on the watery side. These fritters taste similar to masala vadas and if you are going to use frozen corn and a food processor like me, the batter is a breeze. It takes only a couple of minutes,  literally to prepare the batter. A great recipe when you have impromptu guests or in a mood for a quick, savory snack.  
Ingredients: (Yield 12 vadas)
2 cups corn kernels (I used frozen corn.)
2 green chillies (I used Serrano peppers. Adjust if using other variety.)
A handful of cilantro leaves
Salt to taste
1/2 cup besan / chickpea flour
1 onion - finely chopped
Oil to fry
 
Method:
* Place the corn kernels in a bowl with 1-2 tbsp of water and boil in microwave for a minute. Drain the water.
* Add the corn, chilies, cilantro and salt to a food processor or a blender and grind them to a coarse paste without adding water. Transfer the ground paste to a bowl.
* Add besan and onion to the bowl and mix well. 
* Heat oil in a small frying pan / kadai.
* Take a small portion of the batter (about 1.5 tbsp. size) onto your left palm, slightly pat it and gently drop it into the hot oil. Repeat the step with the remaining batter. Drop as many patties as the pan could hold without overcrowding.
* Fry them on low flame, turning them around once or twice in between until they are cooked through and turn brownish.
* Remove them with a slotted spoon and serve warm. 
 
This is going to be a part of BM #35 under the theme of "Cooking with Corn". Check what other marathoners are cooking here.

Comments

Wednesday, December 25, 2013

Makai Palak


This has been on my "to do" list for years now and the "corn" theme this week for the marathon seemed like a perfect opportunity to try it. It's a simple and quick subzi to put together, even though one may get intimidated by the list of ingredients in the recipe. It is a yummy side dish that goes well with rotis / parathas and is on the similar lines of the ever popular palak paneer.
Ingredients:
1 cup corn kernels (I used frozen corn.)
1 big bunch spinach (I got a little more than 1 cup puree)
2 - 3 green chillies (or as per taste)
1/2 tsp sugar
1 tbsp. kasuri methi
1 big onion, chopped roughly
1 inch piece of ginger
1 tbsp. oil
1 tsp cumin seeds
1/8 tsp turmeric powder
1 tsp amchur powder
1/2 tsp coriander powder
1/2 tsp cumin powder
1/2 tsp garam masala
Salt to taste
1/2 cup milk / 1/2 cup yogurt
Preparation:
* Grind onion and ginger to a fine paste.
* Wash the spinach leaves along with the tender stems. Bring 6 - 8 cups of water to a boil in a sauce pan adding 1/2 tsp of sugar. Add the spinach and the chilies. The sugar aids in retaining the vibrant color of spinach. Blanch for a minute, drain and refresh in cold water. Drain in a colander again. Grind them along with kasuri methi to a fine paste in a food processor. 

The cooking part:
* Heat oil in a saute pan and add cumin seeds. When they start to change a few shades darker, add the onion paste and saute until light brown.
* Add turmeric, coriander powder, cumin powder, amchur and garam masala. Stir well and cook for a minute.
* Next add corn, spinach puree and salt. Cook for about 3 - 5 minutes.
* Add milk / yogurt at the end, stir and remove from heat.
* Serve hot with rotis.

Note:
Tomatoes can be added in place of amchur. Add 2 chopped tomatoes  / tomato puree after the onion paste is fried and saute until the oil gets separated.

This is going to be a part of BM #35 under the theme of "Cooking with Corn". Check what other marathoners are cooking here.

Comments

Tuesday, December 24, 2013

Corn - Capsicum Toasties

I have started to take interest in a couple of television cook shows recently and had started to record the episodes. I leisurely go through them to see if anything catches my attention. I wanted to try a couple of corn recipes that I saw on khana khazana and chose this "corn" theme for that specific reason. This simple and filling sandwich was one of them and can be a great breakfast / snack item.

Ingredients:
8 brown bread slices
1 cup boiled sweet corn kernels
1 capsicum finely chopped
2 green chilies finely chopped
1.5 cups finely grated cheese
8 black peppercorns, crushed
Method:
* Preheat the oven at 180 degree Celsius / 350 deg F. While the oven is preheating, put the slices directly on the oven rack to toast them. Or you can choose to toast them in a toaster or on stove top.
* Combine all the other remaining ingredients in a bowl and mix well.
* Remove the toasted slices from the oven and spread the mixture equally over the slices.
* Put them back in the preheated oven. Again place them directly on the rack and remove them when cheese starts to melt.

 This is going to be a part of BM #35 under the theme of "Cooking with Corn". Check what other marathoners are cooking here.

Comments

Thursday, December 19, 2013

Doodh Paak ~ Gujarati Kheer

I was looking for a Gujarati dessert that had no loads of ghee in it and came across this yummy kheer. Kheer undoubtedly happens to be one of the basic sweet dishes cooked through out India on festivities and auspicious occasions. Regardless of the name it goes by regionally or the local variations in the preparation, this is a yummy, rice and milk based dessert. I have noticed that it is also one of the most popular choice of desserts in the Indian restaurants' buffet menus here in US. It may be because it is rich and delicious and simpler to prepare.
The dish is called kheer and payasam respectively in northern and southern parts of India while Gujaratis call it as doodh pak. The basic recipe everywhere remains the same. A small quantity of rice is allowed to cook leisurely in simmering milk and then sweetened with sugar / jaggery. It is finished with a cardamom flavoring and generous garnishing of nuts for the delicious and crunchy bite they offer to the dish. It can be served warm or chilled.
Check the north Indian version kheer recipe here.

Ingredients: (2 servings)
2 cups / 1/2 litre full fat milk
1 tbsp rice (I used extra long grain rice.)
1 tbsp ghee
6 - 8 tbsp white colored rock sugar (Or adjust the quantity as needed. In absence of rock sugar, substitute with regular sugar.)
1/4 tsp cardamom powder
1/4 tsp crushed saffron (or soak a pinch of saffron strands in warm milk and use.)
1/2 cup slivered almonds / pistachios

Method:
* Mix the rice and ghee in a small bowl and keep aside.
* Heat milk preferably in a non stick sauce pan. When the milk is hot, lower the heat and simmer the milk for about 10 - 12 minutes.
Don't forget to stir the milk now and then, through out the process to avoid scorching.
* Add the rice to the milk and continue to simmer until rice is softly cooked.
* Then add the sugar, cardamom, crushed saffron and the nuts. Continue to cook for about 5 - 7  minutes.
* By the time, the saffron will add a beautiful yellowish hue to the dish and the nuts turn a little bit softer, giving a bite to it while consuming the kheer.
* Serve warm / chilled.

This is going to be a part of BM #35 under the theme of "Regional Cooking - Specific Course". Check what other marathoners are cooking here.

Comments

Wednesday, December 18, 2013

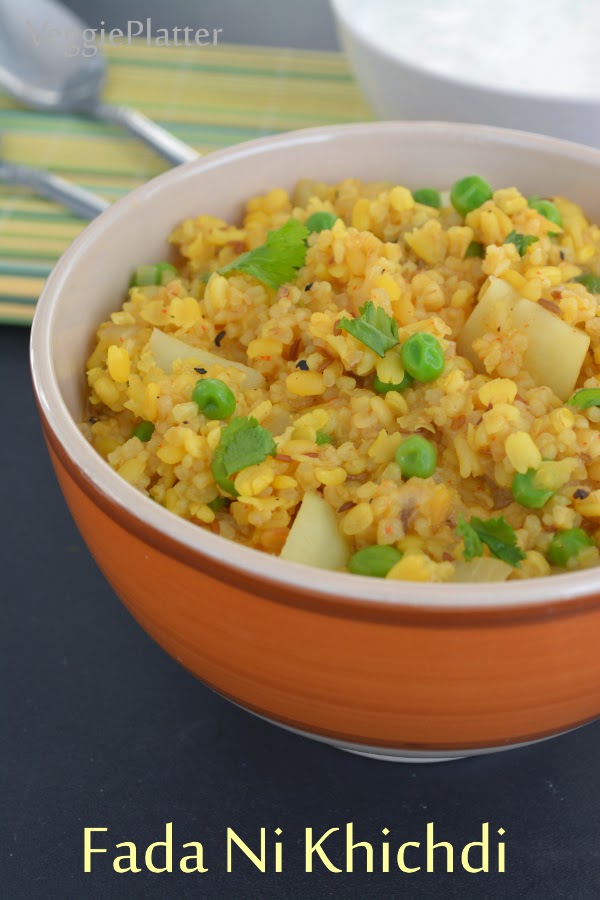
Fada Ni Khichdi ~ A bowl of comfort from Gujarat

Comforting one pot meals like khichdis/pongals are welcome in most of the Indian kitchens. They may go by different names regionally and vary in preparations depending upon the grain / bean combination used. However usually dishes like these are substantial, nutritious and wholesome. Besides they are quick and easy to put together and can be served as lunch / dinner.
I came across one such recipe at Tarla Dalal's space called fada ni khichdi / cracked wheat khichdi. It is a spicy, wholesome and tasty dish prepared using cracked wheat, moong dal and vegetables. And the good thing is it doesn't need any side dish. It can be served on it's own or a simple raita / yogurt. 

Ingredients: (4 servings)
1/2 cup cracked wheat
1/2 cup moong dal
1 potato, peeled and cubed
1 small onion, peeled and diced
1/4 cup fresh green peas / frozen
1/2 tsp ginger paste
1/2 tsp green chilli paste
1/8 tsp turmeric powder
1/4 tsp freshly cracked black pepper
1/2 tsp chili powder
Salt to taste
1 tbsp. minced cilantro to garnish
For tadka:
1 - 2 tbsp. ghee
1 tsp cumin seeds
2 cloves
1/2 inch cinnamon piece
a pinch of asafoetida
Method:
* Soak the cracked wheat and moong dal in water for about 15 minutes.  Drain after the soaking is done. Rinse again with water and drain.
I always cook cracked wheat in pressure cooker without soaking and it gets cooked in about 2 whistles and so I find this step unnecessary if you are using a cooker. If the cooking is happening in a sauce pan, then soaking quickens the cooking process.
* Heat ghee directly in a small pressure cooker and add cumin seeds, cloves, cinnamon and asafoetida.
* When cumin seeds start to turn a few shades darker, add ginger-chili paste, cracked wheat, moong dal and vegetables. Saute for about 4 - 5 minutes.
* Then add about 2 & 1/2 cups water, turmeric, chili powder and pepper. Cook for about 3 - 4 whistles or until the mixture is cooked to the desired consistency.
* When the valve pressure is gone, remove the lid and add salt. Mix well.
* Garnish with cilantro and serve warm with raita / yogurt.

Notes:
* The recipe also had about 1/2 cup cauliflower florets. Add any other vegetables that you prefer, to make it more substantial and healthier.
* Potatoes at my place cook under one whistle. I therefore let the cracked wheat - moong dal mixture cook for 3 - 4 whistles in the pressure cooker. I cooked potato cubes in the microwave separately. At the end I added frozen peas and cooked them for a minute.

This is going to be a part of BM #35 under the theme of "Regional Cooking - Specific Course". Check what other marathoners are cooking here.

Comments

Tuesday, December 17, 2013

Khattu Mag


The name sounded so exotic and I had no idea what to expect when I came across this dish. I saw the recipe in a Sanjeev Kapoor's cookbook and my guess was leaning towards northeast Indian cooking. Surprisingly, it turns out to be a dish that is prepared commonly in Gujarati kitchens. A thick kadhi with a twist, if you can call it so. I found out from online that it is pronounced as "khaa-too-mug", khattu being sour and mag meaning mung beans.
It is relatively a quick and simple dish to put together, if you had soaked mung beans beforehand and if you own a pressure cooker. The soaking period is also less, just a couple of hours and not too long. It's like a typical Jain dish involving no onion-garlic and it is quite an easy preparation sans vegetables. The chickpea flour and the mung make this a protein rich side dish. In spite of it's simplicity, it was a lip-smacking dish for me considering that I am a sucker for kadhi kind of dishes. Even my picky daughter asked for a second serving and so this recipe is a keeper for me.

Ingredients: (4 servings)
1/2 cup green gram / mung beans
1.5 cups low fat sour yogurt
2 tbsp. besan / chickpea flour
Salt to taste
1/4 tsp turmeric powder
1 tsp ginger paste
1 tsp green chile paste
1 tsp sugar
Ingredients for tadka:
2 tsp oil, 1 tsp mustard seeds, 1 tsp cumin seeds, 1/4 tsp fenugreek seeds / methi seeds, 3 whole cloves, 1 inch piece of cinnamon, few curry leaves, and a pinch of asafoetida

Method:
1. Wash moong beans in two exchanges of water and drain. Soak them in 2 cups of fresh water for an hour or two. Drain the beans in a colander after the soaking period.
2. Cook the beans in a pressure cooker adding 1 to 1.5 cups of water. If you don't own a pressure cooker, add moong and about 2 cups of water in a sauce pan and cook on medium flame until moong is softly cooked. Add extra water if needed while cooking.
3. Add yogurt, besan, salt, ginger paste, chile paste, turmeric and sugar to a bowl. Whisk well to combine. Sometimes if besan is not whisked properly, then it forms lumps while cooking. To avoid that, you can add everything to a blender while grinding ginger and green chile. You will get a lump free, homogeneous mixture this way and it is lot easier than whisking besan. Add one more cup of water and whisk again.
4. Heat another nonstick pan and add oil. Add mustard seeds, cumin, fenugreek seeds, cloves and cinnamon. When mustard seeds start to pop, add curry leaves and asfoetida.
5. Then add the yogurt mixture from the step 2 and cook until the besan is cooked and the raw smell leaves, about 5 minutes.
6. Next add the cooked moong and cook for about 3 - 4 minutes. Turn off the stove
7. Serve hot with rotis.

 This is going to be a part of BM #35 under the theme of "Regional Cooking - Specific Course". Check what other marathoners are cooking here.

Comments

Thursday, December 12, 2013

7th Blog Anniversary & Apple Turnovers

During my initial days of blogging, my brother-in-law once jokingly had asked whether I would stop blogging when I run out of recipes. It would be a wacky reason to stop blogging about food, for anyone. Cooking happens to be a continuous learning process. Considering the choices one has with Indian regional / global cuisines and the twists/variations one can lend to dishes, recipes can never be exhaustive. However, I wasn't sure about the amount of enthusiasm I would have had towards blogging after a certain period of time. It is though now proven that this blogging bug is here to stay longer. :) 

Veggie Platter - an integral part of my virtual world turned 7 this week. It is a milestone literally considering the fact that my interest in any given area (except reading) diminishes as time progresses. My love towards my virtual cooking journal had been on an increasing curve since I started. Also friends known / unknown in this virtual world kept / keep me going with their support and appreciation for my blog. Thank you all.

And coming to today's recipe - a final dessert for this week's blogging marathon. Apple turnovers. It is my take over the traditional pastry version. I had used pizza dough for a quick dessert and it tastes like a short cut apple pie.

Ingredients: (Yield 8)
1 pound fresh pizza dough (Check notes)
4 apples (I used golden delicious apples since I prefer sweet ones.)
2 tbsp. apricot preserves
2 tbsp. softened butter
2 tbsp. sugar
1/2 tsp cinnamon
Method:
* Combine sugar and cinnamon in a small bowl.
* Peel, core and dice apples. Combine them with apricot preserves in another bowl and mix well. Keep it aside.
* Preheat the oven to 425 deg F.
* Divide the dough into 8 portions. Spread each portion into a square of about 4 & 1/2 inches.
* Divide the apple mixture among the dough squares.
* Fold over a corner of each square and seal the edges properly to form a triangle. Wet the edges with moist fingers if needed and take care to seal the edges properly. Otherwise they will open up during baking and it would be a mess. The gooey syrup will burn and it is not a pretty sight.
* I highly recommend covering the baking sheet with aluminium foil to avoid any messy accidents. Place the turnovers over the foil lined baking tray or a greased baking pan.
* Brush tops with butter. Sprinkle sugar-cinnamon mixture over them.
* Bake for 15 - 20 minutes or until golden brown. Serve warm.
If at all they open up and the juice starts spilling out, shift them to a cleaner side on the tray. Otherwise the juice starts to burn and stick to turnovers. Or replace a new foil sheet and place the turnovers on them.
Note:
I used this pizza dough and added 2 tbsp. of canola oil while kneading the dough. I had prepared the dough the previous evening and refrigerated it overnight. Next day morning I left it in a warm place to come to room temperature and then used it.

This is going to be a part of BM #35 under the theme of "Desserts". Check what other marathoners are cooking here.

Comments

Wednesday, December 11, 2013

Eggless Marble Cake

During this week's marathon, I thought of clearing some recipes from my "Bookmark" folder instead of wracking my brain for ideas. And this eggless marble cake comes from there. I have seen my share of marble cake versions during the past few years and Sharmi's version was pretty impressive with captivating images. The condensed milk gives this cake a beautiful sponge cake like texture. It is moist, fluffy and delicious. It is delightful to watch the swirly pattern in the cake and  my kids were completely sold.
The only problem I had was not having a right sized baking pan for this quantity of batter which resulted in not so swirly cake as I had expected. However the taste and texture of this cake are so wonderful that any blunders in appearances can be gladly excused. This recipe is definitely a keeper.
Ingredients:
1 & 1/4 cups all purpose flour / maida
2 tsp baking powder
1/2 tsp baking soda
3/4 cup powdered sugar
1/2 cup butter
3 tbsp. condensed milk / milk powder
1 cup milk at room temperature
1 tsp vanilla essence
2 tbsp. cocoa powder
2 tbsp. hot water

Method:
* Sieve flour, baking soda and baking powder together twice and keep it aside.
* Cream sugar and butter until light and fluffy. Add condensed milk, milk and vanilla to the sugar-butter mixture and mix well.
* Stir in flour mixture and mix well. Vanilla flavored batter is ready now.
* Transfer 1/4th of the vanilla batter into another bowl. Add cocoa and hot water to the 1/4th batter bowl and mix well to form the chocolate batter. Keep the two batters aside.
* Preheat the oven to 350 deg F / 170 deg C. Grease a small round cake tin or a small bread loaf. Pour half the portion of vanilla batter into the pan. Then pour half the chocolate batter in 3 dollops over it as shown in the picture below. Then make swirls lightly using a fork. Don't overdo it since the batters would mix up ending in no patterns at all. Repeat the step again with the remaining batters. Pour the remaining vanilla batter over it, then pour chocolate batter in 3 dollops over it and swirl with the fork. 
Note: My loaf pan was bigger for this quantity of batter. I did not have enough batter to do the steps twice. I therefore poured the entire vanilla batter into the pan and poured 3 tbsp. of chocolate batter in 3 dollops and swirled. If you are using above measurements using a 2 lb loaf pan like me, then use only about 1/4 cup of vanilla batter to make chocolate batter instead of using 1/4th quantity of the whole vanilla batter. I had used 1/4th quantity of vanilla batter to make chocolate batter and had extra left to make a couple of chocolate cupcakes as well. 
 * Bake for 40 - 45 minutes or until a toothpick inserted at the center comes out clean.
* Cool, invert and slice the cake.
This is going to be a part of BM #35 under the theme of "Desserts". Check what other marathoners are cooking here.

Comments