HOME        |        ABOUT        |        COPYRIGHT        |        CONTACT        |         RECIPE INDEX        |         INDIAN THAALIS        |         MILLET RECIPES        |        EVENTS' ROUNDUP        

Tuesday, November 24, 2020

Yogiratna / Valval

Yogiratna is a popular vegetable curry preparation from the Konkani cuisine. This coconut milk based mixed vegetable curry which also goes by the name valval is traditionally reserved for special occasions and festive days. This mildly spicy, delicious curry goes well with rice and is a simple dish to prepare. 

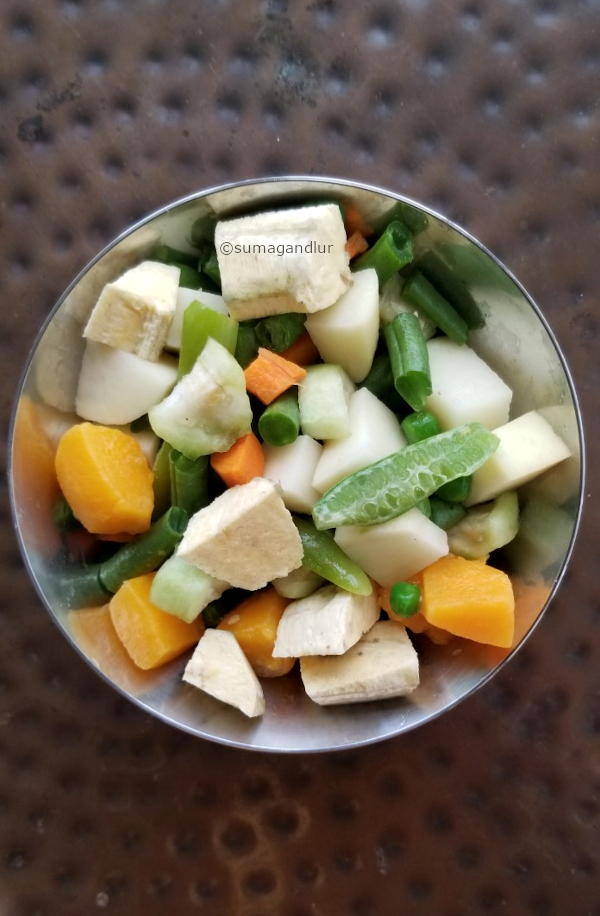
Most of the local variety vegetables on hand were originally used in this preparation as long as they are not the bitter / sour / tough variety. No onion or garlic is used in the recipe. Some of the local vegetables that go in this dish are bread fruit, tender / dried cashews, pumpkin, yam, ash gourd, bottle gourd, ivy gourd, ridge gourd, snake gourd, yard long beans, plantain, the yellow colored cucumber, and sweet potato. I used carrots, beans, potatoes, green peas, butternut squash, ivy gourd, ridge gourd and plantain for my yogiratna / valval. 

Fresh or frozen coconut can be used to prepare coconut milk. If using frozen coconut, thaw it before using. The coconut is ground with water twice to get the first time 'thick' milk and the second time 'thinner milk'. Usually the vegetables are cooked in the thin coconut milk and water mixture in a pot. I made a small portion and pressure cooked them in water. Yogiratna / valval needs to be slightly on a thicker side (and so avoid cooking vegetables in water more than needed or throw away / save the extra water.) Mixed vegetables and coconut milk can be used in an average 1:1 ratio in the recipe. 
Ingredients:
1 cup mixed vegetables, chopped *
2 - 3 green chilies, sliced
1/2 cup shredded coconut / 1 cup coconut milk
1 tsp. rice flour / all purpose flour
Salt to taste
Ingredients for seasoning:
1 tsp. ghee
1/2 tsp. mustard seeds
1/2 tsp. cumin seeds
Few curry leaves

* I used carrots, beans, potatoes, green peas, pumpkin, ivy gourd, ridge gourd and plantain.

Directions:
* Pressure cook the prepared vegetables along with green chilies for one whistle, adding about 1/2 cup of water.
* If preparing coconut milk from scratch, grind the coconut adding about a cup of water. Pass the ground coconut mixture through a sieve and collect the thick milk. Add the coconut residue back to the blender and add about 1/4 cup of water and grind again for few seconds and collect the thin milk. (The milk extracted this time will be thinner than the one extracted the first time.)
* Combine flour and the thin coconut milk in a small cup and mix well. 
* Add the cooked vegetables, the thin coconut milk - flour slurry, and salt to a pan. Cook for 2 or 3 minutes. Add the thick coconut milk and bring the mixture to a boil. Lower the heat once the mixture starts boiling and simmer it for about four to five minutes. Turn off the stove. (I added both the coconut milks at the same time.)
* Heat ghee in a small pan and add mustard seeds and cumin seeds. When mustard seeds start to splutter and cumin seeds turn a shade darker, add curry leaves and turn off the stove. 
* Add this seasoning to the above cooked vegetable mixture and stir well. Serve warm with rice.

So far in my 'A - Z' Karnataka Recipe Series,
Akki Halbai
Biscuit Roti
Congress Kadalekayi
Davanagere Benne Dose

Thursday, November 19, 2020

Pottu Minapappu Garelu / Whole Black Gram Fritters


Garelu, the black gram fritters have an important place in Andhra cuisine and they are a part of menu on festival days and death anniversaries. Pottu minapappu garelu ( whole black gram fritters / sabut urad dal vadas) used to be mandatory on festive days in my grandmothers' homes or for that matter in many Andhra homes until a generation ago. My mother still tries to cram in these fritters as much as possible when there is a special occasion though she uses skinned black gram now. I on the other hand try to stay away as much as possible from fried snacks even though I enjoy them and when I do fry, opt for quicker versions like bajji or pakoda. Kudos to those grandmothers who used to sit and grind the batter manually in stone grinders but I don't have that much patience even though  grinder and mixer are at my disposal.

I like the version made with whole black gram compared to the skinned variety because of the texture and the nostalgia attached to the dish, it reminds me of my grandmothers. However the whole black gram needs more soaking compared to the skinned variety and so these fritters need advance planning. They need a soaking of at least 8 hours. A wet grinder would be more suitable to grind the vada batter compared to a mixer / blender since only a little amount of water should be added while grinding. Vadas can not be shaped if the batter turns out runny.

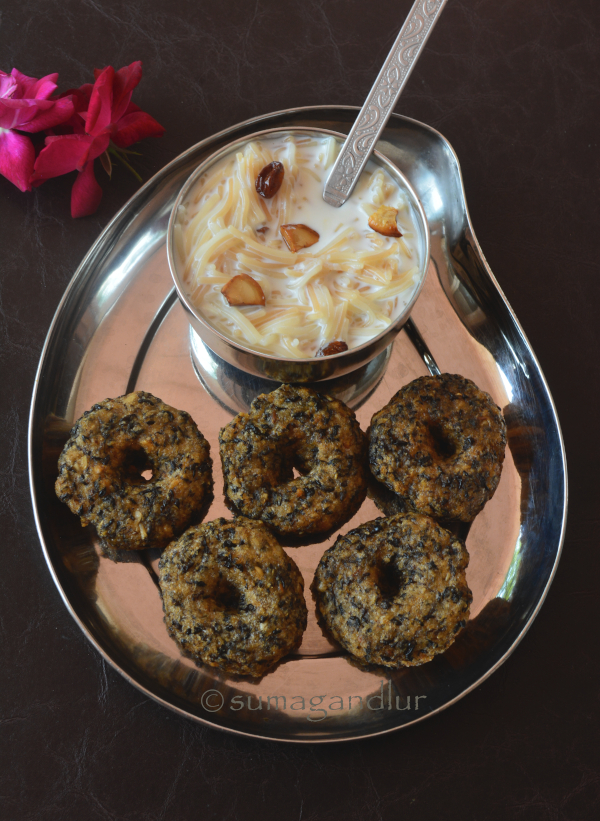
We keep the batter recipe very basic, by grinding just black gram and salt. Ginger and black pepper can be added as well if desired. I prefer to serve it the way my grandmothers did, either with paramannam / payasam or a spicy chutney like ginger or sesame seeds chutney. I made them recently after ages on my husband's request and served them with vermicelli kheer. Warm and crispy vadas served with sweet, delicious kheer, a delicious combo. 

Ingredients:
1 cup whole black gram / sabut urad dal / pottu minapappu
Salt to taste 
2 cups oil to fry 
(Optional ingredients - ginger and black pepper)
Directions:
* Rinse black gram twice and soak it in sufficient water over night or at least for about 8 hours.
* Drain the water after soaking period and rinse the black gram a few times with water to get rid of the black gram skins as much as possible. (There is no need to rinse away all the skin of the beans. In fact, I prefer to retain most of it.)
* Grind the black gram adding salt into a thick, smooth batter adding a few tbsp. of water if needed, to facilitate grinding. Transfer the batter to a bowl and beat the batter with hand for few seconds.
* Heat oil in a kadai / frying pan. Drop a pinch of ground batter into the oil to check whether the oil is hot enough to fry. The oil is ready for frying if the batter immediately skims to the surface. If it stays at the bottom, heat the oil some more but there is no need to bring the oil to a smoking point.
* Wet your hands and pinch a small portion of batter. Place it on the wet palm of the non dominant hand and pat it into a thick disc. Poke a hole at the center using index finger, if preferred. 
* Gently drop it into the pan, from the sides. Add as many vadas as the pan can hold without crowding the pan.
* Fry them on low flame, flipping in between until they turn golden brown on both sides. Remove them with a slotted spoon, draining as much oil as possible and place them in a paper towel covered plate.
* Repeat the steps with the remaining batter and serve the garelu / vadas warm.

Wednesday, November 18, 2020

Avalakki Upkaari ~ Mangalore Style Poha

'Poha' is the Hindi word for both beaten rice flakes / flattened rice and a dish prepared with it. The latter is a popular breakfast dish from India that goes under different regional names and prepared with regional variations. Today's version 'avalakki upkaari' comes from the Mangalore region and is called bajil in Tulu. It is a favorite of mine among the 'spicy poha' category and thought of sharing it today. 

This delicious poha can be prepared in no time as it involves very minimal cooking. There is no need to saute / cook anything here as it does not contain onion, tomatoes or potatoes. In fact, even poha is not cooked in this case which makes it quite a simple dish. This poha is usually served as a breakfast or snack and is often paired with upittu / upma and the combo is a popular pair called sajjige-bajil. In fact the combo used to be a popular breakfast served during weddings in the Mangalore area until a few decades ago. 

This upkaari uses thin variety of beaten rice flakes since they are not soaked here. They are combined with shredded fresh coconut which lends the moisture and softens them. Frozen coconut can be substituted instead of fresh coconut but needs to be thawed before using in the recipe. There are both sweet and spicy version pohas made. The sweet version called sihi avalakki / gul pohe is prepared by mixing beaten rice flakes, coconut, jaggery and cardamom. The spicy version is made by tossing together the beaten rice flakes, coconut, spice mix, jaggery and a simple tempering. Rasam powder / Sambhar powder can be substituted in case if there is no time to prepare the spice mix. Jaggery can be replaced by sugar.
Ingredients for tempering:
1 tbsp. oil
1/2 tsp. mustard seeds
1 tsp. skinned black gram / urad dal
1 or 2 green chili / dried red chili (optional)
Few curry leaves
A pinch of turmeric powder (optional)
Ingredients for avalakki:
1 tsp. cumin seeds
1 tbsp. coriander seeds
4 Byadagi chillies 
2 cups thin rice flakes / paper avalakki / thin variety poha
1 cup fresh / frozen shredded coconut
1 or 2 tbsp. minced cilantro
1/2 tsp. salt or to taste
2 tbsp. jaggery (or to taste)

Directions:
1. Heat oil in a pan. Add mustard seeds and black gram. When black gram starts to change color, add curry leaves and green chilies if using. Saute for few seconds if using green chilies. Add turmeric if using and turn off the stove.
2. Lightly toast cumin seeds, coriander seeds and dried red chilies and grind them together coarsely when they cool down.
3. Add the above tempering and the spice powder, coconut, cilantro, jaggery and salt to a bowl and mix well. Next add the rice flakes / poha and mix again thoroughly with hand. 
4. Let the mix sit for at least 15 minutes, for the beaten rice flakes to absorb the flavors and soften. 
5. The upkaari is ready to serve when the poha softens.

Tuesday, November 17, 2020

Potlakaaya Pindi Miriyam / Andhra Style, Spicy Snake Gourd Dal

Pindi miriyam is a traditional dish from the south Indian state of Andhra Pradesh. It is a lentil based preparation flavored with the addition of a freshly ground spice paste. The paste includes 'miriyam' or black pepper as well which gives a spicy kick to the dish. The dish has a thicker consistency compared to the regular sambhar dish. There is another version called paala pindi miriyam that do not use any lentils but prepared with milk and the spice paste and that recipe is found here.

This had become almost like a forgotten dish though it was a favorite dal of mine while growing up. This is my maternal grandmother's recipe which I got from my aunt as my mother has almost stopped preparing this in the recent years and had forgotten the recipe. It seems that it was one of my grandfather's favorite dishes and so, my grandmother used it prepare it now and then. My mother on the other hand hated the dish and would be in tears whenever she saw the dish. It is hard to visualize the scene as I have never seen my mom disliking any food prepared at home. And guess what, this is one of the dishes she used to prepare regularly while I was growing up and had become one of my favorites over the years. 
We usually use snake gourd in this recipe but any vegetables on hand can be used. My mother used to add coconut in this recipe while my grandmother's recipe does not include it. I prepare it nowadays without adding coconut but I highly recommend it as coconut enhances the flavor of pindi miriyam. I have started making this dish recently and thought of posting today this comfort meal of mine.

Ingredients for dal:
3/4 cup yellow lentils / toordal
1 heaped cup of chopped snake gourd pieces
1/8 tsp. ground turmeric
Salt to taste
1 lime sized tamarind ball
Ingredients for the spicy paste:
1/2 tsp oil (I didn't use any.)
1 heaped tsp. rice 
1 heaped split chickpeas / chana dal
1 tsp. black gram / urad dal
1 heaped tsp. coriander seeds
1/2 tsp. peppercorns 
A pinch of fenugreek seeds 
3 / 4 dried red chilies
2 pinches of asafoetida (I added it in tadka instead.)
1/4 cup fresh / frozen shredded coconut 
Ingredients for tadka:
1 tsp. oil
1/2 tsp. mustard seeds
1/2 tsp. cumin seeds
Few curry leaves
Directions:
* Rinse yellow lentils / toor dal with water and drain. Pressure cook the lentils adding snake gourd pieces, turmeric and 1 and 3/4 cups of water, for three whistles. If the lentils takes longer to cook than three whistles, cook the snake gourd separately as the pieces may turn mushy if cooked longer. Lightly mash the cooked dal with a back of a ladle.
* Soak the tamarind in water for about an hour to soften it or cook the tamarind with water in a microwave for two minutes. Squeeze the tamarind paste and keep it ready.
* Meanwhile, toast the ingredients mentioned under the list. Add oil to a small pan and add rice, split chickpeas, and black gram. Saute until dals start changing color and add coriander seeds, peppercorns, fenugreek seeds, and red chilies. Saute on low flame until coriander seeds and  fenugreek starts changing color. Add asafoetida and turn off the stove. 
* When the toasted ingredients cool down to room temperature, grind them along with coconut to a thick paste, adding water as needed.
* Add a tsp. oil in a kadai / pan and add mustard and cumin seeds. When mustard seeds start to splutter, add curry leaves. (I added asafoetida here.) Immediately add the cooked dal with the snake gourd pieces, the ground paste and salt to the pan. Add tamarind water to your taste. 
* Mix the contents in the pan with a ladle, taste and adjust the seasonings if needed. Add extra water if it appears too thick. (Pindimiriyam's consistency is on a thicker side compared to sambhar and so add water accordingly.) 
* Bring the mixture to a boil, lower the heat and cook for a couple of minutes more. Turn off the stove and serve warm with rice / roti.


Thursday, November 12, 2020

Bengali Cholar Dal / Cholar Dal Narkel Diye

Today's recipe of cholar dal comes from the Bengal region and was included in my Bengali thaali that I posted in September. Cholar dal is a traditional dal prepared in Bengalis homes using chana dal / split chickpeas, ghee toasted coconut and spices. It is not every day kind f dal but usually meant for festive meals like Durga puja bhog and special occasions. This savory and subtly sweet dal does not contain any vegetables and the preparation is quite simple and straight forward. 

It doesn't contain the panch phoran, the traditional five spice mix that is frequently used in Bengali cooking but uses other whole spices.  This flavor filled dal is unique with an inviting addition of toasted coconut slices and raisins along with sugar. I found it interesting and the dal very enjoyable with a slight crunch of those crispy coconut pieces and raisins in each bite. It can be served with luchi, a Bengali puffed bread, rice, khichdi or pulao. 

Ingredients:
1/2 cup split chickpeas / chana dal
1 - 2 tbsp. ghee
2 tbsp. fresh coconut pieces
1 tbsp. raisins
1 tsp. cumin seeds
1 bay leaf
1 inch cinnamon stick
2 or 3 cardamom
1 tsp. ginger paste / grated ginger
2 dried red chili
1 pinch of asafoetida
1/8 tsp. ground turmeric
Salt to taste
1/2 tsp. cumin powder
1/4 tsp. garam masala powder
1/2 tsp. sugar
(I added 1/4 tsp. chili powder as well which is optional.)

Directions:
* Rinse and soak chana dal for a couple of hours. Drain the water used to soak the dal. Pressure cook chana dal adding about 1.5 cups water, for 3 or 4 whistles. The dal should be cooked such that it doesn't turn mushy but still hold some shape. (I had about a cup of cooked dal along with water.) 

* Heat ghee in a pan. Fry coconut pieces and raisins separately and keep aside.

* To the same ghee, add cumin seeds, bay leaf, red chili, cinnamon, and cardamom. Saute for few seconds and add asafoetida and ginger paste. Cook on low flame for about a minute.
 
* Next add the cooked chana dal along with the water, turmeric, salt, chili powder, and sugar. (The toasted coconut and raisins are also added at this point but I decided to add them at the end.) Cook the mixture until it thickens.
* Add cumin powder and garam masala at the final stages and cook for a minute and turn off the stove

* Garnish with the fried coconut pieces and raisins and serve it warm with rice / khichdi or luchi.


Wednesday, November 11, 2020

Instant Appam

I had made these instant appam for my Kerala breakfast platter that was a part of 'Thaalis & Platters' that I posted during September. Idiyappam was originally on my mind when I thought of that platter but decided to include another dish at the last moment. These appams that I found on YouTube came to my rescue (I however forgot to note the link.) which are an instant version. Unlike the traditional version appam posted here, this appam batter does not include any yeast and needs no fermentation overnight though the batter needs to rest for a short amount of time. The instant appam batter instead has an unusual addition of fruit salt that is not typically used in south Indian cooking which make these appam softer and fluffier. These appam make a great breakfast / brunch item on a weekend or even during weekdays if one doesn't mind the short resting period of the batter.
Traditional appam are pancakes / dosas prepared with a fermented batter of rice and coconut and are popular in the south Indian states of Kerala and Tamil Nadu. The appam are bland on their own and are usually served with a savory condiment / side dish. These thin breakfast pancakes are typically bowl shaped since they are made in appachatti, a cast iron frying pan that is rounded at the sides and looks like a shallow bowl. I followed the recipe exactly including making them on a griddle instead of a curved pan similar to a wok and so these don't have the typical appam shape. Also they were made thicker. I had served them with kurma and kaara chutney.
Ingredients:
2 cups rice flour
1/2 cup cooked rice
1/2 cup shredded coconut, fresh or frozen
Salt to taste
1 tsp. sugar
1 to 1.5 tbsp. Eno's fruit salt
Oil to make appam

Directions:
* Thaw coconut if using frozen. Grind rice flour, rice, coconut, salt and sugar together into a smooth batter of pourable consistency, adding water as needed. (One may need about 2.5 cups of water.) 
* Pour the batter into a container, cover and let the batter sit for at least half an hour. (I let it to rest for a couple of hours.) Add any extra water if needed at this point.
* Add fruit salt 
just before making dosas and sprinkle a tbsp. of water over it. 
* Mix gently to combine, yielding a frothy mixture.
* Heat a griddle / tawa and pour a ladleful of batter at the center and don't spread it. 
* Add a tsp. of oil around the edges and when the appam appears dry  on the surface, flip it.
* Cook for few more seconds until the bottom side gets cooked as well and transfer the appam onto a plate using a spatula.
* Repeat the steps of making appam with the remaining batter.
* Serve them warm with a side dish.

Tuesday, November 10, 2020

Raswaale Aloo / Banarasi Aloo

This potato curry aka raswaale aloo is part of the classic combo that is served along with dalwaali kachori in the lanes of Banaras. This gravy and the Sitaphal ki subzi / Kaddu ki subzi together make an unusual and lip smacking combination to go with Banarasi dalwaali kachori, the spicy pooris made with wheat flour and black gram paste. 

It is an extremely easy and simple curry which needs minimal cooking skills and basic ingredients that can be found in any Indian kitchen. This curry falls under 'satvik food' category as it is made with just potatoes using no onion, garlic or tomatoes that are usually an integral part of the north Indian style curries. The curry can be paired with roti / poori or paratha too.

Recipe Source: Here
Ingredients:
3 potatoes, peeled and boiled 
2 tsp. mustard oil / any oil preferred
1 tsp. mustard seeds
A pinch of asafoetida
1 tsp. ginger paste
1/8 tsp. turmeric powder
1 tsp. cumin powder
1 tsp. coriander powder
2 tsp. dried mango powder / amchur powder (or to taste)
Chili powder to taste
1/2 tsp. black pepper powder or to taste
Salt to taste
Cilantro to garnish
Directions:
* Add ginger paste, turmeric, cumin powder, coriander powder, dried mango powder, chili powder, pepper powder to a small bowl. Add 2 tbsp. of water to the mix and make a paste.
* Heat oil in a pan and add mustard seeds. When they start to splutter add asafoetida. Next add the spice powder paste and saute on low flame until the oil separates and floats to the surface.
* Crumble the cooked potatoes roughly with hand and add it to the pan. Mix the ingredients to combine, with a ladle.
* Add salt and pour about a cup of water to the pan. (More water can be added for a thinner gravy.) Bring the mixture to a boil. Smash the potatoes with the back of a ladle if needed.
* Garnish with cilantro if preferred and turn off the stove. 

Thursday, November 5, 2020

Kaara Chutney / Kara Chutney

Today's recipe is of a classic side dish from the southern state of Tamil Nadu. Kara chutney is a spicy and delicious chutney that is perfect to go with south Indian style breakfast dishes like idli and dosas. It is quite simple to prepare as it involves only sauteing onion and tomato. It can be prepared ahead a day or two so that it can be handy during morning rush hours. 

Ingredients:
1.5 tbsp. oil
1 tbsp. chana dal / Bengal gram
1 tbsp. urad dal / skinned black gram
4 - 5 dried red chillies (I used less spicier byadagi chillies. Use less quantity if using spicier variety.)
3 garlic cloves with skin peeled
1 medium sized onion, chopped (about 1/2 cup)
1 tomato, chopped (about 1/2 cup)
1 tiny ball of tamarind (that would fit into a tsp.)
Salt to taste
Ingredients for tempering / tadka:
1 tsp. oil
1/2 tsp. mustard leaves
6 curry leaves

Directions:
* Heat oil in a pan and add chana dal, urad dal and chillies. When the dals start to turn reddish, remove the chillies and soak them in water. (Or chillies can be soaked in hot water for about 20 minutes ahead and then added along with the onions in the next step.)
* Add garlic and onions to the pan and saute until the onions turn light brownish. 
*  Next add tomatoes, tamarind and salt and cook until the tomatoes turn into a mush.
* Turn off the heat and let the mixture to cool. Grind the mixture finely adding water as needed. (One can make it thinner than the one shown in the pictures.)
* Heat oil in a small pan for tadka and add mustard seeds and curry leaves. When the mustad starts to sputter, turn off the stove and add it to the ground chutney and mix well.
* Serve with dosas / idlis.

Wednesday, November 4, 2020

Tomato - Peanut Chutney

There are several versions of tomato chutney in Indian cuisine that can be served as aside dish to several breakfast dishes / rice or can be used as a spread or dip. The version I am posting today uses peanuts as well that makes the chutney more flavorful. I have added both green and red chilies here but only red chilies can be added for a brighter color, if you prefer. This spicy chutney goes well with idlis or dosas and can stays fresh for 2 or 3 days, refrigerated.

Here are some other tomato based chutneys to go with breakfast dishes. 
Chettinad chutney

Ingredients for chutney:
1 tbsp. oil
1/2 tsp cumin seeds
1 onion, chopped
4 red chilies + 2 green chilies or to taste
2 tomatoes
1/2 tsp. sized tamarind ball
1/4 cup roasted and skinned peanuts
Salt to taste
Ingredients for tadka:
1 tsp. oil
1/2 tsp each mustard seeds 
1/2 tsp. black gram / urad dal
Few curry leaves
 
Directions:
* Heat oil in a pan and add cumin seeds. When the cumin seeds start to turn a shade darker, add chilies and saute for about 10 seconds and add onion. 
* Saute until the onion turns translucent. Add tomatoes and tamarind. Continue to cook until tomatoes turn mushy. Turn off the stove.
* Grind the sauteed tomato mixture, peanuts and salt, adding hot water if needed. (The hot water increases the shelf life of the chutney.) Transfer the ground chutney to a bowl.
* Heat a tsp. oil and add mustard seeds and black gram. When the black gram starts to turn  reddish, add curry leaves and turn off the stove. Pour this tadka over the chutney and stir once to combine.
* Serve this with any south Indian breakfast dishes as a side dsih. Refrigerate any left overs and use within a couple of days. 

Tuesday, November 3, 2020

Peanut - Onion Chutney

Peanut based chutney is one of the common chutneys prepared in south Indian homes besides the coconut chutney and roasted gram chutney. The thick, creamy and richly flavorful chutney goes well with breakfast dishes like idlis, dosa, upma, pongal and such. 

Peanuts that are roasted on low heat until the rawness is gone is used in this chutney. The low heat is the key here. If peanuts are roasted on high flame then only the skins get blackened faster but the peanuts still would taste raw. The chutney doesn't taste good when the peanuts are not roasted well. The roasted peanuts are cooled and then usually skinned by rubbing between the palms, before getting used in the chutney. It is absolutely fine if one wishes to skip this step and use them with the skin intact. Peanuts can be roasted ahead and stored to use later. Or if using store bought skinned peanuts, these steps can be skipped altogether which makes the chutney making a quick and simple task.

Peanut chutney is made in many versions. I usually stick to the basic one that needs just roasted peanuts, green chilies and salt. Many add garlic too to this chutney. Coconut, ginger, cilantro, tamarind can go into this chutney as well. Here is a version that one of my sister-in-law prepares using fried onion. She adds sautéed onion at the end while grinding but I add directly to the chutney. An extras step to the basic version but adds flavor to the chutney. I served dosas with peanut chutney and ginger - tamarind chutney. 
Ingredients:
2 - 3 tsp. oil
1 tsp. mustard seeds
1 tsp. skinned black gram / urad dal
1 tsp. split chickpeas / chana dal
1 sprig of curry leaves
1 onion, finely chopped
1 cup roasted and skinned peanuts
2 green chilies or to taste
Salt to taste
1 cup water

Directions:
* Heat oil in a small pan and add mustard seeds, black gram and split chick peas. Stir once and when mustard seeds start to splutter and split chickpeas start to turn reddish, add curry leaves and onion. Sauté on low flame until onion turns translucent. (Or the sautéing of onions and tadka can be done separately.)
* Grind peanuts, green chilies and salt together adding water, finely or slightly grainy, depending upon one's preference.
* Transfer the ground peanut chutney to a bowl and add the sautéed onion mixture. Mix well and serve as a side dish to south Indian breakfast dishes like dosa, idli, or upma.