HOME        |        ABOUT        |        COPYRIGHT        |        CONTACT        |         RECIPE INDEX        |         INDIAN THAALIS        |         MILLET RECIPES        |        EVENTS' ROUNDUP        

Friday, July 15, 2011

Eggless Moist Chocolate Cake


Before I proceed with the recipe for this moist chocolate cake, I should mention that this one is a no egg, no butter and no fuss recipe. A few food bloggers have earlier tried this cake inspired by this one and had attracted my attention with their captivating images. However, I was put off by the cocoa powder and oil used. I was not happy with the flavor of a cocoa cake I baked earlier and so decided to pass this one. "Palates differ" as one of those Telugu saying goes. I know those ingredients can be easily substituted but just mentioning. Then I got to taste an excellent brownie made with cocoa powder and had to change my opinion.
Later this cake was again personally recommended by a family member. Actually it was me who referred her to the recipe when she was looking for some egg ess, chocolate cakes. She tried it and was all praises about this cake. Hearing it from a sweet-hater (the girl doesn't prefer sweet stuff, lol.), I had to give this a try and that's what I did today.
It gets full marks for the texture and appearance. I loved the glistening, dark brown hue of the cake and the perfect texture. It was soft and moist with the gooey chips appearing in between. However the cake itself is not messy, sticky or gooey. If you skip those chocolate chips, you don't even notice those gooey spots in between. Chocolate / cocoa lovers would like this cake.


Ingredients:
1.5 cups flour
3 Tbsp unsweetened cocoa powder (I used Hershey's brand)
1 tsp baking soda
1/4 tsp salt
1 cup water
1 cup sugar
1/4 cup oil (I used canola oil.)
1 Tbsp white vinegar / lime juice / lemon juice
1 tsp vanilla essence
2 Tbsp chocolate chips (optional)

Method:
* Preheat the oven at 350 deg F / 180 deg C. Grease a cake / loaf pan and keep aside.
* Sieve the flour, baking soda, cocoa powder and salt, 2 - 3 times and keep it aside.
* Add sugar to the water and stir it to get dissolved. Then add the oil, vinegar / lemon juice and vanilla and mix well.
* Now combine the dry and wet ingredients stirring gently, to form a lump free batter. The final batter would be runny as in the below image.


* If using chocolate chips, sprinkle them on the surface or mix it into the batter.


* Pour the batter into the greased cake / loaf pan. Bake for about 35 - 40 minutes or until a tooth pick inserted in the center of the cake comes out clean.
* Place the pan on a cooling rack. Once cool, invert the pan and remove the bread. Slice and serve.


The batter raises while baking and so, choose a pan where the initial batter comes up to only 1/2 of the pan. I baked in a big loaf pan and cut it into slices.


This goes to "Only Baked" event at Tamalapaku, an event originally started by Pari.

Monday, July 11, 2011

Pear Milkshake


For those of you wondering about my absence from the blog world and what happened to me, I am all well and alive. J We had been on a short, rejuvenating vacation over the long weekend and got to meet some family members. I had been busy with the preparation and packing for the vacation, the actual part of it and again the unpacking and cleanup chores after returning back home. And of course the latter part was no fun though we enjoyed each day of our vacation. The little one is already asking whether we can go on another one next weekend. Probably we have to do it one more time next month. J
Summer holidays for the kids have started just last month in our parts of the world and obviously we parents have to devise new methods to beat their boredom. Or else we get bombarded with a routine tag line of a summer vacation 'I am bored'. Luckily 'the daughter' is in summer program giving me some respite for a few hours each day. She seemed to like the concept of the program and tries to follow their routine at home during weekends. And this milkshake, basically a simple recipe was the result of it. Her summer program teacher cooks a snack once a week in front of the students. Usually the kind that can be created easily by even kids (with adult supervision of course.) My daughter has planned to cook with me once a week during the summer break and for our first cooking session, I chose to go with a milkshake for its simplicity. Though the picky eater tasted only a few spoons, she now at least knows what goes into a milkshake and how it is prepared. Mission accomplished. J

We just blended together two peeled pears, 1.5 cups milk and sugar for this quick, refreshing treat. Add extra milk if thinner milkshake is preferred.


Comments

Wednesday, June 29, 2011

Mambhaza Kaalan


For the past week, I have been blogging with Regional Specials - Andhra theme during blogging marathon # 6. Check what the other marathoners have been cooking.

So far, I have blogged
1. Uppudu Pindi
2. Panasathonalu
3. Keera - Nuvvula Pachadi
4. Thokkudu Laddu
5. Pesarattu
6. Sojjappalu

On the seventh and final day of BM#6 I have been paired with Jayasree of Kailas Kitchen. That means we have to choose one recipe from each other's blog and cook based on the themes we have selected for weeklong blogging. There were many interesting recipes but I decided to go with mambhaza / mango kaalan for a couple of reasons. Kaalan recipe was in my 'to do list' from a long time and I also wanted to see how a "mango - yogurt" combo works in a spicy dish. Of course I know how the combo does wonders in a lassi.J
I was a little apprehensive initially that the dish may end on a sweet note because of the mango used. After tasting it, I felt very glad for trying this. I have to tell you that I am bowled over by this simple and quick traditional dish from Kerala. Sometimes all we need is a simple basic recipe that has been tried and tested (over generations.)
M is not a friend of coconut and my son is not a fan of yogurt dishes and so I prepared this in small quantity and adjusted the ingredients accordingly. It was spicy enough and was reminding me the majjiga pulusu slightly. (Obviously because of the similiarity in the ingredients used though a mango in kadhi is unthinkable.) I think I prepared it the way it should taste. J It was spicy (enough for me) and not sweet.
BTW, kaalan is a very delicious yogurt - coconut based gravy. Thanks Jayasree, I am going to make this often, for myself. J

Ingredients: (3 servings)
1 cup chopped mango cubes (mango fruit)
1/2 cup yogurt
1/4 tsp chili powder
Salt to taste
1/2 tsp turmeric powder
3 - 4 Tbsp grated fresh coconut (Thaw if using frozen coconut.)
2 Green chillies (I used Serrano peppers)
For seasoning / tadka: 2 tsp oil, 1 tsp mustard seeds, 1 or 2 red chillies broken into bits, 1/4 tsp methi seeds and few curry leaves

Method:
* Add mango cubes, salt, turmeric powder, chili powder and 1/2 cup water to a microwave safe bowl and cook for 5 minutes. Or cook on stove top. Let cool.
* Grind the coconut, chillies, cooked mango mixture along with the water and yogurt in a blender. I found this method quicker and easier instead of whisking the yogurt, pureeing the mango and grinding coconut - chillies separately. It would take just a few seconds to take care of three steps. The only thing you need to remember is not to add plenty of water to cook mango since the kaalan needs to be thicker. Adjust the salt quantity if needed.
* Bring this mixture to a rolling boil and turn off the stove.
* Heat oil in another small pan and add all the seasoning ingredients. When mustard seeds start to splutter, turn off the stove and add it to the cooked kaalan. Serve it with hot rice.


Note:
1. Ashgourd or plantain can also be added.
2. A small quantity of jaggery can also be added.

Comments

Tuesday, June 28, 2011

Sojjappalu / Sojja Poorilu


I chose to post sojjappalu, one of my favorite dishes from Andhra festive foods on this sixth day of BM#6. Let's check what the other marathoners are cooking today.
Sojjappalu or sojja poorilu are one of the easiest and delicious festive dishes that can be prepared and I opt for them when I have to make many dishes on festival days (like on the day of varamahalakshmi vratam). Sojjappalu appear like thick, palm sized patties. Sojjappalu can be loosely translated as pooris stuffed with a sweet, semolina halwa filling accentuated with cardamom flavor.

Ingredients: (For 12 appalu)
1 cup maida / all purpose flour
A pinch of salt
1 cup rava / semolina
1 cup sugar
1 tsp cardamom powder
4 tsp ghee
A few ghee toasted cashews (optional)
Oil / ghee to fry

Method:
* Combine the flour, 2 Tbsp oil and salt in a mixing bowl. Add water as needed and form firm dough (like chaptahi dough). Rest it for an hour or so.
* Heat 2 tsp of ghee in a pan and toast the cashews until golden brown. Remove them with a slotted spoon.
Toast the semolina in the same ghee often stirring, until it starts to change the color.
* Heat 2 cups of water and when it comes to a rolling boil, lower the heat. Slowly add the semolina, stirring continuously to avoid the lumps. Add 2 tsp of ghee and cook covered until the semolina is done. Then add the sugar and cardamom powder. Cook until all the sugar melts, gets incorporated into the mixture and the whole mixture turns into a thick mass. Add cashews and turn off the stove. Let the halwa come to room temperature.
* Divide the dough into 12 equal portions and shape them into balls. Similarly, divide the halwa into 12 equal portions and shape them into balls.


* Dust the work surface with flour if needed. Roll a dough ball into a thin circle of about 4 - 5 inches diameter. Place the halwa ball at the center of the circle and bring the edges of the rolled dough together. Grease your fingers if needed and pat into a circle of 1/4 inches thickness (like that of a athirasam / kajjaya). Appalu are usually about palm sized, thick discs and so don't press them thin as in the case of polis.

Photobucket

* Heat the oil in a frying pan. Pinch a small portion of the dough and drop into the oil to check the readiness. If the dough sizzles and comes to the surface then the oil is ready to fry. Slide the patted dough circle into the hot oil and fry on low flame until golden brown. Repeat the steps with the remaining dough and the filling.


Note:
1. Though traditionally appalu are deep fried, they can also be shallow fried. Or they can be toasted with little oil / ghee as we prepare poli.
2. The mentioned sugar quantity is perfect. If the sugar quantity is reduced, the appams are going to taste very mildly sweet.

Comments

Monday, June 27, 2011

Pesarattu


My BM theme this week is Regional Specials - Andhra Pradesh. Check what the other marathoners in BM#6 have come up with, for today.

Today I am posting a recipe that is more popular among Indian bloggers than in the Andhra households itself. J I am just kidding but I have noticed that "pesarattu" and "gongura" are two popular items when bloggers not native to the region are posting about Andhra vegetarian recipes. I therefore initially thought to stay away from "oh, so predictable pesarattus" during this Andhra themed marathon. This weekend I however had second thoughts since this is one of those commonly prepared items in my household that has not yet got the opportunity to shine on my blog (even after four years). What a shame. L

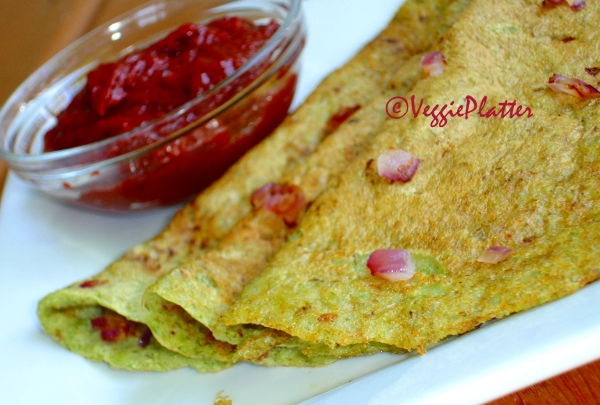
And so here I am with one of those Andhra classic dishes, pesarattlu. Pesara (refers to the pesarapappu / pesalu) means green gram / moong dal and attu means dosa in Telugu. A pesarattu would therefore be a moong dal (whole green gram) dosa and the plural is pesaratlu. It is a power packed, traditional dish to start your day on a healthy note. And one better thing about these delicious dosas is that the batter need not be fermented after grinding. Just soak the dal and rice, grind and you are ready to enjoy protein rich, nutritious atlu for any meal.

Ingredients: (for about 15 dosas)
1 cup moong dal (green gram)
A handful of rice
4 -5 green chillies or to taste (I used Serrano peppers)
One inch piece of ginger
1 Tbsp cumin seeds
Salt to taste
Oil to make dosas
2 onions, finely minced (Entirely optional.)


Preparation of batter:
Soak moongdal and rice overnight or for a minimum of 3 - 4 hours. Discard the water used to soak dal and wash the dal again in one or two exchanges of water. Add the other ingredients (excepting the oil and onion) to the drained dal and grind into a coarse, thick batter adding only as much water needed. The batter should be not runny.


Method:
Heat a griddle / shallow pan. Sprinkle some water on the griddle. If the water sizzles and evaporates, then the griddle is ready to prepare dosas. Pour a ladleful of batter (about 1/2 cup) at the center of the griddle and spread it into a circle. Sprinkle some minced onion over it. Pour 1/2 tsp of oil around the circumference of the spread batter (and also onion if preferred). Flip the dosa after the bottom side is done and spread a few drops of oil again along the edges. Fry the other side too and remove the dosas. Repeat the process with the remaining batter.


Traditionally the dosas are served with allam pachadi / ginger chutney while we went ahead with mango ginger chutney.

This moong dal dish goes to Cook it Healthy - Proteinicious event.
Comments

Sunday, June 26, 2011

Thokkudu Laddu / Bandar Laddu


My sister Siri has been blessed with a lovely, little angel last night (it was 26th morning in India) and that calls for a celebration. Though I could be not present there personally, my blessings and wishes are with them. Now I am passing over a virtual platter of laddus on this joyous occasion. J
Sticking to my "Andhra Special" theme, here are thokkudu laddu / Bandar laddu, one more delicacy from the long list of Andhra pindivantalu (traditional festive foods). They are said to be originated in the port city of Bandar / Machalipatnam and hence the name. Even if you haven't heard these names, probably you have read about this town as Masulipatam in your history classes (at least in South Indian schools).
Though these laddus are made with besan, they are way apart in flavor department compared to the regular besan laddus. A little superior in taste I should say. The way these are made makes all the difference. These laddus involve extra steps instead of frying besan as in the besan laddu preparation but once you taste them you feel that the extra efforts you put in was worth.

Ingredients:
1 cup besan / chickpea flour
A pinch of salt
1 cup jaggery
1/4 cup ghee
1 tsp cardamom powder
Oil to fry

Making Chaklis:
* Combine besan and salt in a mixing bowl. Add enough water to make soft dough that can be passed through a chakli press.
* Mean while heat oil in a frying pan. Drop a pea sized dough into the oil to check the readiness of the oil. If the dough sizzles and comes to surface then the oil is ready to fry.
* Fill a chakli press with a small portion of the prepared dough. I used a three star disc. Press the mould over the hot oil making a circular motion so that the coils of dough dropping into the oil make a circle shape. You can make as big chaklis as you can fit in the pan. Fry on low flame until golden brown and crisp. Remove them with a slotted spoon and drain on paper towels. Repeat the steps with the remaining dough.
* Cool the chaklis, break them into pieces and grind very finely.


Making jaggery syrup:
After chakli powder is prepared, start to make jaggery syrup. Add a cup of powdered jaggery and 1/2 cup water to a pan and start heating on low - medium flame. When the syrup reaches one thread consistency (theega pakam), add cardamom powder and ghee to it. Then add the chakli powder and mix well. Turn off the stove.

Making laddus:
Grease your palms with ghee and shape the mixture into laddus (lime sized balls) while the mixture is still warm. Don't worry if the mixture appears a little wet. It will dry as it cools. 

Notes:
1. It is very important to remember that the laddus should be made when the mixture is still warm. The mixture turns powdery after cooling and hence it is impossible to shape them into laddus.
Adding some milk while shaping may salvage the situation but laddus need to be refrigerated since the shelf life is going to be less.
2. The chakli should be ground to very fine powder. I could grind only coarsely because of my blender and so my laddu texture appears different. Also I took the pictures as soon as I made them so they appear to be moist.
3. Sugar can be substituted instead of jaggery. Some Cashews may be added for extra crunch.
4. Coming to the pronunciation of Bandar, "Ban" pronounced as "bun" and "da" as 'th' in they.

Now let's check what the other marathoners are cooking today, during this Blogging Marathon #6.

Comments

Saturday, June 25, 2011

Keera - Nuvvula Pachadi

Recipe Source: Prabha Gandlur

I can't shy away from posting a 'pachadi' (chutney / pickle) recipe while posting Andhra specials. J Can I ? And so here we go with a  quick cucumber - sesame seeds chutney today. The combination of cucumbers and sesame seeds in chutney may sound preposterous to some. Or to many, it may seem like a combo that never works. I must mention that I was in the second category until I tasted this and had to change my mind.
I got hold of this recipe while casually chatting online with a family member. With BM in mind, I had asked her for some simple, Andhra recipes though I hadn't expected that she would surprise me with such an interesting recipe. This chutney is a simple and quick one besides being unusual. The original recipe needs only five ingredients but I tweaked the recipe a little bit by adding the sweetener and a flavorful tadka of hing. Everyone at home admired it and so here I am sharing this yummy chutney recipe. J

Ingredients:
1 cup very finely chopped cucumber
1/4 sesame seeds
10 - 12 red chillies
Small ball of tamarind soaked in water and juice extracted
Jaggery to taste
Salt to taste
For tadka: 1 tsp oil, 1/2 tsp mustard seeds, 1/2 tsp uraddal (split blackgram), few curry leaves and a little asafoetida

Method:
* Toast sesame seeds and red chillies together on low flame and let cool.
* Heat oil and add the tadka ingredients. When urad dal starts turning reddish, turn off the stove.
* Dry grind the sesame seeds, red chillies, jaggery and salt together finely. Then add the tamarind juice (about 2 -3 Tbsp or to taste) and run the blender again to mix. There is no need to add water even if the mixture appears not well combined or seems very dry. The moisture from the cucumbers is enough to bind. In fact, the paste turns liquidy after combining with cucumbers. Combine this ground paste and the tadka to the finely chopped cucumbers and mix well. Leave aside for 5 - 10 minutes.
* Serve with hot steamed rice and ghee.


Check here for other version of keera / cucumber pachadi.

Now let's check what the other marathoners are cooking today, during this Blogging Marathon #6.

Comments

Friday, June 24, 2011

Panasa Thonalu

Panasa thonalu is a traditional Andhra sweet dish that can be put together very quickly. Panasa thonalu literally means the jackfruit bulbs / pods in Telugu. Why is a sweet dish named so then? It is probably because of their shape. Compared to the other Andhra 'pindivantalu' - the  traditional festive dishes, this one is not a very well known dish but really a mouthwatering kind. I should however assert that the entire process is really a breeze and so a suitable one to prepare in a short notice. 

If a couple of tiny extra steps involved is not counted then panasa thonalu preparation is similar to poori making, if I could put it that way. The dough is shaped, deep fried and dunked in sugar syrup for a few minutes so that the crisp thonalu is left with a thin coating of sugar resulting in a yummy delicacy. A good and easy one even for a novice.

Ingredients: (Yield - 12)
1 cup all purpose flour / maida
2 tbsp. ghee (2 tbsp. more can be used if preferred.)
A pinch of salt
1 cup sugar
1/4 tsp. ground cardamom 
Oil to fry

Directions:

* Combine melted ghee, salt and flour in a mixing bowl. Add water in increments and prepare a firm dough (like that of chapathi dough consistency).
* Add sugar and 1/2 cup of water to a pan and bring to a boil. Lower the heat and keep cooking until one thread consistency syrup (theega pakam) is formed. Add cardamom powder and mix well. Remove the syrup from heat.

* Divide the prepared dough into twelve equal portions and shape them into balls. 
* Take one ball and roll it into a thin disc of about 4 -5 inches diameter (like a poori). Using a knife, make vertical slits along the disc about 1 cm apart, taking care to leave the edges untouched.  

* Though I have shown 4 slits in the above image, you can go with more. Now gently roll the disc. 
* Pinch / twist at the edges of the roll.
* This is how a panasathona looks when spread. Repeat the steps with the remaining dough balls.
* Meanwhile heat oil in a frying pan. When it is hot enough to fry, lower the heat and gently slide in a few prepared panasathonalu. Panasathonalu can be fried in batches, 4 to 6 at a time depending upon the size of the frying pan being used.
* Fry the pieces until golden brown and crisp, flipping in between. Remove with a slotted spoon and drop into the sugar syrup prepared earlier. Remove them from the syrup after 3 - 4 minutes and place it on a tray / plate. When they dry, store them in an airtight container. 

Thursday, June 23, 2011

Easy Breezy Uppudu Pindi


The second session of Blogging Marathon #6 starts from today. There are 20 marathoners participating in this week's marathon and the themes this time are going to be
1. Cooking with one ingredient in seven different ways.
2. Seven days of Regional specials
3. Seven days of Picnic food
4. Seven days of 'Mini bites'
5. One theme a day

I selected "Regional Specials" for this week and chose "Andhra Cuisine" to be my theme. I am starting with a simple and basic sort of dish, "Uppudu Pindi" that can be created using ingredients mundanely found in any Indian pantry. This traditional recipe from the region is served either as breakfast or as a mini meal. One can loosely translate uppudu pindi as rice rava-moong-coconut upma with a basic tadka. A comfortably fulfilling meal that is simple in terms of preparation and can be put together in less time compared to the standard upma since there is no frying of onions / vegetables involved. You don't even have to take out your cutting board and knife if using frozen coconut. 

Ingredients: (For 3 - 4 servings)
1 & 1/4 cups biyyapu ravva (rice rava)
3 Tbsp moongdal (the split, yellow one)
1/4 cup fresh / frozen grated coconut (I used frozen)
2 cups water
Salt to taste
For tadka: 2 - 3 tsp oil, 1 Tbsp uraddal (skinned, split blackgram), 1 tsp cumin seeds, 1 tsp mustard seeds, 5 - 6 red chillies broken into bits


Method:
* Soak moongdal in hot water for about 10 minutes and drain.
* Heat oil in a kadai / pan and add the tadka ingredients. When the dal starts to turn reddish, add water, salt, coconut and moong dal to the pan.
* When the water comes to a rolling boil, reduce the heat to medium low. Add rava, continuously stirring. Cook covered until rava is done and appears fluffy.
* Serve with some avakaya for that authentic touch or with any spicy pickle or powder.


Note:
1. Moongdal is generally cooked prior to the rava addition. The extra water used to cook moongdal tends to make a mushy upma since it is hard to keep count on the water used. I don't prefer to end up with a mushy stuff and so soak the moongdal before adding it to the rava, which results in a fluffier upma.
2. Biyyapu nooka (coarse / cracked rice) can replace biyyapu rava (rice rava / rice ground to semolina consistency) in this recipe. The water quantity may need adjustment when cracked rice is used.

Comments

Wednesday, June 22, 2011

Ragi Vermicelli - Mango Halwa & Ragi Vermicelli - Cracked Wheat Upma


Today marks the seventh and final day of BM#6 for the participants in group 1. Srivalli has paired bloggers on the final day so that we can cook picking a recipe from each other's blog, adhering to our themes. I have been paired with Archana and unfortunately, she hasn't blogged any recipes related to my theme 'Ragi'. And so, Srivalli has given me a green signal to go ahead with my own recipe and today, here I am with not one but two ragi recipes. A halwa and upma like a Bangalore's popular chowchow bhath combo. However instead of keeping it simple, I have paired ragi vermicelli with mango, the king of fruits for a flavorful halwa and with a delicious combo of cracked wheat - coconut in upma. The combinations did work out well resulting in yummy dishes.

Ragi Vermicelli - Mango Halwa:

Ingredients:
3/4 cup ragi vermicelli
Puree from a mango (I had about 3/4 cup)
1/2 cup water
Sugar to taste
1 tsp Cardamom powder
1 tbsp each - ghee and cashews

Method:
* Toast the cashews until golden in ghee and keep aside. To the same ghee, add the vermicelli and fry for a minute.
* Bring the water to a rolling boil and add the vermicelli and mango puree. Cook covered on low flame until vermicelli is done. Add extra water if needed. It takes a little longer than usual because of the addition of mango. Then add sugar and continue to cook until the sugar melts and gets incorporated into the mixture. Add cardamom powder and the toasted cashews and mix well. Turn off the stove.
Vermicelli can be cooked alone and then mango puree may be added. This second method surely cuts down the time but it would not be a thicker version of halwa.

Ragi Vermicelli - Cracked Wheat Upma:


Now let's move on to the second recipe. This one is a quick and healthy breakfast combined with the goodness of ragi and wheat. It takes around 10 minutes to prepare this breakfast and the addition of any veggies would make it wholesome.
Ingredients: (2 - 3 servings)
1 cup vermicelli
1/4 cup cracked wheat / godhuma rava
1/4 cup grated coconut (fresh / frozen)
3 green chillies, chopped fine ()
1.5 cup water
Salt to taste
For tadka:
1 - 2 Tbsp oil, 1 tsp chanadal, 1 tsp mustard seeds, 1 tsp cumin seeds, 1 tsp uraddal (split black gram), 1 Tbsp cashews (optional), few curry leaves

Method:
Heat oil in a pan and add the tadka ingredients. When the dals start to turn reddish, add the green chillies and sauté for a few seconds. Then add the water and salt to the pan. When water starts to boil, add the ragi vermicelli, cracked wheat and coconut. Stir well, lower the heat and cover the pan. Cook until done. 


Check what the other marathoners are cooking.