HOME        |        ABOUT        |        COPYRIGHT        |        CONTACT        |         RECIPE INDEX        |         INDIAN THAALIS        |         MILLET RECIPES        |        EVENTS' ROUNDUP        

Tuesday, April 9, 2019

A - Z Indian Biryani / Pulao / Khichdi Series ~ H for Hyderabadi Vegetable Dum Biryani

Biryani has evolved over centuries and cooking styles, from an army dish to a tantalizing treat fit for royals, ending up being a synonym to the local culture. The many varieties and variations of biryanis reflect the gastronomic histories of the regions, the local touches and the preferred regional tastes. The kitchens of Hyderabadi Nizams, of course inspired by Mughal kitchens seem to be the torchbearers of 'Biryani' revolution. It all started when Nizam-ul-Mulk was appointed the ruler of Hyderabad by Aurangzeb. His chefs reportedly experimented with spices and flavors to create about 50 versions of flavored meat biryanis. 

They are also credited coming up with a unique, aromatic saffron infused rice that was layered, that has come to be known as the Hyderabadi Dum biryani. This non vegetarian culinary delight is complimented with some of these chefs' other creations like mirchi ka salan or baingan bhartha. An authentic Hyderabadi biryani is a popular example for a 'kutchi' style biryani. Unlike elsewhere, the meat and rice are not cooked separately in case of this biryani. The raw rice and raw meat are cooked together with exotic spices in a 'kutchi' (raw) style. The 'dum pukth' method, which means slow breathing oven in Persian was and still used to make the biryani. The ingredients are loaded in a pot and slow cooked over charcoal, sometimes from the top too. The pot is sealed around the edges with dough so that steam wouldn't escape and the meat tenderizes in it's own juices while flavoring the rice.

Being a vegetarian, I prepared the classic dish using vegetables and served it with bhindi ka salan. I used 1 inch sized pieces of green beans, chopped carrot, chopped potatoes, and green peas. Paneer, mushrooms, cauliflower or soy chunks can be additional ingredients. If using paneer, add at the end of the vegetable gravy preparation. If using soy chunks, soak them in hot water for few minutes, squeeze the water and add in the middle of vegetable cooking. The laundry list of ingredients and instructions may seem intimidating but trust me, this is not such a difficult task to master.  One doesn't need any special utensils to cook this dish. A heavy bottomed pan with a lid will do. A non-stick one, preferably. And if your's is a full fledged Indian kitchen, probably even don't need to run to the store for spices.

I have divided the whole process into 4 steps for convenience and ease. To begin with, soak the rice and start working on step 2.
Step 1. Soaking and cooking rice.
Step 2. Preparing a vegetable gravy. (Do this while the rice is being soaked and cooked, to cut down the biryani making time.)
Step 3. Layering the rice and vegetable gravy in a pot / pan. (This is child's play and takes less than 5 minutes.)
Step 4. Cooking the biryani in 'dum' style. (One minute of prep work and about 25 minutes of cooking with no supervision.)

Ingredients for cooking rice: (Step 1)
1.5 cups of basmati rice
3 cloves
1 inch cinnamon
1 bay leaf
1 star anise
3 cardamom
1/2 tsp. salt
6 cups of water

Ingredients for vegetable gravy: (Step 2)
3 tbsp. ghee / oil
1 tsp. shahjeera / caraway seeds
3 green cardamom
1 black cardamom
3 cloves
1 inch piece cinnamon
1 star anise
1 bay leaf
1 onion, finely chopped
2 green chillies, sliced
1 tsp. ginger - garlic paste
4 cups of chopped vegetables 
1 cup yogurt
1/8 tsp. ground turmeric
1 tsp. mild variety chili powder
1 tsp. biryani masala / garam masala
Salt to taste
2 tbsp. each - almonds, cashews and raisins

Ingredients for layering: (Step 3)
1 large onion, thinly sliced (or 1/2 cup fried onions)
1/4 cup finely minced cilantro
1/4 cup finely minced, mint leaves
1/4 cup warm milk + 2 pinches of saffron strands
1 tbsp. ghee
2 tsp. rose water / kewra water

Prep work:
1. Rinse basmati rice in two or three changes of water and soak the rice in enough water for about 30 minutes. Drain the water after the soaking period.
2. Cut and prepare the vegetables that are going to be used for vegetable gravy.
3. Add yogurt to a small bowl, whisk until smooth and keep aside.
4. Add two pinches of saffron strands to 1/4 cup of warm milk and keep aside.


Step 1 - Directions for cooking rice: 
* Rinse basmati rice in two or three changes of water and soak the rice in enough water for about 30 minutes. Drain the water after the soaking period.

* Add 6 cups of water, cloves, cinnamon, bay leaf, cardamom, and salt to a pot on high flame and bring it to a rolling boil.
 * Add the soaked and drained rice and gently mix once. Do not cover and continue to cook on high flame, until the rice is 80% cooked. (It took less than 7 minutes.) 
* The rice should be almost done, with a slight bite at the center of the grain when tasted.

* Immediately drain the rice in a colander. Rinse the rice with cold running water to avoid further cooking. Drain completely, fluff and keep aside.
Step 2 - Preparing vegetable gravy:
* Heat 3 tbsp. ghee in a pan and add half the onions and a pinch of salt. Fry them until golden brown, remove with a slotted spoon by gently pressing against the edges of the pan to remove the excess of oil. Drain on the absorbent towels and keep aside. (We will use it for layering, the 3rd step.)

* Add a little more ghee / oil if needed to the same pan and add shahjeera / carom seeds, bay leaf, cardamoms, cloves, cinnamon and saute for few seconds, until the shahjeera starts to brown.
* Now add the chopped onions and saute on low flame until golden brown. 

* Then add green chillies and the ginger - garlic paste and saute until the raw smell goes away. Add turmeric, chili powder, biryani masala and stir well.

* Next add the chopped vegetables and salt to taste. Saute for a minute or two. 
* Add yogurt and saute for a minute, on low flame since the yogurt may curdle. 
* Add about 1/4 to 1/2 cup of water, cover the pan with a lid and cook until the vegetables are done. (Or the vegetables can be pressure cooked for 2 - 3 whistles. Remember that the sourness from the yogurt increases the cooking time.)  Add raisins, cashews and almonds and mix well.

* Check the taste and add any seasonings if needed. If the gravy appears watery, cook on high flame, continuously stirring until most of the water dries up. The final gravy should be on a thicker side.

Step 3 - Layering the biryani:
* Choose a heavy bottomed pot, preferable a non stick one. Spread evenly half of the vegetable gravy at the base of the pan.
 * Spread half of the rice over it, in an even layer. Sprinkle half of the fried onions (the onions we fried before making the vegetable gravy), cilantro, mint, and saffron milk, evenly over the rice. (Fried onions are not pictured.)

* Repeat the vegetable gravy and rice layers. Sprinkle the remaining fried onions, cilantro - mint and saffron milk. Pour a tbsp. of ghee all over.
* Finally sprinkle the rose water evenly.

Step 4 - The "dum" cooking part:
* While layering the biryani, heat a iron griddle / tawa on medium flame. 
* Seal the pot tightly with an aluminium foil and cover it with a lid. Or seal the pot with a moist, cotton towel or cloth and cover with a lid. Or cover the pot with a lid and seal it with a dough ring.
* Place the sealed pot on the hot tawa and cook on the lowest heat setting / lowest flame, for about 25 to 30 minutes.
* Let it sit for about 10 minutes, once the rice is cooked. Fluff and serve with a spicy gravy.

So far in my Biryani / Pulao / Khichdi series,
A for Ambur Biryani
B for Basanti Pulao / Misthi Pulao
C for Corn - Fenugreek Greens Pulao
D for Donne Biryani

E for Ek Toap na Dal Bhaat

F for Fada ni Khichdi
G for Gutti Vankaya Biryani

BMLogo
Check out the Blogging Marathon page for the other Blogging Marathoners doing BM#99.

Monday, April 8, 2019

G for Gutti Vankaya Biryani (Stuffed Eggplant Biryani)

The biryanis which originated in the royal kitchens of India under Muslim regime were predominantly meat based. The vegetarian versions of the recent era are substitutes to these traditional versions to suit the palates of vegetarians. There have been recently regional twists to these meatless meals to come up with an umpteen number of vegetarian and vegan options in the pulao / biryani section. Gutti vankaya biryani is one such dish I came across during my last summer visit to India. There was a birthday in the family and a nephew of ours, who happens to be a great fan of biryanis ordered a couple of them online. They were gutti vankaya biryani and pandumirapakaya pachadi biryani, which were obviously and heavily inspired by Andhra cuisine, though we were in Bangalore.

Pandu miarapakaya pachadi is a classic Andhra pickle made with red, ripe chillies while 'gutti vankaya koora' is a stuffed brinjal preparation from the region that is quite popular. I cannot stand the smell of garlic and so didn't taste either of them. Even adults who love garlic and are used to the heat of Andhra cuisine started to sniffle and started to complain about the overly spicy and garlicky rice. However I thought they were two great adaptations with local flare. If you take out Hyderabad from the region, I don't think there are any traditional biryanis left that is distinctly Andhra flavored. A gutti vankaya biryani is one of those new era biryanis which can be easily associated with the state just by it's name.

It also makes sense to come up with an eggplant or gutti vankaya biryani. Eggplant has an elevated status among the vegetables in Andhra cuisine and most of the locals love it. My husband too happens to be a fan and I had decided to recreate that biryani for him when I came back home. This marathon proved to be a perfect opportunity to try it. Honestly speaking I was not well versed with pulao - biryani preparations before this marathon. I have cooked around 20 dishes in the past two months to the point of vexation and in turn kinda gained expertise now in the preparation. This was one of the dishes that I cooked early on and so opted for a simple pressure cooker preparation like a pulao. If it had been now, I would have prepared in an authentic biryani style by preparing a marinated base and cooking in a dum style. That is for another time, I guess.

The word 'Gutti' literally means a bouquet or a bunch in Telugu, the language spoken in Andhra and Telangana states. 'Gu' here is not pronounced as in the word 'gut' but as in 'guru'. And 'tti' as the 'th' sound in the word 'thin'.  Eggplant / brinjal is called vankaaya. The 'vanka' in the word 'vankaaya' is pronounced as 'lanka' as in Srilanka. The eggplants are stuffed with a spice - legume mixture here instead of being chopped and sauteed, which is a common feature in vegetable biryani preparation. I added the spice mixture in the gravy as well along with biryani masala to bring out the flavor more. Don't be intimidated by the long list of ingredients. Most of them go into tempering. The final feedback I got from my husband was good. If one is an eggplant lover and looking for a quick and easy biryani version to prepare, give it a try. The dish is spicy enough that it can be served with plain yogurt / a simple raita.

Ingredients:
1 cup Basmati rice
1 - 2 tbsp. ghee and/or oil
1 tsp. shahjeera / jeera (caraway / cumin seeds)
3 cardamom pods
3 cloves
2 small bay leaves
2 star anise
2 one inch pieces of cinnamon / casia
1 or 2 green chilies, finely chopped (depending upon the spiciness)
1 cup thinly sliced onions
1 inch piece of finely chopped ginger
1 tsp. garlic paste (I didn't use any.)
A handful of cilantro leaves
Roughly a handful of mint leaves
1 big tomato, finely chopped
1 tsp. biryani masala / garam masala
1/4 cup yogurt
1 and 1/4 tsp. salt or as needed
A little more than 1 and 1/2 cups water

Stuffing ingredients for 6 eggplants:
6 small eggplants
2 tbsp. peanuts
2 tbsp. chana dal / roasted, split chickpeas
1 tbsp. coriander seeds
1 tsp. sesame seeds
4 cloves
4 one inch pieces of cinnamon
4 - 6 red chillies depending upon their spiciness
Salt to taste
(The stuffing is for six eggplants. I had used the stuffing for 4 eggplants and used the rest in the onion and tomato gravy.  In case, if six eggplants are used and need more to use in the gravy, prepare more stuffing powder.)

Directions for the spice powder preparation and stuffing:
* Toast chana dal in a small skillet or wok on medium flame until it starts to lightly brown. Add coriander seeds, sesame seeds, cloves, cinnamon and red chillies and saute for a minute or two on low flame until everything is toasted. Take care not to burn them. Transfer the toasted contents to a plate and let them cool.
* Peanuts take longer to toast than the above ingredients and so toast them individually. Toast on low flame until black spots start to appear on the peanut skins and they don't appear raw when tasted. Cool and skin the peanuts by rubbing them between your palms. Let them cool. (Ready made toasted and skinned peanuts can be used instead.) 
* Add all the toasted ingredients and salt to a mixer / spice grinder and grind them fine. Add a tbsp. or two of water to the powder, make a thick paste and keep it aside.
* Wash and wipe the eggplants dry. Make crosswise slit on the eggplants, to the opposite side of the stem. (Make a plus mark cut, taking care not to quarter the eggplants.)
* Stuff the eggplants with the above spice mixture uniformly. If there is any leftover spice powder, use it in the gravy prepared.

Directions for biryani preparation:
1. Heat ghee in a small pressure cooker / pan and add carom or cumin seeds. When they start to brown, add cardamom, clove, cinnamon, bay leaf and star anise. Saute for few seconds, until the aroma of spices is noted. 
2. Add green chillies and onions and saute until golden brown. Next add ginger - garlic paste and saute until the raw smell leaves. Next add mint and cilantro and saute for a couple of minutes. Add tomatoes and cook until mush.

3. Add biryani masala, salt, any left over spice mixture from the above stuffing step, and yogurt and cook until almost the yogurt evaporates.
4. Wash the rice in two changes of water and drain. Add the drained rice and water. Mix gently to combine. Arrange the eggplants over the top, close the lid and pressure cook for three whistles. Let the valve pressure release on it's own. Wait for few minutes and then open the lid. Gently fluff and serve with yogurt.

Notes:
1. If the rice was soaked for about 20 - 30 minutes prior to cooking, pressure cook for two whistles.
2. If cooking in a pan, don't add the stuffed eggplants and cook until the rice is half cooked. Then add the eggplants, cover the pan tightly and continue to cook on low flame until rice is completely cooked. (It may take about 20 minutes to cook this way.)

So far in my Biryani / Pulao / Khichdi series,
A for Ambur Biryani
B for Basanti Pulao / Misthi Pulao
C for Corn - Fenugreek Greens Pulao
D for Donne Biryani
E for Ek Toap na Dal Bhaat
F for Fada ni Khichdi

BMLogo
Check out the Blogging Marathon page for the other Blogging Marathoners doing BM#99.

Saturday, April 6, 2019

F for Fada ni Khichdi (Version 2) / Spicy Cracked Wheat & Moongdal Porridge

I did not need any planning for 'E' or 'F' recipes in the series since I had these dishes on my to do list for sometime now though I have another fada ni khichadi recipe on my blog. Fada ni khichadi is one more wholesome, nutritious and easy to prepare khichdi. As the name indicates it is prepared with fada, which means broken wheat. This one pot meal comes from the state of Gujarat and quite an easy one to put together as a quick lunch or brunch meal. It is almost 'dump and cook' kind of khichdi that needs no expertise in cooking. 

Rice, millet or any other gluten free grain can replace the wheat if on a gluten-free diet. Any combination of mixed vegetables of one's own preference can be used but care need to be taken not to use those vegetables that turn mushy when cookedThe ghee definitely adds loads of flavor here and so don't skimp on it unless counting calories or is vegan. In that case, oil can be used instead of ghee. The khichdi nonetheless would taste delicious even with all the substitutionsI had tried another version earlier and remember liking it. The variations available online are almost the same and differ only in the kind of spice powders added. I tried the pav bhaji powder version, though authentic it may not be but loved it along with a bowl of sabudana papad (home made dried and oil toasted tapioca pearl wafers). 

Ingredients: (Yield - 3 servings)
1/2 cup cracked wheat (I used fine one.)
6 tbsp. yellow moong dal / split and skinned green gram
1 to 2 tbsp. ghee
1 tsp. cumin seeds
1/4 tsp. peppercorns
2 cloves
1 inch cinnamon piece
1/2 tsp. ginger paste
1/2 tsp. green chili paste / 2 dried red chillies (I didn't use any.)
Few curry leaves (optional)
2 pinches of asafoetida powder
1/8 tsp. turmeric powder
1 onion, finely minced
3 cups chopped mixed vegetables (I used carrots, green beans, tomato and peas.)
Salt to taste
Chili powder as needed
1 tsp. pav bhaji masala (Optional. Can add garam masala instead.)

Directions:
* Rinse moong dal and cracked wheat with water and drain. Keep them aside.
* Heat ghee directly in a small pressure cooker. Add cumin seeds, peppercorns, cloves and cinnamon. When the cumin starts to brown, add ginger and chillies if using. Saute for about 30 seconds and add curry leaves and asafoetida.
* Add onions next and saute for  a couple of minutes. Add the other vegetables now. 
* Add moong dal, wheat, 3 cups water, turmeric, salt, chili powder and pav bhaji masala to the cooker.
* Cook for 3 whistles and switch off the stove. When the valve pressure is gone, remove the lid. Mix the khichdi well once and taste the seasonings.
* If the seasonings need any adjustment or extra water needs to be added for a thinner consistency, add them now and bring the khichdi to a boil once more or simmer for few minutes.
* Serve hot along with papad / plain yogurt.

So far in my Biryani / Pulao / Khichdi series,
A for Ambur Biryani
B for Basanti Pulao / Misthi Pulao
C for Corn - Fenugreek Greens Pulao
D for Donne Biryani
E for Ek Toap na Dal Bhaat

BMLogo
Check out the Blogging Marathon page for the other Blogging Marathoners doing BM#99.

Friday, April 5, 2019

A - Z Indian Biryani / Pulao / Khichdi Series ~ E for Ek Toap Na Dal Bhaat

Here is a one pot khichdi from the Gujarati kitchens. It is wholesome, nutritious and a filling meal as a khichdi should be but is somewhat a special one. It is easy and quick to prepare this as well. This is one of the dishes I cooked early on but I started to have second thoughts because I have another recipe in the line which involves stuffing and I was not impressed with the images I captured. It was a cloudy day in the middle of Midwest winter and there was not even a single image that looked crisp. I cooked another khichdi last week, in case I didn't want to go with it. However I changed my mind again today and decided to go with this Gujarati meal, I found on Tarla Dalal's website. 

Calling it a one pot rice - lentil khichdi would be misleading since it is not your everyday khichdi where you dump spices, rice, lentil and vegetables in one pot and cook. Vegetables used here are not chopped but stuffed and eggplants are an interesting addition too, considering that it is not commonly used in a khichdi preparation. The addition of vegetables, stuffed with a coconut - cilantro base is the highlight of this khichdi and it definitely elevates the simple khichdi to an entertaining meal. The onions I used were tiny and kind of disintegrated into the khichdi and so, it is hard to notice them in the images. 

This dal bhaat can be cooked under 30 minutes, if soaking toor dal is not involved. I have noticed that the same toor dal without any prior soaking can be cooked in 3 whistles in some cookers and some take longer even if they are newly bought cookers. If you own a cooker which can cook dal in 3 whistles, go ahead with the recipe without soaking dal. If not, soak dal for 1 to 2 hours before so that rice and dal gets cooked at the same time. Otherwise, the rice would be a mush and the dal may not be cooked enough. The stuffing can be changed to a personal favorite one as well instead of using the one mentioned in the recipe. I changed the stuffing slightly while cooking though I am posting the same one mentioned in the original recipe.

Ingredients: (Yield - 4 servings)
1 cup rice
1/3 cup pigeon peas / toor dal
2 1/2 cups water (I used 1.5 + 2/3 cup, It is perfect if you prefer a dry version khichdi like shown in the image.)
2 tbsp. ghee
1 tsp. cumin seeds
a pinch of asafoetida
1/8 tsp. turmeric powder
Salt to taste
1/4 cup frozen peas
4 baby potatoes
4 small variety brinjals / eggplants 
4 to 6 baby onions 

Ingredients for stuffing:
1 tbsp. coriander powder
1 tbsp. cumin powder
1 tbsp. sugar (I didn't use.)
1.5 tbsp. red chili powder
A pinch of asafoetida
Salt to taste
3/4 cup fresh coconut, grated
1/3 cup finely minced cilantro / coriander leaves

Directions:
* If the variety of toor dal being used is not going to pressure cook in 3 whistles or cook at the same time as rice, wash and soak the dal in water for 1 or 2 hours and drain the water. There is no need to soak the rice but wash and drain.
* Combine all ingredients mentioned under stuffing in a small bowl and mix well. 
* Peel the potatoes and onions. Make criss-cross slits on onions, potatoes and brinjals, taking care not to separate the 4 segments. (Keep the stalk of the brinjals intact and cut along the opposite end. Cut a + mark, not cutting all the way through.)
* Stuff the onions, potatoes and brinjals evenly with the stuffing prepared in the above step. Keep them aside.
* Heat ghee in a small (3 liter) pressure cooker and add cumin seeds. When they start to brown add asafoetida, turmeric powder, drained rice and toor dal. Saute them for about a minute, on medium flame. 
* Add green peas, salt and water and stir well. Next add the stuffed vegetables and gently stir the mixture once. Pressure cook on high flame for 3 whistles.
* When the valve pressure is gone, remove the lid.
* If preferred, add another tbsp. of ghee at this point and gently mix.
* Serve it with some plain yogurt / butter milk. 

So far in my Biryani / Pulao / Khichdi series,
A for Ambur Biryani
B for Basanti Pulao / Misthi Pulao
C for Corn - Fenugreek Greens Pulao
D for Donne Biryani


BMLogo
Check out the Blogging Marathon page for the other Blogging Marathoners doing BM#99.

Thursday, April 4, 2019

A to Z Biryani / Pulao / Khichdi Series ~ D for Donne Biryani (Vegetarian Version)

Military hotels are a standard feature of many towns across the parts of southern India. Though no one is sure about the story behind the name, they have nothing to do with niether the military nor the lodging. Indians have a habit of loosely calling an eatery as a hotel though it has nothing to do with lodging facilities. These miltary hotels are usually small eateries that serve non vegetarian food. These kind of tiny establishments with the boards 'Ragi mudde oota tayaar' outside (meaning ragi mudde lunch is ready), dot the parts of Bangalore city. Ragi mudde, the cooked balls of finger millet flour are served with non vegetarian curries here. Rustic farmer food from the plains of Karnataka is the staple food in these humble hotels and women wouldn't step into these hotels in the olden days.

Some hotels are so well known in Bangalore that they are running over a hundred years. Many military hotels in and around Bangalore, like Shivaji Military Hotel  display an unmistakable Maratha influence according to this interesting excerpt about the history of Military hotels in Bangalore. It is believed that Maratha soldiers who garrisoned in Bangalore area during the 17th century might have brought their traditional non-vegetarian cuisine with them and those families were the forerunners of Bangalore's miltary hotels, which were obviously heavily influenced by the Saoji-style eateries, that they were used to back home.

Mutton biryani slowly cooked over coals, using short grain rice and coriander, mint and green chili paste takes precedence at these Maratha influenced eateries over ragi mudde. The meat dishes here tend to be spicier, influenced by the fierce Saoji and Kolhapuri cuisines of central Maharashtra. This kind of biryani is also called donne biryani and it seems to be a signature dish of especially, the Shivaji military hotel in Bangalore mentioned above. Mutton and chicken seems to be the popular choices for the preparation of donne biryani. 


I lived in Bangalore area almost all my life before moving to US more than two decades ago but being a vegetarian, the name 'donne biryani' never crossed my radar during that time. Donne biryani seems to be a popular choice in military style hotels of the region. This biryani is called so since it is served in a donne. Donne, pronounced as 'though - nnay' (with a stress on n) is a Kannada word (the local language) used for the biodegradable cups made with areca nut palm leaves / banana leaves and so on.
 
The recipe is a secretly guarded one and so, basically the recipes floating online are own interpretations of food bloggers. I did not pick any particular recipe to cook this biryani from and chose to  pressure cook it making it an easy, quick and flavorful meal. Basmati rice is not used to make this biryani but seeraga samba rice, a popular choice in Karnataka and Tamilnadu is used. If the preferred rice is not available, go with regular rice. Mint flavor is the most dominating one in this biryani unlike most of other biryanis.

I have made it a vegetarian version using soy chunks and my husband thought potatoes and capsicum would have been a nicer addition. Any combination of preferred vegetables can be used to make this biryani. This is one of the biryanis that I had on my to do list even before this marathon theme was announced and so, it was the first biryani I tried for this series. I am so glad that I tried this biryani and that too with soy chunks since they were like the selling point of this biryani. Soy chunks were so succulent, each infused with the cilantro - mint base flavor and I don't think the vegetables would have created the same effect. Serve it with a simple raita / plain yogurt.
Ingredients to saute and grind:
1 - 2 tbsp. ghee / oil
2 cloves
1 inch cinnamon piece
2 pieces of stone flower / dagad phool
1 onion, chopped
2 green chillies (Mine were very spicy chillies. adjust the quantity depending upon the spiciness of the chillies used.)
1 inch piece ginger, finely chopped
2 garlic cloves (I didn'y use any)
1 cup cilantro and mint leaves

Other Ingredients:
1 cup soy chunks, hydrated (or substitute vegetables) 
2 tbsp. ghee and /or oil
2 cloves
2 cardamom
1 inch piece cinnamon
1 bay leaf
1 onion, thinly sliced
1/8 tsp. turmeric powder (optional)
2 tbsp. yogurt
1 tsp. biryani masala
1 and 1/4 cup water
Salt to taste (I used about 1 and 1/4 tsp.)
1/2 tsp. lemon juice
3/4 cup rice (I used sona masuri rice.)

Directions:
* If using seeraga samba rice, soak it in water for about 15 minutes and drain completely. If using sona masuri or the regular kind, no need to soak. I used sona masuri rice and the water quantity mentioned is for that variety of rice. 
* Soak soy chunks in water to hydrate them. If using vegetables, chop them and keep aside. When the soy chunks soften, squeeze out water from them and keep aside.
* Heat ghee / oil directly in a small pressure cooker or a pan. Add all the other ingredients mentioned under 'saute and grind" list except the cilantro and mint. Saute them stirring intermittently until the onions turn pinkish and add cilantro and mint. Saute for about a minute and turn off the stove. Let them cool slightly and grind to a paste adding a little water. If more water is needed to grind, use some from that 1 and 1/4 cup water mentioned under ingredients' list ( so that you would not end up adding more liquid while cooking rice which in turn ends up in a mushy biryani.)

* To the same pan which is of course empty now, add ghee, cloves, cardamom. cinnamon, bay leaf and saute for few seconds. Then add onion and fry stirring intermittently until it turns pinkish.

* Next add turmeric, biryani masala and yogurt and stir well. Next add water and salt to the cooker / pan and bring it to a boil. Add rice, soy chunks and lemon juice.  

* If using sona masuri rice, rinse and add to the cooker. Pressure cook for three whistles if using cooker.

* If not using pressure cooker, add 1/8 cup more water, cover the pan tightly with an aluminium foil and close the lid. or cover the lid and seal it with a dough ring, to cook it in dum style. Cook on low flame, until rice is cooked, about 15 to 20 minutes.
* Open and check after 20 minutes. If there is stll water, cover and cook until all the water evaporates. If the mixture appears dry and the rice is not cooked through, sprinkle some water and cook some more time.

So far in my Biryani / Pulao / Khichdi series,
A for Ambur Biryani
B for Basanti Pulao / Misthi Pulao
C for Corn - Fenugreek Greens Pulao

BMLogo
Check out the Blogging Marathon page for the other Blogging Marathoners doing BM#99.


Comments

Wednesday, April 3, 2019

C ~ Corn - Fenugreek Greens Pulao / Makai - Methi Pulao

Here is a quick and tasty pulao made with juicy, succulent corn and my personal favorite, fenugreek greens aka methi. This pulao can be made with corn alone if preferred or replace the greens in the recipe with other vegetables like potato / capsicum / peas or even soy chunks or paneer. I like the combo of corn and fenugreek where the strong flavor of the latter is balanced by the hint of sweetness from corn kernels.

The recipe again is made to serve two adults. My son is away at college while my daughter won't touch these rice dishes with a barge pole. There was no point in making large servings though the recipe below can be doubled or tripled easily. I used fresh corn to make this pulao. This can be a quick lunch box recipe and if one has cooked basmati rice or leftover rice, this can be prepared in a short time. I cooked rice separately since I did want my corn to retain some bite. I have given both methods of cooking below. This is a kid - friendly recipe and one can add green chillies as needed. The chillies I used here were hot. This can be served with a spicy raita if the pulao is mildly hot. Or it can be made more spicier by adding more chillies and can be served with plain yogurt.
Ingredients: (Yield - 2 servings)
1/2 cup Basmati rice
1 cup or more roughly chopped fenugreek greens / methi
1 cup corn kernels (I used one ear of corn.)
2 tbsp. oil
1 tsp. cumin or caraway seeds (jeera / shahjeera)
2 cardamom pods
2 cloves
2 one inch piece cinnamon
1 bay leaf
1 star anise
2 or more spicy green chillies
1 big onion
1 tsp. ginger - garlic paste or grated ginger - chopped garlic
1.5 tsp. salt
3/4 cup water
Prep work:
1. If using fresh corn, peel off the husks and the silky threads. Use a sharp knife to cut down along the cob, to remove kernels.
2. Thinly slice the onions and green chillies.
3. Wash and roughly chop the fenugreek greens.

This is what I did:
1. Rinse the rice in two or three changes of water and pressure cook for 3 whistles adding 3/4 cup water. (I didn't soak the rice in water before cooking.) Let it sit for few minutes after the valve pressure is gone. 
2. Heat oil directly in a pressure cooker or a pan. Add cumin / caraway seeds. When they brown, add cloves, cardamom, cinnamon, bay leaf, star anise and saute for 30 seconds. Add green chillie, onion and salt. Saute until onion is cooked to golden brown. Then add garlic - ginger paste and saute until raw smell disappears.
3. Next add chopped fenugreek greens and corn. Saute the vegetables until the fenugreek greens is cooked well, about 5 to 7 minutes. By the time corn would be done as well with very slight bite to it.
4. Next add the cooked rice and if it is still warm, leave it for few minutes. Gently fluff it with a fork or spoon and mix gently to combine. Let it sit for few minutes for the flavors to mingle.

This is how it is usually done:
1. Rinse and soak the rice in water and keep it aside.
2. Heat oil directly in a pressure cooker or a pan. Add cumin / caraway seeds. When they brown, add cloves, cardamom, cinnamon, bay leaf, star anise and saute for 30 seconds. Add green chillie, onion and salt. Saute until onion is cooked to golden brown. Then add garlic - ginger paste and saute until raw smell disappears.
3. Next add chopped fenugreek greens and corn. Saute the vegetables for a couple of minutes.
4. Drain the rice and add it along with 3/4 cup of water.
5. a) If using pressure cooker, cook for 3 whistles and turn off the stove. When the valve pressure is gone, fluff and serve.
 b) If the pulao is being cooked in a pan instead of a cooker, add 1/4 cup more water. Cover and cook on low flame until rice is done, about 18 - 20 minutes. Taste and see whether rice is cooked. If the rice is not cooked yet, sprinkle some water and let it cook for some more time.
c) If you don't want to brown the bottom of the pressure cooker by directly cooking in it, a pan can be used to cook until step 4 and the contents can be transferred to a pressure cooker or a electric rice cooker and finish cooking. 

So far in my Biryani / Pulao / Khichdi series,
A for Ambur Biryani
B for Basanti Pulao / Misthi Pulao

BMLogo
Check out the Blogging Marathon page for the other Blogging Marathoners doing BM#99

Tuesday, April 2, 2019

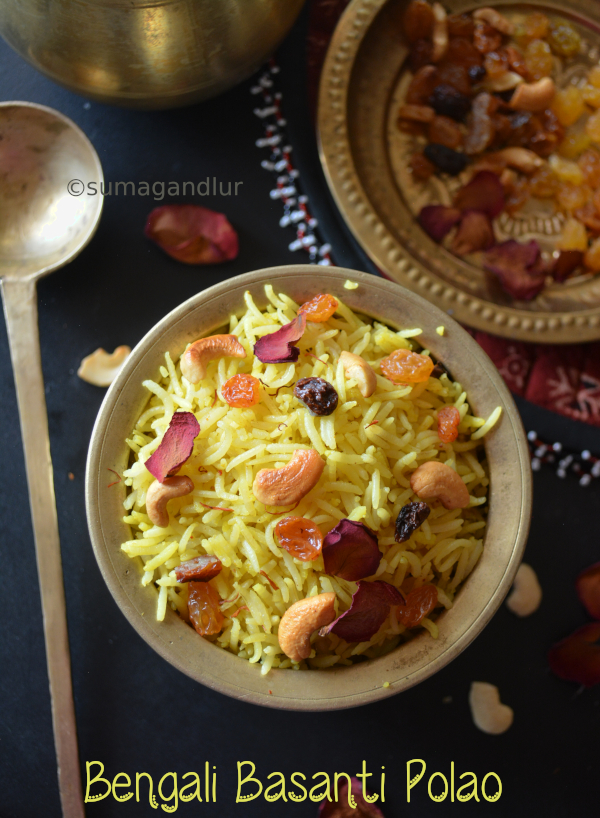
A - Z Indian Biryani / Pulao / Khichdi Series ~ B for Bengali Basanti Polao / Mishti Polao

Many basic versions of pulao exist in Indian regional cuisine that pair well with a spicy curry or gravy. Most of them sound similar and vary very minutely and today's basanti polao is one such dish. Yes, it's not a typo. It's called polao instead of pulao. It is a specialty from the Bengal region and is usually reserved there for auspicious occasions like Durga pooja, new year celebration and so on. The word 'basanti' has nothing to do with basant, the spring season but stands for the polao's bright yellow color. The rice is also called holud polao for the same reason. This rice delicacy is  called misthi polao as well since it is on the sweeter side unlike the regular pulao dishes. 

It is usually served with a spicier side dish to balance out the sweetness from the polao. The use of saffron lends a yellow tinge to the dish and food color is added as well for the yellow color of the pulao but not turmeric, according to some Bengali food bloggers. (I am not a fan of food colors to be honest and turmeric is of course an healthier choice. The bloggers were mentioning that one should not feel the whiff of turmeric from the dish.) 


It is distinctly yellow in color, subtly rose flavored and unmistakably sweeter. Not enough sweeter that it can be served as a dessert on it's own but sweet enough to put it apart from the savory versions. If one is counting calories then feel free to decrease the quantity or totally skip the sugar even if purists may scoff at the suggestion since it may no longer be called a misthi polao.

Bengalis use a locally cultivated rice called Gobindobhog rice which is a short grain, sticky and aromatic rice. The rice supposedly imparts an inviting aroma and flavor to this rice delicacy. I used aged Basmati rice instead. The addition of rose water lifts the flavor of the dish. The dish is subtly spicy and serves as a base for spicy curries. The most popular Bengali accompaniment to this polao seems to be a mutton curry called kosha mangsho. Vegetarian side dishes like aloor dum and aloo phulkopir dalna would go well with this polao. I preferred a gravy curry instead.
Ingredients:
1 cup rice *
2 tbsp. ghee
2 tbsp. cashew nuts
2 tbsp. raisins
2 - 3 cardamom
2 - 3 cloves 
1 inch cinnamon
1 bay leaf
1 and 1/2 cups water
3 tbsp. sugar
Salt to taste
1/2 tsp. garam masala
A pinch of saffron strands soaked in a tbsp. milk 
A few drops yellow food color
Few drops of rose water
* Use Gobindobhog rice if available and if not, Basmati rice would be a great substitute. 

Directions:
* Rinse and soak rice for about 30 minutes. Drain and keep aside.
* Heat ghee directly in a small pressure cooker and add cashews and raisins. Toast until cashews are golden and raisins turn plump. Remove them with a slotted spoon onto a plate and keep them aside.
* To the same ghee, add cardamom, clove, cinnamon and bay leaf. Toast them for 30 seconds and then add drained rice. Saute them for few seconds.
* Add water and the remaining ingredients. Stir them once and pressure cook for 3 whistles. Wait until the valve pressure is gone. Add the toasted cashews and raisins to the polao, fluff and serve with a spicy side dish.

So far in my Biryani / Pulao / Khichdi series,
A for Ambur Biryani

BMLogo

Check out the Blogging Marathon page for the other Blogging Marathoners doing BM#99.

Monday, April 1, 2019

A - Z Indian Biryani / Pulao / Khichdi Series ~ A for Ambur Biryani / Arcot Briyani (Vegetarian Version)

It's April again, time for that month long cooking marathon with recipes that fall under a specific theme. It's going to be Indian style rice dishes - 'Biryani / Khichdi / Pulao' this time and there are going to be an assortment of simple and festive recipes picked from across the region. We have reduced our rice intake and so most of the recipes that I posted this marathon cater mostly two since I made small portions each time. Most of the recipes can be doubled or even quadrupled easily though. I am starting the marathon with a biryani from the Tamilnadu region called Ambur biryani, which supposedly originated in the Arcot royal kitchens. 

Ambur biryani is a testament to the fascinating 'Biryani Trail' tales of Indian sub continent. Ambur, a small town which lies in between Chennai and Bangalore was an important part of the former Arcot region, ruled by the nawabs of Arcot. The Arcot briyani, cooked in those royal kitchens became popular as Ambur biryani (or briyani as it is called locally) in the course of time. Thanks to a cook named Hasin Baig, who worked in those kitchens and later brought the art to his hometown of Ambur where he set up a biryani shop and started dishing out the 'once nawabi food' to the common man. The small establishment has grown into a brand over time and is still run by his family, called 'Star Briyani'. They have branches in Ambur, Bangalore and Chennai. 

This biryani is mildly spiced unlike it's counterparts from other regions and an unique addition of red chili paste during the preparation imparts usually an orangish hue to the biryani. It is of course a non-veg preparation, like most of those authentic versions that were cooked in Indian royal kitchens, in the by gone era. Being a vegetarian, I had to rely mostly on online articles and videos to figure out the dish and substituted the meat part with soy chunks here. One can easily substitute it with mixed vegetables like potato, carrot, beans, cauliflower, and peas. Or even paneer , tofu or mushroom would be great vegetarian options. Originally the choice of rice used to prepare this biryani was a thin and short rice variety called 'surdas' which was replaced later by seeraga samba. In absence of that, Basmati variety rice should do. In this biryani preparation, the rice and meat are cooked individually and then brought together in a covered pot to cook in 'dum' style.
Ingredients: (Yield 2 servings)
1/2 cup seeraga samba rice *
2 cup soy chunks (or mixed vegetables)
2 tbsp. oil
2 cloves
2 cardamom
1 inch cinnamon piece
1 bay leaf
1 big onion or 2 small onions, thinly sliced
1 tsp. ginger- garlic paste
4 to 6 (not very spicy) dried red chili
1 tbsp. each - mint and coriander leaves
1 tomato, diced
2 tbsp. yogurt
1 tsp. lemon juice
Salt to taste
1 tbsp. ghee
* Basmati rice can be substituted.

Prep work:
* Wash and soak rice in enough water for about 15 minutes and drain. Keep aside.
* Soak soy chunks in water to hydrate them. Squeeze out the water when they soften and keep aside. If using mixed vegetables, chop them and keep ready.
* Wash and soak red chillies in hot water for about 15 minutes. Drain the water and grind finely adding a few tsp. of water.

Part 1: Cooking the soy chunks / vegetables
* Heat oil in a medium sized deep pan, lower the flame and add 1 tbsp. yogurt. Carefully stir and then add cloves, cardamom, cinnamon, and bay leaf. Saute them for about 30 seconds and add the onion slices and saute them until golden brown.
* Add ginger - garlic paste and saute for few seconds. Next add mint and cilantro and saute until they wilt. Add the red chili paste and saute.
* Add the tomatoes and lemon juice continue cooking until they turn mushy.
* Next add the remaining curd, salt, and soy chunks and mix. Add one or two tbsp. of water if needed and saute for few seconds. 

Part 2: Cooking the rice
* After the rice is soaked, bring about 2 to 2 and 1/2 cups of water to a rolling boil in a pot and add the drained rice and a little salt. 
* Continue to cook the rice on medium to high flame without covering, until the rice is about 70% cooked. The rice still should have a bite at center when eaten. 
* Switch off the flame and drain the rice in a colander. The rice can be rinsed in cold water as well to stop it from further getting cooked. Keep it aside.

Part 3: Assembling the gravy and rice for 'dum' cooking
* Heat a tawa / griddle on low flame for about 5 minutes 
* Transfer the cooked soy chunks gravy from the pan to another dish. Use the same pan which was used to cook the gravy earlier and arrange the gravy and the cooked rice in layers (2 or 4 layers depending upon the quantity). Spoon ghee in between layers. (I had fried sliced onions and sprinkled them as well.)
* Seal the pan with aluminium foil and cover it with a lid. Or cover the pan with a lid and seal it with a dough ring to cook in 'dum' style.
* Place the pan on the hot tawa and cook biryani for about 10 to 15 minutes on low flame. Check and see whether all the moisture has been absorbed and rice is cooked. If the rice appears not cooked and the mixture appears dry, sprinkle some more water and cook for few minutes more.
* Let it sit for few minutes before fluffing and serving.
* Serve it with a spicy accompaniment. Ours was served with brinjal dalcha and yogurt.

BMLogo
Check out the Blogging Marathon page for the other Blogging Marathoners doing BM#99.