HOME        |        ABOUT        |        COPYRIGHT        |        CONTACT        |         RECIPE INDEX        |         INDIAN THAALIS        |         MILLET RECIPES        |        EVENTS' ROUNDUP        

Monday, September 12, 2016

A - Z Rice Dishes ~ J for Jodhpuri Vegetable Pulao

Here is an impressive and delicious pulao recipe that supposedly comes from the royal kitchens of Rajasthan. Interestingly, there is no addition of onion and garlic in this recipe which is a norm in any pulao / biryani recipe. May be the influence of the local vegetarian community or the arid weather. It is however loaded with nuts and dry fruits as it is fit to be a regal dish.
This pulao can be served along with some plain yogurt and the papad on the side. Or if looking for a spicy meal, serve it along with a gravy side dish of your choice. I served it along with a spicy dal (which is not pictured) as I found it bland.

Source: Sanjeev Kapoor
Ingredients: (yield 4 to 6 servings)
1.5 cups Basmati Rice 
1.5 tbsp. ghee 1 tsp. cumin seeds
1/2 tsp. fennel seeds
1 tbsp. raisins
1 tbsp. cashew halves
1 tbsp. almond slivers / almond halves
2 to 3 chopped, dried dates
1 tbsp. ginger paste / finely grated ginger
12 small cauliflower florets 
1/4 cup fresh peas
3/4 cup yogurt
2 cups water
Salt to taste
1/2 tsp. garam masala
8 to 10 pepper corns, coarsely crushed 

Method:
* Rinse and soak rice in water for about 10 - 15 minutes. Drain and keep aside.
* Heat ghee in a pan or directly in a small sized pressure cooker. Add cumin and fennel seeds. When cumin starts to brown, add the nuts and dry fruits and saute for 30 seconds.
* Next add ginger and saute for 30 more seconds. Add rice and saute lightly for 30 seconds. Add vegetables and yogurt now and stir with a spoon. Then add salt, garam masala, crushed peppercorns and water. Stir once more.
* If using a pan, cover it with a lid and cook on low flame until the rice is done. No need to stir in between while the rice is cooking and it would be done anywhere in between 20 to 25 minutes.
If using a pressure cooker, cook for 2 to 3 whistles.
Recipes so far in A - Z Rice Dishes,
A for Achaari Chole Pulao
B for Bhuna Khichuri
C for Chintapandu Pulihora
D for Dindigul Thalapakatti Veg Biryani
E for Ellorai / Ellotharai  
F for Fodnicha Bhaat 
G for Gongura Pulihora 
H for Hare Moong ki Chaaswaali Khichdi 
I for Iyengar Style Kadambam

Check out the Blogging Marathon page for the other Blogging Marathoners doing BM# 68.

Saturday, September 10, 2016

A - Z Rice Dishes ~ I for Iyengar Style Kadambam

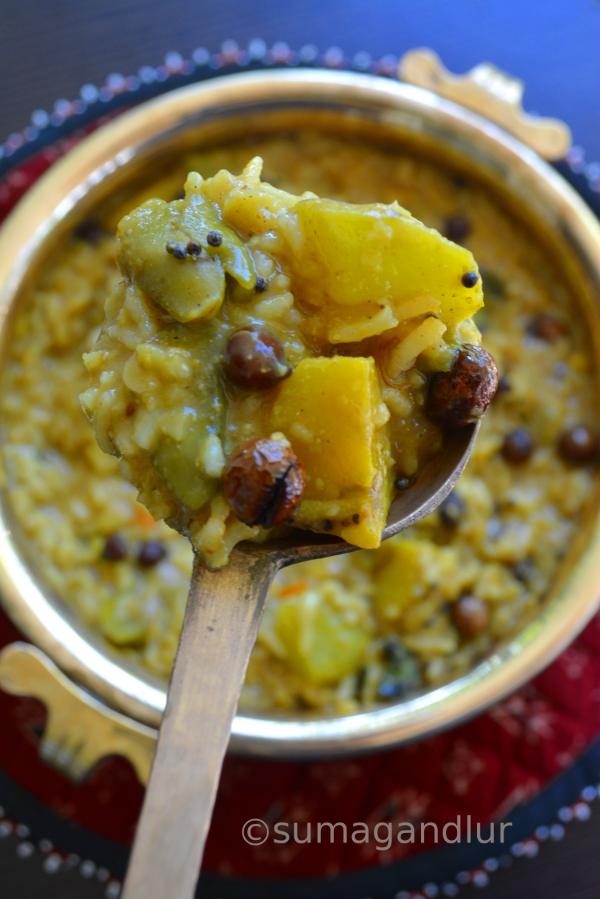
Today, it's time for kadambam, a traditional rice dish that literally tastes divine. Kadambam, in Tamil can be referred to as a medley of similar things though a strand/garland made with a mixture of aromatic flowers is commonly referred to as so. Here in culinary terms, a kadambam is a medley of rice, lentils and vegetables cooked with flavorful spices, steamed lentil balls and fried sun-dried berries. According to the source recipe, this dish happens to be a specialty of Iyengar community and this is a famous prasadam served in Perumal temples across the state. Though on-set, this kadambam sounds similar to sambhar saadam or kadhamba saadam, it is not the case. A kadambam dish makes use of country vegetables like ash gourd, pumpkin, plantain, flat beans and others. Onion, garlic, cilantro, whole spices like cinnamon & cloves, non-local vegetables like carrot, beans, potatoes are all avoided in this recipe. 

The recipe has a long list of ingredients and comes across as a tedious one though apart from the paruppu urundai preparation which takes a little extra time, the dish is not that difficult to put together. The fried sun dried berries, sundakkai add a nice crunch to the dish and paruppu urundai are an interesting addition..
Source: Here
Ingredients to grind:
1 tsp. oil
3 tbsp. coriander seeds
2 tsp. split chick peas / Bengal gram
2 tsp. black gram / urad dal
1/4 tsp. fenugreek seeds / methi seeds
1/2 tsp. peppercorns
2 dried red chiilies
2 tbsp. grated coconut
1/8 tsp. asafoetida powder
Ingredients for paruppu urundai:
1/2 cup toor dal / lentils
2 dried red chillies
Salt to taste
2 tbsp. oil 
Ingredients for kadambam:
1 tbsp. dry sundakkai
1 cup rice
1/2 cup toor dal
3 cups mixed vegetables cut into big pieces (vegetables like ash gourd, broad beans, cluster beans, pumpkin and plantain)
1 tbsp. black garbanzo beans / kala chana
A lemon sized ball of tamarind
1/8 tsp. turmeric powder
1 tbsp. + 1 tsp. sesame oil
Salt to taste
Ingredients for tempering:
1 tsp. ghee
2 dry red chillies
1/4 tsp. mustard seeds
A sprig of curry leaves

Prep work: 
* Soak black garbanzo beans overnight.
* Soak tamarind in water for about 30 minutes. Extract pulp from the tamarind. 
* Heat a tsp. oil and toast all the ingredients except coconut under the list 'to grind' until light brown. Add coconut next and fry until it changes color. Let cool and grind finely.

Method:
* For paruppu urundai, soak lentils and red chilies in water for an hour. Drain the water and grind to a coarse paste adding salt. Heat oil, add this paste and saute well until the color changes. Shape into big marble sized balls and steam cook until done. Keep them aside.
* Heat a tsp. of ghee and fry sundakkais until dark brown.
* Wash rice and toor dal thoroughly with water and drain. Pressure cook rice, toor dal and black garbanzo adding 3 cups of water. When the valve pressure is gone, remove the lid, mash the cooked mixture well and keep aside.
* Meanwhile, cook vegetables adding about a cup water, a tbsp. of oil and turmeric in a pan, until almost done. Next add tamarind and cook until the raw smell of tamarind leaves. Now add the cooked rice and lentils mixture, paruppu urundai, sundakkais, ground spice powder and salt to the pan. Mix well with a ladle thoroughly so that there are not any lumps. Add any extra water if needed to reach the desired consistency and cook for about another five minutes, stirring frequently.
* Heat a tsp. ghee for tempering in a small pan. Add mustard seeds, red chillies and curry leaves. When the mustard seeds start to splutter, turn off the stove and add this tempering to the above rice, kadambam.
* Finally add a tsp.of raw sesame oil to the kadambam and mix well.
* Serve with papad / wadis.

Recipes so far in A - Z Rice Dishes,
A for Achaari Chole Pulao
B for Bhuna Khichuri
C for Chintapandu Pulihora
D for Dindigul Thalapakatti Veg Biryani
E for Ellorai / Ellotharai  
F for Fodnicha Bhaat 
G for Gongura Pulihora 
H for Hare Moong ki Chaaswaali Khichdi

Check out the Blogging Marathon page for the other Blogging Marathoners doing BM# 68.

Friday, September 9, 2016

A - Z Rice Dishes ~ H for Hare Moong Ki Chaaswali Khichdi


Khichdis are wholesome and fuss-free one pot meals that fall into comfort food category for many Indians. Depending upon the regional cooking style, the ingredients used and the consistency preferred, no two khichdis may taste the same but they all fit into one category of being quick fix meals. These filling meals usually contain a rice and lentil base with flavorful spices along with any vegetables on hand, thrown in. Today's rice - mung beans khichdi is cooked in a buttermilk / chaas base, which led me to try this khichdi in the first place. I had prepared it on the dry side though it can be cooked soft and mushy if preferred. It was delicious though my khichdi turned out to be really spicy since I had used very hot variety chilies. 

Recipe idea: Sanjeev Kapoor
Ingredients:
1/2 cup moong beans (green ones)
2 tsp. ghee
1 tsp. cumin seeds
2 cloves
1 to 2 green chillies, chopped
3/4 cup basmati rice
1.5 cup chopped vegetables (I used carrots & beans.)
2 cups buttermilk
1/8 tsp. turmeric powder
Salt to taste

Method:
* Soak moong beans in water for a couple of hours and drain.
* Heat ghee, directly in a small sized pressure cooker. Add cumin seeds and cloves. When cumin seeds start to brown, add chili and saute for few seconds. Next add all the remaining ingredients and mix well.
* Close the lid and cook for 3 to 4 whistles and turn off the stove.
* Serve it warm with pickle, papad and yogurt.

Recipes so far in A - Z Rice Dishes,
A for Achaari Chole Pulao
B for Bhuna Khichuri
C for Chintapandu Pulihora
D for Dindigul Thalapakatti Veg Biryani
E for Ellorai / Ellotharai  
F for Fodnicha Bhaat 
G for Gongura Pulihora

Check out the Blogging Marathon page for the other Blogging Marathoners doing BM# 68.

An InLinkz Link-up

Thursday, September 8, 2016

A - Z Rice Dishes ~ G for Gongura Pulihora / Spicy & Tangy Sorrel Rice


There are traditional recipes that are carried through generations in families and there are spin-offs with little twists given to the older ones by creative minds. Today's dish gongura pulihora falls in the latter category. Chintapandu pulihora (tamarind rice), nimmakaaya pulihora (lemon rice), mamidi kaaya pulihora (green mango rice) and dabbakaaya pulihora (I guess the English name for the citrus fruit used in the preparation is pomelo) used to be the most commonly prepared pulihoras in Andhra. I have been noticing a wide variety of pulihoras these days on TV cook shows, that were unheard of until a few years back. That's how I ended up hearing about gongura pulihora a while ago though I didn't give a second thought about it until later when it started doing the rounds on several blogs. 

I happened to see this particular gongura pulihora recipe on Pavani's blog a few years ago and have tried it several times over the period though I did not get to post it until now. The pulihora is really delicious and makes a quick alternative to the tamarind rice. My recipe is on the spicier side and Pavani's would be perfect for those who do not prefer very spicy rice.
Ingredients to grind:
2 cups chopped gongura / sorrel leaves
2 tbsp. tamarind puree (I added 3 tbsp.)
3 red chillies

Ingredients for pulihora:
3.5 cups cooked rice (preferably sona masuri style medium grained rice)
2 to 3 tbsp. oil
2 tbsp. peanuts
1 tsp. split chick peas / chana dal
1 tsp. black gram / urad dal
1 tsp. mustard seeds
2 red chilies
1 green chili
Few curry leaves
A few pinches of asafoetida powder
1/8 tsp. turmeric powder
Salt to taste

Method: 
* Cook rice such that each granule stands apart. Don't cook the rice mushy. Spread it on a wide plate.
* Grind the ingredients under 'to grind' smoothly, adding few tsp. of water if needed.
 
* Heat oil in a wide pan or a kadai. Add peanuts, dals and mustard seeds. Fry until dals turn light brownish and add the chillies, asafoetida, turmeric and curry leaves. 
 
 * Now add the ground paste and salt to the pan and stir.
 
* Cook the mixture on low flame until the raw smell of gongura leaves, about 4 -5 minutes. 
 
* Turn off the stove and transfer this mixture to the rice plate or transfer the rice to the pan. Mix gently to combine. 

Recipes so far in A - Z Rice Dishes,
A for Achaari Chole Pulao
B for Bhuna Khichuri
C for Chintapandu Pulihora
D for Dindigul Thalapakatti Veg Biryani
E for Ellorai / Ellotharai  
F for Fodnicha Bhaat


Check out the Blogging Marathon page for the other Blogging Marathoners doing BM# 68.


Wednesday, September 7, 2016

Rice Dishes ~ Fodnicha Bhaat / Phodnicha Bhaat

Leftover rice in Indian kitchens is a common occurrence as rice is eaten in majority of the households on a daily basis. In olden days, when there were no conveniences like a cooker or a microwave to reheat the food, leftover rice mixed with curd or a pickle would be served as a breakfast for school going kids in many homes. Or the women of the house had to finish it off during lunch times, if being frugal or given away to a maid. Sometimes, the leftover rice was / is recycled into something interesting like today's Fodnicha bhaat or a lemon rice. 

Turning left over rice into something delicious and likable using the simplest trick of seasoning is pretty common in many parts of the country. There is talimpu annam from Andhra, oggarane anna from Karnataka and so on. Today's version is from the state of Maharashtra and is called fodnicha bhaat / phodnicha bhaa, which literally means seasoned rice. It is a simple and quick dish to prepare and a great way to recycle the leftover rice. I am not used to eating rice for breakfast as neither of my mothers served it in the mornings and so, I never came across this seasoned rice in our families. I tried it for the first time a few months back and I was immensely pleased with this recipe. Though fodnicha bhaat is prepared as a breakfast, it makes a great meal anytime, especially on lazy days.
Ingredients: (4 servings)
1 to 2 tbsp. oil
2 tbsp. peanuts (optional)
1 tsp. mustard seeds
1 tsp. cumin seeds
1 small green chili, finely chopped
Few curry leaves
1 cup finely chopped onion
A pinch of asafoetida
1/8 tsp. turmeric powder
Salt to taste
Red chili powder to taste
3 cups cooked rice (I used sona masuri.)
2 tbsp. minced cilantro to garnish
 
Method:
* Heat oil in a pan and add peanuts. When they start turning golden brown, add mustard and cumin seeds. When mustard seeds start to pop, add curry leaves and green chili. Saute for few seconds and then add onion. Cook until it is translucent. There is no need to brown the onion. 
* Then add asafoetida, turmeric powder, salt, red chili powder and cooked rice. Mix well with a spatula and cook for a minute. Turn off the stove.
* Garnish with cilantro and serve.

Recipes so far in A - Z Rice Dishes,
A for Achaari Chole Pulao
B for Bhuna Khichuri
C for Chintapandu Pulihora
D for Dindigul Thalapakatti Veg Biryani
E for Ellorai / Ellotharai 
 Check out the Blogging Marathon page for the other Blogging Marathoners doing BM# 68.

Tuesday, September 6, 2016

Rice Dishes ~ E for Ellorai / Ellotharai (Sweet Version)

I accidentally came across this traditional sweet recipe from Tamil nadu a few months back while looking for some other recipe and it ended up being my 'E' dish for this event. I have tried and liked the spicy ellu sadam (sesame seeds' rice) before. And so decided to give this sweet version also a try as I tend to be a little bit more partial towards sweet dishes. I love sesame seed laddus very much but this dish turned out just 'okay' for me. I guess that this sweet version is more like an acquired taste. I may be wrong and people who are partial to this dish may not agree with me but the dish  tasted more like crumbled laddus mixed with rice. I prefer the spicy version over the sweet one but thought of documenting it on my blog since this happens to be a traditional dish.

Ingredients: (2 to 3 servings)
1 cup cooked rice (I used sona masuri rice.)
1 tbsp. ghee
2 tbsp. cashews
3 tbsp black sesame seeds
6 to 8 tbsp. jaggery powder *
1/4 tsp. ground cardamom
* The amount of jaggery used depends upon it's sweetness and the level of sweetness preferred in the final dish.

Method:
* Toast sesame seeds on low flame for 30 - 40 seconds and let cool.
* Grind sesame seeds, jaggery and cardamom to a fine powder.
* Heat ghee in a pan and toast cashews until golden brown. Turn off the stove. Add the cooked rice and mix well so that there are no rice lumps. Each grain should appear separate.
* Add the sesame powder to the above rice and mix well. 
Do not add the sesame powder to the pan before adding the rice since the jaggery would start melting if done so and the rice would be a wet mess.

Recipes so far in A - Z Rice Dishes,
A for Achaari Chole Pulao
B for Bhuna Khichuri
C for Chintapandu Pulihora
D for Dindigul Thalapakatti Veg Biryani

Check out the Blogging Marathon page for the other Blogging Marathoners doing BM# 68.

Monday, September 5, 2016

Rice Dishes ~ D for Dindigul Thalapakatti Veg Biryani


Hyderabadi Dum Biryani or Maharashtrian Dalimbi Bhaat were my original choices for today's alphabet. After having a tussle with myself over the choice of 'D' dish, I finally settled with neither of those but with a veg version of Dindigul biryani. I remembered seeing Kalyani's post during one of the previous mega marathons and decided to try it. And am glad that I did since this has become a favorite of mine.

A little googling told me that the dish is associated with the  'Dindigul Thalappakatti Resturant', a restaurant chain that operates in the south Indian state of Tamilnadu, focusing on biryani. The first outlet was started in 1957 by a paan seller named Nagasamy Naidu under the name 'Anandha Vilas Biriyani Hotel' in Dindigul town. The customers ended up calling the restaurant 'Thalapakatti' instead of it's name from the beginning. A reference to the hotel owner who sat at the cash counter always wearing a 'Thalapa' (A white traditional, head turban). 
Naidu's wife used to prepare a unique biryani which was quite popular and he realized that the recipe had the potential to go places. The particular recipe used a local short grain rice, special blend of spices and meat that came from tender grass fed goats from a neighboring town named Kannivadi. The short grain rice, seeraga samba rice used is called parakkum sittu with no particular taste of it's own and hence absorbs the spice flavors.

The original hotel was a hole in the wall kinda place with hardly seating for four but however the mutton bityani sold there became so popular that it started to attract customers even from the neighboring cities and now they operate over 21 restaurants in the state. 
The vegetarian versions I found online for the recipe mostly used mushrooms and soya chunks. I was the only one who was home to eat the biryani the day I prepared it and so I stuck with my preferences and used only soya chunks. I did not make any changes to Kalyani's recipe and I totally fell in love with the spicy biryani. I made it a point to save some for my husband who was traveling and he too enjoyed the flavorsome biryani as excepted.

Ingredients for spice powder:
2 inch piece cinnamon
1 tsp. coriander seeds
1 black stone flower / Dagad phool (optional but recommended)
1/2 tbsp. fennel seeds / saunf
2 cardamom pods
3 cloves
Ingredients for Biryani:
1 & 1/4 cup Seeraga Samba rice / Basmati rice
1/4 cup soya chunks (I used mini sized ones.)
1 big sized onion
1 medium sized tomato
2 to 3 green chillies 
3 tbsp. oil
2 bay leaves
1 tsp. ginger - garlic paste
Salt to taste
1 tsp. coriander powder
1/2 tsp. red chili powder (optional)
2 tbsp. curd
1/4 cup chopped mint & coriander leaves

Method:
* Dry roast and fine grind the ingredients under the 'spice powder' list.
* Wash and soak rice for 10 - 15 minutes in water, if using Basmati rice.  Drain and keep it aside. Seeraga samba rice do not need to soak. 
* Soak the soy chunks in hot water for about 10 minutes. Squeeze out the water and cut into desired size if using bigger sized chunks. There is no need to chop if using smaller sized chunks. 
* Chop onion and tomato fine. Slice green chilies lengthwise.
* Heat oil in a pan or a small pressure cook directly and add bay leaves, onion, ginger-garlic paste and green chillies. Saute until done.
* Next add tomatoes and the ground spice powder to the pan and cook until tomatoes turn mushy.
* Add salt, coriander powder, chili powder, mint and coriander leaves to the pan and mix well.
* Then add soy chunks and curd to the pan and saute for few minutes until the spices are well coated. Add the drained rice next and saute for a minute.
* Transfer the contents to a pressure cooker and add enough water to it. Close the lid and pressure cook for 3 whistles. (I used Basmati rice and 1 & 3/4 cups water.) 
Cook covered on low flame, if using a pan instead of a cooker. The water quantity will increase if using a pan.
* Serve it with raita and papad. (I used chili powder along with chillies and the biryani was spicy. And so, I served it with plain yogurt instead of raita.)

Recipes so far in A - Z Rice Dishes,
A for Achaari Chole Pulao
B for Bhuna Khichuri
C for Chintapandu Pulihora

Check out the Blogging Marathon page for the other Blogging Marathoners doing BM# 68.

Saturday, September 3, 2016

Rice Dishes ~ C for Chintapandu Pulihora / Andhra Style Tamarind Rice


It's time for the alphabet 'C' and time for the most traditional dish of my A - Z Rice series. I didn't have to think twice for the letter 'C' since this 'chintapandu pulihora' post has been long due on my blog. Chintapandu pulihora aka the tamarind rice has a significant place in Andhra cooking or south Indian cooking for that matter. Whether you call it pulihora / puliyogare / puliyodarai depending upon which part of south India you are from, this classic dish steals the limelight among the traditional rice recipes. It appears on every menu associated with auspicious occasions and festive meals. It is one of the preferred and common neivedyams (food offering to Gods) offered at hindu temples and distributed as prasadam (the neivedyam distributed among devotees). It is also one of the commonly carried items for picnics and long distance travels since it doesn't get spoiled for at least a couple of days even without refrigeration.

The word 'puliohora' literally means a sour dish, the word 'puli' coming from 'pulupu' which means sour in Telugu. The traditional version of pulihoras are made using tamarind / lemon or mango though some just refer to the tamarind rice as pulihora. The version I am posting today is a pretty common one in Andhra brahmin households though there are versions with the addition of powdered sesame seeds / mustard seeds.
 
My maternal grandmother used to make a superb pulihora and till date I haven't eaten a version that at least came closer to hers, in terms of taste and flavors. Neither my mother nor my aunts have been able to replicate her pulihora taste though they are all considered wonderful cooks and make good pulihoras. My version is usually good, better than the most of the versions sold across the temples in U.S., according to my family. I have learnt from experience that though a pulihora recipe is simple and straight forward, balancing the flavors is the most important aspect in the preparation of tamarind rice and a few trials go in mastering the recipe. It is hard to exactly give the right measurements since tamarind / chillies / jaggery from one batch to another do not taste the same and for the same reason, I held back all these years from posting a recipe. These measurements made a very good pulihora with the kind of tamarind and the very spicy variety chillies I used. And so use your discretion and the below recipe can be used as a guideline. Taste the gojju / pulihora if needed during preparation. The gojju can be prepared in advance and stored for weeks. It is convenient to have it handy when preparing a quick or impromptu meal.

Ingredients for 8 - 10 servings:
5 to 6 cups cooked rice *
1 cup tamarind puree 

3 to 4 tbsp. oil 
3 dried red chilies
1/2 cup peanuts
2 tbsp. chanadal / split chickpeas
1 tbsp. urad dal / black gram
1 tsp. mustard seeds
3 to 4 green chilies, slit lengthwise (I used medium sized, Serrnao peppers)
1 - 2 sprig of curry leaves
1/2 tsp. turmeric powder
1/8 tsp. asafoetida powder
2 tbsp. powdered jaggery (or adjust as needed)
2 tsp. salt approximately or as per taste


* - A medium grained south Indian variety white rice such as sona masuri
 
Method:
* Heat oil in a kadai or preferably a non stick pan. Add red chillies, peanuts, split chick peas, black gram and mustard seeds in that order. Stir and when peanuts appear golden brown, add green chillies and saute for few seconds.
* Next add curry leaves, turmeric powder and asafoetida powder. Stir for few seconds and pour the tamarind puree into the pan.
* Cook the mixture until it thickens, with intermittent stirring. Stay near the stove at the final stages since the mixture may stick to the pan and burn, especially when not using a non stick pan. Add salt and jaggery and stir until they combine. Turn off the stove and let the mixture cool.
 

* This paste can be used immediately at this point or can be stored for later use. The mixture stays good even if left outside on a counter for few days but to be on a safer side, let it be refrigerated.
* Meanwhile, spread the rice on a wide plate. (My mother sprinkles turmeric powder on the rice and pours the cooked paste over it, instead of adding turmeric in the seasoning.) Add the cooked paste to the rice and mix well. Let it sit for few minutes for the flavors to develop. Taste and add if any extra salt is needed. Extra rice can be added if the pulihora seems spicy.
(Cook extra rice in case. You may start with 3/4th quantity of the rice and about 3/4th of the paste to begin with so that you can taste and adjust the quantities of rice and tamarind paste to suit your tastes.)
* Serve with some papad, potato chips or wadi / vadiyalu.
 

Recipes so far in A - Z Rice Dishes,
A for Achaari Chole Pulao
B for Bhuna Khichuri
Check out the Blogging Marathon page for the other Blogging Marathoners doing BM# 68.

Friday, September 2, 2016

Rice Dishes ~ B For Bhuna Khichuri

When I decided to post recipes this month based on one ingredient, I thought of doing it as a A - Z series as well, to make it more complicated fun. And so today, I am on alphabet 'B' as part of the series. 

My first choice would have been Bisi Bele Bhath if I hadn't posted it already. It is a spicy medley of rice, lentils and vegetables from the south Indian state of Karnataka. 
There are of course 'Birinj' and 'Biryani' which can be converted to vegetarian versions, even though true connoisseurs may look down at them. 'Birinj' came to India from Persia and Mesopotamian regions through invaders and trade routes and transformed to Biryani. And there are other choices for Biryani lovers like the Bhatkal Biryani and Beri Biryani from Karnataka and Bombay Biryani.

I had also had a choice of picking 'Bellam Pongali' or 'Bellam Paramannam', which are south Indian style eggfree sweet rice puddings using jaggery. And there was 'bakala bhath' which happens to be seasoned yogurt rice.
I also came across a couple of Bengali version khichdis online that started with the letter 'B'. The first one being Bhoger khichuri aka Bhaja moog dal er khichuri which uses rice, roasted moong dal and vegetables. And there was this simple bhuna khichuri sans vegetables that was a breeze to prepare. 

Khicuri / Khichdi seemingly is an ultimate comfort food for many Indians and Bengalis too seem to be no exception.The original recipe author eloquently pens down how it is the comfort food of many on a rainy day. I loved the fact that it was a simple and filling meal to put together in a short time. I prepared the khichdi on the dry side as the original recipe mentioned, where each grain stands apart. However the consistency can be changed according to one's preference and even vegetables of your choice can be added to make it wholesome. This can be served with a spicy side dish or a pickle.

Ingredients: (Servings 4 to 5)
1 cup Basmati rice
1/2 cup moong dal (Yellow Colored)
2 to 3 tbsp. ghee
1 onion, peeled and sliced lengthwise
1/2 tsp. ginger - garlic paste (I omitted garlic.)
1 each - sliced green chillie, clove, 1" cinnamon bark, bay leaf
1/2 tsp. turmeric powder
1/2 tsp. cumin powder
Salt to taste
2.5 cups water

Method:
* Roast moong dal on low flame until you start to notice the nutty aroma and the dal has turned light golden brown. 
* Wash rice and dal and drain. Let it sit aside.
* Heat ghee in a pan or a small pressure cooker directly. Add onion and fry until golden brown. Next, add ginger - garlic paste, green chillie, clove, cinnamon and bay leaf. Saute for a minute.
* Then add turmeric and cumin powder and saute for few seconds. 
* Add rice, dal, salt and water. Bring to a boil, lower the heat and cook covered until rice is done.
* If using a pressure cooker, cover the lid and cook for 3 to 4 whistles. I used the pressure cooker to cook this khichuri.

Disclaimer:
I am not doing a detailed study on rice dishes with each alphabet. I am just mentioning those that I am familiar with and may miss even the popular ones. 

Check out the Blogging Marathon page for the other Blogging Marathoners doing BM# 68


Thursday, September 1, 2016

Rice Dishes ~ A for Achari Chole Pulao

 
It's time for another mega marathon. Readers who follow my blog may have noticed that I do participate in an event called blogging marathon based on preset themes and this month, there are going to be 26 recipes posted here as part of that event. Participants had a choice of picking any one ingredient or one category for each week of  the month or the entire month. I chose to base my recipes on one ingredient for the entire month. I picked 'rice' as my ingredient and my focus mainly remained on Indian based one pot meals that can be put together quickly and easily. And of course there is some sweet stuff thrown in the mix.

The first one in the series is going to be achari chole pulao. Achar in the title refers to the Indian style spicy pickle that is being used in the cooking and chole are the garbanzo beans. In India, serving a spicy pickle along with rice based dishes like a khichdi (a savory porridge) is norm but this pulao is unusual in the sense where a pickle is part of the cooking. It lends an interesting base to the dish whereas garbanzo beans add nutrition to the dish. If you have the garbanzo beans ready, this pulao makes a quick one pot meal. If using canned beans, rinse thoroughly before using. Serve it along with yogurt to make it a quick meal.
Ingredients:
1 cup Basmati rice
3/4 cup soaked and partially cooked garbanzo beans / chana
2 tsp. ghee/oil
1 tsp. cumin seeds
Whole spices - I used 10 black peppercorns, 2 cardamom pods, 2 cloves, 2 bay leaves, 1 star anise
1 tsp. ginger paste / minced ginger
1 onion, sliced lengthwise / minced
1 tomato, chopped
2 tbsp. mango achaar / pickle
Salt to taste
1/2 tsp. chili powder
1/2 tsp. garam masala (optional)
1/8 tsp. turmeric powder
Minced cilantro to garnish
1.5 cups water
 
Method:
* Soak rice in water for about 10-15 minutes and drain.
* Heat oil / ghee in a pan or a small sized pressure cooker directly. Add cumin seeds and the whole spices and saute until cumin seeds start to turn a shade darker. 
* Next add ginger and onion to the pan and saute until done. Next add tomatoes and cook until mushy.
* Add salt, chili powder, turmeric powder and garam masala if using. Saute for few seconds and next add mango pickle to the pan and stir.
* Finally add rice and garbanzo beans, saute for few seconds and add the required amount of water. 
* Transfer the contents to a pressure cooker, cover the lid and cook for 3 to 4 whistles.
* If not using a pressure cooker, cook on low flame covered, until the rice grains appear done. (A little extra water may be needed if not using cooker.)
* Let cool a little before serving and fluff t with a fork if needed to separate the grains.
* Serve it along with yogurt to balance the flavors.

Check out the Blogging Marathon page for the other Blogging Marathoners doing BM# 68.


Comments