HOME        |        ABOUT        |        COPYRIGHT        |        CONTACT        |         RECIPE INDEX        |         INDIAN THAALIS        |         MILLET RECIPES        |        EVENTS' ROUNDUP        

Saturday, October 19, 2019

Chegodilu

Chegodi is a traditional snack item from Andhra cuisine that is shaped like a ring. The Tamilnadu version is called kola vadai. They may also bring to mind a somewhat similar looking snack from the neighboring Karnataka region called kodubale but the resemblance ends there. Chegodilu, the plural for chegodi are made using just plain rice flour with basic seasonings while kodubale is made with combination of rice flour and all purpose flour, which I realized just now that they are not posted yet in my blog. Another version uses peanut powder as well, as shown here which makes them super crunchy and addictive. 
Despite their popularity online, I would say that chegodilu are not frequently prepared anymore at homes compared to other chakli varieties. However they make a great festive or tea time snack and are quite easy to prepare if choosing to make a small batch. There is also a version made with all purpose flour alone. I had tried making chegodilu with jowar flour too but that recipe still needs some tweaking. Chegodilu can be made bigger and thinner than what I have made. Peanut oil is used traditionally to fry these but I used canola oil here. Any flavorless oil works fine. 

Ingredients: (Yield - About 28)
1 cup water
1 cup rice flour
1 tsp cumin seeds and/or carom seeds
Salt to taste
Chili powder to taste
1 tsp. butter / solid ghee or 2 tsp. oil
Oil for deep frying

Directions:
* Bring water to a boil in a pan and turn off the stove. 
* Meanwhile combine flour, cumin / carom seeds, salt, chili powder and ghee in a mixing bowl. Next add the hot water carefully and mix well with a spoon to combine. Use a ladle if the dough quantity is more. Don't use hands to mix since the water is hot.
Alternatively, the ingredients can be added directly to the hot water pan and mixed. The first method works best when one is used to eye ball the quantities of ingredients rather than working with measuring cups. One can add only as much water as needed to the flour mixture to make a stiff dough.  

* Let the dough come to room temperature or hot enough to handle. Knead the dough to just make sure that it is mixed well once it is safe to handle.
* Heat oil in a frying pan on medium heat. When a small pinch of dough is put into the oil, it must immediately swim to the surface  meaning the oil is at the right temperature to fry. If the dough sinks to the bottom of the pan then the oil needs some more heating. There is no need to bring the oil to a smoking point.
* While the oil is heating, shape some chegodilu. Pinch a marble sized dough and roll into a ball. Shape it into a log of uniform thickness. Bring the edges together and join them to make a ring. Repeat the process with the remaining rings. 
(The logs I made were about 1/2 cm thickness and about 5 inches long. Chegodilu can be made bigger and thinner than mine. Also one can shape only as many rings as needed to fit the frying pan while the rest of the dough can sit covered.) 

* Add the shaped rings to the frying pan and fry on low medium heat, flipping intermittently until it turns golden brown through out.
 
* Remove the fried chegodilu with a slotted spoon, draining as much oil as possible and transfer them to a plate covered with paper towel. Repeat the process of shaping and frying rings with the remaining dough. Adjust the temperature as needed as you proceed with frying. The temperature may need to be increased between each batch as the temperature of the oil falls down.
* Let them cool and store them in an airtight container. (Mine were gone in one sitting.) 

Friday, October 18, 2019

South Indian Mixture / Chow Chow

This mixture -  a melange of various flavored / textured / sized sevs (chickpea flour based snack), fried thick poha (flattened rice), fried chana dal (Bengal Gram), boondi along with a tempering of peanuts, cashews, curry leaves and turmeric makes a great snack for festive occasions like Diwali to share with some one or just to munch on as an afternoon treat. My medley here is influenced by south Indian style spicy mixtures available back home in every nook and corner and these kind of medleys also go by the name 'chow chow' in some parts of Bangalore which literally means a mixture / medley. It brings to mind the popular breakfast combo from the region which is called chow chow bhath for the same reason since it is a medley of savory khara bhath and the sweet kesari bhath. This can be easily customized according to one's taste preferences. Mixture in the first picture doesn't contain boondi or fried chana dal and the second image is of another variety where they were included. If need those 'khatta meetha' mix kind of flavors, add a pinch of citric acid and powdered sugar as needed and also some toasted raisins. It won't remain south Indian hot and spicy mix kind anymore though. I don't recall exactly but when we were kids, I think the store bought kind used to include fried dal moth as well.
 
I am not giving the recipe here since I have already posted recipes for sevs, fried poha aka chivda and boondi. Check my 'Snacks' page if looking for these recipes or any other snacks. I usually have sev, fried chana dal and plain boondi on hand and so making this kind of mixture is not a big deal. If starting from scratch, this recipe does demand some time and patience. There is no hard and fast rules about how much quantity of each variety of fried snacks should go into this mix. Combine varieties of plain and spicy sevs, fried thick variety poha, fried boondi (not the sweet kind), fried chana dal and any extra kind if you prefer in a mixing bowl. Heat 2 or 3 tsp. of oil in  a small pan and fry peanuts and / or cashews and curry leaves. Add turmeric before turning off the stove. Add this to the mixing bowl and toss the bowl well and taste the mixture before adding any seasonings. If you think curry leaves are going to be discarded, wait until the tempering cools down and crush the toasted leaves into bits. No one minds eating the flavorful tiny bits of the leaves. Keep in mind that some of the fried stuff like sev / chana dal are already spicy. Add salt as needed and shake the bowl to combine. Add a bit of chili powder or fried dry red chillies only if the mixture needs to be more spicier.

Thursday, October 17, 2019

Protein laddu


My parents used to subscribe a variety number of magazines while we were growing up. The subscription also extended to some of the kids' classics like chandamama and balamithra in Telugu versions  which were exclusively for me. Remember this was way before the kids started to glue on to television sets and I was content with my books and the neighborhood friends. Probably in guise, my parents were trying to see if I can pick up reading and writing skills in Telugu which eventually I did though I have never lived In Andhra and besides ended up being a bookworm. Meanwhile, my young and energetic mother would try the recipes from those magazines which caught her attention. Nowadays she sticks mostly to tedious, tried and tested traditional kind of snacks / sweets when it comes to festivals which I don't even dare to try. 

Nowadays she has this habit of noting down making my father note down any interesting and easy recipes that she come across on cooking shows or any magazines. It is done, keeping me in my mind as she knows that I like to try new dishes as long as they are easy and quick ones. This laddu recipe was one among the bunch that came from her a while ago. I tried a couple and this laddu was surely a winner in terms of taste and nutrition though they look rustic. They faintly reminded me of sunnundalu which are dear to me. I don't need to go on singing the virtues of these laddus as the ingredients speak for themselves. My daughter who doesn't like sweets in general had liked these and that is surely a winner recipe to me. As far I go, I am unable to stop myself from popping one into my mouth every time I am near the laddu container. 😋 Try these easy, yummy laddus for this Diwali and I promise that you wouldn't be disappointed.

I tried a small portion of the recipe and still got about 16 standard size laddus. The new peanut packet was misplaced and had only a handful in the bottle which filled up to 3/4th of a 1/4 cup measuring cup. I therefore measured my ingredients based on that but interchanging quantities slightly shouldn't affect the final product. If one is confused with the measurements I have provided, just use one measure each of lentils, peanuts and nuts and double the flours' measurements. Use jaggrey and ghee accordingly.  Also I need to mention that the jaggery I used was a sweeter variety and the laddus were sweeter with the amount of jaggery I used. One may need to adjust the jaggery quantity since the amount of jaggery used in the recipe depends upon the sweetness of the jaggery being used and the preferred sweetness of laddus. 

Ingredients: (Yield - 16 laddus)
3 tbsp. moong lentils (yellow moong dal) 
3 tbsp. black lentils (urad dal with husk)  
3 tbsp. peanuts 
3 tbsp. almonds
3 tbsp. cashews (I replaced half with pistachios.)
1/4 cup + 2 tbsp. wheat flour
1/4 cup + 2 tbsp. finger millet flour / ragi flour
1 and 1/4 cup powdered jaggery
4 - 5 tbsp. melted ghee
Directions:
* Toast lentils in a pan individually on low flame until moong starts to turn slightly reddish and the black lentils start to change their color as well. Transfer them onto a plate.
* Next toast almonds and cashews individually. Transfer them to the lentils' plate.  
* Next add peanuts and toast on low flame until done. Let them cool and rub between your palms to remove the skin. Or for a quicker version, toast them in a microwave as I did. It takes around 3 to 4 minutes in a microwave to roast this small quantity but giving one or two intermittent breaks is recommended to avoid them from burning. This step can be avoided if using toasted and skinned peanuts.
* Toast flours individually on low flame until they start to change color slightly. I toasted them without adding any ghee but if preferred, it can be done so. 
* Let all the toasted ingredients come to room temperature.
* First the lentils need to be ground since they take longer than the rest of the ingredients. We like to keep our sunnundalu a tiny bit coarser and so I opted to do the same here as well. They can be ground very fine if one chooses to do so. It depends upon one's preference how the texture of these laddus should be. (I did use my blender for this part and continued the next steps in my food processor.)
* Next finely grind peanuts and the other nuts that are being used. Add the flours at the end and just pulse to combine.
* Finally add the ground jaggery and run the blender / food processor until the mixture is combined well.

* Transfer the mixture to a wide plate and run your hand through the mixture and break any lumps if present.

* Add ghee in increments to the mixture and keep working it into the dough. 

* Mix well so that ghee uniformly coats the mixture. Stop adding ghee when a small portion of the mixture can be easily shaped into a ball without breaking. (Initially about 3 tbsp. of ghee can be added and then the rest in increments and as needed. Mostly 1/4 cup should be enough.) 
* Make lemon sized balls out of the mixture and store in an airtight container. 


Comments

Saturday, October 12, 2019

Bandh Samosa / Bun Samosa

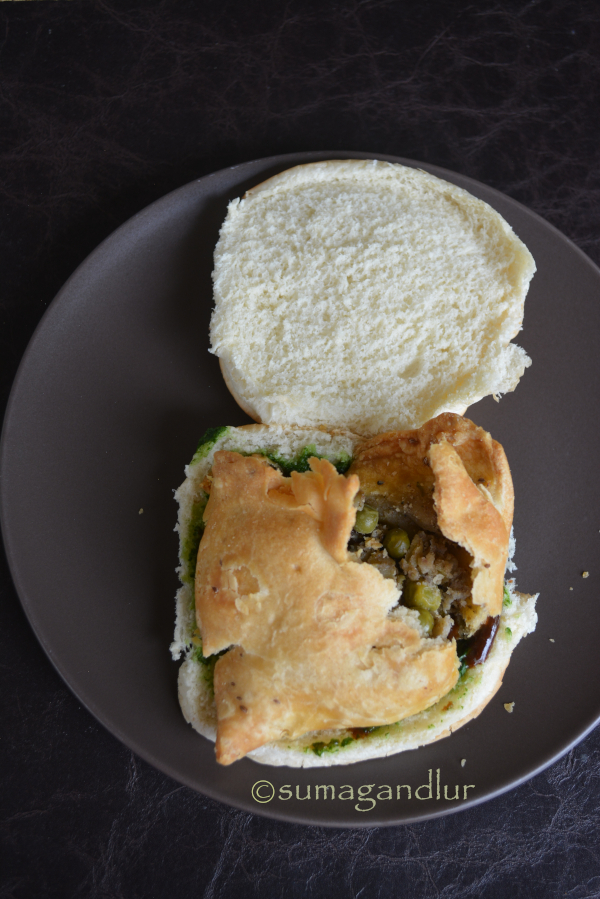
I had prepared this dish to be a part of the regional snacks for the 'Indian Sweets and Snacks' themed September marathon but held onto it once I saw this month's blogging marathon theme of 'stuffed dishes'. This bun samosa seems to be a signature street food dish of  Kasauli, a hilly town in the north Indian state of Himachal Pradesh. I came across this recipe when my husband was browsing through a YouTube video featuring street food from the region and the snack seemed to be right in our alley. We love samosa chaat and this bun is a part of that chaat wrapped in a toasted bun. What can go wrong with that, right? And so I got some buns and samosas from the store immediately and tried these delicious samosa buns. 

The shopkeeper in the video was selling these jamun buns as well to our surprise. He mentioned in the video that decades ago, a south Indian customer requested him to make that bun after giving him the directions for the recipe. He has been selling jamun buns ever since and the other shoppers have also caught on and now jamun bun has become a hot commodity along with bun samosas. My brother in law's family lived in Kasauli during 80's for a considerable amount of time and so we even wondered for a moment whether my brother in law was that customer by any chance since we haven't heard jamun buns outside of my husband's hometown. 😀

These mess free buns make a lip smacking snack or a mini meal on it's own. If one loves samosa chaat as we do, then this bun is for you. In this bun preparation, samosa, chole and the green and sweet chutneys all go inside a bun and then the bun is toasted using a generous amount of butter. For the uninitiated, samosas are a deep fried pastry with a spicy potato and pea filling while chole is the spicy chickpea curry where as the chutneys are the standard flavor boosters in most of the chaat items, a major portion of the Indian street food. Bun samosa is therefore also called as bundh samosa as the stuffing is encased inside the bun. The word 'bundh / bandh' means closed in Hindi. I used store bought buns, samosa and sweet chutney which makes the preparation relatively quicker and easier than starting from scratch.

Ingredients:
4 burger style buns 
Green chutney as needed
Sweet chutney as needed
4 samosas
About 1 cup chole masala
2 tbsp. butter
* I opened the burger bun for pictures sake but the buns can be cut open only slightly and the samosa and curry can be stuffed as in a pocket. Spread green and sweet chutneys liberally on one side of the bun.
* Slightly mash a samosa and place it over the chutney side.

* Pour over a ladeful (about 1/4 cup or as needed) of chole curry. I made it slightly thicker but the consistency of the curry can be like the regular one.
* Cover it with the other side of the bun.
* Heat a griddle and melt a little butter over it. Place the bun over the griddle and toast until golden brown on both sides. Repeat the stuffing and toasting parts with the remaining buns. Serve them immediately.

bmlogo
This post is an entry for Blogging Marathon #105 under 'Stuffed Dishes - Buns' theme. Check what other marathoners are cooking, clicking at the link.

Comments

Friday, October 11, 2019

Stuffed Idlis / Sandwich idli


I cooked and clicked three dishes in advance for this week's  'Stuffed dishes' theme only to toss them away and cook something else again this week. That's what I do somehow when I plan ahead and so I blissfully keep procrastinating most of the time. 😉 These stuffed idlis are replacing the momos I prepared earlier under stuffed dumpling category.

My husband recently watched a television cook show where the chef used the ubiquitous and the popular Indian potato curry as stuffing in some unusual dishes. He suggested to try them out only to get a negative response from me. Later I was mentioning the incident to my mother who also started wondering who in the world enjoys those dishes. Then the topic moved to these stuffed idlis and I felt the inclination to try these for the first time though I have seen other stuffed idli versions before.

I had prepared potato curry a couple of days ago and coincidentally I happened to have some idli batter on hand as well. And these idlis happened on a whim during our lunch time though lunch was already on the table. See how crazy we bloggers sound? 😀 I was not even thinking about blogging these this week but still took some pictures in case. 

The potato curry used for stuffing needs to be a dry preparation and the recipe can be found here. I have used idli batter made with idli rice and skinned black gram aka urad dal but any idli batter of one's choice can be used here. The idli moulds are filled with the batter up to half, a small portion of curry is placed at the center and batter is poured over it to cover and then steamed, resulting in a idli, stuffed with spicy potato curry giving the bland idlis a delicious touch. This can make a mess free snack / lunch box item for little ones without the need of any side dishes. If serving adults, keep the curry on a spicier side, spicier than one usually prefers to balance the blandness of idlis. Otherwise the taste of the idlis would be mediocre. Also serve it along with some coconut chutney or sambhar to make it more enjoyable. 

Ingredients:
Fermented idli batter
Potato curry
Ghee / Oil to grease idli plates

Directions:
* Heat water in a steamer or a idli cooker or a cooker base. 
* Grease the idli moulds. Pour batter into a mould, filling only up to half of it. Take a big lemon sized portion of curry and gently pat into a disc shape. Place it at the center of the mould and pour extra batter over it, enough to fill the mould. (More curry can be stuffed than shown in the picture.)

* Repeat the steps with the remaining batter and the curry.
* Place the idli stand in the steamer, cover the lid and cook on low flame until done. If using cooker, don't put on the whistle. Add extra water to the steamer if water evaporates in the middle of steaming, taking care not to pour over the cooking idlis. One way to figure out if the idlis are done is to touch the idlis with moist fingers. If they don't stick then idlis are done. If they are sticking then they need more steaming. (I usually steam for about 20 minutes on low flame while making idlis.)
* Turn off the stove and let them sit for about 5 - 10 minutes before removing them from moulds.
* Enjoy the stuffed idlis with chutney and/or sambhar.

bmlogo
This post is an entry for Blogging Marathon #105 under 'Stuffed Dishes - Dumplings' theme. Check what other marathoners are cooking, clicking at the link.

Comments

Thursday, October 10, 2019

Senagapindi Gutti Vankaya Koora / Eggplants Stuffed With Chickpea Flour

Stuffed vegetable preparations are relished across India and some vegetables like eggplants, bitter gourds and capsicum are the preferred choices when it comes to these kind of dishes. Today's version is for eggplant lovers. Stuffed eggplant preparations are called gutti vankaya koora in the states of Andhra and Telangana. A gutti literally means a bouquet, vankaya being eggplant and koora is curry / subzi in Telugu language. The 'tti' sound in the word gutti is pronounced as 'thi' as in 'thick' with a stress. The 'vanka' in vankaya rhymes with lanka as in Sri Lanka. Gutti vankaya koora comes both in dry and gravy versions. A typical dry version is prepared in the way I have given below but there are several stuffing choices one can choose from, making this curry a versatile one. 

Also some versions use up all the stuffing mixture to stuff into eggplants with no extra powder left unlike my version. In that case, the eggplants may need a little sprinkling of salt at the end. I added about a tsp. of super spicy chilli powder in the recipe which is perfect for people like my husband who eat very spicy food. People who prefer it to be less spicy need to adjust the quantity as needed. The extra stuffing mixture added to the curry at the final stages makes the curry delicious and keeps it on a spicier side.

My mother's kitchen is a onion - garlic free zone and so, she prepares dry gutti vankaya versions or simple eggplant curries throwing in curry leaves and coconut, the typical south Indian way. Today's version used to be a common preparation in my both grand mothers' kitchens and still is a regular one in my mother's and aunt's places. It is by far the simplest preparation I have seen when it comes to preparing the stuffing - no toasting, no grinding and no cooking involved. You just mix chickpea flour / senagapindi, salt and chili powder and use it as a stuffing. My mother follows her mother and uses an iron kadai / wok to prepare curries like these and so at the final stages, the left over stuffing mixture is fried to the point where it looks like it got accidentally burnt. My mother was telling me that she prepares it so since she grew up enjoying the curry made that way by her mother. The powder looks  black though it doesn't taste like burnt powder. We used to relish that powder alone with some hot rice and ghee when we were kids. My paternal grand mother used to fry it only until it turned reddish like I did. Apart from what color the remaining stuffing mixture is fried to, the recipe is same in both my mother and father's side of the families. Even little kids who cannot eat the stuffed eggplants can enjoy the fried stuffing mixture alone with rice and ghee.

Ingredients:
4 small sized eggplants
2 Tbsp. oil 
Ingredients for stuffing:
1/4 cup chickpea flour / senagapindi
Salt to taste
1/2 to 3/4 tsp. spicy variety chili powder (or to taste)
1 tbsp. oil (optional)

Method:
* 
Sieve chickpea flour into a bowl and add the remaining stuffing ingredients. Mix well to combine.
* Wash eggplants and wipe them dry. I haven't removed the stalks here but they can be cut off if preferred. Keeping the base (the stalk side) intact, make two cuts in each eggplant vertically from the opposite side, making a + shape. In case the stalks are removed, make the  '+' cut from that side. Fill them with the chickpea flour mixture as shown. You can fill as much as the eggplants can hold without spilling. If the filling gets spilled over the surface of the eggplant, wipe it clean.

* Heat a pan and add oil. Drop the eggplants carefully. Rotate each eggplant in the oil holding the stalk so that they are coated well with oil.
* Lower the flame, cover and let it cook until all the eggplants are done. Keep rotating the eggplants in between for uniform cooking. By this time, the eggplants loose their color and are tender to touch. Sprinkle a little salt over eggplants only if needed.

* When they are done, transfer the eggplants onto a plate. Add the remaining stuffing mixture and cook on low medium flame. The little oil present in the pan would be enough to fry the mixture and in case, one can add a tsp. extra if preferred. This powder when fried should be on a dry side. 

* Keep stirring until it starts to change the color, about 5 minutes or so. 

* Add the eggplants back to the pan and gently mix.

* Remove and serve one or two eggplants along with the chickpea flour mixture in each plate, with warm rice and ghee.

bmlogo
This post is an entry for Blogging Marathon #105 under 'Stuffed Dishes - Vegetables' theme. Check what other marathoners are cooking, clicking at the link.

Comment

Saturday, October 5, 2019

Capsicum Gravy Curry

The final dish of the week under the theme 'easy side dishes' is this yummy curry where capsicum is cooked in a spicy, flavorful gravy made with peanuts and sesame seeds. This gravy happens to be my personal favorite and can be used as a base for other vegetables as well. The base is perfect without being nauseatingly cloying and the powder can be prepared in advance. The peanut and sesame seeds combo add body to the gravy and tastes rich without the addition of any cashews / nuts or cream which happen to be a constant presence in such gravies. 

Ingredients:
2 to 3 tsp. oil
1/2 tsp. mustard seeds
1/2 tsp. cumin seeds
1 big onion, finely chopped / 1/2 cup minced onion
1 big or 2 small tomatoes, roughly chopped
1/2 inch ginger piece
1 green chili, finely minced
A pinch of turmeric powder
1 big sized capsicum (I had slightly more than 1 cup chopped capsicum.)
Salt to taste
Chili powder to taste
A pinch of sugar //stevia (optional)
3/4 cup water or as needed
Ingredients for the paste:
1/2 tsp. coriander seeds
1/2 tsp. cumin seeds
1 tsp. white sesame seeds
1/4 cup toasted and skinned peanuts

Directions:
1. Heat oil in a pan and add mustard seeds and cumin seeds. When the mustard seeds start to splutter, add onions and saute on low heat until they start to brown.
2. Mean while, toast coriander seeds, cumin seeds and sesame seeds together and saute until the coriander seeds start to change a shade of color. Transfer them to a plate and let them cool. If not using pre-toasted peanuts, place them in a microwave safe bowl and toast for 5 to 6 minutes, giving short breaks in between to avoid burning. Or toast on stove-top in a pan on low flame. Let them cool and rub between your palms and remove the skins. Grind all the ingredients together to a fine powder.
3. Grind tomatoes, ginger and green chilli in a blender. If not able to run the blender, use a little quantity of water to grind.
4. Add the above tomato paste and turmeric to the onion pan and cook until it slightly thickens.
5. Next add capsicum pieces and salt. Cook until capsicum is almost done. 
6. Add the peanut mixture powder from step 2, chili powder, sugar if using and water. 
7. Continue to cook on low flame stirring intermittently. Taste and adjust any seasonings if needed. Also adjust the water quantity if needed to form a gravy with consistency on a slightly thicker side. Cook until the gravy thickens, about 6 - 8 minutes.
8. Serve it hot with rotis / phulkas. 

Comments

Thursday, October 3, 2019

Batani Kobbari Koora / Peas - Coconut Curry

After the month long marathon of 'Indian Sweets and Snacks', today's post seems like an easy-peasy one, as my daughter used to say when she was young. Each post of the marathon ended up being quite lengthy even without planning to do so but I will keep it simple and quick for today. I am posting easy side dishes to go with rotis or rice for the next three days. The first one in the series is a  curry of fresh peas cooked in a coconut base.

I don't regularly make my side dishes with fresh green peas being the star ingredient and therefore was intrigued when I came across this recipe on a TV show and jotted it down. I eat peas but don't claim to be a fan. My mother probably is one in our family. She buys a large quantity of  fresh pea pods, and sits patiently separating the peas from the pods. She freezes them in a large box and uses them whenever needed. I on the other hand don't remember ever shelling a pea pod in my life. However to my defense, I have done my share of shelling avarekayi / hyacinth beans which really happens to be a chore. I buy frozen peas for the ease and the year long availability and randomly throw them in mixed vegetable dishes or breakfast dishes. 

The recipe however has been lying in my drafts folder for the past four years since I wasn't sure how it would turn out. I tried it today as it seemed a right one for this week's 'Easy side dishes' theme. It is a simple and easy preparation and uses Indian kitchen staples like onion, tomato and coconut and that too in small quantities. This is a recipe to try when one runs out of vegetables, given that one still has on hands these basic ingredients. The only changes I made to the recipe was using garam masala in place of cumin and coriander powders, adding a little milk at the end and changing the sequence of cooking steps. To be honest, this is one of those dishes I had zero expectations while noting it down and even while preparing it. However it ended up being a delicious side dish to eat with rotis, with sweet undertones of coconut and peas. I was planning to pass the recipe to my sister by the time I finished eating it. 😀

Below are some of the recipe links I posted with fresh green peas.
Green Pea Rice
Green Pas Fritters / Batani Vada
Matarchi Usal
Matar ka Paratha
Peas Pulao
Ingredients: Yield 3 - 4 servings
onion, finely chopped
1 tsp. ginger paste / minced ginger
1 tsp. green chili paste
1 tomato, finely chopped
2 pinches of turmeric powder
1/2 cup fresh coconut
Salt to taste
1 cup fresh / frozen peas
1 tsp. cumin powder
1 tsp. coriander powder
Cilantro to garnish

Directions:
* Heat oil and add chopped onion, ginger and green chili paste. Fry until onion turns pinkish / lightly browns depending upon whether red or white onions are used.
* Then add tomato and turmeric, cook until mushy. 
* Meanwhile, grind the coconut to a thick paste adding water as needed. Add the coconut paste, frozen / fresh peas, cumin powder, coriander powder, salt and a little water if needed. Let the mixture cook for about 5 minutes or as needed. Taste in between and see if the seasonings need any adjustment. I added a few tbsp. of fat free milk at the end.
* Garnish with cilantro.

bmlogo
This post is an entry for Blogging Marathon #105 under 'Everyday Easy Side Dishes' theme. Check what other marathoners are cooking, clicking at the link.

Comments

Wednesday, October 2, 2019

'Indian Sweets and Snacks' - A Recap


Readers who follow my blog might me aware that I am a part of blogging marathon group where we sign up to post recipes each month. April and September months are meant for month long marathons where we post recipes each day with set themes, barring Sundays. I have been part of these mega marathons since it started excepting a few owing to my India trips. I posted some traditional sweets and snacks from India this September. Before posting round up of those recipes, below are links for my previous mega marathons with the mentioned themes. If interested, click on those links and you will find about 26 to 30 dishes in each category.

Apr 2019 A - Z Indian Biryani / Pulao / Khichdi Series
Apr 2018 A - Z Indian Street Food
Sep 2016 A - Z Indian Rice Dishes
Apr 2016 A - Z Andhra Cuisine
Sep 2015 Buffet on the Table
Apr 2015 Fire up Your Oven (Baking Recipes)
Sep 2014 Around the World in 30 Days (International Recipes)
Apr 2014 Indian Food Odyssey - Recipes from 30 States
Sep 2013 A - Z Event with 4 Set Themes
Apr 2013 Event with 4 Different themes


This September's marathon was based on Indian sweets and snacks, divided between four themes. This marathon was a learning curve with some surprises thrown in, indeed. I would have never thought that I would even try making the tricky khandvi or the tedious khakras from Gujarat, at home. For a person who doesn't even make urad dal vadas to avoid deep frying, Uttar Pradesh's dahi gujiyas were a revelation. I had no idea such a recipe even existed where a batter would act as an outer covering for stuffing a gujiya instead of a flour based dough and more surprising was that I enjoyed it with full gusto. Neither I had an inkling that I get to try and enjoy a delicious treat sitting in my home, that was originally created for the officers of British Raj in Ooty, a hill station in the south Indian state of Tamil Nadu. There was this snack from Ratlam in Madhya Pradesh, a spicy sev that was created to satiate the Mughal emperors and now boasts a GI tag to it's name. What was new and extremely pleasing in the sweets category was a simple yet flavorful kheer made with coconut water, coconut milk and the tender coconut meat which has become now my 'favorite' kheer. The black eyed peas based dumpling, pandoli was an interesting addition to my idli repertoire. Apart from these, if you are interested to see what other delicious Indian snacks I got to try this marathon, check out the below links.


The first week was meant for sweets and I went ahead with simple yet festive treats keeping in mind Navratri and Diwali festivals. What conjures up in my mind when I think about an Indian sweet is a laddu / burfi / kheer / halwa, or a stuffed sweet rather than dairy based sweets. My mind automatically associates the latter category or the deep fried varieties like jalebis / jhangri kind to a sweet shop / bakery somehow. I included a recipe from each of the above categories along with the ever popular jamun recipe, a dry one this time. 


Dry Gulab Jamun (North India)


Elaneer Payasam (Tamil Nadu)

Godhuma Sojjappalu (Andhra Pradesh)

The second week's theme was to pick some traditional snacks from one particular state. I did not have to think much and blindly picked Gujarat, a state in the western part of India that happens to be the land of farsans aka snacks. The local cuisine not only has a wide range of deep fried snacks that have become popular among the Indian diaspora but also can boast about guilt free ones. I went ahead with the latter category picking the healthy, traditional snacks that can be enjoyed by everyone, including diabetics. Five of those dishes are steamed snacks and most of them can be enjoyed as a mini meal too. 

Damni Dhokla (Gujarat)


Dal Pandoli (Gujarat)

Sev Khamani (Gujarat)

Methi Khakhra (Gujarat)


The third week was a free choice and we could pick whatever we preferred. I went ahead with some more guilt free, regional snacks that were mostly quick fix ones as well. None were deep fried except the kalmi vada chaat, where I used the vadas that were fried as part of the final week theme.

Bafauri (Chattisgarh / Madhya Pradesh)


Jhal Muri (West Bengal)


The fourth week was meant for eight traditional Indian snacks that were agreed upon beforehand by the participating team. The snacks chosen were from four corners of the country and a few proved to be new and delectable surprises to me.

'Aakukoora' Pappu Chekkalu (Andhra Pradesh)


Ratlami Sev (Madhya Pradesh)

'Jowar' Kothimbir Vadi (Maharasthra)

Kalmi Vada (Rajasthan)

Ooty Varkey (Tamil Nadu)

Dahi Gujiya (Uttar Pradesh)


Check out the Blogging Marathon page for the other Blogging Marathoners doing BM#104.

Comments